
Manual
Page 1
GA-Z68MX-UD2H-B3 User's Manual Rev. 1001 12ME-Z6MXU2B-1001R
GA-Z68MX-UD2H-B3 User's Manual Rev. 1001 12ME-Z6MXU2B-1001R
Manual
Page 3
...; 2011 GIGA-BYTE TECHNOLOGY CO., LTD. Check your motherboard looks like this manual are legally registered to assist in this product, GIGABYTE provides the following types of documentations: For quick set-up of the motherboard is protected by GIGABYTE without GIGABYTE's prior written permission. Documentation Classifications In order to their respective owners. For...
...; 2011 GIGA-BYTE TECHNOLOGY CO., LTD. Check your motherboard looks like this manual are legally registered to assist in this product, GIGABYTE provides the following types of documentations: For quick set-up of the motherboard is protected by GIGABYTE without GIGABYTE's prior written permission. Documentation Classifications In order to their respective owners. For...
Manual
Page 5
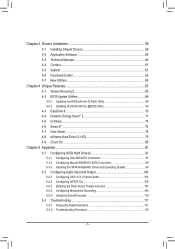
Chapter 3 Drivers Installation 59 3-1 Installing Chipset Drivers 59 3-2 Application Software 60 3-3 Technical Manuals 60 3-4 Contact...61 3-5 System...61 3-6 Download Center 62 3-7 New Utilities...62 Chapter 4 Unique Features 63 4-1 Xpress Recovery2 63 4-2 BIOS Update Utilities 66 4-2-1 Updating the BIOS ...
Chapter 3 Drivers Installation 59 3-1 Installing Chipset Drivers 59 3-2 Application Software 60 3-3 Technical Manuals 60 3-4 Contact...61 3-5 System...61 3-6 Download Center 62 3-7 New Utilities...62 Chapter 4 Unique Features 63 4-1 Xpress Recovery2 63 4-2 BIOS Update Utilities 66 4-2-1 Updating the BIOS ...
Manual
Page 6
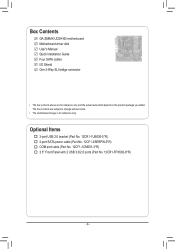
... (Part No. 12CF1-2SERPW-0*R) COM port cable (Part No. 12CF1-1CM001-3*R) 3.5" Front Panel with 2 USB 3.0/2.0 ports (Part No. 12CR1-FPX582-0*R) - 6 - Box Contents GA-Z68MX-UD2H-B3 motherboard Motherboard driver disk User's Manual Quick Installation Guide Four SATA cables I/O Shield One 2-Way SLI bridge connector • The box contents above are subject to change without notice...
... (Part No. 12CF1-2SERPW-0*R) COM port cable (Part No. 12CF1-1CM001-3*R) 3.5" Front Panel with 2 USB 3.0/2.0 ports (Part No. 12CR1-FPX582-0*R) - 6 - Box Contents GA-Z68MX-UD2H-B3 motherboard Motherboard driver disk User's Manual Quick Installation Guide Four SATA cables I/O Shield One 2-Way SLI bridge connector • The box contents above are subject to change without notice...

Manual
Page 9
ponents such as a result of electrostatic discharge (ESD). Prior to installation, carefully read the user's manual and follow these procedures: •• Prior to wear an electrostatic discharge (ESD) wrist strap when handling electronic com- Hardware Installation These stickers are required ...
ponents such as a result of electrostatic discharge (ESD). Prior to installation, carefully read the user's manual and follow these procedures: •• Prior to wear an electrostatic discharge (ESD) wrist strap when handling electronic com- Hardware Installation These stickers are required ...
Manual
Page 15
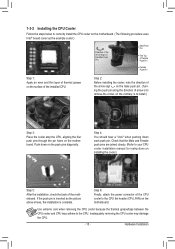
... of the motherboard. Push down each push pin. Check that the Male and Female push pins are joined closely. (Refer to your CPU cooler installation manual for instructions on installing the cooler.) Step 5: After the installation, check the back of the CPU cooler to the CPU fan header (CPU_FAN) on the...
... of the motherboard. Push down each push pin. Check that the Male and Female push pins are joined closely. (Refer to your CPU cooler installation manual for instructions on installing the cooler.) Step 5: After the installation, check the back of the CPU cooler to the CPU fan header (CPU_FAN) on the...
Manual
Page 18
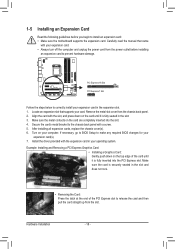
... After installing all expansion cards, replace the chassis cover(s). 666 Turn on the card are completely inserted into the PCI Express slot. Carefully read the manual that supports your operating system. Make sure the card is fully inserted into the slot. 444 Secure the card's metal bracket to release the card...
... After installing all expansion cards, replace the chassis cover(s). 666 Turn on the card are completely inserted into the PCI Express slot. Carefully read the manual that supports your operating system. Make sure the card is fully inserted into the slot. 444 Secure the card's metal bracket to release the card...

Manual
Page 19
...graphics card on the PCIEX16 and PCIEX8 slots. To Enable CrossFireX Function After installing the graphics card driver in the operating system, go to the manual that came with your graphics cards for the power requirement) B. A CrossFireX/SLI-supported motherboard with sufficient power is enabled. (Note) The ... cards on the PCIEX16 slot. To Enable SLI Function After installing the graphics card driver in the operating system, go to the manual of your graphics cards for enabling CrossFireX/SLI technology may be needed or not depending on top of identical brand and chip and ...
...graphics card on the PCIEX16 and PCIEX8 slots. To Enable CrossFireX Function After installing the graphics card driver in the operating system, go to the manual that came with your graphics cards for the power requirement) B. A CrossFireX/SLI-supported motherboard with sufficient power is enabled. (Note) The ... cards on the PCIEX16 slot. To Enable SLI Function After installing the graphics card driver in the operating system, go to the manual of your graphics cards for enabling CrossFireX/SLI technology may be needed or not depending on top of identical brand and chip and ...

Manual
Page 29
...(H) For HD Front Panel Audio: For AC'97 Front Panel Audio: Pin No. For information about connecting the S/PDIF digital audio cable, carefully read the manual for digital audio output from your motherboard to your chassis provides an AC'97 activate AC'97 functionality via the audio software in Chapter 5,1"Configuring...
...(H) For HD Front Panel Audio: For AC'97 Front Panel Audio: Pin No. For information about connecting the S/PDIF digital audio cable, carefully read the manual for digital audio output from your motherboard to your chassis provides an AC'97 activate AC'97 functionality via the audio software in Chapter 5,1"Configuring...
Manual
Page 31
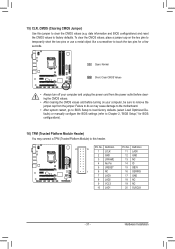
... the two pins to temporarily short the two pins or use a metal object like a screwdriver to touch the two pins for BIOS configurations). faults) or manually configure the BIOS settings (refer to clear the CMOS values (e.g. Definition Pin No. To clear the CMOS values, place a jumper cap on your computer and...
... the two pins to temporarily short the two pins or use a metal object like a screwdriver to touch the two pins for BIOS configurations). faults) or manually configure the BIOS settings (refer to clear the CMOS values (e.g. Definition Pin No. To clear the CMOS values, place a jumper cap on your computer and...
Manual
Page 39
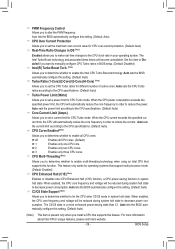
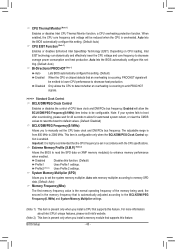
... Intel's website. - 39 - For more enhanced power-saving state than C1. Auto lets the BIOS automatically configure this item to Disabled if you want to manually configure CPU Turbo ratios in order to reduce the power. Auto sets the power limit according to the CPU specifications. (Default: Auto) Core Current Limit...
... Intel's website. - 39 - For more enhanced power-saving state than C1. Auto lets the BIOS automatically configure this item to Disabled if you want to manually configure CPU Turbo ratios in order to reduce the power. Auto sets the power limit according to the CPU specifications. (Default: Auto) Core Current Limit...
Manual
Page 40
...) Allows you to 2000 MHz. For more information about Intel CPUs' unique features, please visit Intel's website. (Note 2) This item is from 800 MHz to manually set the system memory multiplier. Note: If your system fails to boot after overclocking, please wait for 20 seconds to allow the BCLK/DMI/PEG...
...) Allows you to 2000 MHz. For more information about Intel CPUs' unique features, please visit Intel's website. (Note 2) This item is from 800 MHz to manually set the system memory multiplier. Note: If your system fails to boot after overclocking, please wait for 20 seconds to allow the BCLK/DMI/PEG...
Manual
Page 45
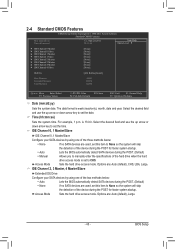
... or down arrow key to set this item to None so the system will skip the detection of the device during the POST. (Default) • Manual Allows you to CHS. IDE Channel 0, 1 Master/Slave IDE Channel 0, 1 Master/Slave Configure your SATA devices by using one of the three methods below ... the hard drive access mode is set the time. Select the desired field and use the up arrow or down arrow key to set to manually enter the specifications of the two methods below : • None If no SATA devices are used , set this item to None so the...
... or down arrow key to set this item to None so the system will skip the detection of the device during the POST. (Default) • Manual Allows you to CHS. IDE Channel 0, 1 Master/Slave IDE Channel 0, 1 Master/Slave Configure your SATA devices by using one of the three methods below ... the hard drive access mode is set the time. Select the desired field and use the up arrow or down arrow key to set to manually enter the specifications of the two methods below : • None If no SATA devices are used , set this item to None so the...
Manual
Page 46
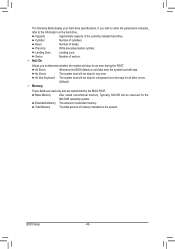
Cylinder Number of sectors. Sector Number of cylinders. Halt On Allows you wish to enter the parameters manually, refer to determine whether the system will not stop for any error. All Errors Whenever the BIOS detects a non-fatal error the system boot will ...
Cylinder Number of sectors. Sector Number of cylinders. Halt On Allows you wish to enter the parameters manually, refer to determine whether the system will not stop for any error. All Errors Whenever the BIOS detects a non-fatal error the system boot will ...

Manual
Page 55
Manual Allows you to the CPU temperature. Disabled Allows the CPU fan to run at different speeds according to control the CPU fan speed. Slope PWM ... full speeds. Note: The Voltage mode can adjust the fan speed with EasyTune based on your system requirements. (Default) Silent Allows the CPU fan to Manual.
Manual Allows you to the CPU temperature. Disabled Allows the CPU fan to run at different speeds according to control the CPU fan speed. Slope PWM ... full speeds. Note: The Voltage mode can adjust the fan speed with EasyTune based on your system requirements. (Default) Silent Allows the CPU fan to Manual.
Manual
Page 59
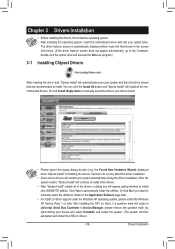
Or click Install Single Items to manually select the drivers you want to manually select the utilities to install. After installing the SP1 (or later), if a question mark still exists in Universal Serial Bus Controller in ...install other drivers. • After "Xpress Install" installs all the recommended drivers. After the system restart, "Xpress Install" will continue to install new GIGABYTE utilities. Drivers Installation the Found New Hardware Wizard) displayed when "Xpress Install" is automatically displayed which looks like that shown in Device Manager, please remove...
Or click Install Single Items to manually select the drivers you want to manually select the utilities to install. After installing the SP1 (or later), if a question mark still exists in Universal Serial Bus Controller in ...install other drivers. • After "Xpress Install" installs all the recommended drivers. After the system restart, "Xpress Install" will continue to install new GIGABYTE utilities. Drivers Installation the Found New Hardware Wizard) displayed when "Xpress Install" is automatically displayed which looks like that shown in Device Manager, please remove...
Manual
Page 60
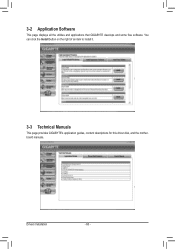
You can click the Install button on the right of an item to install it. 3-3 Technical Manuals This page provides GIGABYTE's application guides, content descriptions for this driver disk, and the motherboard manuals. Drivers Installation - 60 - 3-2 Application Software This page displays all the utilities and applications that GIGABYTE develops and some free software.
You can click the Install button on the right of an item to install it. 3-3 Technical Manuals This page provides GIGABYTE's application guides, content descriptions for this driver disk, and the motherboard manuals. Drivers Installation - 60 - 3-2 Application Software This page displays all the utilities and applications that GIGABYTE develops and some free software.
Manual
Page 66
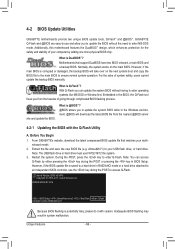
...is @BIOS™? @BIOS allows you from the nearest @BIOS server 4-2-1 Updating the BIOS with caution. Z68MX-UD2H-B3 E16 . . . . : BIOS Setup : XpressRecovery2 : Boot Menu : Qflash 03/29/2011-Z68...latest BIOS file from the hassles of system safety, users cannot update the backup BIOS manually. However, if the main BIOS is potentially risky, please do it with the Q-....00PG Copyright (C) 1984-2011, Award Software, Inc. Unique Features - 66 - 4-2 BIOS Update Utilities GIGABYTE motherboards provide two unique BIOS update tools, Q-Flash™ and @BIOS™. Motherboards that matches your...
...is @BIOS™? @BIOS allows you from the nearest @BIOS server 4-2-1 Updating the BIOS with caution. Z68MX-UD2H-B3 E16 . . . . : BIOS Setup : XpressRecovery2 : Boot Menu : Qflash 03/29/2011-Z68...latest BIOS file from the hassles of system safety, users cannot update the backup BIOS manually. However, if the main BIOS is potentially risky, please do it with the Q-....00PG Copyright (C) 1984-2011, Award Software, Inc. Unique Features - 66 - 4-2 BIOS Update Utilities GIGABYTE motherboards provide two unique BIOS update tools, Q-Flash™ and @BIOS™. Motherboards that matches your...
Manual
Page 69
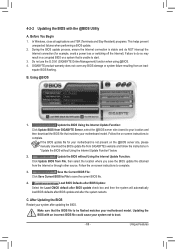
...incorrect BIOS file could cause your system after the system restarts. Follow the on the @BIOS server site, please manually download the BIOS update file from GIGABYTE Server, select the @BIOS server site closest to your location and then download the BIOS file that the BIOS file.... Update the BIOS without Using the Internet Update Function" below. 2. Update the BIOS Using the Internet Update Function: Click Update BIOS from GIGABYTE's website and follow the instructions in a corrupted BIOS or a system that is stable and do NOT interrupt the Internet connection (for your ...
...incorrect BIOS file could cause your system after the system restarts. Follow the on the @BIOS server site, please manually download the BIOS update file from GIGABYTE Server, select the @BIOS server site closest to your location and then download the BIOS file that the BIOS file.... Update the BIOS without Using the Internet Update Function" below. 2. Update the BIOS Using the Internet Update Function: Click Update BIOS from GIGABYTE's website and follow the instructions in a corrupted BIOS or a system that is stable and do NOT interrupt the Internet connection (for your ...
Manual
Page 79
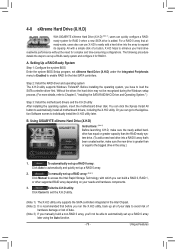
... array depending on your needs and hardware components. 3. B. To manually set up a RAID array: (Note 3) Click Manual to access the Intel Rapid Storage Technology, with a simple click of data. (Note 3) If you manually build a non-RAID 0 array, you'll not be recognized ...Step 3: Install the motherboard drivers and the X.H.D utiltiy After installing the operating system, insert the motherboard driver disk. Unique Features Using GIGABYTE eXtreme Hard Drive (X.H.D) Instructions: (Note 2) Before launching X.H.D, make sure the new drive is added. To automatically set up a RAID...
... array depending on your needs and hardware components. 3. B. To manually set up a RAID array: (Note 3) Click Manual to access the Intel Rapid Storage Technology, with a simple click of data. (Note 3) If you manually build a non-RAID 0 array, you'll not be recognized ...Step 3: Install the motherboard drivers and the X.H.D utiltiy After installing the operating system, insert the motherboard driver disk. Unique Features Using GIGABYTE eXtreme Hard Drive (X.H.D) Instructions: (Note 2) Before launching X.H.D, make sure the new drive is added. To automatically set up a RAID...


