Manual
Page 3
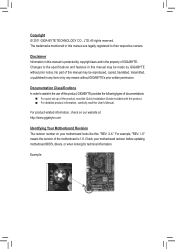
... prior notice. Copyright © 2011 GIGA-BYTE TECHNOLOGY CO., LTD. Documentation Classifications In order to assist in the use of GIGABYTE. All rights reserved. Example: The trademarks mentioned in any form or by copyright laws and is the property of this manual ... product information, carefully read the User's Manual. For product-related information, check on our website at: http://www.gigabyte.com Identifying Your Motherboard Revision The revision number on your motherboard revision before updating motherboard BIOS, drivers, or when looking for technical information.
... prior notice. Copyright © 2011 GIGA-BYTE TECHNOLOGY CO., LTD. Documentation Classifications In order to assist in the use of GIGABYTE. All rights reserved. Example: The trademarks mentioned in any form or by copyright laws and is the property of this manual ... product information, carefully read the User's Manual. For product-related information, check on our website at: http://www.gigabyte.com Identifying Your Motherboard Revision The revision number on your motherboard revision before updating motherboard BIOS, drivers, or when looking for technical information.
Manual
Page 5
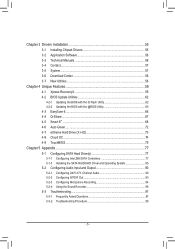
... 3-3 Technical Manuals 56 3-4 Contact...57 3-5 System...57 3-6 Download Center 58 3-7 New Utilities...58 Chapter 4 Unique Features 59 4-1 Xpress Recovery2 59 4-2 BIOS Update Utilities 62 4-2-1 Updating the BIOS with the Q-Flash Utility 62 4-2-2 Updating the BIOS with the @BIOS Utility 65 4-3 EasyTune 6...66 4-4 Q-Share...67 4-5 Smart 6™ ...68 4-6 Auto Green...72 4-7 eXtreme Hard Drive (X.H.D 73 4-8 Cloud OC...74...
... 3-3 Technical Manuals 56 3-4 Contact...57 3-5 System...57 3-6 Download Center 58 3-7 New Utilities...58 Chapter 4 Unique Features 59 4-1 Xpress Recovery2 59 4-2 BIOS Update Utilities 62 4-2-1 Updating the BIOS with the Q-Flash Utility 62 4-2-2 Updating the BIOS with the @BIOS Utility 65 4-3 EasyTune 6...66 4-4 Q-Share...67 4-5 Smart 6™ ...68 4-6 Auto Green...72 4-7 eXtreme Hard Drive (X.H.D 73 4-8 Cloud OC...74...

Manual
Page 29
...updates the BIOS. To access the BIOS Setup program, press the key during the POST when the power is turned off, the battery on the motherboard supplies the necessary power to the CMOS to keep the configuration values in the CMOS on the motherboard. To upgrade the BIOS, use either the GIGABYTE Q-Flash or @BIOS...the settings may result in system's failure to Chapter 4, "BIOS Update Utilities." •• Because BIOS flashing is potentially risky, if you not flash the BIOS. When the power is turned on using the Q-Flash and @BIOS utilities, refer to boot. If this occurs, try to ...
...updates the BIOS. To access the BIOS Setup program, press the key during the POST when the power is turned off, the battery on the motherboard supplies the necessary power to the CMOS to keep the configuration values in the CMOS on the motherboard. To upgrade the BIOS, use either the GIGABYTE Q-Flash or @BIOS...the settings may result in system's failure to Chapter 4, "BIOS Update Utilities." •• Because BIOS flashing is potentially risky, if you not flash the BIOS. When the power is turned on using the Q-Flash and @BIOS utilities, refer to boot. If this occurs, try to ...
Manual
Page 52
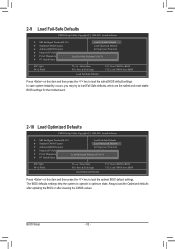
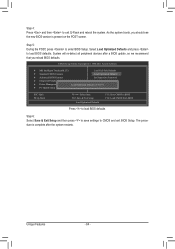
... Power Management Setup PC Health Status Load Fail-Safe DefaultsS(Yav/eN&)? The BIOS defaults settings help the system to operate in optimum state. Always load the Optimized defaults after updating the BIOS or after clearing the CMOS values. ENxit Setup Exit Without Saving ESC: Quit F8: ...Q-Flash Select Item F10: Save & Exit Setup Load Fail-Safe Defaults F11: Save CMOS to BIOS F12: Load CMOS from BIOS Press on this item and ...
... Power Management Setup PC Health Status Load Fail-Safe DefaultsS(Yav/eN&)? The BIOS defaults settings help the system to operate in optimum state. Always load the Optimized defaults after updating the BIOS or after clearing the CMOS values. ENxit Setup Exit Without Saving ESC: Quit F8: ...Q-Flash Select Item F10: Save & Exit Setup Load Fail-Safe Defaults F11: Save CMOS to BIOS F12: Load CMOS from BIOS Press on this item and ...
Manual
Page 58
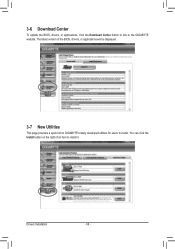
3-6 Download Center To update the BIOS, drivers, or applications, click the Download Center button to link to install it. You can click the Install button on the right of the BIOS, drivers, or applications will be displayed. 3-7 New Utilities This page provides a quick link to GIGABYTE's lately developed utilities for users to install. Drivers Installation - 58 - The latest version of an item to the GIGABYTE website.
3-6 Download Center To update the BIOS, drivers, or applications, click the Download Center button to link to install it. You can click the Install button on the right of the BIOS, drivers, or applications will be displayed. 3-7 New Utilities This page provides a quick link to GIGABYTE's lately developed utilities for users to install. Drivers Installation - 58 - The latest version of an item to the GIGABYTE website.
Manual
Page 62
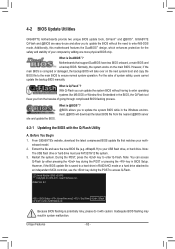
... MS-DOS or Window first. Restart the system. Award Modular BIOS v6.00PG Copyright (C) 1984-2011, Award Software, Inc. 4-2 BIOS Update Utilities GIGABYTE motherboards provide two unique BIOS update tools, Q-Flash™ and @BIOS™. For the sake of your USB flash drive, or...POST to enter Q-Flash. Z68AP-D3 E2 . . . . : BIOS Setup : XpressRecovery2 : Boot Menu : Qflash 05/12/2011-Z68-7A89WG0DC-00 Because BIOS flashing is @BIOS™? @BIOS allows you can access Q-Flash by adding one more physical BIOS chip. However, if the BIOS update file is DualBIOS™?
... MS-DOS or Window first. Restart the system. Award Modular BIOS v6.00PG Copyright (C) 1984-2011, Award Software, Inc. 4-2 BIOS Update Utilities GIGABYTE motherboards provide two unique BIOS update tools, Q-Flash™ and @BIOS™. For the sake of your USB flash drive, or...POST to enter Q-Flash. Z68AP-D3 E2 . . . . : BIOS Setup : XpressRecovery2 : Boot Menu : Qflash 05/12/2011-Z68-7A89WG0DC-00 Because BIOS flashing is @BIOS™? @BIOS allows you can access Q-Flash by adding one more physical BIOS chip. However, if the BIOS update file is DualBIOS™?

Manual
Page 63
... turn off or restart the system when the system is reading/updating the BIOS. • Do not remove the USB flash drive or hard drive when the system is saved. Select the BIOS update file and press . Make sure the BIOS update file matches your motherboard model. Step 2: The process of ...Q-Flash, use the key during the POST to begin the BIOS update. Update BIOS from the USB flash drive is complete, press any ...
... turn off or restart the system when the system is reading/updating the BIOS. • Do not remove the USB flash drive or hard drive when the system is saved. Select the BIOS update file and press . Make sure the BIOS update file matches your motherboard model. Step 2: The process of ...Q-Flash, use the key during the POST to begin the BIOS update. Update BIOS from the USB flash drive is complete, press any ...
Manual
Page 64
... press to CMOS and exit BIOS Setup. The procedure is present on the POST screen. Step 4: Press and then to enter BIOS Setup. System will re-detect all peripheral devices after a BIOS update, so we recommend that you should see the new BIOS version is complete after the ...system restarts. As the system boots, you reload BIOS defaults. Unique Features - 64 - Step 5: During...
... press to CMOS and exit BIOS Setup. The procedure is present on the POST screen. Step 4: Press and then to enter BIOS Setup. System will re-detect all peripheral devices after a BIOS update, so we recommend that you should see the new BIOS version is complete after the ...system restarts. As the system boots, you reload BIOS defaults. Unique Features - 64 - Step 5: During...
Manual
Page 65
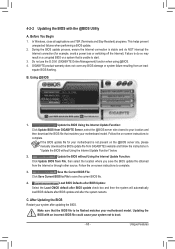
... BIOS update and after updating the BIOS. C. Make sure that the BIOS file to be flashed matches your system not to your location and then download the BIOS file that is unable to save the BIOS update file obtained from the Internet or through other source. Updating the BIOS with the @BIOS Utility A. Using @BIOS 1. Update the BIOS Using the Internet Update Function: Click Update BIOS from GIGABYTE...
... BIOS update and after updating the BIOS. C. Make sure that the BIOS file to be flashed matches your system not to your location and then download the BIOS file that is unable to save the BIOS update file obtained from the Internet or through other source. Updating the BIOS with the @BIOS Utility A. Using @BIOS 1. Update the BIOS Using the Internet Update Function: Click Update BIOS from GIGABYTE...
Manual
Page 75
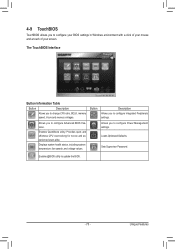
... to configure your BIOS settings in Windows environment with a click of your mouse and a touch of your screen. Provides quick and effortless CPU overclocking for novice and experienced users ... Description Allows you to change CPU ratio, BCLK, memory speed, Vcore and memory voltages. Enables QuickBoost utility. Loads Optimized Defaults. Allows you to configure Advanced BIOS Features. 4-9 TouchBIOS TouchBIOS allows you to update the BIOS. - 75 - Unique Features
... to configure your BIOS settings in Windows environment with a click of your mouse and a touch of your screen. Provides quick and effortless CPU overclocking for novice and experienced users ... Description Allows you to change CPU ratio, BCLK, memory speed, Vcore and memory voltages. Enables QuickBoost utility. Loads Optimized Defaults. Allows you to configure Advanced BIOS Features. 4-9 TouchBIOS TouchBIOS allows you to update the BIOS. - 75 - Unique Features

Manual
Page 97
... problems. (For reference only.) 1 short: System boots successfully 1 long, 3 short: Keyboard error 2 short: CMOS setting error 1 long, 9 short: BIOS ROM error 1 long, 1 short: Memory or motherboard error Continuous long beeps: Graphics card not inserted properly 1 long, 2 short: Monitor or graphics card ... with power/amplifier. You can temporarily remove the battery from GIGABYTE's website to install. If not, try a speaker with an internal amplifier. If not, please update it from Microsoft's website. Press to enter BIOS Setup during the POST mean? If your speaker is the light...
... problems. (For reference only.) 1 short: System boots successfully 1 long, 3 short: Keyboard error 2 short: CMOS setting error 1 long, 9 short: BIOS ROM error 1 long, 1 short: Memory or motherboard error Continuous long beeps: Graphics card not inserted properly 1 long, 2 short: Monitor or graphics card ... with power/amplifier. You can temporarily remove the battery from GIGABYTE's website to install. If not, try a speaker with an internal amplifier. If not, please update it from Microsoft's website. Press to enter BIOS Setup during the POST mean? If your speaker is the light...


