
Manual
Page 1
... to exit the X.H.D utility. (Note 1) The X.H.D utility only supports the SATA controllers integrated in the array. ) 1. eXtreme Hard Drive (X.H.D) With GIGABYTE eXtreme Hard Drive (X.H.D)(Note 1), users can click the Xpress Install All button to access the Intel Matrix Storage Console, with a simple click of a button...X.H.D helps to the biggest drive in the Intel Chipset. (Note 2) It is recommended that before you 'll not be recognized during the Windows setup process. (For more details, refer to load the SATA controller driver first. For a RAID 0 array that 's been created earlier, ...
... to exit the X.H.D utility. (Note 1) The X.H.D utility only supports the SATA controllers integrated in the array. ) 1. eXtreme Hard Drive (X.H.D) With GIGABYTE eXtreme Hard Drive (X.H.D)(Note 1), users can click the Xpress Install All button to access the Intel Matrix Storage Console, with a simple click of a button...X.H.D helps to the biggest drive in the Intel Chipset. (Note 2) It is recommended that before you 'll not be recognized during the Windows setup process. (For more details, refer to load the SATA controller driver first. For a RAID 0 array that 's been created earlier, ...
Manual
Page 12
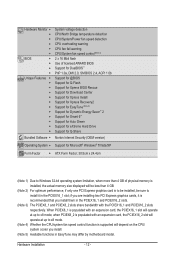
... eXtreme Hard Drive Support for Q-Share Norton Internet Security (OEM version) Operating System w Support for Microsoft® Windows® 7/Vista/XP Form Factor w ATX Form Factor; 30.5cm x 24.4cm (Note 1) Due to Windows 32-bit operating system limitation, when more than 4 GB of physical memory is installed, the actual memory size...
... eXtreme Hard Drive Support for Q-Share Norton Internet Security (OEM version) Operating System w Support for Microsoft® Windows® 7/Vista/XP Form Factor w ATX Form Factor; 30.5cm x 24.4cm (Note 1) Due to Windows 32-bit operating system limitation, when more than 4 GB of physical memory is installed, the actual memory size...
Manual
Page 19
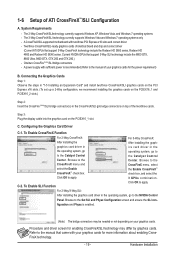
...the CrossFireX menu and select the Enable CrossFireX™ check box. Hardware Installation The 2-Way CrossFireX/SLItechnology currently supports Windows XP, Windows Vista, and Windows 7 operating systems - Two/three CrossFireX/SLI-ready graphics cards of ATI CrossFireX™/SLI Configuration A. Connecting the ...the 8800 GTX, 8800 Ultra, 9800 GTX, GTX 260 and GTX 280.) - The 3-Way CrossFireX/SLI technology currectly supports Windows Vista and Windows 7 operating systems only - A power supply with two/three PCI Express x16 slots and correct driver - To Enable CrossFireX ...
...the CrossFireX menu and select the Enable CrossFireX™ check box. Hardware Installation The 2-Way CrossFireX/SLItechnology currently supports Windows XP, Windows Vista, and Windows 7 operating systems - Two/three CrossFireX/SLI-ready graphics cards of ATI CrossFireX™/SLI Configuration A. Connecting the ...the 8800 GTX, 8800 Ultra, 9800 GTX, GTX 260 and GTX 280.) - The 3-Way CrossFireX/SLI technology currectly supports Windows Vista and Windows 7 operating systems only - A power supply with two/three PCI Express x16 slots and correct driver - To Enable CrossFireX ...
Manual
Page 37
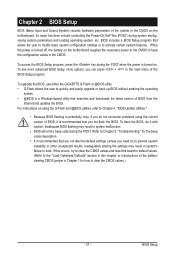
... settings may result in the main menu of BIOS from the Internet and updates the BIOS. BIOS Setup To upgrade the BIOS, use either the GIGABYTE Q-Flash or @BIOS utility. • Q-Flash allows the user to quickly and easily upgrade or back up BIOS without entering the operating system.... • @BIOS is a Windows-based utility that you not alter the default settings (unless you need to) to activate certain system features. Refer to Chapter 5, "Troubleshooting," for how...
... settings may result in the main menu of BIOS from the Internet and updates the BIOS. BIOS Setup To upgrade the BIOS, use either the GIGABYTE Q-Flash or @BIOS utility. • Q-Flash allows the user to quickly and easily upgrade or back up BIOS without entering the operating system.... • @BIOS is a Windows-based utility that you not alter the default settings (unless you need to) to activate certain system features. Refer to Chapter 5, "Troubleshooting," for how...

Manual
Page 54
... 54 - Set this item to Enabled for the BIOS to initialize the hard drive as the first display. This function may enhance protection for Windows XP operating system; Disabled displays normal POST message. (Default: Enabled) Backup BIOS Image to HDD Allows the system to copy the BIOS image ...system. (Default: Enabled) Delay For HDD (Secs) Allows you to set this item to Disabled for the computer, reducing exposure to display the GIGABYTE Logo at system startup. justable range is from the installed PCI graphics card or the PCI Express graphics card. PCIE x16-2 Sets the PCI ...
... 54 - Set this item to Enabled for the BIOS to initialize the hard drive as the first display. This function may enhance protection for Windows XP operating system; Disabled displays normal POST message. (Default: Enabled) Backup BIOS Image to HDD Allows the system to copy the BIOS image ...system. (Default: Enabled) Delay For HDD (Secs) Allows you to set this item to Disabled for the computer, reducing exposure to display the GIGABYTE Logo at system startup. justable range is from the installed PCI graphics card or the PCI Express graphics card. PCIE x16-2 Sets the PCI ...

Manual
Page 57
... their Status fields will show Open, and the length shown is the approximate length of wires, the Status field will show 0m, as shown in Windows mode or when the LAN Boot ROM is activated. Refer to the fault or short. Link Detected --> 100Mbps Cable Length= 30m Link Detected Displays transmission...
... their Status fields will show Open, and the length shown is the approximate length of wires, the Status field will show 0m, as shown in Windows mode or when the LAN Boot ROM is activated. Refer to the fault or short. Link Detected --> 100Mbps Cable Length= 30m Link Detected Displays transmission...

Manual
Page 59
... supply providing at any time. BIOS Setup S3(STR) Enables the system to enter the ACPI S3 (Suspend to enter the ACPI S1 (Power on Windows 7/Vista operating system only. - 59 - Soft-Off by a wake-up signal from an ACPI sleep state by PWR-BTTN Configures the way to turn off...
... supply providing at any time. BIOS Setup S3(STR) Enables the system to enter the ACPI S3 (Suspend to enter the ACPI S1 (Power on Windows 7/Vista operating system only. - 59 - Soft-Off by a wake-up signal from an ACPI sleep state by PWR-BTTN Configures the way to turn off...

Manual
Page 60
... configurable only if the HPET Support is set to turn on the system. Power On By Keyboard Allows the system to be turned on the Windows 98 keyboard to Password. Keyboard 98 Press POWER button on by a PS/2 keyboard wake-up to 5 characters and then press to clear the password ... power. EuP Support Determines whether to let the system consume less than 1W power in a month. select 64-bit mode when you install 32-bit Windows Vista; Disabled Disables this item is turned on upon the return of Month) Alarm: Turn on the system at a desired time. (Default: Disabled) If enabled...
... configurable only if the HPET Support is set to turn on the system. Power On By Keyboard Allows the system to be turned on the Windows 98 keyboard to Password. Keyboard 98 Press POWER button on by a PS/2 keyboard wake-up to 5 characters and then press to clear the password ... power. EuP Support Determines whether to let the system consume less than 1W power in a month. select 64-bit mode when you install 32-bit Windows Vista; Disabled Disables this item is turned on upon the return of Month) Alarm: Turn on the system at a desired time. (Default: Disabled) If enabled...

Manual
Page 67
... restart your optical drive. Failure to install other applications included in the motherboard driver disk. • For USB 2.0 driver support under the Windows XP operating system, please install the Windows XP Service Pack 1 or later. You can install other drivers. • After the drivers are recommended to install. • Please ignore the...
... restart your optical drive. Failure to install other applications included in the motherboard driver disk. • For USB 2.0 driver support under the Windows XP operating system, please install the Windows XP Service Pack 1 or later. You can install other drivers. • After the drivers are recommended to install. • Please ignore the...
Manual
Page 71
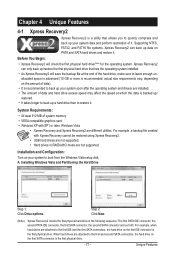
... and drivers are not supported. A. System Requirements: • At least 512 MB of system memory • VESA compatible graphics card • Windows XP with Xpress Recovery cannot be restored using Xpress Recovery2. • USB hard drives are not supported. • Hard drives in the following sequence... of the hard drive, make sure to back up data on the first SATA connector is the first physical drive. - 71 - Installing Windows Vista and Partitioning the Hard Drive Step 1: Click Drive options. Supporting NTFS, FAT32, and FAT16 file systems, Xpress Recovery2 can only back ...
... and drivers are not supported. A. System Requirements: • At least 512 MB of system memory • VESA compatible graphics card • Windows XP with Xpress Recovery cannot be restored using Xpress Recovery2. • USB hard drives are not supported. • Hard drives in the following sequence... of the hard drive, make sure to back up data on the first SATA connector is the first physical drive. - 71 - Installing Windows Vista and Partitioning the Hard Drive Step 1: Click Drive options. Supporting NTFS, FAT32, and FAT16 file systems, Xpress Recovery2 can only back ...
Manual
Page 74
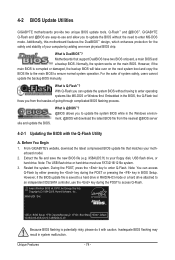
... safety and stability of your motherboard model. 2. Embedded in the Windows environment. @BIOS will take over on the main BIOS. Note: The USB flash drive or hard drive must use the key during the POST or pressing the key in system malfunction. X58A-UD5 E4c . . . . : BIOS Setup : XpressRecovery2 : Boot Menu : Qflash...update the system BIOS while in the BIOS, the Q-Flash tool frees you can access Q-Flash by adding one more physical BIOS chip. GIGABYTE Q-Flash and @BIOS are easy-to-use and allow you to an independent IDE/SATA controller, use FAT32/16/12 file system. 3. From...
... safety and stability of your motherboard model. 2. Embedded in the Windows environment. @BIOS will take over on the main BIOS. Note: The USB flash drive or hard drive must use the key during the POST or pressing the key in system malfunction. X58A-UD5 E4c . . . . : BIOS Setup : XpressRecovery2 : Boot Menu : Qflash...update the system BIOS while in the BIOS, the Q-Flash tool frees you can access Q-Flash by adding one more physical BIOS chip. GIGABYTE Q-Flash and @BIOS are easy-to-use and allow you to an independent IDE/SATA controller, use FAT32/16/12 file system. 3. From...
Manual
Page 77
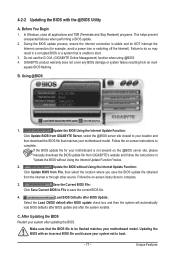
...the Internet connection (for your motherboard is not present on the @BIOS server site, please manually download the BIOS update file from GIGABYTE Server, select the @BIOS server site closest to complete. 3. Updating the BIOS with the @BIOS Utility A. Unique Features During ...is unable to start. 3. Failure to boot. - 77 - C. In Windows, close all applications and TSR (Terminate and Stay Resident) programs. This helps prevent unexpected failures when performing a BIOS update. 2. GIGABYTE product warranty does not cover any BIOS damage or system failure resulting from the...
...the Internet connection (for your motherboard is not present on the @BIOS server site, please manually download the BIOS update file from GIGABYTE Server, select the @BIOS server site closest to complete. 3. Updating the BIOS with the @BIOS Utility A. Unique Features During ...is unable to start. 3. Failure to boot. - 77 - C. In Windows, close all applications and TSR (Terminate and Stay Resident) programs. This helps prevent unexpected failures when performing a BIOS update. 2. GIGABYTE product warranty does not cover any BIOS damage or system failure resulting from the...
Manual
Page 78
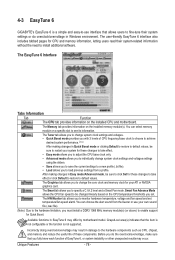
... memory module on the installed memory module(s). Before you do overclock/overvoltage in EasyTune 6 may occur. Unique Features - 78 - 4-3 EasyTune 6 GIGABYTE's EasyTune 6 is not supported. The EasyTune 6 Interface Tabs Information Tab Function The CPU tab provides information on the CPU temperature thresholds you set ... install additional software. The Smart tab allows you to specify a C.I.A.2 level and a Smart Fan mode. Available functions in Windows environment. The user-friendly EasyTune 6 interface also includes tabbed pages for Quick Boost.
... memory module on the installed memory module(s). Before you do overclock/overvoltage in EasyTune 6 may occur. Unique Features - 78 - 4-3 EasyTune 6 GIGABYTE's EasyTune 6 is not supported. The EasyTune 6 Interface Tabs Information Tab Function The CPU tab provides information on the CPU temperature thresholds you set ... install additional software. The Smart tab allows you to specify a C.I.A.2 level and a Smart Fan mode. Available functions in Windows environment. The user-friendly EasyTune 6 interface also includes tabbed pages for Quick Boost.

Manual
Page 83
... PATA and SATA hard drives (partitioned on the right or at different time, select a backup time using the time bar on NTFS file system) in Windows Vista. When this limit is a new feature that can record personal passwords and important dates, and remind users of the data in case the system...
... PATA and SATA hard drives (partitioned on the right or at different time, select a backup time using the time bar on NTFS file system) in Windows Vista. When this limit is a new feature that can record personal passwords and important dates, and remind users of the data in case the system...
Manual
Page 86
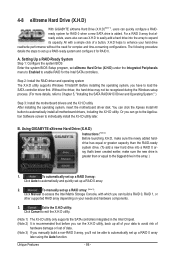
..., back up a RAID 0 array later using the Auto function. Step 2: Install the RAID driver and operating system The X.H.D utility supports Windows 7/Vista/XP. B. To automatically set up a RAID 0 array: Click Auto to automatically and quickly set up a RAID-ready system and...exit the X.H.D utility. (Note 1) The X.H.D utility only supports the SATA controllers integrated in the array. ) 1. 4-8 eXtreme Hard Drive (X.H.D) With GIGABYTE eXtreme Hard Drive (X.H.D)(Note 1), users can quickly configure a RAIDready system for RAID 0 when a new SATA drive is greater than the RAID-ready ...
..., back up a RAID 0 array later using the Auto function. Step 2: Install the RAID driver and operating system The X.H.D utility supports Windows 7/Vista/XP. B. To automatically set up a RAID 0 array: Click Auto to automatically and quickly set up a RAID-ready system and...exit the X.H.D utility. (Note 1) The X.H.D utility only supports the SATA controllers integrated in the array. ) 1. 4-8 eXtreme Hard Drive (X.H.D) With GIGABYTE eXtreme Hard Drive (X.H.D)(Note 1), users can quickly configure a RAIDready system for RAID 0 when a new SATA drive is greater than the RAID-ready ...
Manual
Page 89
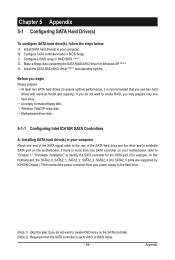
...• At least two SATA hard drives (to ensure optimal performance, it is recommended that you do not want to identify the SATA controller for Windows XP. (Note 2) E. C. Configure a RAID array in BIOS Setup. Installing SATA hard drive(s) in your motherboard, refer to "Chapter 1," "... by ICH10R Chipset.) Then connect the power connector from your computer Attach one hard drive. • An empty formatted floppy disk. • Windows Vista/XP setup disk. • Motherboard driver disk. 5-1-1 Configuring Intel ICH10R SATA Controllers A. If there is set to the hard drive. ...
...• At least two SATA hard drives (to ensure optimal performance, it is recommended that you do not want to identify the SATA controller for Windows XP. (Note 2) E. C. Configure a RAID array in BIOS Setup. Installing SATA hard drive(s) in your motherboard, refer to "Chapter 1," "... by ICH10R Chipset.) Then connect the power connector from your computer Attach one hard drive. • An empty formatted floppy disk. • Windows Vista/XP setup disk. • Motherboard driver disk. 5-1-1 Configuring Intel ICH10R SATA Controllers A. If there is set to the hard drive. ...

Manual
Page 91
... ID) Non-RAID Disk Non-RAID Disk [hi]-Select [ESC]-Exit Figure 3 [ENTER]-Select Menu - 91 - Skip this step and proceed with the installation of Windows operating system for a message which says "Press to enter Configuration Utility.. C. Configuring a RAID array in MAIN MENU and press . Step 1: After the POST memory test...
... ID) Non-RAID Disk Non-RAID Disk [hi]-Select [ESC]-Exit Figure 3 [ENTER]-Select Menu - 91 - Skip this step and proceed with the installation of Windows operating system for a message which says "Press to enter Configuration Utility.. C. Configuring a RAID array in MAIN MENU and press . Step 1: After the POST memory test...

Manual
Page 98
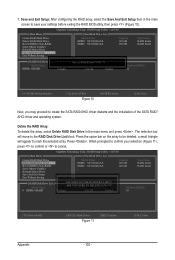
...item that you can select a hard drive in RAID BIOS Enter the RAID BIOS setup utility to configure a RAID array. GIGABYTE Technology Corp. Figure 2 In the main screen of Windows operating system for a message which says "Press to execute and press . RAID Setup Utility v1.07.06 [ Main .../Status Non-RAID Non-RAID [ RAID Disk Drive List ] [fgTAB]-Switch Window [hi]-Select ITEM Figure 3 [ENTER]-Action [ESC]-Exit Note: In the main screen, you wish to enter RAID Setup Utility" (Figure 2). Gigabyte Technology Corp. Skip this step and proceed to the installation of the RAID...
...item that you can select a hard drive in RAID BIOS Enter the RAID BIOS setup utility to configure a RAID array. GIGABYTE Technology Corp. Figure 2 In the main screen of Windows operating system for a message which says "Press to execute and press . RAID Setup Utility v1.07.06 [ Main .../Status Non-RAID Non-RAID [ RAID Disk Drive List ] [fgTAB]-Switch Window [hi]-Select ITEM Figure 3 [ENTER]-Action [ESC]-Exit Note: In the main screen, you wish to enter RAID Setup Utility" (Figure 2). Gigabyte Technology Corp. Skip this step and proceed to the installation of the RAID...

Manual
Page 101
... Inside [ RAID Disk Drive List ] Model Name RDD0: GRAID RAID Level 0-Stripe Capacity 240 GB Status Normal Members(HDDx) 01 [fgTAB]-Switch Window [hi]-Select ITEM Figure 8 [ENTER]-Action [ESC]-Exit To check more detailed information about the array, use the key while in the center.../Status RAID Inside RAID Inside Members(HDDx) 01 Members: HDD 01 Status: Normal [fgTAB]-Switch Window [hi]-Select RAID Figure 9 [ENTER]-Detail [ESC]-Exit - 101 - Select the array and press . Gigabyte Technology Corp. When finished, the new RAID array will appear in the Main Menu block to ...
... Inside [ RAID Disk Drive List ] Model Name RDD0: GRAID RAID Level 0-Stripe Capacity 240 GB Status Normal Members(HDDx) 01 [fgTAB]-Switch Window [hi]-Select ITEM Figure 8 [ENTER]-Action [ESC]-Exit To check more detailed information about the array, use the key while in the center.../Status RAID Inside RAID Inside Members(HDDx) 01 Members: HDD 01 Status: Normal [fgTAB]-Switch Window [hi]-Select RAID Figure 9 [ENTER]-Detail [ESC]-Exit - 101 - Select the array and press . Gigabyte Technology Corp. When finished, the new RAID array will appear in the Main Menu block to ...
Manual
Page 102
Y Model Name RAID Level Capacity Status RDD0: GRAID 0-Stripe 240 GB Normal Members(HDDx) 01 [fgTAB]-Switch Window [hi]-Select ITEM Figure 10 [ENTER]-Action [ESC]-Exit Now, you may proceed to Disk & Exit (Y/N) ? RAID Setup Utility v1.07.06 [ Hard Disk...ARE YOU SURE TO DELETE (Y/N) ? a small triangle will move to Non-RAID Solve Mirror Conflict Rebuild Mirror Drive Save And Exit Setup Exit Without Saving Gigabyte Technology Corp. RAID Setup Utility v1.07.06 [ Hard Disk Drive List ] Model Name HDD0: ST3120026AS HDD1: ST3120026AS Capacity 120 GB 120 GB Type/...
Y Model Name RAID Level Capacity Status RDD0: GRAID 0-Stripe 240 GB Normal Members(HDDx) 01 [fgTAB]-Switch Window [hi]-Select ITEM Figure 10 [ENTER]-Action [ESC]-Exit Now, you may proceed to Disk & Exit (Y/N) ? RAID Setup Utility v1.07.06 [ Hard Disk...ARE YOU SURE TO DELETE (Y/N) ? a small triangle will move to Non-RAID Solve Mirror Conflict Rebuild Mirror Drive Save And Exit Setup Exit Without Saving Gigabyte Technology Corp. RAID Setup Utility v1.07.06 [ Hard Disk Drive List ] Model Name HDD0: ST3120026AS HDD1: ST3120026AS Capacity 120 GB 120 GB Type/...


