
Manual
Page 30
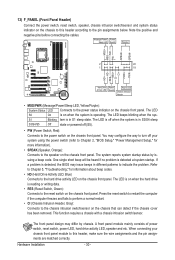
...This function requires a chassis with a chassis intrusion switch/sensor. Hardware Installation - 30 - 13) F_PANEL (Front Panel Header) Connect the power switch, reset switch, speaker, chassis intrusion switch/sensor and system status indicator on the chassis to this header, make sure the wire assignments and the pin assignments..., power LED, hard drive activity LED, speaker and etc. When connecting your system using the power switch (refer to Chapter 2, "BIOS Setup," "Power Management Setup," for information about beep codes. • HD (Hard Drive Activity LED, Blue) Connects to the power...
...This function requires a chassis with a chassis intrusion switch/sensor. Hardware Installation - 30 - 13) F_PANEL (Front Panel Header) Connect the power switch, reset switch, speaker, chassis intrusion switch/sensor and system status indicator on the chassis to this header, make sure the wire assignments and the pin assignments..., power LED, hard drive activity LED, speaker and etc. When connecting your system using the power switch (refer to Chapter 2, "BIOS Setup," "Power Management Setup," for information about beep codes. • HD (Hard Drive Activity LED, Blue) Connects to the power...
Manual
Page 35
...code during system startup, saving system parameters and loading operating system, etc. If this occurs, try to clear the CMOS values and reset the board to default values. (Refer to the "Load Optimized Defaults" section in this chapter or introductions of the battery/ clearing ... For instructions on . Its major functions include conducting the Power-On Self-Test (POST) during the POST. To upgrade the BIOS, use either the GIGABYTE Q-Flash or @BIOS utility. • Q-Flash allows the user to prevent system instability or other unexpected results. Refer to Chapter 5, "Troubleshooting," ...
...code during system startup, saving system parameters and loading operating system, etc. If this occurs, try to clear the CMOS values and reset the board to default values. (Refer to the "Load Optimized Defaults" section in this chapter or introductions of the battery/ clearing ... For instructions on . Its major functions include conducting the Power-On Self-Test (POST) during the POST. To upgrade the BIOS, use either the GIGABYTE Q-Flash or @BIOS utility. • Q-Flash allows the user to prevent system instability or other unexpected results. Refer to Chapter 5, "Troubleshooting," ...

Manual
Page 39
Auto x tRAS - Auto x tRAS - BIOS Setup Auto x Command Rate(CMD) - Auto x Command Rate(CMD) - If this occurs, clear the CMOS values and reset the board to default values.) (Note 1) This item appears only if you install a CPU that supports this feature. (Note 2) This item appears only if you ...
Auto x tRAS - Auto x tRAS - BIOS Setup Auto x Command Rate(CMD) - Auto x Command Rate(CMD) - If this occurs, clear the CMOS values and reset the board to default values.) (Note 1) This item appears only if you install a CPU that supports this feature. (Note 2) This item appears only if you ...
Manual
Page 43
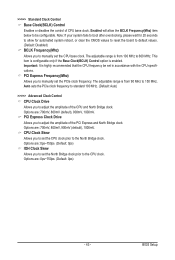
... seconds to allow the BCLK Frequency(Mhz) item below to be set the North Bridge clock prior to adjust the amplitude of CPU base clock. BIOS Setup Options are : 0ps~750ps. (Default: 0ps) - 43 - Note: If your system fails to boot after overclocking, please wait for automated ...system reboot, or clear the CMOS values to reset the board to default values. (Default: Disabled) BCLK Frequency(Mhz) Allows you to the CPU clock. Important: It is enabled. PCI Express Frequency(Mhz)...
... seconds to allow the BCLK Frequency(Mhz) item below to be set the North Bridge clock prior to adjust the amplitude of CPU base clock. BIOS Setup Options are : 0ps~750ps. (Default: 0ps) - 43 - Note: If your system fails to boot after overclocking, please wait for automated ...system reboot, or clear the CMOS values to reset the board to default values. (Default: Disabled) BCLK Frequency(Mhz) Allows you to the CPU clock. Important: It is enabled. PCI Express Frequency(Mhz)...
Manual
Page 59
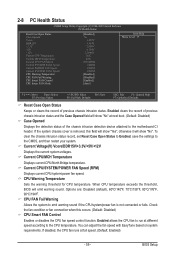
...restart your system. If disabled, the CPU fan runs at different speed according to the CPU temperature. BIOS Setup When CPU temperature exceeds the threshold, BIOS will show "No". Current Voltage(V) Vcore/DDR15V/+3.3V/+5V/+12V Displays the current system voltages. Enabled...otherwise it will emit warning sound. 2-8 PC Health Status CMOS Setup Utility-Copyright (C) 1984-2009 Award Software PC Health Status Reset Case Open Status Case Opened Vcore DDR15V +3.3V +5V +12V Current CPU Temperature Current MCH Temperature Current CPU FAN Speed ...
...restart your system. If disabled, the CPU fan runs at different speed according to the CPU temperature. BIOS Setup When CPU temperature exceeds the threshold, BIOS will show "No". Current Voltage(V) Vcore/DDR15V/+3.3V/+5V/+12V Displays the current system voltages. Enabled...otherwise it will emit warning sound. 2-8 PC Health Status CMOS Setup Utility-Copyright (C) 1984-2009 Award Software PC Health Status Reset Case Open Status Case Opened Vcore DDR15V +3.3V +5V +12V Current CPU Temperature Current MCH Temperature Current CPU FAN Speed ...
Manual
Page 73
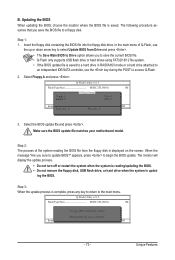
... 25L1605A 1M Keep0 DfilMe(Is)DfaotuandEnable Floppy A Loa d CMO S Default Enable HDD 1-0 Upda te BIOS from Drive Please SparevsesBaInOySketoy Dtoricvoentinue Enter : Run hi:Move ESC:Reset F10:Power Off - 73 - appears, press to Drive Enter : Run hi:Move ESC:Reset F10:Power Off Total size : 0 Free size : 0 3. The following procedure assumes that you...
... 25L1605A 1M Keep0 DfilMe(Is)DfaotuandEnable Floppy A Loa d CMO S Default Enable HDD 1-0 Upda te BIOS from Drive Please SparevsesBaInOySketoy Dtoricvoentinue Enter : Run hi:Move ESC:Reset F10:Power Off - 73 - appears, press to Drive Enter : Run hi:Move ESC:Reset F10:Power Off Total size : 0 Free size : 0 3. The following procedure assumes that you...
Manual
Page 78
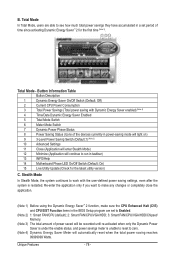
...CPU Power Consumption 3 Total Power Savings (Total power saving with the user-defined power saving settings, even after the system is unable to reset to make any changes or completely close the application. (Note 1) Before using the Dynamic Energy Saver™ 2 function, make sure the... Switch (Default:1) (Note 2) 10 Advanced Settings 11 Close (Application will enter Stealth Mode) 12 Minimize (Application will continue to run in the BIOS Setup program are set to work with Dynamic Energy Saver enabled) (Note 4) 4 Time/Date Dynamic Energy Saver Enabled 5 Total Mode Switch 6 ...
...CPU Power Consumption 3 Total Power Savings (Total power saving with the user-defined power saving settings, even after the system is unable to reset to make any changes or completely close the application. (Note 1) Before using the Dynamic Energy Saver™ 2 function, make sure the... Switch (Default:1) (Note 2) 10 Advanced Settings 11 Close (Application will enter Stealth Mode) 12 Minimize (Application will continue to run in the BIOS Setup program are set to work with Dynamic Energy Saver enabled) (Note 4) 4 Time/Date Dynamic Energy Saver Enabled 5 Total Mode Switch 6 ...

Manual
Page 87
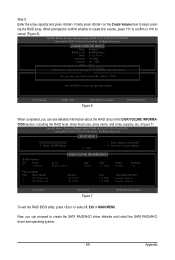
...1 ST3120026AS Serial # 3JT354CP 3JT329JX Size 111.7GB 111.7GB Type/Status(Vol ID) Non-RAID Disk Non-RAID Disk Press to Non-RAID 4. Reset Disks to enter Configuration Utility.. Press + to enter Configuration Utility" (Figure 2). All Rights Reserved. [ MAIN MENU ] 1. Recovery Volume Options ...option ROM v8.9.0.1023 PCH-D wRAID5 Copyright(C) 2003-09 Intel Corporation. Exit 3. Appendix Configuring a RAID array in RAID BIOS Enter the RAID BIOS setup utility to create a RAID array, select Create RAID Volume in MAIN MENU and press . Intel(R) Matrix Storage ...
...1 ST3120026AS Serial # 3JT354CP 3JT329JX Size 111.7GB 111.7GB Type/Status(Vol ID) Non-RAID Disk Non-RAID Disk Press to Non-RAID 4. Reset Disks to enter Configuration Utility.. Press + to enter Configuration Utility" (Figure 2). All Rights Reserved. [ MAIN MENU ] 1. Recovery Volume Options ...option ROM v8.9.0.1023 PCH-D wRAID5 Copyright(C) 2003-09 Intel Corporation. Exit 3. Appendix Configuring a RAID array in RAID BIOS Enter the RAID BIOS setup utility to create a RAID array, select Create RAID Volume in MAIN MENU and press . Intel(R) Matrix Storage ...
Manual
Page 89
....7GB 111.7GB Type/Status(Vol ID) Member Disk(0) Member Disk(0) [hi]-Select [ESC]-Exit Figure 7 [ENTER]-Select Menu To exit the RAID BIOS utility, press or select 5. Appendix Reset Disks to begin creating the RAID array. Delete RAID Volume 5. All Rights Reserved. [ MAIN MENU ] 1. Now, you can proceed to cancel (Figure...
....7GB 111.7GB Type/Status(Vol ID) Member Disk(0) Member Disk(0) [hi]-Select [ESC]-Exit Figure 7 [ENTER]-Select Menu To exit the RAID BIOS utility, press or select 5. Appendix Reset Disks to begin creating the RAID array. Delete RAID Volume 5. All Rights Reserved. [ MAIN MENU ] 1. Now, you can proceed to cancel (Figure...


