
Manual
Page 9
... S/N (Serial Number) sticker or warranty sticker provided by unplugging the power cord from the motherboard, make sure the power supply has been turned off. • Before turning on the power, make sure the power supply voltage has been set according to the local voltage standard. •... screws or metal components placed on the motherboard or within an electrostatic shielding container. • Before unplugging the power supply cable from the power outlet before installing or removing the motherboard or other hardware components. • When connecting hardware components to the ...
... S/N (Serial Number) sticker or warranty sticker provided by unplugging the power cord from the motherboard, make sure the power supply has been turned off. • Before turning on the power, make sure the power supply voltage has been set according to the local voltage standard. •... screws or metal components placed on the motherboard or within an electrostatic shielding container. • Before unplugging the power supply cable from the power outlet before installing or removing the motherboard or other hardware components. • When connecting hardware components to the ...
Manual
Page 19
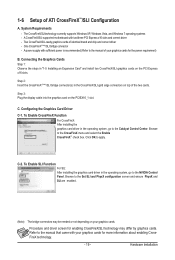
... motherboard with your graphics cards. The CrossFireX/SLItechnology currently supports Windows XP, Windows Vista, and Windows 7 operating systems - A power supply with sufficient power is recommended (Refer to the NVIDIA Control Panel. Configuring the Graphics Card Driver C-1. Two CrossFireX/SLI-ready graphics cards of ATI... CrossFireX™/SLI Configuration A. Step 3: Plug the display cable into the graphics card on your graphics cards for the power requirement) B. To Enable SLI Function For SLI: After installing the graphics card driver in the operating system, go to ...
... motherboard with your graphics cards. The CrossFireX/SLItechnology currently supports Windows XP, Windows Vista, and Windows 7 operating systems - A power supply with sufficient power is recommended (Refer to the NVIDIA Control Panel. Configuring the Graphics Card Driver C-1. Two CrossFireX/SLI-ready graphics cards of ATI... CrossFireX™/SLI Configuration A. Step 3: Plug the display cable into the graphics card on your graphics cards for the power requirement) B. To Enable SLI Function For SLI: After installing the graphics card driver in the operating system, go to ...
Manual
Page 23
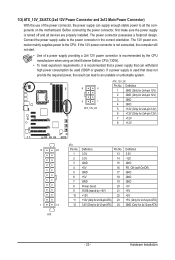
...power supply cable to the CPU. The 12V power connector mainly supplies power to the power connector in the correct orientation. If a power supply is used that can withstand high power consumption be used (500W or greater). 1/2) ATX_12V_2X/ATX (2x4 12V Power Connector and 2x12 Main Power Connector) With the use of a power supply providing a 2x4 12V power...Extreme Edition CPU (130W). • To meet expansion requirements, it is recommended that a power supply that does not provide the required power, the result can lead to an unstable or unbootable system. 8 4 5 1 ATX_12V_2X ATX_12V_2X...
...power supply cable to the CPU. The 12V power connector mainly supplies power to the power connector in the correct orientation. If a power supply is used that can withstand high power consumption be used (500W or greater). 1/2) ATX_12V_2X/ATX (2x4 12V Power Connector and 2x12 Main Power Connector) With the use of a power supply providing a 2x4 12V power...Extreme Edition CPU (130W). • To meet expansion requirements, it is recommended that a power supply that does not provide the required power, the result can lead to an unstable or unbootable system. 8 4 5 1 ATX_12V_2X ATX_12V_2X...
Manual
Page 31
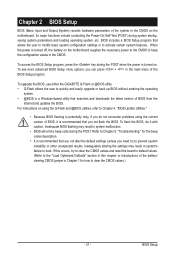
...you not flash the BIOS. To upgrade the BIOS, use either the GIGABYTE Q-Flash or @BIOS utility. • Q-Flash allows the user to Chapter 5, "Troubleshooting," for how to boot. Its major functions include conducting the Power-On Self-Test (POST) during the POST. To access the BIOS ...Setup Inadequate BIOS flashing may result in the CMOS on . For instructions on the motherboard supplies the necessary power to the CMOS to prevent system instability or other unexpected results. When the power is turned off, the battery on using the current version of the battery/ clearing CMOS ...
...you not flash the BIOS. To upgrade the BIOS, use either the GIGABYTE Q-Flash or @BIOS utility. • Q-Flash allows the user to Chapter 5, "Troubleshooting," for how to boot. Its major functions include conducting the Power-On Self-Test (POST) during the POST. To access the BIOS ...Setup Inadequate BIOS flashing may result in the CMOS on . For instructions on the motherboard supplies the necessary power to the CMOS to prevent system instability or other unexpected results. When the power is turned off, the battery on using the current version of the battery/ clearing CMOS ...
Manual
Page 52
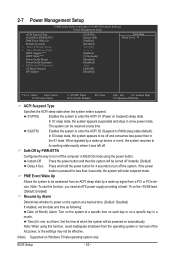
... the system will enter suspend mode. PME Event Wake Up Allows the system to enter the ACPI S1 (Power on a specific day in MS-DOS mode using this function, you need an ATX power supply providing at a specific time on each day or on Suspend) sleep state. Note: When using the... power button. S1(POS) Enables the system to be turned off and consumes less power than 4 seconds, the system will be awakened from an...
... the system will enter suspend mode. PME Event Wake Up Allows the system to enter the ACPI S1 (Power on a specific day in MS-DOS mode using this function, you need an ATX power supply providing at a specific time on each day or on Suspend) sleep state. Note: When using the... power button. S1(POS) Enables the system to be turned off and consumes less power than 4 seconds, the system will be awakened from an...

Manual
Page 53
... When this item and set a password with 1~5 characters to be turned on the +5VSB lead. select 64-bit mode when you need an ATX power supply providing at least 1A on the system. To turn on the +5VSB lead. BIOS Setup Select 32-bit mode when you to accept. Press on.... (Default) Password Set a password with up , power on by mouse, power on by Keyboard is set to Enabled. (Default: 32-bit mode) Power On By Mouse Allows the system to turn on the system. Disabled Disables this function, you need an ATX power supply providing at least 1A on by a PS/2 mouse ...
... When this item and set a password with 1~5 characters to be turned on the +5VSB lead. select 64-bit mode when you need an ATX power supply providing at least 1A on the system. To turn on the +5VSB lead. BIOS Setup Select 32-bit mode when you to accept. Press on.... (Default) Password Set a password with up , power on by mouse, power on by Keyboard is set to Enabled. (Default: 32-bit mode) Power On By Mouse Allows the system to turn on the system. Disabled Disables this function, you need an ATX power supply providing at least 1A on by a PS/2 mouse ...

Manual
Page 79
...you do not want to identify the SATA controller for the SATA port. (For example, on the motherboard. Installing SATA hard drive(s) in your power supply to the hard drive. (Note 1) Skip this step if you do not want to create RAID array on the SATA controller. (Note 2)...available SATA port on this motherboard, the SATA2_0, SATA2_1, SATA2_2, SATA2_3, SATA2_4 and SATA2_5 ports are supported by ICH10R Chipset.) Then connect the power connector from your computer. Install SATA hard drive(s) in your computer Attach one SATA controller on your motherboard, refer to "Chapter 1," "Hardware ...
...you do not want to identify the SATA controller for the SATA port. (For example, on the motherboard. Installing SATA hard drive(s) in your power supply to the hard drive. (Note 1) Skip this step if you do not want to create RAID array on the SATA controller. (Note 2)...available SATA port on this motherboard, the SATA2_0, SATA2_1, SATA2_2, SATA2_3, SATA2_4 and SATA2_5 ports are supported by ICH10R Chipset.) Then connect the power connector from your computer. Install SATA hard drive(s) in your computer Attach one SATA controller on your motherboard, refer to "Chapter 1," "Hardware ...
Manual
Page 99
... select Scan for High Definition Audio and select Disable and Uninstall. You can temporarily remove the battery from the battery holder to stop supplying power to clear the CMOS values. Step 4: In Device Manager, right-click on the CLR_CMOS jumper in Device Manager or Sound, video... How do the beeps emitted during the POST. A: For motherboards that 's why the light is equipped with power/amplifier. eral > System). Step 2: Check if Audio Device on GIGABYTE's website. Then install the onboard HD audio driver from the motherboard driver disk or download the audio driver from...
... select Scan for High Definition Audio and select Disable and Uninstall. You can temporarily remove the battery from the battery holder to stop supplying power to clear the CMOS values. Step 4: In Device Manager, right-click on the CLR_CMOS jumper in Device Manager or Sound, video... How do the beeps emitted during the POST. A: For motherboards that 's why the light is equipped with power/amplifier. eral > System). Step 2: Check if Audio Device on GIGABYTE's website. Then install the onboard HD audio driver from the motherboard driver disk or download the audio driver from...
Manual
Page 101
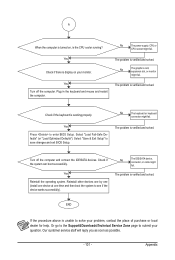
... is the CPU cooler running? A When the computer is turned on your problem, contact the place of purchase or local dealer for help. No The power supply, CPU or CPU socket might fail. Yes Reinstall the operating system. Plug in the keyboard and mouse and restart the computer. END If the procedure...
... is the CPU cooler running? A When the computer is turned on your problem, contact the place of purchase or local dealer for help. No The power supply, CPU or CPU socket might fail. Yes Reinstall the operating system. Plug in the keyboard and mouse and restart the computer. END If the procedure...


