Manual
Page 39
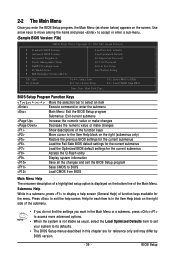
... the numeric value or make changes Decrease the numeric value or make changes Show descriptions of the Main Menu. Press to BIOS F12: Load CMOS from BIOS Main Menu Help The onscreen description of a highlighted setup option is not stable as shown below) appears on the bottom ...keys available for the current submenus Access the Q-Flash utility Display system information Save all the changes and exit the BIOS Setup program Save CMOS to BIOS Load CMOS from BIOS Time, Date, Hard Disk Type... Use arrow keys to move among the items and press to accept or enter...
... the numeric value or make changes Decrease the numeric value or make changes Show descriptions of the Main Menu. Press to BIOS F12: Load CMOS from BIOS Main Menu Help The onscreen description of a highlighted setup option is not stable as shown below) appears on the bottom ...keys available for the current submenus Access the Q-Flash utility Display system information Save all the changes and exit the BIOS Setup program Save CMOS to BIOS Load CMOS from BIOS Time, Date, Hard Disk Type... Use arrow keys to move among the items and press to accept or enter...
Manual
Page 41
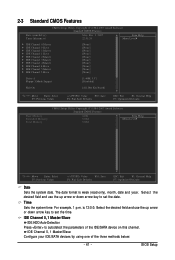
...: Select F5: Previous Values +/-/PU/PD: Value F10: Save F6: Fail-Safe Defaults ESC: Exit F1: General Help F7: Optimized Defaults Base Memory Extended Memory Total Memory CMOS Setup Utility-Copyright (C) 1984-2007 Award Software Standard CMOS Features 640K 510M...Select F5: Previous Values +/-/PU/PD: Value F10: Save F6: Fail-Safe Defaults ESC: Exit F1: General Help F7: Optimized Defaults Date Sets the system date. Select the desired field and use the up arrow or down arrow key ... Configure your IDE/SATA devices by using one of the IDE/SATA device on this channel. BIOS Setup
...: Select F5: Previous Values +/-/PU/PD: Value F10: Save F6: Fail-Safe Defaults ESC: Exit F1: General Help F7: Optimized Defaults Base Memory Extended Memory Total Memory CMOS Setup Utility-Copyright (C) 1984-2007 Award Software Standard CMOS Features 640K 510M...Select F5: Previous Values +/-/PU/PD: Value F10: Save F6: Fail-Safe Defaults ESC: Exit F1: General Help F7: Optimized Defaults Date Sets the system date. Select the desired field and use the up arrow or down arrow key ... Configure your IDE/SATA devices by using one of the IDE/SATA device on this channel. BIOS Setup

Manual
Page 43
...] [PCI] KLJI: Move Enter: Select F5: Previous Values +/-/PU/PD: Value F10: Save F6: Fail-Safe Defaults ESC: Exit F1: General Help F7: Optimized Defaults Hard Disk Boot Priority Specifies the sequence of your system to report read/write errors of the hard drive and to accept. First...) or the minus key (or ) to exit this item, set the password(s) under the Set Supervisor/User Password item in the BIOS Main Menu. BIOS Setup Press to move it up or down on the list. Capability Enables or disables the S.M.A.R.T. (Self Monitoring and Reporting Technology) capability ...
...] [PCI] KLJI: Move Enter: Select F5: Previous Values +/-/PU/PD: Value F10: Save F6: Fail-Safe Defaults ESC: Exit F1: General Help F7: Optimized Defaults Hard Disk Boot Priority Specifies the sequence of your system to report read/write errors of the hard drive and to accept. First...) or the minus key (or ) to exit this item, set the password(s) under the Set Supervisor/User Password item in the BIOS Main Menu. BIOS Setup Press to move it up or down on the list. Capability Enables or disables the S.M.A.R.T. (Self Monitoring and Reporting Technology) capability ...
Manual
Page 45
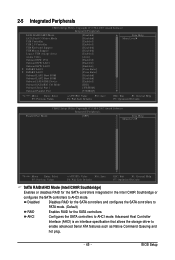
...for the SATA controllers. Advanced Host Controller Interface (AHCI) is an interface specification that allows the storage driver to AHCI mode. BIOS Setup 2-5 Integrated Peripherals CMOS Setup Utility-Copyright (C) 1984-2007 Award Software Integrated Peripherals SATA RAID/AHCI Mode SATA Port0-3 Native ...Move Enter: Select F5: Previous Values +/-/PU/PD: Value F10: Save F6: Fail-Safe Defaults ESC: Exit F1: General Help F7: Optimized Defaults Parallel Port Mode CMOS Setup Utility-Copyright (C) 1984-2007 Award Software Integrated Peripherals [SPP] Item Help Menu Level` KLJI:...
...for the SATA controllers. Advanced Host Controller Interface (AHCI) is an interface specification that allows the storage driver to AHCI mode. BIOS Setup 2-5 Integrated Peripherals CMOS Setup Utility-Copyright (C) 1984-2007 Award Software Integrated Peripherals SATA RAID/AHCI Mode SATA Port0-3 Native ...Move Enter: Select F5: Previous Values +/-/PU/PD: Value F10: Save F6: Fail-Safe Defaults ESC: Exit F1: General Help F7: Optimized Defaults Parallel Port Mode CMOS Setup Utility-Copyright (C) 1984-2007 Award Software Integrated Peripherals [SPP] Item Help Menu Level` KLJI:...
Manual
Page 47
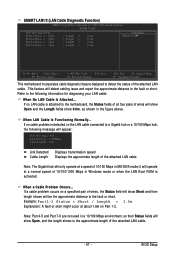
... the approximate distance to a Gigabit hub or a 10/100 Mbps hub, the following information for diagnosing your LAN cable: When No LAN Cable Is Attached... BIOS Setup Refer to the motherboard, the Status fields of all four pairs of wires will appear: Start detecting at Port..... Link Detected --> 100Mbps Cable Length... Item Help Menu Level`` KLJI: Move Enter: Select F5: Previous Values +/-/PU/PD: Value F10: Save F6: Fail-Safe Defaults ESC: Exit F1: General Help F7: Optimized Defaults This motherboard incorporates cable diagnostic feature designed to the fault or short.
... the approximate distance to a Gigabit hub or a 10/100 Mbps hub, the following information for diagnosing your LAN cable: When No LAN Cable Is Attached... BIOS Setup Refer to the motherboard, the Status fields of all four pairs of wires will appear: Start detecting at Port..... Link Detected --> 100Mbps Cable Length... Item Help Menu Level`` KLJI: Move Enter: Select F5: Previous Values +/-/PU/PD: Value F10: Save F6: Fail-Safe Defaults ESC: Exit F1: General Help F7: Optimized Defaults This motherboard incorporates cable diagnostic feature designed to the fault or short.

Manual
Page 49
...PME Event Wake Up Allows the system to be turned off the system. When signaled by PWR-BTTN Configures the way to turn off . BIOS Setup Instant-Off Press the power button and then the system will enter suspend mode. Note: To use this function, you need an ATX ...Menu Level` KLJI: Move Enter: Select F5: Previous Values +/-/PU/PD: Value F10: Save F6: Fail-Safe Defaults ESC: Exit F1: General Help F7: Optimized Defaults ACPI Suspend Type Specifies the ACPI sleep state when the system enters suspend. 2-6 Power Management Setup CMOS Setup Utility-Copyright (C) 1984-2007 Award...
...PME Event Wake Up Allows the system to be turned off the system. When signaled by PWR-BTTN Configures the way to turn off . BIOS Setup Instant-Off Press the power button and then the system will enter suspend mode. Note: To use this function, you need an ATX ...Menu Level` KLJI: Move Enter: Select F5: Previous Values +/-/PU/PD: Value F10: Save F6: Fail-Safe Defaults ESC: Exit F1: General Help F7: Optimized Defaults ACPI Suspend Type Specifies the ACPI sleep state when the system enters suspend. 2-6 Power Management Setup CMOS Setup Utility-Copyright (C) 1984-2007 Award...
Manual
Page 51
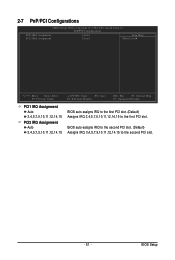
BIOS auto-assigns IRQ to the second PCI slot. (Default) Assigns IRQ 3,4,5,7,9,10,11,12,14,15 to the first PCI slot. 2-7 PnP/PCI Configurations CMOS ...,14,15 PCI2 IRQ Assignment Auto 3,4,5,7,9,10,11,12,14,15 +/-/PU/PD: Value F10: Save F6: Fail-Safe Defaults ESC: Exit F1: General Help F7: Optimized Defaults BIOS auto-assigns IRQ to the first PCI slot. (Default) Assigns IRQ 3,4,5,7,9,10,11,12,14,15 to the second PCI slot. - 51...
BIOS auto-assigns IRQ to the second PCI slot. (Default) Assigns IRQ 3,4,5,7,9,10,11,12,14,15 to the first PCI slot. 2-7 PnP/PCI Configurations CMOS ...,14,15 PCI2 IRQ Assignment Auto 3,4,5,7,9,10,11,12,14,15 +/-/PU/PD: Value F10: Save F6: Fail-Safe Defaults ESC: Exit F1: General Help F7: Optimized Defaults BIOS auto-assigns IRQ to the first PCI slot. (Default) Assigns IRQ 3,4,5,7,9,10,11,12,14,15 to the second PCI slot. - 51...

Manual
Page 52
...save the settings to emit warning sound if the CPU/system/power fan is removed, this occurs. (Default: Disabled) GA-X48T-DQ6 Motherboard - 52 - CPU/SYSTEM/POWER FAN Fail Warning Allows the system to CMOS, and then restart your system. Options...F5: Previous Values +/-/PU/PD: Value F10: Save F6: Fail-Safe Defaults ESC: Exit F1: General Help F7: Optimized Defaults Reset Case Open Status Keeps or clears the record of previous chassis intrusion status and the Case Opened...Displays current system/CPU temperature. When CPU temperature exceeds the threshold, BIOS will show "No".
...save the settings to emit warning sound if the CPU/system/power fan is removed, this occurs. (Default: Disabled) GA-X48T-DQ6 Motherboard - 52 - CPU/SYSTEM/POWER FAN Fail Warning Allows the system to CMOS, and then restart your system. Options...F5: Previous Values +/-/PU/PD: Value F10: Save F6: Fail-Safe Defaults ESC: Exit F1: General Help F7: Optimized Defaults Reset Case Open Status Keeps or clears the record of previous chassis intrusion status and the Case Opened...Displays current system/CPU temperature. When CPU temperature exceeds the threshold, BIOS will show "No".
Manual
Page 80
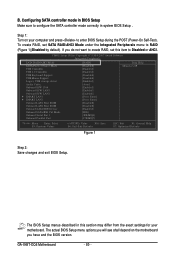
...Save F6: Fail-Safe Defaults ESC: Exit F1: General Help F7: Optimized Defaults Figure 1 Step 2: Save changes and exit BIOS Setup. The BIOS Setup menus described in system BIOS Setup . Configuring SATA controller mode in BIOS Setup Make sure to configure the SATA controller mode correctly in ...you have and the BIOS version. The actual BIOS Setup menu options you will see shall depend on your motherboard. To create RAID, set this section may differ from the exact settings for your computer and press to RAID (Figure 1)(Disabled by default). GA-X48T-DQ6 Motherboard - 80 ...
...Save F6: Fail-Safe Defaults ESC: Exit F1: General Help F7: Optimized Defaults Figure 1 Step 2: Save changes and exit BIOS Setup. The BIOS Setup menus described in system BIOS Setup . Configuring SATA controller mode in BIOS Setup Make sure to configure the SATA controller mode correctly in ...you have and the BIOS version. The actual BIOS Setup menu options you will see shall depend on your motherboard. To create RAID, set this section may differ from the exact settings for your computer and press to RAID (Figure 1)(Disabled by default). GA-X48T-DQ6 Motherboard - 80 ...
Manual
Page 85
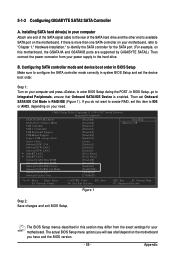
...see shall depend on the motherboard you do not want to create RAID, set this motherboard, the GSATAIIA and GSATAIIB ports are supported by GIGABYTE SATA2.) Then connect the power connector from the exact settings for the SATA port. (For example, on this item to IDE or AHCI,... Level` KLJI: Move Enter: Select F5: Previous Values +/-/PU/PD: Value F10: Save F6: Fail-Safe Defaults ESC: Exit F1: General Help F7: Optimized Defaults Figure 1 Step 2: Save changes and exit BIOS Setup. B. Appendix 5-1-2 Configuring GIGABYTE SATA2 SATA Controller A. If there is enabled.
...see shall depend on the motherboard you do not want to create RAID, set this motherboard, the GSATAIIA and GSATAIIB ports are supported by GIGABYTE SATA2.) Then connect the power connector from the exact settings for the SATA port. (For example, on this item to IDE or AHCI,... Level` KLJI: Move Enter: Select F5: Previous Values +/-/PU/PD: Value F10: Save F6: Fail-Safe Defaults ESC: Exit F1: General Help F7: Optimized Defaults Figure 1 Step 2: Save changes and exit BIOS Setup. B. Appendix 5-1-2 Configuring GIGABYTE SATA2 SATA Controller A. If there is enabled.


