Manual
Page 5
Chapter 3 Drivers Installation 45 3-1 Installing Chipset Drivers 45 3-2 SoftwareApplications 46 3-3 Driver CD Information 46 3-4 Hardware Information 47 3-5 Contact Us ...47 Chapter 4 Appendix ...49 4-1 Unique Software Utilities 49 4-1-1 EasyTune 5 Introduction 49 4-1-2 Xpress Recovery2 Introduction 50 4-1-3 Flash BIOS Method Introduction 52 4-1-4 Configuring SATA Hard Drive(s 56 4-1-5 2- / 4- / 5.1- / 7.1- Channel Audio Introduction 67 4-2 Troubleshooting 72 4-2-1 Frequently Asked Questions 72 4-2-2 Troubleshooting Procedure 73 4-3 Windows Vista ReadyBoost 75 - 5 -
Chapter 3 Drivers Installation 45 3-1 Installing Chipset Drivers 45 3-2 SoftwareApplications 46 3-3 Driver CD Information 46 3-4 Hardware Information 47 3-5 Contact Us ...47 Chapter 4 Appendix ...49 4-1 Unique Software Utilities 49 4-1-1 EasyTune 5 Introduction 49 4-1-2 Xpress Recovery2 Introduction 50 4-1-3 Flash BIOS Method Introduction 52 4-1-4 Configuring SATA Hard Drive(s 56 4-1-5 2- / 4- / 5.1- / 7.1- Channel Audio Introduction 67 4-2 Troubleshooting 72 4-2-1 Frequently Asked Questions 72 4-2-2 Troubleshooting Procedure 73 4-3 Windows Vista ReadyBoost 75 - 5 -
Manual
Page 6
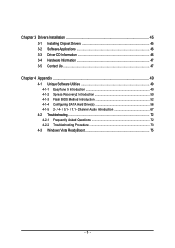
... (Part No. 12CF1-1CM001-31/R) S/PDIF in and out cable (Part No. 12CR1-1SPINO-11/R) 5.1/7.1 surround cable (Part No. 12CF1-1AU004-01R) - 6 - Box Contents GA-VM900M motherboard Motherboard driver disk User's Manual Intel® LGA775 CPU Installation Guide One IDE cable and one floppy disk drive cable One SATA 3Gb/s cable I/O Shield The...
... (Part No. 12CF1-1CM001-31/R) S/PDIF in and out cable (Part No. 12CR1-1SPINO-11/R) 5.1/7.1 surround cable (Part No. 12CF1-1AU004-01R) - 6 - Box Contents GA-VM900M motherboard Motherboard driver disk User's Manual Intel® LGA775 CPU Installation Guide One IDE cable and one floppy disk drive cable One SATA 3Gb/s cable I/O Shield The...

Manual
Page 15
... Cards Follow the steps below to the chassis back panel with a screw. 5. Secure the card's metal bracket to correctly install your expansion card(s). 7. Install the driver provided with the slot, and press down on the card are completely inserted into the PCI Express x16 slot. English 1-5 Installation of the PCI Express...
... Cards Follow the steps below to the chassis back panel with a screw. 5. Secure the card's metal bracket to correctly install your expansion card(s). 7. Install the driver provided with the slot, and press down on the card are completely inserted into the PCI Express x16 slot. English 1-5 Installation of the PCI Express...

Manual
Page 16
... must be used to connect devices such as a printer, scanner and etc. Refer to the instructions on setting up to this jack. GA-VM900M Motherboard - 16 - Line Out Jack (Green) The default line out jack. English 1-6 I/O Back Panel Introduction PS/2 Keyboard and PS... mouse and the lower port (purple) to install a 5.1/7.1 surround cable (optional) and enable the multi-channel audio feature through the audio driver. The parallel port is not established LAN Port Line In Jack (Blue) The default line in Chapter 4, "Configuring 2/4/5.1/7.1Channel Audio Introduction." ...
... must be used to connect devices such as a printer, scanner and etc. Refer to the instructions on setting up to this jack. GA-VM900M Motherboard - 16 - Line Out Jack (Green) The default line out jack. English 1-6 I/O Back Panel Introduction PS/2 Keyboard and PS... mouse and the lower port (purple) to install a 5.1/7.1 surround cable (optional) and enable the multi-channel audio feature through the audio driver. The parallel port is not established LAN Port Line In Jack (Blue) The default line in Chapter 4, "Configuring 2/4/5.1/7.1Channel Audio Introduction." ...

Manual
Page 22
..., connect the front panel audio module to work or even damage it. To connect an AC'97 front panel audio module to this connector. GA-VM900M Motherboard - 22 - Definition 1 MPD+ 2 MPD- 3 MPD- 10) F_AUDIO (Front Audio Connector) This connector supports either HD (High ...status. Definition 1 MIC 2 GND 3 MIC Power 4 NC 5 Line Out (R) 6 NC 7 NC 8 No Pin 9 Line Out (L) 10 NC By default, the audio driver is on page 71 about the software settings. For optional front panel audio module, please contact your chassis manufacturer. 10 9 HD Audio: Pin No. 1 2 3 4 5 ...
..., connect the front panel audio module to work or even damage it. To connect an AC'97 front panel audio module to this connector. GA-VM900M Motherboard - 22 - Definition 1 MPD+ 2 MPD- 3 MPD- 10) F_AUDIO (Front Audio Connector) This connector supports either HD (High ...status. Definition 1 MIC 2 GND 3 MIC Power 4 NC 5 Line Out (R) 6 NC 7 NC 8 No Pin 9 Line Out (L) 10 NC By default, the audio driver is on page 71 about the software settings. For optional front panel audio module, please contact your chassis manufacturer. 10 9 HD Audio: Pin No. 1 2 3 4 5 ...
Manual
Page 45
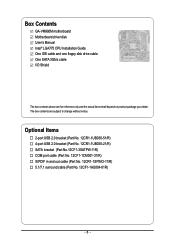
...that are installed, follow the onscreen instructions to install. Drivers Installation Or you wish to install all the drivers that you can install other drivers. • After the drivers are recommended to restart your system automatically during the driver installation. After installing the SP1 (or later), if... a question mark still exists in Universal Serial Bus Controller in the motherboard driver disk. • For USB 2.0 driver support under the Windows XP operating system, please install the Windows XP Service Pack 1 or later. After the...
...that are installed, follow the onscreen instructions to install. Drivers Installation Or you wish to install all the drivers that you can install other drivers. • After the drivers are recommended to restart your system automatically during the driver installation. After installing the SP1 (or later), if... a question mark still exists in Universal Serial Bus Controller in the motherboard driver disk. • For USB 2.0 driver support under the Windows XP operating system, please install the Windows XP Service Pack 1 or later. After the...

Manual
Page 46
English 3-2 Software Applications This page displays all the tools and applications that GIGABYTE develops and some free software. You may press the Install button following an item to install it. 3-3 Driver CD Information This page provides information about the drivers, applications and tools in this driver disk. GA-VM900M Motherboard - 46 -
English 3-2 Software Applications This page displays all the tools and applications that GIGABYTE develops and some free software. You may press the Install button following an item to install it. 3-3 Driver CD Information This page provides information about the drivers, applications and tools in this driver disk. GA-VM900M Motherboard - 46 -

Manual
Page 47
Drivers Installation English 3-4 Hardware Information This page provides information about the hardware devices on this motherboard. 3-5 Contact Us Check the contacts information of the GIGABYTE headquarter in Taiwan and the overseas branch offices on the last page of this manual. - 47 -
Drivers Installation English 3-4 Hardware Information This page provides information about the hardware devices on this motherboard. 3-5 Contact Us Check the contacts information of the GIGABYTE headquarter in Taiwan and the overseas branch offices on the last page of this manual. - 47 -

Manual
Page 50
...the steps above are completed, subsequent access to Xpress Recovery2 can simply press F9 during system power-on PATA and SATA IDE controllers. GA-VM900M Motherboard - 50 - System requirements: 1. VM900M FAm . . . . : BIOS Setup/Q-Flash : XpressRecovery2 : Boot Menu : Qflash 05/10/2007-P4M900-8237S-6A7L8G10C-00 Boot...simply pressing the key during system bootup to back up data on hard disks on . . . Intel x86 platforms 2. Insert the provided driver CD into your hard disk. Boot from CD/DVD: Xpress Recovery2 1. Award Modular BIOS v6.00PG, An Energy Star Ally Copyright (C) ...
...the steps above are completed, subsequent access to Xpress Recovery2 can simply press F9 during system power-on PATA and SATA IDE controllers. GA-VM900M Motherboard - 50 - System requirements: 1. VM900M FAm . . . . : BIOS Setup/Q-Flash : XpressRecovery2 : Boot Menu : Qflash 05/10/2007-P4M900-8237S-6A7L8G10C-00 Boot...simply pressing the key during system bootup to back up data on hard disks on . . . Intel x86 platforms 2. Insert the provided driver CD into your hard disk. Boot from CD/DVD: Xpress Recovery2 1. Award Modular BIOS v6.00PG, An Energy Star Ally Copyright (C) ...

Manual
Page 51
.... 3. For the use of backing up data to correctly identify RAID and SATA IDE mode. SATA IDE channel 2 e. Capable of backing up data from the driver CD before data backup. 2. When using hard disks with the GPL regulations. 4. On a few motherboards based on the hard disk for Xpress Recovery2 to your...
.... 3. For the use of backing up data to correctly identify RAID and SATA IDE mode. SATA IDE channel 2 e. Capable of backing up data from the driver CD before data backup. 2. When using hard disks with the GPL regulations. 4. On a few motherboards based on the hard disk for Xpress Recovery2 to your...

Manual
Page 56
... only one end of the SATA signal cable to the rear of the SATA hard drive and the other end to RAID (IDE by default). GA-VM900M Motherboard - 56 - To create RAID, set the first boot device. English 4-1-4 Configuring SATA Hard Drive(s) To configure SATA hard drive(s), follow the steps... (3) Configure RAID set in your system Attach one hard drive. (b) An empty formatted floppy disk. (Note) (c) Windows Vista/XP/2000 setup disk. (d) Driver CD for setting up RAID array. Then connect the power connector from your power supply to the hard drive. (2) Configuring SATA controller mode and boot...
... only one end of the SATA signal cable to the rear of the SATA hard drive and the other end to RAID (IDE by default). GA-VM900M Motherboard - 56 - To create RAID, set the first boot device. English 4-1-4 Configuring SATA Hard Drive(s) To configure SATA hard drive(s), follow the steps... (3) Configure RAID set in your system Attach one hard drive. (b) An empty formatted floppy disk. (Note) (c) Windows Vista/XP/2000 setup disk. (d) Driver CD for setting up RAID array. Then connect the power connector from your power supply to the hard drive. (2) Configuring SATA controller mode and boot...
Manual
Page 63
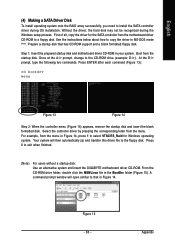
... See the instructions below about how to exit when finished. (Note) For users without a startup disk: Use an alternative system and insert the GIGABYTE motherboard driver CD-ROM. Boot from the menu. Press ENTER after each command (Figure 13): cd bootdrv menu Figure 13 Figure 14 Step 2: When the ...controller menu (Figure 14) appears, remove the startup disk and insert the blank formatted disk. Press 0 to copy the driver in MS-DOS mode . (Note) Prepare a startup disk that in Figure 14, press 1 to select VT8237S_Raid for the SATA controller from the menu ...
... See the instructions below about how to exit when finished. (Note) For users without a startup disk: Use an alternative system and insert the GIGABYTE motherboard driver CD-ROM. Boot from the menu. Press ENTER after each command (Figure 13): cd bootdrv menu Figure 13 Figure 14 Step 2: When the ...controller menu (Figure 14) appears, remove the startup disk and insert the blank formatted disk. Press 0 to copy the driver in MS-DOS mode . (Note) Prepare a startup disk that in Figure 14, press 1 to select VT8237S_Raid for the SATA controller from the menu ...
Manual
Page 64
...from a mass storage device manufacturer, or do not have chosen to manually specify an adapter. S=Specify Additional Device ENTER=Continue F3=Exit Figure 17 GA-VM900M Motherboard - 64 - Currently, Setup will be a few moments of some files being loaded before you see the "Press F6 if you need... in your SATA hard drive with Windows, press ENTER. Figure 16 Step 2: When a screen similar to install a third party SCSI or RAID driver. The following mass storage devices(s) * To specify additional SCSI adapters, CD-ROM drives, or special disk controllers for use with Windows, including those...
...from a mass storage device manufacturer, or do not have chosen to manually specify an adapter. S=Specify Additional Device ENTER=Continue F3=Exit Figure 17 GA-VM900M Motherboard - 64 - Currently, Setup will be a few moments of some files being loaded before you see the "Press F6 if you need... in your SATA hard drive with Windows, press ENTER. Figure 16 Step 2: When a screen similar to install a third party SCSI or RAID driver. The following mass storage devices(s) * To specify additional SCSI adapters, CD-ROM drives, or special disk controllers for use with Windows, including those...

Manual
Page 65
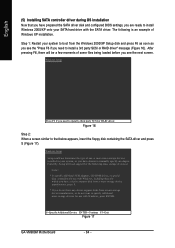
... XP/SRV2003) (Note) and press ENTER. Windows Setup Setup will begin to continue the SATA driver installation from the floppy disk. Appendix English Step 3: If Setup correctly recognizes the driver in about one or some file(s) cannot be found, please check the floppy disk or copy the... support disk from a mass storage device manufacturer, or do not want to Figure 18 below appears, press ENTER to load the SATA driver from the motherboard driver CD. Windows Setup You have any device support disks from a mass storage device manufacturer, press S. * If you want to install Windows...
... XP/SRV2003) (Note) and press ENTER. Windows Setup Setup will begin to continue the SATA driver installation from the floppy disk. Appendix English Step 3: If Setup correctly recognizes the driver in about one or some file(s) cannot be found, please check the floppy disk or copy the... support disk from a mass storage device manufacturer, or do not want to Figure 18 below appears, press ENTER to load the SATA driver from the motherboard driver CD. Windows Setup You have any device support disks from a mass storage device manufacturer, press S. * If you want to install Windows...

Manual
Page 66
.... You can proceed with the Windows 2000/XP installation. To repair a Windows XP installation using Recovery Console, press R. Enter= Continue R=Repair F3=Exit Figure 20 GA-VM900M Motherboard - 66 - To quit Setup without installing Windows XP, press F3. This port of the Setup program prepares Microsoft(R) Windows (R) XP to Setup. English After...
.... You can proceed with the Windows 2000/XP installation. To repair a Windows XP installation using Recovery Console, press R. Enter= Continue R=Repair F3=Exit Figure 20 GA-VM900M Motherboard - 66 - To quit Setup without installing Windows XP, press F3. This port of the Setup program prepares Microsoft(R) Windows (R) XP to Setup. English After...

Manual
Page 67
... comes with a screw. To set up multi-channel surround sound, install an additional 5.1/7.1 surround cable (optional) and enable the feature through the audio driver. To set up multi-channel surround sound, this cable needs to either the default Mic In jack or the Line In jack and configure it... in the audio driver. - 67 - Secure the cable's metal bracket to function as a rear speaker out jack. Line In Center/Subwoofer Speaker Out Line Out (Front Speaker ...
... comes with a screw. To set up multi-channel surround sound, install an additional 5.1/7.1 surround cable (optional) and enable the feature through the audio driver. To set up multi-channel surround sound, this cable needs to either the default Mic In jack or the Line In jack and configure it... in the audio driver. - 67 - Secure the cable's metal bracket to function as a rear speaker out jack. Line In Center/Subwoofer Speaker Out Line Out (Front Speaker ...

Manual
Page 68
... Audio is able to acquire the best sound effect if the stereo output is completed. In the left list, click the 2 Channel button. GA-VM900M Motherboard - 68 - English HD Audio With multiple built-in high quality digital-to-analog converters (DACs) that you use the speaker with amplifier... to handle multiple audio streams (in and out) simultaneously. STEP 1 : After installation of the audio driver, you can, for instance, listen to open the Audio Control Panel. The 2-channel audio setup is applied. Double-click the icon to MP3 music...
... Audio is able to acquire the best sound effect if the stereo output is completed. In the left list, click the 2 Channel button. GA-VM900M Motherboard - 68 - English HD Audio With multiple built-in high quality digital-to-analog converters (DACs) that you use the speaker with amplifier... to handle multiple audio streams (in and out) simultaneously. STEP 1 : After installation of the audio driver, you can, for instance, listen to open the Audio Control Panel. The 2-channel audio setup is applied. Double-click the icon to MP3 music...

Manual
Page 69
... icon to open the Audio Control Panel. In the left list, click the 6 Channel button. Setting Up 5.1-Channel Audio STEP 1 : After installation of the audio driver, you should find a VIA HD Audio Deck icon in your system tray. In the left list, click the 4 Channel button. Double-click the icon to... open the Audio Control Panel. Appendix English Setting Up 4-Channel Audio STEP 1 : After installation of the audio driver, you should find a VIA HD Audio Deck icon in your system tray.
... icon to open the Audio Control Panel. In the left list, click the 6 Channel button. Setting Up 5.1-Channel Audio STEP 1 : After installation of the audio driver, you should find a VIA HD Audio Deck icon in your system tray. In the left list, click the 4 Channel button. Double-click the icon to... open the Audio Control Panel. Appendix English Setting Up 4-Channel Audio STEP 1 : After installation of the audio driver, you should find a VIA HD Audio Deck icon in your system tray.

Manual
Page 70
Double-click the icon to open the Audio Control Panel. STEP 2: In the Audio Control Panel, click the Speaker tab. The 7.1-channel audio setup is completed. In the left list, click the 8 Channel button. GA-VM900M Motherboard - 70 - English Setting Up 7.1-Channel Audio STEP 1 : After installation of the audio driver, you should find a VIA HD Audio Deck icon in your system tray.
Double-click the icon to open the Audio Control Panel. STEP 2: In the Audio Control Panel, click the Speaker tab. The 7.1-channel audio setup is completed. In the left list, click the 8 Channel button. GA-VM900M Motherboard - 70 - English Setting Up 7.1-Channel Audio STEP 1 : After installation of the audio driver, you should find a VIA HD Audio Deck icon in your system tray.


