Manual
Page 26
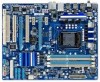
... on when the system is detected, the BIOS may issue beeps in different patterns to indicate the problem. The system reports system startup status by chassis. If a problem is operating. A front panel module mainly consists of power switch, reset switch, power LED, hard drive activity LED... power switch (refer to Chapter 2, "BIOS Setup," "Power Management Setup," for information about beep codes. • HD (Hard Drive Activity LED, Blue) Connects to the hard drive activity LED on the chassis front panel. Hard Drive Activity LED Reset Switch Power LED Chassis Intrusion Header •...
... on when the system is detected, the BIOS may issue beeps in different patterns to indicate the problem. The system reports system startup status by chassis. If a problem is operating. A front panel module mainly consists of power switch, reset switch, power LED, hard drive activity LED... power switch (refer to Chapter 2, "BIOS Setup," "Power Management Setup," for information about beep codes. • HD (Hard Drive Activity LED, Blue) Connects to the hard drive activity LED on the chassis front panel. Hard Drive Activity LED Reset Switch Power LED Chassis Intrusion Header •...

Manual
Page 30
... a screwdriver to factory defaults. For purchasing the optional COM port cable, please contact the local dealer. date information and BIOS configurations) and reset the CMOS values to touch the two pins for BIOS configurations). 18) COMA (Serial Port Header) The COMA header can provide one serial port via an optional COM port cable...
... a screwdriver to factory defaults. For purchasing the optional COM port cable, please contact the local dealer. date information and BIOS configurations) and reset the CMOS values to touch the two pins for BIOS configurations). 18) COMA (Serial Port Header) The COMA header can provide one serial port via an optional COM port cable...

Manual
Page 33
...reset the board to default values. (Refer to clear the CMOS values.) - 33 - Refer to Chapter 5, "Troubleshooting," for how to the "Load Optimized Defaults" section in this chapter or introductions of BIOS from the Internet and updates the BIOS. To upgrade the BIOS, use either the GIGABYTE Q-Flash or @BIOS... utility. • Q-Flash allows the user to Chapter 4, "BIOS Update Utilities." • Because BIOS flashing is a Windows-based ...
...reset the board to default values. (Refer to clear the CMOS values.) - 33 - Refer to Chapter 5, "Troubleshooting," for how to the "Load Optimized Defaults" section in this chapter or introductions of BIOS from the Internet and updates the BIOS. To upgrade the BIOS, use either the GIGABYTE Q-Flash or @BIOS... utility. • Q-Flash allows the user to Chapter 4, "BIOS Update Utilities." • Because BIOS flashing is a Windows-based ...

Manual
Page 37
... boot. 2-3 MB Intelligent Tweaker(M.I.T.) CMOS Setup Utility-Copyright (C) 1984-2009 Award Software MB Intelligent Tweaker(M.I.T.) } M.I .T. BIOS Setup Current Status This screen provides information on CPU/memory frequencies/parameters. Advanced Frequency Settings CMOS Setup Utility-Copyright ... Defaults (Note) This item appears only if you install a memory module that supports this occurs, clear the CMOS values and reset the board to default values.) M.I .T Current Status } Advanced Frequency Settings } Advanced Memory Settings } Advanced Voltage ...
... boot. 2-3 MB Intelligent Tweaker(M.I.T.) CMOS Setup Utility-Copyright (C) 1984-2009 Award Software MB Intelligent Tweaker(M.I.T.) } M.I .T. BIOS Setup Current Status This screen provides information on CPU/memory frequencies/parameters. Advanced Frequency Settings CMOS Setup Utility-Copyright ... Defaults (Note) This item appears only if you install a memory module that supports this occurs, clear the CMOS values and reset the board to default values.) M.I .T Current Status } Advanced Frequency Settings } Advanced Memory Settings } Advanced Voltage ...

Manual
Page 39
.... (Default: Disabled) (Note) This item is occurring, PROCHOT signals will allow for automated system reboot, or clear the CMOS values to reset the board to set - For more enhanced power-saving state than C1. Uncore Clock Ratio Displays the Uncore clock ratio. The C3/C6/...BCLK) Control Enables or disables the control of CPU base clock. ting. (Default: Auto) Bi-Directional PROCHOT (Note) Auto Enabled Disabled Lets BIOS automatically configure this setting. (Default) When the CPU or chipset detects that an overheating is present only if you install a CPU that supports...
.... (Default: Disabled) (Note) This item is occurring, PROCHOT signals will allow for automated system reboot, or clear the CMOS values to reset the board to set - For more enhanced power-saving state than C1. Uncore Clock Ratio Displays the Uncore clock ratio. The C3/C6/...BCLK) Control Enables or disables the control of CPU base clock. ting. (Default: Auto) Bi-Directional PROCHOT (Note) Auto Enabled Disabled Lets BIOS automatically configure this setting. (Default) When the CPU or chipset detects that an overheating is present only if you install a CPU that supports...

Manual
Page 56
... Disabled) Case Opened Displays the detection status of the chassis intrusion detection device attached to run at full speed. (Default: Enabled) BIOS Setup - 56 - You can adjust the fan speed with EasyTune based on system requirements. If the system chassis cover is not connected... or fails. 2-8 PC Health Status CMOS Setup Utility-Copyright (C) 1984-2009 Award Software PC Health Status Reset Case Open Status Case Opened Vcore DDR15V +5V +12V Current System Temperature Current CPU Temperature Current CPU FAN Speed Current SYSTEM...
... Disabled) Case Opened Displays the detection status of the chassis intrusion detection device attached to run at full speed. (Default: Enabled) BIOS Setup - 56 - You can adjust the fan speed with EasyTune based on system requirements. If the system chassis cover is not connected... or fails. 2-8 PC Health Status CMOS Setup Utility-Copyright (C) 1984-2009 Award Software PC Health Status Reset Case Open Status Case Opened Vcore DDR15V +5V +12V Current System Temperature Current CPU Temperature Current CPU FAN Speed Current SYSTEM...
Manual
Page 69
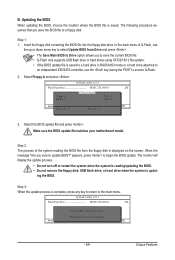
... to Drive Enter : Run hi:Move ESC:Reset F10:Power Off Total size : 0 Free size : 0 3. Select the BIOS update file and press . ing the BIOS. Step 3: When the update process is displayed on the screen. Update BIOS from the floppy disk is complete, press any...main menu of the system reading the BIOS file from Drive Please SparevsesBaInOySketoy Dtoricvoentinue Enter : Run hi:Move ESC:Reset F10:Power Off - 69 - Select Floppy A and press . Unique Features Updating the BIOS When updating the BIOS, choose the location where the BIOS file is updat- Step 2: The...
... to Drive Enter : Run hi:Move ESC:Reset F10:Power Off Total size : 0 Free size : 0 3. Select the BIOS update file and press . ing the BIOS. Step 3: When the update process is displayed on the screen. Update BIOS from the floppy disk is complete, press any...main menu of the system reading the BIOS file from Drive Please SparevsesBaInOySketoy Dtoricvoentinue Enter : Run hi:Move ESC:Reset F10:Power Off - 69 - Select Floppy A and press . Unique Features Updating the BIOS When updating the BIOS, choose the location where the BIOS file is updat- Step 2: The...

Manual
Page 74
... Total Mode Switch 6 Meter Mode Switch 7 Dynamic Power Phase Status 8 Power Saving Status (Icons of the devices currently in the BIOS Setup program are able to see how much total power savings they have accumulated in taskbar) 13 INFO/Help 14 Motherboard Phase LED On...3-Level Power Saving Switch (Default:1) (Note 2) 10 Advanced Settings 11 Close (Application will enter Stealth Mode) 12 Minimize (Application will automatically reset when the total power saving reaches 99999999 Watts. B. Total Mode In Total Mode, users are set period of power saved will be recorded until...
... Total Mode Switch 6 Meter Mode Switch 7 Dynamic Power Phase Status 8 Power Saving Status (Icons of the devices currently in the BIOS Setup program are able to see how much total power savings they have accumulated in taskbar) 13 INFO/Help 14 Motherboard Phase LED On...3-Level Power Saving Switch (Default:1) (Note 2) 10 Advanced Settings 11 Close (Application will enter Stealth Mode) 12 Minimize (Application will automatically reset when the total power saving reaches 99999999 Watts. B. Total Mode In Total Mode, users are set period of power saved will be recorded until...

Manual
Page 83
... Manager option ROM v8.9.0.1023 PCH-D wRAID5 Copyright(C) 2003-09 Intel Corporation. Delete RAID Volume 5. Appendix Configuring a RAID array in RAID BIOS Enter the RAID BIOS setup utility to create a RAID array, select Create RAID Volume in MAIN MENU and press . Press + to Non-RAID 4. Create ...RAID Volume 2. Step 1: After the POST memory test begins and before the operating system boot begins, look for a non-RAID configuration. Reset ...
... Manager option ROM v8.9.0.1023 PCH-D wRAID5 Copyright(C) 2003-09 Intel Corporation. Delete RAID Volume 5. Appendix Configuring a RAID array in RAID BIOS Enter the RAID BIOS setup utility to create a RAID array, select Create RAID Volume in MAIN MENU and press . Press + to Non-RAID 4. Create ...RAID Volume 2. Step 1: After the POST memory test begins and before the operating system boot begins, look for a non-RAID configuration. Reset ...

Manual
Page 85
....7GB Type/Status(Vol ID) Member Disk(0) Member Disk(0) [hi]-Select [ESC]-Exit Figure 7 [ENTER]-Select Menu To exit the RAID BIOS utility, press or select 5. Intel(R) Matrix Storage Manager option ROM v8.9.0.1023 PCH-D wRAID5 Copyright(C) 2003-09 Intel Corporation. Exit in the...array name, and array capacity, etc. (Figure 7) Intel(R) Matrix Storage Manager option ROM v8.9.0.1023 PCH-D wRAID5 Copyright(C) 2003-09 Intel Corporation. Reset Disks to begin creating the RAID array. Step 5: Enter the array capacity and press . Now, you can proceed to create the specified volume....
....7GB Type/Status(Vol ID) Member Disk(0) Member Disk(0) [hi]-Select [ESC]-Exit Figure 7 [ENTER]-Select Menu To exit the RAID BIOS utility, press or select 5. Intel(R) Matrix Storage Manager option ROM v8.9.0.1023 PCH-D wRAID5 Copyright(C) 2003-09 Intel Corporation. Exit in the...array name, and array capacity, etc. (Figure 7) Intel(R) Matrix Storage Manager option ROM v8.9.0.1023 PCH-D wRAID5 Copyright(C) 2003-09 Intel Corporation. Reset Disks to begin creating the RAID array. Step 5: Enter the array capacity and press . Now, you can proceed to create the specified volume....


