
Manual
Page 1
... B. Or you 'll not be recognized during the Windows setup process. (For more details, refer to Chapter 5, "Installing the SATA RAID/AHCI Driver and Operating System." ) Step 3: Install the motherboard drivers and the X.H.D utiltiy After installing the operating system, insert the motherboard driver disk.... For a RAID 0 array that before you have to load the SATA controller driver first. Using GIGABYTE eXtreme Hard Drive (X.H.D) Instructions:(Note 2) Before launching X.H.D, make sure the new drive is greater than the RAID-ready system drive. (...
... B. Or you 'll not be recognized during the Windows setup process. (For more details, refer to Chapter 5, "Installing the SATA RAID/AHCI Driver and Operating System." ) Step 3: Install the motherboard drivers and the X.H.D utiltiy After installing the operating system, insert the motherboard driver disk.... For a RAID 0 array that before you have to load the SATA controller driver first. Using GIGABYTE eXtreme Hard Drive (X.H.D) Instructions:(Note 2) Before launching X.H.D, make sure the new drive is greater than the RAID-ready system drive. (...

Manual
Page 5
......81 5-1 Configuring SATA Hard Drive(s 81 5-1-1 Configuring Intel P55 SATA Controllers 81 5-1-2 Configuring Marvell 9128 SATA Controller 89 5-1-3 Making a SATA RAID/AHCI Driver Diskette 94 5-1-4 Installing the SATA RAID/AHCI Driver and Operating System 95 5-2 Configuring Audio Input and Output 104 5-2-1 Configuring 2/4/5.1/7.1-Channel Audio 104 5-2-2 Configuring S/PDIF In/Out 106 5-2-3 Configuring Microphone...
......81 5-1 Configuring SATA Hard Drive(s 81 5-1-1 Configuring Intel P55 SATA Controllers 81 5-1-2 Configuring Marvell 9128 SATA Controller 89 5-1-3 Making a SATA RAID/AHCI Driver Diskette 94 5-1-4 Installing the SATA RAID/AHCI Driver and Operating System 95 5-2 Configuring Audio Input and Output 104 5-2-1 Configuring 2/4/5.1/7.1-Channel Audio 104 5-2-2 Configuring S/PDIF In/Out 106 5-2-3 Configuring Microphone...
Manual
Page 51
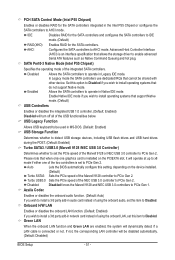
... Turbo USB3.0 Sets the PCIe speed of the integrated SATA controllers. Disabled Disabled forces the Marvell 9128 and NEC USB 3.0 controllers to AHCI mode. If not, the corresponding LAN controller will dynamically detect if a LAN cable is an interface specification that cannot be disabled automatically. ...LAN When the onboard LAN function and Green LAN are enabled, the system will be shared with other device. Advanced Host Controller Interface (AHCI) is connected or not. Azalia Codec Enables or disables the onboard audio function. (Default: Auto) If you wish to install a...
... Turbo USB3.0 Sets the PCIe speed of the integrated SATA controllers. Disabled Disabled forces the Marvell 9128 and NEC USB 3.0 controllers to AHCI mode. If not, the corresponding LAN controller will dynamically detect if a LAN cable is an interface specification that cannot be disabled automatically. ...LAN When the onboard LAN function and Green LAN are enabled, the system will be shared with other device. Advanced Host Controller Interface (AHCI) is connected or not. Azalia Codec Enables or disables the onboard audio function. (Default: Auto) If you wish to install a...
Manual
Page 53
.... Parallel Port Mode Selects an operating mode for the Marvell 9128 SATA controller. Advanced Host Controller Interface (AHCI) is an interface specification that allows the storage driver to AHCI mode. Onboard LAN Boot ROM Allows you to decide whether to activate the boot ROM integrated with the ... ATA features such as Native Command Queuing and hot plug. IDE Configures the SATA controller to IDE mode. (Default) AHCI Configures the SATA controller to Chapter 5, "Configuring SATA Hard Drive(s)," for instructions on configurin a RAID array. ing interrupt. Refer to...
.... Parallel Port Mode Selects an operating mode for the Marvell 9128 SATA controller. Advanced Host Controller Interface (AHCI) is an interface specification that allows the storage driver to AHCI mode. Onboard LAN Boot ROM Allows you to decide whether to activate the boot ROM integrated with the ... ATA features such as Native Command Queuing and hot plug. IDE Configures the SATA controller to IDE mode. (Default) AHCI Configures the SATA controller to Chapter 5, "Configuring SATA Hard Drive(s)," for instructions on configurin a RAID array. ing interrupt. Refer to...
Manual
Page 65
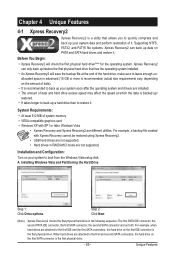
... Windows Vista and Partitioning the Hard Drive Step 1: Click Drive options. Step 2: Click New. (Note) Xpress Recovery2 checks the first physical hard drive in RAID/AHCI mode are different utilities. Installation and Configuration: Turn on your system soon after the operating system and drivers are attached to boot from the Windows...
... Windows Vista and Partitioning the Hard Drive Step 1: Click Drive options. Step 2: Click New. (Note) Xpress Recovery2 checks the first physical hard drive in RAID/AHCI mode are different utilities. Installation and Configuration: Turn on your system soon after the operating system and drivers are attached to boot from the Windows...

Manual
Page 68
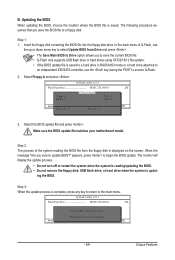
... RAID/AHCI mode or a hard drive attached to an independent IDE/SATA controller, use the key during the POST to update the system BIOS while in the Windows environment. @BIOS will take over on the main BIOS. Before You Begin 1. P55A-UD3 D4c .... . . . : BIOS Setup : XpressRecovery2 : Boot Menu : Qflash 10/08/2009-P55-7A89TG04C-00 Because BIOS flashing is Q-Flash™? Motherboards that matches your floppy disk, USB flash drive, or hard drive. What is potentially risky, please do it with the Q-Flash Utility A. Embedded in system malfunction. From GIGABYTE...
... RAID/AHCI mode or a hard drive attached to an independent IDE/SATA controller, use the key during the POST to update the system BIOS while in the Windows environment. @BIOS will take over on the main BIOS. Before You Begin 1. P55A-UD3 D4c .... . . . : BIOS Setup : XpressRecovery2 : Boot Menu : Qflash 10/08/2009-P55-7A89TG04C-00 Because BIOS flashing is Q-Flash™? Motherboards that matches your floppy disk, USB flash drive, or hard drive. What is potentially risky, please do it with the Q-Flash Utility A. Embedded in system malfunction. From GIGABYTE...
Manual
Page 69
... USB flash drive or hard drives using FAT32/16/12 file system. • If the BIOS update file is saved to a hard drive in RAID/AHCI mode or a hard drive attached to an independent IDE/SATA controller, use the up or down arrow key to select Update BIOS from Drive Save...
... USB flash drive or hard drives using FAT32/16/12 file system. • If the BIOS update file is saved to a hard drive in RAID/AHCI mode or a hard drive attached to an independent IDE/SATA controller, use the up or down arrow key to select Update BIOS from Drive Save...

Manual
Page 80
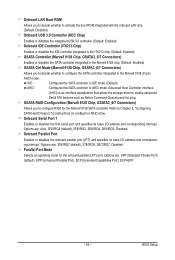
...array, you'll not be recognized during the Windows setup process. (For more details, refer to Chapter 5, "Installing the SATA RAID/AHCI Driver and Operating System." ) Step 3: Install the motherboard drivers and the X.H.D utiltiy After installing the operating system, insert the motherboard ...Console, with which you run the X.H.D utility, back up all motherboard drivers, including the X.H.D utility. 4-8 eXtreme Hard Drive (X.H.D) With GIGABYTE eXtreme Hard Drive (X.H.D)(Note 1), users can quickly configure a RAIDready system for RAID 0 when a new SATA drive is recommended that already...
...array, you'll not be recognized during the Windows setup process. (For more details, refer to Chapter 5, "Installing the SATA RAID/AHCI Driver and Operating System." ) Step 3: Install the motherboard drivers and the X.H.D utiltiy After installing the operating system, insert the motherboard ...Console, with which you run the X.H.D utility, back up all motherboard drivers, including the X.H.D utility. 4-8 eXtreme Hard Drive (X.H.D) With GIGABYTE eXtreme Hard Drive (X.H.D)(Note 1), users can quickly configure a RAIDready system for RAID 0 when a new SATA drive is recommended that already...

Manual
Page 81
... for the SATA port. (For example, on the motherboard. If you do not want to AHCI or RAID mode. - 81 - Configure a RAID array in BIOS Setup. Installing SATA hard drive(s) in your motherboard, refer to "Chapter 1," "Hardware Installation," to ensure... Configuring SATA Hard Drive(s) To configure SATA hard drive(s), follow the steps below: A. Configure SATA controller mode in RAID BIOS. (Note 1) D. Install the SATA RAID/AHCI driver and operating system. (Note 2) Before you begin Please prepare: • At least two SATA hard drives (to identify the SATA controller for Windows XP...
... for the SATA port. (For example, on the motherboard. If you do not want to AHCI or RAID mode. - 81 - Configure a RAID array in BIOS Setup. Installing SATA hard drive(s) in your motherboard, refer to "Chapter 1," "Hardware Installation," to ensure... Configuring SATA Hard Drive(s) To configure SATA hard drive(s), follow the steps below: A. Configure SATA controller mode in RAID BIOS. (Note 1) D. Install the SATA RAID/AHCI driver and operating system. (Note 2) Before you begin Please prepare: • At least two SATA hard drives (to identify the SATA controller for Windows XP...

Manual
Page 82
Step 1: Turn on the motherboard you have and the BIOS version. The BIOS Setup menus described in this item to Disabled or AHCI. Appendix - 82 - If you will see shall depend on your motherboard. B. The actual BIOS Setup menu options you do not want to enter BIOS Setup ...
Step 1: Turn on the motherboard you have and the BIOS version. The BIOS Setup menus described in this item to Disabled or AHCI. Appendix - 82 - If you will see shall depend on your motherboard. B. The actual BIOS Setup menu options you do not want to enter BIOS Setup ...

Manual
Page 85
... this volume, press to confirm or to cancel (Figure 6). When prompted to confirm whether to create this volume? (Y/N) : Press ENTER to create the SATA RAID/AHCI driver diskette and install the SATA RAID/AHCI driver and operating system. - 85 -
... this volume, press to confirm or to cancel (Figure 6). When prompted to confirm whether to create this volume? (Y/N) : Press ENTER to create the SATA RAID/AHCI driver diskette and install the SATA RAID/AHCI driver and operating system. - 85 -

Manual
Page 89
...controller mode correctly in your computer Attach one end of the SATA signal cable to the rear of the SATA AHCI driver is enabled. Then set GSATA Ctrl Mode to IDE or AHCI, depending on your motherboard. CMOS Setup Utility-Copyright (C) 1984-2009 Award Software Integrated Peripherals eXtreme Hard Drive .... Refer to section, "5-1-3" for your computer and press to the hard drive. Skip this section may differ from your requirements (Figure 1). (In AHCI mode, installation of the SATA hard drive and the other end to available SATA port on the motherboard you do not want to enter the...
...controller mode correctly in your computer Attach one end of the SATA signal cable to the rear of the SATA AHCI driver is enabled. Then set GSATA Ctrl Mode to IDE or AHCI, depending on your motherboard. CMOS Setup Utility-Copyright (C) 1984-2009 Award Software Integrated Peripherals eXtreme Hard Drive .... Refer to section, "5-1-3" for your computer and press to the hard drive. Skip this section may differ from your requirements (Figure 1). (In AHCI mode, installation of the SATA hard drive and the other end to available SATA port on the motherboard you do not want to enter the...

Manual
Page 93
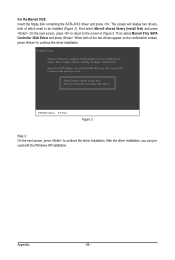
... main menu (example: VD 0: New_VD) and press to cancel (Figure 8). Press . If you may proceed to create the SATA driver diskette (for AHCI mode) and the installation of the SATA driver and operating system. Now, you did not set up an array or view the current array status... in the operating system. To install the utility, insert the motherboard driver disk, then go to Application Software\Install GIGABYTE Utilities and select Marvell Raid Utility to login the operating system. Note: After the installation, you must login the utility with the same ...
... main menu (example: VD 0: New_VD) and press to cancel (Figure 8). Press . If you may proceed to create the SATA driver diskette (for AHCI mode) and the installation of the SATA driver and operating system. Now, you did not set up an array or view the current array status... in the operating system. To install the utility, insert the motherboard driver disk, then go to Application Software\Install GIGABYTE Utilities and select Marvell Raid Utility to login the operating system. Note: After the installation, you must login the utility with the same ...

Manual
Page 94
...mode: Figure 2 Steps: 1: Use an alternative system and insert the motherboard driver disk. 2: From your optical drive is /are configured to RAID/AHCI mode, you wish to copy the Windows 64-bit driver. Your system will open similar to that in Figure 4, • For the Intel P55...2: Remove the startup disk and insert the prepared floppy disk and the motherboard driver disk (here we as- 5-1-3 Making a SATA RAID/AHCI Driver Diskette (Required for AHCI and RAID Mode) To successfully install operating system onto SATA hard drive(s) that is D:\). 3: At the A:\> prompt, type the following ...
...mode: Figure 2 Steps: 1: Use an alternative system and insert the motherboard driver disk. 2: From your optical drive is /are configured to RAID/AHCI mode, you wish to copy the Windows 64-bit driver. Your system will open similar to that in Figure 4, • For the Intel P55...2: Remove the startup disk and insert the prepared floppy disk and the motherboard driver disk (here we as- 5-1-3 Making a SATA RAID/AHCI Driver Diskette (Required for AHCI and RAID Mode) To successfully install operating system onto SATA hard drive(s) that is D:\). 3: At the A:\> prompt, type the following ...

Manual
Page 95
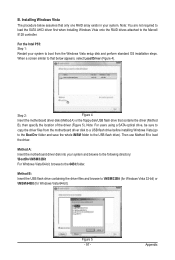
... the previous screen. Figure 1 Step 2: For the Intel P55: Insert the floppy disk containing the SATA RAID/AHCI driver and press . 5-1-4 Installing the SATA RAID/AHCI Driver and Operating System With the SATA RAID/AHCI driver diskette and correct BIOS settings, you need to install a third party SCSI or RAID driver. Windows Setup...
... the previous screen. Figure 1 Step 2: For the Intel P55: Insert the floppy disk containing the SATA RAID/AHCI driver and press . 5-1-4 Installing the SATA RAID/AHCI Driver and Operating System With the SATA RAID/AHCI driver diskette and correct BIOS settings, you need to install a third party SCSI or RAID driver. Windows Setup...
Manual
Page 96
... F3=Exit Figure 3 Step 3: On the next screen, press to the screen in Figure 3. For the Marvell 9128: Insert the floppy disk containing the SATA AHCI driver and press . After the driver installation, you want from the following list, or press ESC to return to configure a SCSI Adapter for use with...
... F3=Exit Figure 3 Step 3: On the next screen, press to the screen in Figure 3. For the Marvell 9128: Insert the floppy disk containing the SATA AHCI driver and press . After the driver installation, you want from the following list, or press ESC to return to configure a SCSI Adapter for use with...
Manual
Page 97
... to load the driver. Method A: Insert the motherboard driver disk into your system. Figure 5 - 97 - Appendix Note: You are not required to load the SATA AHCI driver first when installing Windows Vista onto the RAID drives attached to the 64Bit folder. Step 2: Figure 4 Insert the motherboard driver disk (Method A) or the...
... to load the driver. Method A: Insert the motherboard driver disk into your system. Figure 5 - 97 - Appendix Note: You are not required to load the SATA AHCI driver first when installing Windows Vista onto the RAID drives attached to the 64Bit folder. Step 2: Figure 4 Insert the motherboard driver disk (Method A) or the...
Manual
Page 98
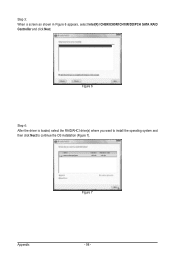
Step 3: When a screen as shown in Figure 6 appears, select Intel(R) ICH8R/ICH9R/ICH10R/DO/PCH SATA RAID Controller and click Next. Figure 6 Step 4: After the driver is loaded, select the RAID/AHCI drive(s) where you want to install the operating system and then click Next to continue the OS installation (Figure 7). Appendix Figure 7 - 98 -
Step 3: When a screen as shown in Figure 6 appears, select Intel(R) ICH8R/ICH9R/ICH10R/DO/PCH SATA RAID Controller and click Next. Figure 6 Step 4: After the driver is loaded, select the RAID/AHCI drive(s) where you want to install the operating system and then click Next to continue the OS installation (Figure 7). Appendix Figure 7 - 98 -

