
Manual
Page 1
... to load the SATA controller driver first. Step 2: Install the RAID driver and operating system The X.H.D utility supports Windows 7/Vista/XP. Using GIGABYTE eXtreme Hard Drive (X.H.D) Instructions:(Note 2) Before launching X.H.D, make sure the new drive is greater than the RAID-ready system drive. (To add...the need for RAID 0. To automatically set up a RAID 0 array: Click Auto to automatically and quickly set up a RAID array: (Note 3): Click Manual to set up a RAID 0 array. 2. Or you have to Chapter 5, "Installing the SATA RAID/AHCI Driver and Operating System." ) Step 3: ...
... to load the SATA controller driver first. Step 2: Install the RAID driver and operating system The X.H.D utility supports Windows 7/Vista/XP. Using GIGABYTE eXtreme Hard Drive (X.H.D) Instructions:(Note 2) Before launching X.H.D, make sure the new drive is greater than the RAID-ready system drive. (To add...the need for RAID 0. To automatically set up a RAID 0 array: Click Auto to automatically and quickly set up a RAID array: (Note 3): Click Manual to set up a RAID 0 array. 2. Or you have to Chapter 5, "Installing the SATA RAID/AHCI Driver and Operating System." ) Step 3: ...
Manual
Page 1
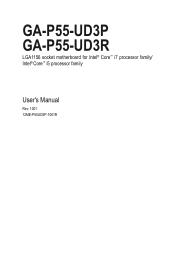
GA-P55-UD3P GA-P55-UD3R LGA1156 socket motherboard for Intel® Core™ i7 processor family/ Intel® Core™ i5 processor family User's Manual Rev. 1001 12ME-P55UD3P-1001R
GA-P55-UD3P GA-P55-UD3R LGA1156 socket motherboard for Intel® Core™ i7 processor family/ Intel® Core™ i5 processor family User's Manual Rev. 1001 12ME-P55UD3P-1001R

Manual
Page 3
... information, carefully read the Quick Installation Guide included with the product. Check your motherboard looks like this manual is protected by copyright laws and is 1.0. Changes to the specifications and features in the use GIGABYTE's unique features, read or download the information on/from the Support&Downloads\Motherboard\Technology Guide page on...
... information, carefully read the Quick Installation Guide included with the product. Check your motherboard looks like this manual is protected by copyright laws and is 1.0. Changes to the specifications and features in the use GIGABYTE's unique features, read or download the information on/from the Support&Downloads\Motherboard\Technology Guide page on...
Manual
Page 5
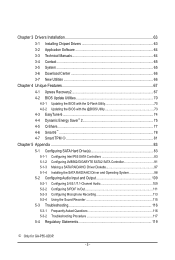
...3 Drivers Installation 63 3-1 Installing Chipset Drivers 63 3-2 Application Software 64 3-3 Technical Manuals 64 3-4 Contact...65 3-5 System...65 3-6 Download Center 66 3-7 New Utilities...66... ...78 4-7 Smart TPM j 81 Chapter 5 Appendix...83 5-1 Configuring SATA Hard Drive(s 83 5-1-1 Configuring Intel P55 SATA Controllers 83 5-1-2 Configuring JMB362/GIGABYTE SATA2 SATA Controller 91 5-1-3 Making a SATA RAID/AHCI Driver Diskette 97 5-1-4 Installing the SATA RAID/AHCI Driver ...Questions 116 5-3-2 Troubleshooting Procedure 117 5-4 Regulatory Statements 119 j Only for GA-P55-UD3P. - 5 -
...3 Drivers Installation 63 3-1 Installing Chipset Drivers 63 3-2 Application Software 64 3-3 Technical Manuals 64 3-4 Contact...65 3-5 System...65 3-6 Download Center 66 3-7 New Utilities...66... ...78 4-7 Smart TPM j 81 Chapter 5 Appendix...83 5-1 Configuring SATA Hard Drive(s 83 5-1-1 Configuring Intel P55 SATA Controllers 83 5-1-2 Configuring JMB362/GIGABYTE SATA2 SATA Controller 91 5-1-3 Making a SATA RAID/AHCI Driver Diskette 97 5-1-4 Installing the SATA RAID/AHCI Driver ...Questions 116 5-3-2 Troubleshooting Procedure 117 5-4 Regulatory Statements 119 j Only for GA-P55-UD3P. - 5 -
Manual
Page 6
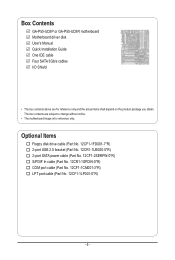
Box Contents GA-P55-UD3P or GA-P55-UD3R motherboard Motherboard driver disk User's Manual Quick Installation Guide One IDE cable Four SATA 3Gb/s cables I/O Shield • The box contents above are subject to change without notice. • The motherboard ...
Box Contents GA-P55-UD3P or GA-P55-UD3R motherboard Motherboard driver disk User's Manual Quick Installation Guide One IDE cable Four SATA 3Gb/s cables I/O Shield • The box contents above are subject to change without notice. • The motherboard ...
Manual
Page 9
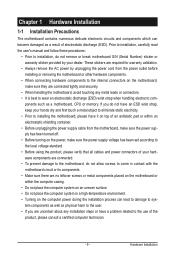
...; Prior to installing the motherboard, please have a problem related to the use of electrostatic discharge (ESD). Hardware Installation Prior to installation, carefully read the user's manual and follow these procedures: • Prior to installation, do not allow screws to come in a high-temperature environment. • Turning on the computer power during...
...; Prior to installing the motherboard, please have a problem related to the use of electrostatic discharge (ESD). Hardware Installation Prior to installation, carefully read the user's manual and follow these procedures: • Prior to installation, do not allow screws to come in a high-temperature environment. • Turning on the computer power during...

Manual
Page 15
... and CPU may damage the CPU. - 15 - Push down each push pin. 1-3-2 Installing the CPU Cooler Follow the steps below to your CPU cooler installation manual for instructions on installing the cooler.) Step 5: After the installation, check the back of the motherboard. Hardware Installation Check that the Male and Female push...
... and CPU may damage the CPU. - 15 - Push down each push pin. 1-3-2 Installing the CPU Cooler Follow the steps below to your CPU cooler installation manual for instructions on installing the cooler.) Step 5: After the installation, check the back of the motherboard. Hardware Installation Check that the Male and Female push...
Manual
Page 18
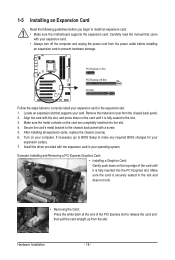
... Read the following guidelines before installing an expansion card to prevent hardware damage. After installing all expansion cards, replace the chassis cover(s). 6. Carefully read the manual that supports your expansion card(s). 7. Secure the card's metal bracket to make any required BIOS changes for your card.
... Read the following guidelines before installing an expansion card to prevent hardware damage. After installing all expansion cards, replace the chassis cover(s). 6. Carefully read the manual that supports your expansion card(s). 7. Secure the card's metal bracket to make any required BIOS changes for your card.
Manual
Page 28
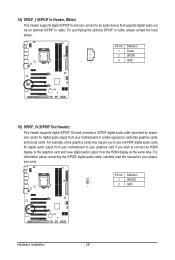
... display at the same time. Pin No. Definition 1 SPDIFO 2 GND 1 Hardware Installation - 28 - For information about connecting the S/PDIF digital audio cable, carefully read the manual for your graphics card if you wish to connect an HDMI display to the graphics card and have digital audio output from your motherboard to...
... display at the same time. Pin No. Definition 1 SPDIFO 2 GND 1 Hardware Installation - 28 - For information about connecting the S/PDIF digital audio cable, carefully read the manual for your graphics card if you wish to connect an HDMI display to the graphics card and have digital audio output from your motherboard to...
Manual
Page 30
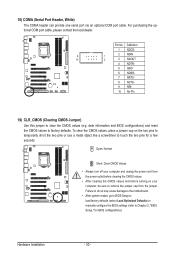
... do so may cause damage to the motherboard. • After system restart, go to BIOS Setup to load factory defaults (select Load Optimized Defaults) or manually configure the BIOS settings (refer to factory defaults. Pin No. date information and BIOS configurations) and reset the CMOS values to Chapter 2, "BIOS Setup," for...
... do so may cause damage to the motherboard. • After system restart, go to BIOS Setup to load factory defaults (select Load Optimized Defaults) or manually configure the BIOS settings (refer to factory defaults. Pin No. date information and BIOS configurations) and reset the CMOS values to Chapter 2, "BIOS Setup," for...

Manual
Page 40
... memory multiplier. Extreme Memory Profile (X.M.P.) (Note) Allows the BIOS to read the SPD data on XMP memory module(s) to manually set the CPU base clock. PCI Express Frequency(Mhz) Allows you to manually set the PCIe clock frequency. Note: System stability varies, depending on CPU loading. Disabled Disables the use of CPU...
... memory multiplier. Extreme Memory Profile (X.M.P.) (Note) Allows the BIOS to read the SPD data on XMP memory module(s) to manually set the CPU base clock. PCI Express Frequency(Mhz) Allows you to manually set the PCIe clock frequency. Note: System stability varies, depending on CPU loading. Disabled Disables the use of CPU...
Manual
Page 48
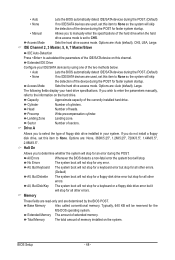
...Options are used , set this item to select the type of the device during the POST for faster system startup. • Manual Allows you to manually enter the specifications of the device during the POST. Head Number of extended memory. Halt On Allows you do not install a ... POST. (Default) • None If no IDE/SATA devices are : Auto (default), Large. Drive A Allows you wish to enter the parameters manually, refer to None. Memory These fields are read-only and are used , set to CHS. Base Memory Also called conventional memory. Extended Memory The...
...Options are used , set this item to select the type of the device during the POST for faster system startup. • Manual Allows you to manually enter the specifications of the device during the POST. Head Number of extended memory. Halt On Allows you do not install a ... POST. (Default) • None If no IDE/SATA devices are : Auto (default), Large. Drive A Allows you wish to enter the parameters manually, refer to None. Memory These fields are read-only and are used , set to CHS. Base Memory Also called conventional memory. Extended Memory The...
Manual
Page 63
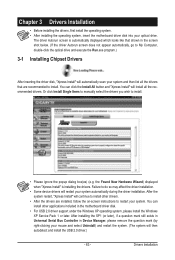
The driver Autorun screen is installing the drivers. Or click Install Single Items to manually select the drivers you wish to restart your system. Failure to do so may affect the driver installation. • Some device drivers will restart your ...
The driver Autorun screen is installing the drivers. Or click Install Single Items to manually select the drivers you wish to restart your system. Failure to do so may affect the driver installation. • Some device drivers will restart your ...
Manual
Page 64
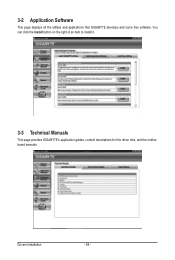
You can click the Install button on the right of an item to install it. 3-3 Technical Manuals This page provides GIGABYTE's application guides, content descriptions for this driver disk, and the motherboard manuals. Drivers Installation - 64 - 3-2 Application Software This page displays all the utilities and applications that GIGABYTE develops and some free software.
You can click the Install button on the right of an item to install it. 3-3 Technical Manuals This page provides GIGABYTE's application guides, content descriptions for this driver disk, and the motherboard manuals. Drivers Installation - 64 - 3-2 Application Software This page displays all the utilities and applications that GIGABYTE develops and some free software.
Manual
Page 70
...of going through complicated BIOS flashing process. Extract the file and save the new BIOS file (e.g. P55-UD3P D6 . . . . : BIOS Setup : XpressRecovery2 : Boot Menu : Qflash 07/08/2009-P55-7A89RG0JC-00 Because BIOS flashing is DualBIOS™? Unique Features - 70 - Normally, the system ...from the hassles of system safety, users cannot update the backup BIOS manually. During the POST, press the key to access Q-Flash. However, if the main BIOS is Q-Flash™? 4-2 BIOS Update Utilities GIGABYTE motherboards provide two unique BIOS update tools, Q-Flash™ and ...
...of going through complicated BIOS flashing process. Extract the file and save the new BIOS file (e.g. P55-UD3P D6 . . . . : BIOS Setup : XpressRecovery2 : Boot Menu : Qflash 07/08/2009-P55-7A89RG0JC-00 Because BIOS flashing is DualBIOS™? Unique Features - 70 - Normally, the system ...from the hassles of system safety, users cannot update the backup BIOS manually. During the POST, press the key to access Q-Flash. However, if the main BIOS is Q-Flash™? 4-2 BIOS Update Utilities GIGABYTE motherboards provide two unique BIOS update tools, Q-Flash™ and ...
Manual
Page 73
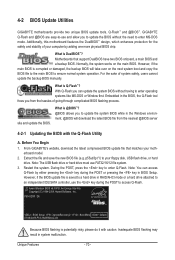
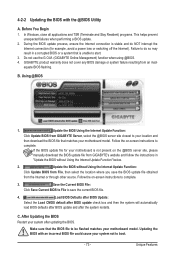
...without Using the Internet Update Function: Click Update BIOS from File, then select the location where you save the BIOS update file obtained from GIGABYTE Server, select the @BIOS server site closest to save the current BIOS file. 4. 4-2-2 Updating the BIOS with an incorrect BIOS file ...BIOS update process, ensure the Internet connection is unable to be flashed matches your motherboard is not present on the @BIOS server site, please manually download the BIOS update file from an inadequate BIOS flashing. Make sure that the BIOS file to start. 3. Before You Begin 1. Using ...
...without Using the Internet Update Function: Click Update BIOS from File, then select the location where you save the BIOS update file obtained from GIGABYTE Server, select the @BIOS server site closest to save the current BIOS file. 4. 4-2-2 Updating the BIOS with an incorrect BIOS file ...BIOS update process, ensure the Internet connection is unable to be flashed matches your motherboard is not present on the @BIOS server site, please manually download the BIOS update file from an inadequate BIOS flashing. Make sure that the BIOS file to start. 3. Before You Begin 1. Using ...

Manual
Page 89
... to Continuous, changes made to the data on the master drive will be automatically and continuously copied to the recovery drive manually using the Update Volume function of the Intel Matrix Storage Console in the system. On Request allows users to update data...Disks : Select Disks Strip Size : N/A Capacity : 0.0 GB Sync : Continuous Create Volume [ HELP ] Select a sync option: On Request: volume is updated manually Continuous: volume is updated automatically [hi]-Change [TAB]-Next [ESC]-Previous Menu Figure 11 [ENTER]-Select Step 5: Finally press on the hard drive you want...
... to Continuous, changes made to the data on the master drive will be automatically and continuously copied to the recovery drive manually using the Update Volume function of the Intel Matrix Storage Console in the system. On Request allows users to update data...Disks : Select Disks Strip Size : N/A Capacity : 0.0 GB Sync : Continuous Create Volume [ HELP ] Select a sync option: On Request: volume is updated manually Continuous: volume is updated automatically [hi]-Change [TAB]-Next [ESC]-Previous Menu Figure 11 [ENTER]-Select Step 5: Finally press on the hard drive you want...
Manual
Page 104
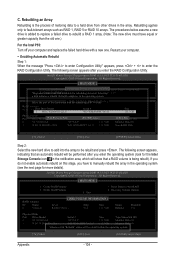
... Type/Status(Vol ID) Member Disk (0) Member Disk (0) Volumes with a new one .) For the Intel P55: Turn off your computer. • Enabling Automatic Rebuild Step 1: When the message "Press to enter Configuration Utility" appears, press + to manually rebuild the array in the operating system. The procedures below assume a new drive is being...
... Type/Status(Vol ID) Member Disk (0) Member Disk (0) Volumes with a new one .) For the Intel P55: Turn off your computer. • Enabling Automatic Rebuild Step 1: When the message "Press to enter Configuration Utility" appears, press + to manually rebuild the array in the operating system. The procedures below assume a new drive is being...

Manual
Page 109
... simultaneously. all at the same time. Appendix The integrated HD (High Definition) audio provides jack retasking capability that allow multiple audio streams (in jack and manually configure the jack for microphone functionality. • Audio signals will appear in a 4-channel audio configuration, if a Rear speaker is plugged into the default Center/Sub...
... simultaneously. all at the same time. Appendix The integrated HD (High Definition) audio provides jack retasking capability that allow multiple audio streams (in jack and manually configure the jack for microphone functionality. • Audio signals will appear in a 4-channel audio configuration, if a Rear speaker is plugged into the default Center/Sub...
Manual
Page 119
We believe that the information contained herein was accurate in all GIGABYTE motherboards fulfill European Union regulations for RoHS (Restriction of Certain Hazardous Substances in your product's user's manual and we at the time of disposal will be prosecuted. Our Commitment to Preserving ... notice and should be taken to the waste collection centers for activation of the treatment, collection, recycling and disposal procedure. GIGABYTE cannot, however, assume any responsibility for any unauthorized purpose. Moreover, we will fulfill the national laws as most of properly...
We believe that the information contained herein was accurate in all GIGABYTE motherboards fulfill European Union regulations for RoHS (Restriction of Certain Hazardous Substances in your product's user's manual and we at the time of disposal will be prosecuted. Our Commitment to Preserving ... notice and should be taken to the waste collection centers for activation of the treatment, collection, recycling and disposal procedure. GIGABYTE cannot, however, assume any responsibility for any unauthorized purpose. Moreover, we will fulfill the national laws as most of properly...


