
Manual
Page 1
...you 'll not be recognized during the Windows setup process. (For more details, refer to Chapter 5, "Installing the SATA RAID/AHCI Driver and Operating System." ) Step 3: Install the motherboard drivers and the X.H.D utiltiy After installing the operating system, insert the ... X.H.D utility: Click Cancel to exit the X.H.D utility. (Note 1) The X.H.D utility only supports the SATA controllers integrated in the array. ) 1. eXtreme Hard Drive (X.H.D) With GIGABYTE eXtreme Hard Drive (X.H.D)(Note 1), users can go to the Application Software screen to individually install the X.H.D utility ...
...you 'll not be recognized during the Windows setup process. (For more details, refer to Chapter 5, "Installing the SATA RAID/AHCI Driver and Operating System." ) Step 3: Install the motherboard drivers and the X.H.D utiltiy After installing the operating system, insert the ... X.H.D utility: Click Cancel to exit the X.H.D utility. (Note 1) The X.H.D utility only supports the SATA controllers integrated in the array. ) 1. eXtreme Hard Drive (X.H.D) With GIGABYTE eXtreme Hard Drive (X.H.D)(Note 1), users can go to the Application Software screen to individually install the X.H.D utility ...
Manual
Page 6
... 4-8 Auto Green...82 4-9 eXtreme Hard Drive (X.H.D 83 Chapter 5 Appendix...85 5-1 Configuring SATA Hard Drive(s 85 5-1-1 Configuring Intel P55 SATA Controllers 85 5-1-2 Configuring GIGABYTE SATA2 SATA Controller 93 5-1-3 Making a SATA RAID/AHCI Driver Diskette 99 5-1-4 Installing the SATA RAID/AHCI Driver and Operating System 100 5-2 Configuring Audio Input and Output 111 5-2-1 Configuring 2/4/5.1/7.1-Channel Audio 111 5-2-2 Configuring S/PDIF...
... 4-8 Auto Green...82 4-9 eXtreme Hard Drive (X.H.D 83 Chapter 5 Appendix...85 5-1 Configuring SATA Hard Drive(s 85 5-1-1 Configuring Intel P55 SATA Controllers 85 5-1-2 Configuring GIGABYTE SATA2 SATA Controller 93 5-1-3 Making a SATA RAID/AHCI Driver Diskette 99 5-1-4 Installing the SATA RAID/AHCI Driver and Operating System 100 5-2 Configuring Audio Input and Output 111 5-2-1 Configuring 2/4/5.1/7.1-Channel Audio 111 5-2-2 Configuring S/PDIF...
Manual
Page 51
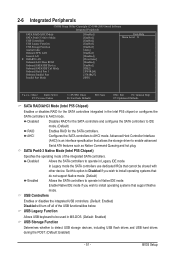
...: Save F6: Fail-Safe Defaults ESC: Exit F1: General Help F7: Optimized Defaults SATA RAID/AHCI Mode (Intel P55 Chipset) Enables or disables RAID for the SATA controllers integrated in the Intel P55 chipset or configures the SATA controllers to detect USB storage devices, including USB flash drives and USB hard drives during the POST...
...: Save F6: Fail-Safe Defaults ESC: Exit F1: General Help F7: Optimized Defaults SATA RAID/AHCI Mode (Intel P55 Chipset) Enables or disables RAID for the SATA controllers integrated in the Intel P55 chipset or configures the SATA controllers to detect USB storage devices, including USB flash drives and USB hard drives during the POST...
Manual
Page 53
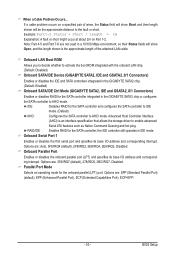
... and specifies its base I /O address and corresponding interrupt. RAID/IDE Enables RAID for the onboard parallel (LPT) port. the IDE controller still operates in the GIGABYTE SATA2 chip or configures the SATA controller to AHCI mode. BIOS Setup Options are : Auto, 3F8/IRQ4 (default), 2F8/IRQ3, 3E8/IRQ4, 2E8/IRQ3, Disabled. Onboard LAN Boot...
... and specifies its base I /O address and corresponding interrupt. RAID/IDE Enables RAID for the onboard parallel (LPT) port. the IDE controller still operates in the GIGABYTE SATA2 chip or configures the SATA controller to AHCI mode. BIOS Setup Options are : Auto, 3F8/IRQ4 (default), 2F8/IRQ3, 3E8/IRQ4, 2E8/IRQ3, Disabled. Onboard LAN Boot...
Manual
Page 70
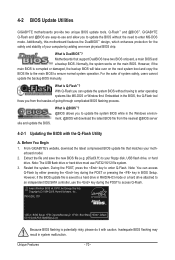
...During the POST, press the key to access Q-Flash. GIGABYTE Q-Flash and @BIOS are easy-to an independent IDE/SATA controller, use FAT32/16/12 file system. 3. For the sake...From GIGABYTE's website, download the latest compressed BIOS update file that support DualBIOS have two BIOS onboard, a main BIOS and a backup BIOS. However, if the BIOS update file is potentially risky, please do it with the Q-Flash Utility A. P55-UD3L D11...copy the BIOS file to the main BIOS to update the system BIOS while in RAID/AHCI mode or a hard drive attached to -use and allow you from the nearest @BIOS...
...During the POST, press the key to access Q-Flash. GIGABYTE Q-Flash and @BIOS are easy-to an independent IDE/SATA controller, use FAT32/16/12 file system. 3. For the sake...From GIGABYTE's website, download the latest compressed BIOS update file that support DualBIOS have two BIOS onboard, a main BIOS and a backup BIOS. However, if the BIOS update file is potentially risky, please do it with the Q-Flash Utility A. P55-UD3L D11...copy the BIOS file to the main BIOS to update the system BIOS while in RAID/AHCI mode or a hard drive attached to -use and allow you from the nearest @BIOS...

Manual
Page 71
... POST to a floppy disk. Updating the BIOS When updating the BIOS, choose the location where the BIOS file is saved to a hard drive in RAID/AHCI mode or a hard drive attached to an independent IDE/SATA controller, use the up or down arrow key to begin the BIOS update.
... POST to a floppy disk. Updating the BIOS When updating the BIOS, choose the location where the BIOS file is saved to a hard drive in RAID/AHCI mode or a hard drive attached to an independent IDE/SATA controller, use the up or down arrow key to begin the BIOS update.

Manual
Page 83
4-9 eXtreme Hard Drive (X.H.D) With GIGABYTE eXtreme Hard Drive (X.H.D) (Note 1), users can click the Xpress Install All button to enable RAID for the Intel SATA controllers. For a RAID 0 array that already exists, users also can use X.H.D to easily add a hard drive into a RAID 0 ...or lost of a button, X.H.D helps to automatically set up a RAID array: (Note 3) Click Manual to Chapter 5, "Installing the SATA RAID/AHCI Driver and Operating System." ) Step 3: Install the motherboard drivers and the X.H.D utiltiy After installing the operating system, insert the motherboard driver disk. ...
4-9 eXtreme Hard Drive (X.H.D) With GIGABYTE eXtreme Hard Drive (X.H.D) (Note 1), users can click the Xpress Install All button to enable RAID for the Intel SATA controllers. For a RAID 0 array that already exists, users also can use X.H.D to easily add a hard drive into a RAID 0 ...or lost of a button, X.H.D helps to automatically set up a RAID array: (Note 3) Click Manual to Chapter 5, "Installing the SATA RAID/AHCI Driver and Operating System." ) Step 3: Install the motherboard drivers and the X.H.D utiltiy After installing the operating system, insert the motherboard driver disk. ...
Manual
Page 85
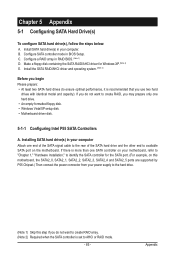
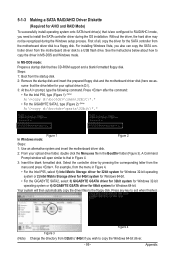
... than one hard drive. • An empty formatted floppy disk. • Windows Vista/XP setup disk. • Motherboard driver disk. 5-1-1 Configuring Intel P55 SATA Controllers A. Install the SATA RAID/AHCI driver and operating system. (Note 2) Before you use two hard drives with identical model and capacity). Appendix Install SATA hard drive(s) in your...
... than one hard drive. • An empty formatted floppy disk. • Windows Vista/XP setup disk. • Motherboard driver disk. 5-1-1 Configuring Intel P55 SATA Controllers A. Install the SATA RAID/AHCI driver and operating system. (Note 2) Before you use two hard drives with identical model and capacity). Appendix Install SATA hard drive(s) in your...
Manual
Page 86
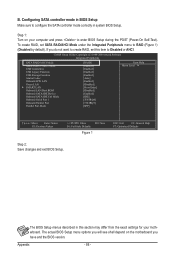
...). B. To create RAID, set this section may differ from the exact settings for your computer and press to configure the SATA controller mode correctly in this item to RAID (Figure 1) (Disabled by default). The actual BIOS Setup menu options you will see shall...not want to create RAID, set SATA RAID/AHCI Mode under the Integrated Peripherals menu to Disabled or AHCI. CMOS Setup Utility-Copyright (C) 1984-2009 Award Software Integrated Peripherals SATA RAID/AHCI Mode SATA Port0-3 Native Mode USB Controllers USB Legacy Function USB Storage Function Azalia Codec ...
...). B. To create RAID, set this section may differ from the exact settings for your computer and press to configure the SATA controller mode correctly in this item to RAID (Figure 1) (Disabled by default). The actual BIOS Setup menu options you will see shall...not want to create RAID, set SATA RAID/AHCI Mode under the Integrated Peripherals menu to Disabled or AHCI. CMOS Setup Utility-Copyright (C) 1984-2009 Award Software Integrated Peripherals SATA RAID/AHCI Mode SATA Port0-3 Native Mode USB Controllers USB Legacy Function USB Storage Function Azalia Codec ...
Manual
Page 93
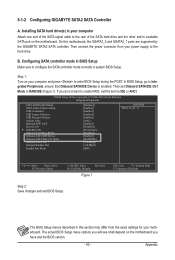
... available SATA port on the motherboard you have and the BIOS version. - 93 - Step 1: Turn on your power supply to IDE or AHCI. Then set this item to the hard drive. The BIOS Setup menus described in system BIOS Setup. CMOS Setup Utility-Copyright (C) 1984-2009 ... to enter BIOS Setup during the POST. In BIOS Setup, go to configure the SATA controller mode correctly in this motherboard, the GSATA2_0 and GSATA2_1 ports are supported by the GIGABYTE SATA2 SATA controller. Appendix On this section may differ from your computer and press to RAID/IDE (Figure ...
... available SATA port on the motherboard you have and the BIOS version. - 93 - Step 1: Turn on your power supply to IDE or AHCI. Then set this item to the hard drive. The BIOS Setup menus described in system BIOS Setup. CMOS Setup Utility-Copyright (C) 1984-2009 ... to enter BIOS Setup during the POST. In BIOS Setup, go to configure the SATA controller mode correctly in this motherboard, the GSATA2_0 and GSATA2_1 ports are supported by the GIGABYTE SATA2 SATA controller. Appendix On this section may differ from your computer and press to RAID/IDE (Figure ...
Manual
Page 99
...the Menu.exe file in MS-DOS and Windows mode. Press after the command: • For the Intel P55, type (Figure 1): (Note) A:\>copy d:\bootdrv\imsm\32bit\*.* • For the GIGABYTE SATA2, type (Figure 2): (Note) A:\>copy d:\bootdrv\gsata\32bit\*.* Figure 1 In Windows mode: Figure ...2 Steps: 1: Use an alternative system and insert the motherboard driver disk. 2: From your optical drive is /are configured to RAID/AHCI mode, you need to install the SATA controller...
...the Menu.exe file in MS-DOS and Windows mode. Press after the command: • For the Intel P55, type (Figure 1): (Note) A:\>copy d:\bootdrv\imsm\32bit\*.* • For the GIGABYTE SATA2, type (Figure 2): (Note) A:\>copy d:\bootdrv\gsata\32bit\*.* Figure 1 In Windows mode: Figure ...2 Steps: 1: Use an alternative system and insert the motherboard driver disk. 2: From your optical drive is /are configured to RAID/AHCI mode, you need to install the SATA controller...

Manual
Page 100
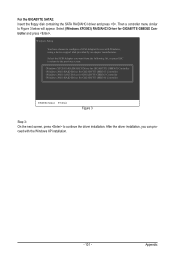
... and Operating System With the SATA RAID/AHCI driver diskette and correct BIOS settings, you are examples of Windows XP and Vista installation. Select Intel(R) ICH8R/ICH9R/ICH10R/DO/PCH SATA RAID Controller and press . A. The followings are ready to install Windows Vista/ XP onto your system to boot from the following... ESC to return to configure a SCSI Adapter for use with Windows, using a device support disk provided by an adapter manufacturer. Figure 1 Step 2: For the Intel P55: Insert the floppy disk containing the SATA RAID/AHCI driver and press .
... and Operating System With the SATA RAID/AHCI driver diskette and correct BIOS settings, you are examples of Windows XP and Vista installation. Select Intel(R) ICH8R/ICH9R/ICH10R/DO/PCH SATA RAID Controller and press . A. The followings are ready to install Windows Vista/ XP onto your system to boot from the following... ESC to return to configure a SCSI Adapter for use with Windows, using a device support disk provided by an adapter manufacturer. Figure 1 Step 2: For the Intel P55: Insert the floppy disk containing the SATA RAID/AHCI driver and press .
Manual
Page 101
... following list, or press ESC to return to the previous screen. (Windows XP/2003) RAID/AHCI Driver for GIGABYTE GBB36X Controller (Windows 2000) RAID Driver for GIGABYTE GBB363 Controller (Windows 2000) AHCI Driver for GIGABYTE GBB363 Controller (Windows 2000) RAID Driver for GIGABYTE GBB360 Controller ENTER=Select F3=Exit Figure 3 Step 3: On the next screen, press to Figure 3 below will...
... following list, or press ESC to return to the previous screen. (Windows XP/2003) RAID/AHCI Driver for GIGABYTE GBB36X Controller (Windows 2000) RAID Driver for GIGABYTE GBB363 Controller (Windows 2000) AHCI Driver for GIGABYTE GBB363 Controller (Windows 2000) RAID Driver for GIGABYTE GBB360 Controller ENTER=Select F3=Exit Figure 3 Step 3: On the next screen, press to Figure 3 below will...

Manual
Page 103
Figure 6 Step 4: After the driver is loaded, select the RAID/AHCI drive(s) where you want to install the operating system and then click Next to continue the OS installation (Figure 7). Figure 7 - 103 - Step 3: When a screen as shown in Figure 6 appears, select Intel(R) ICH8R/ICH9R/ICH10R/DO/PCH SATA RAID Controller and click Next. Appendix
Figure 6 Step 4: After the driver is loaded, select the RAID/AHCI drive(s) where you want to install the operating system and then click Next to continue the OS installation (Figure 7). Figure 7 - 103 - Step 3: When a screen as shown in Figure 6 appears, select Intel(R) ICH8R/ICH9R/ICH10R/DO/PCH SATA RAID Controller and click Next. Appendix

Manual
Page 105
Step 3: When a screen as shown in Figure 10 appears, select GIGABYTE GBB36X Controller and click Next. Figure 11 - 105 - Appendix Figure 10 Step 4: After the driver is loaded, select the RAID/AHCI drive(s) where you want to install the operating system and then click Next to continue the OS installation (Figure 11).
Step 3: When a screen as shown in Figure 10 appears, select GIGABYTE GBB36X Controller and click Next. Figure 11 - 105 - Appendix Figure 10 Step 4: After the driver is loaded, select the RAID/AHCI drive(s) where you want to install the operating system and then click Next to continue the OS installation (Figure 11).


