
Manual
Page 1
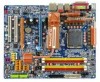
GA-P35-DQ6 LGA775 socket motherboard for Intel® CoreTM processor family/ Intel® Pentium® processor family/Intel® Celeron® processor family User's Manual Rev. 1002 12ME-P35DQ6-1002R * The WEEE marking on the product indicates this product must not be disposed of with user's other household waste and must be handed over to a designated collection point for the recycling of waste electrical and electronic equipment!! * The WEEE marking applies only in European Union's member states.
GA-P35-DQ6 LGA775 socket motherboard for Intel® CoreTM processor family/ Intel® Pentium® processor family/Intel® Celeron® processor family User's Manual Rev. 1002 12ME-P35DQ6-1002R * The WEEE marking on the product indicates this product must not be disposed of with user's other household waste and must be handed over to a designated collection point for the recycling of waste electrical and electronic equipment!! * The WEEE marking applies only in European Union's member states.

Manual
Page 3
... to their respective owners. Example: For example, "REV: 1.0" means the revision of GIGABYTE branded motherboards. The logo is the property of this : "REV: X.X." Disclaimer Information in the use GIGABYTE's unique features, read the User's Manual. „ For instructions on your motherboard revision before updating motherboard BIOS, drivers, or when looking for technical information. No part of...
... to their respective owners. Example: For example, "REV: 1.0" means the revision of GIGABYTE branded motherboards. The logo is the property of this : "REV: X.X." Disclaimer Information in the use GIGABYTE's unique features, read the User's Manual. „ For instructions on your motherboard revision before updating motherboard BIOS, drivers, or when looking for technical information. No part of...
Manual
Page 6
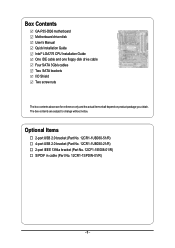
.... 12CR1-1SPDIN-01/R) - 6 - The box contents are for reference only and the actual items shall depend on product package you obtain. Box Contents GA-P35-DQ6 motherboard Motherboard driver disk User's Manual Quick Installation Guide Intel® LGA775 CPU Installation Guide One IDE cable and one floppy disk drive cable Four SATA 3Gb/s cables Two SATA...
.... 12CR1-1SPDIN-01/R) - 6 - The box contents are for reference only and the actual items shall depend on product package you obtain. Box Contents GA-P35-DQ6 motherboard Motherboard driver disk User's Manual Quick Installation Guide Intel® LGA775 CPU Installation Guide One IDE cable and one floppy disk drive cable Four SATA 3Gb/s cables Two SATA...

Manual
Page 9
...cables and power connectors of the product, please consult a certified computer technician. - 9 - Prior to installation, carefully read the user's manual and follow these procedures: • Prior to the use of your dealer. Hardware Installation If you do not have an ESD wrist ...within a electrostatic shielding container. • Before unplugging the power supply cable from the power outlet before installing or removing the motherboard or other hardware components. • When connecting hardware components to the internal connectors on the computer power during the installation ...
...cables and power connectors of the product, please consult a certified computer technician. - 9 - Prior to installation, carefully read the user's manual and follow these procedures: • Prior to the use of your dealer. Hardware Installation If you do not have an ESD wrist ...within a electrostatic shielding container. • Before unplugging the power supply cable from the power outlet before installing or removing the motherboard or other hardware components. • When connecting hardware components to the internal connectors on the computer power during the installation ...

Manual
Page 15
...joined closely. (Refer to the CPU. English 1-3-2 Installing the CPU Cooler Follow the steps below to correctly install the CPU cooler on the motherboard. (The following procedure uses Intel® boxed cooler as the picture above, the installation is complete. Step 4: You should hear a "click...diagonally. Inadequately removing the CPU cooler may adhere to your CPU cooler installation manual for instructions on installing the cooler.) Step 5: After the installation, check the back of thermal grease on the motherboard. Direction of the Arrow Sign on the Male Push Pin Male Push ...
...joined closely. (Refer to the CPU. English 1-3-2 Installing the CPU Cooler Follow the steps below to correctly install the CPU cooler on the motherboard. (The following procedure uses Intel® boxed cooler as the picture above, the installation is complete. Step 4: You should hear a "click...diagonally. Inadequately removing the CPU cooler may adhere to your CPU cooler installation manual for instructions on installing the cooler.) Step 5: After the installation, check the back of thermal grease on the motherboard. Direction of the Arrow Sign on the Male Push Pin Male Push ...

Manual
Page 16
... the nuts and complete the steps to remove the Crazy Cool heatsink. (Remember to replace the copper fin.) Refer to your CPU cooler installation manual for the other spring screw. Step 5: Push down on one of the two spring screws and put the nut on the bottom of the ... from the back of turns. Do not remove the spring screws. Step 3: Before unfastening the spring screw as circled in the picture to the left ). GA-P35-DQ6 Motherboard - 16 - A long nose plier 3. Step 6: Do the same for instructions on installing the cooler. (Note) The components received may easily remove the Crazy ...
... the nuts and complete the steps to remove the Crazy Cool heatsink. (Remember to replace the copper fin.) Refer to your CPU cooler installation manual for the other spring screw. Step 5: Push down on one of the two spring screws and put the nut on the bottom of the ... from the back of turns. Do not remove the spring screws. Step 3: Before unfastening the spring screw as circled in the picture to the left ). GA-P35-DQ6 Motherboard - 16 - A long nose plier 3. Step 6: Do the same for instructions on installing the cooler. (Note) The components received may easily remove the Crazy ...

Manual
Page 19
... Express x16 Slot (PCIE_16_2) PCI Express x1 Slot PCI Slot Follow the steps below to the chassis back panel with your card. Carefully read the manual that supports your expansion card. • Always turn off the computer and unplug the power cord from the slot. If necessary, go to BIOS Setup...
... Express x16 Slot (PCIE_16_2) PCI Express x1 Slot PCI Slot Follow the steps below to the chassis back panel with your card. Carefully read the manual that supports your expansion card. • Always turn off the computer and unplug the power cord from the slot. If necessary, go to BIOS Setup...

Manual
Page 35
..."BIOS Setup," for a few seconds. Failure to do so may cause damage to the motherboard. • After system restart, go to BIOS Setup to load factory defaults (select Load Optimized Defaults) or manually configure the BIOS settings (refer to clear the CMOS values (e.g. Definition 1 1 Signal 2 ...use a metal object like a screwdriver to touch the two pins for BIOS configurations). 22) CI (Chassis Intrusion Header) This motherboard provides a chassis detection feature that detects if the chassis cover has been removed. Hardware Installation This function requires a chassis with chassis...
..."BIOS Setup," for a few seconds. Failure to do so may cause damage to the motherboard. • After system restart, go to BIOS Setup to load factory defaults (select Load Optimized Defaults) or manually configure the BIOS settings (refer to clear the CMOS values (e.g. Definition 1 1 Signal 2 ...use a metal object like a screwdriver to touch the two pins for BIOS configurations). 22) CI (Chassis Intrusion Header) This motherboard provides a chassis detection feature that detects if the chassis cover has been removed. Hardware Installation This function requires a chassis with chassis...

Manual
Page 42
...The system boot will not stop for a floppy disk drive error but it will stop for any error. Cylinder Number of extended memory. GA-P35-DQ6 Motherboard - 42 - Precomp Write precompensation cylinder. Typically, 640 KB will be reserved for the MS-DOS operating system. All Errors Whenever the ...item to None so the system will skip the detection of the device during the POST for faster system startup. • Manual Allows you to manually enter the specifications of the hard drive when the hard drive access mode is 3-mode floppy disk drive, a Japanese standard ...
...The system boot will not stop for a floppy disk drive error but it will stop for any error. Cylinder Number of extended memory. GA-P35-DQ6 Motherboard - 42 - Precomp Write precompensation cylinder. Typically, 640 KB will be reserved for the MS-DOS operating system. All Errors Whenever the ...item to None so the system will skip the detection of the device during the POST for faster system startup. • Manual Allows you to manually enter the specifications of the hard drive when the hard drive access mode is 3-mode floppy disk drive, a Japanese standard ...
Manual
Page 54
...CPU FSB. As stability is from 90 MHz to 200 MHz. High Speed DRAM DLL Settings Provides two different memory timing configurations. GA-P35-DQ6 Motherboard - 54 - For an 800 MHz FSB CPU, set this item to be changed dynamically based on system components, when system ...SPD data. (Default: Auto) Memory Frequency (Mhz) The first memory frequency value is designed to automatically adjust CPU computing power to manually set the CPU host frequency. Warning: Before using C.I .A.2 allows your system hardware components. Auto sets the PCIe clock frequency to help...
...CPU FSB. As stability is from 90 MHz to 200 MHz. High Speed DRAM DLL Settings Provides two different memory timing configurations. GA-P35-DQ6 Motherboard - 54 - For an 800 MHz FSB CPU, set this item to be changed dynamically based on system components, when system ...SPD data. (Default: Auto) Memory Frequency (Mhz) The first memory frequency value is designed to automatically adjust CPU computing power to manually set the CPU host frequency. Warning: Before using C.I .A.2 allows your system hardware components. Auto sets the PCIe clock frequency to help...

Manual
Page 61
Drivers Installation English 3-4 Hardware Information This page provides information about the hardware devices on this motherboard. 3-5 Contact Us Check the contacts information of the GIGABYTE headquarter in Taiwan and the overseas branch offices on the last page of this manual. - 61 -
Drivers Installation English 3-4 Hardware Information This page provides information about the hardware devices on this motherboard. 3-5 Contact Us Check the contacts information of the GIGABYTE headquarter in Taiwan and the overseas branch offices on the last page of this manual. - 61 -

Manual
Page 68
...the BIOS, the Q-Flash tool frees you to update the system BIOS while in RAID/AHCI mode or a hard drive attached to access Q-Flash. GA-P35-DQ6 Motherboard - 68 - What is Q-FlashTM? GIGABYTE Q-Flash and @BIOS are easy-to-use and allow you can access Q-Flash by adding one more physical BIOS chip. Additionally, this...and copy the BIOS file to the main BIOS to enter MSDOS mode. For the sake of system safety, users cannot update the backup BIOS manually. What is Dual BIOS ? What is saved to enter Q-Flash. Before You Begin: 1. Inadequate BIOS flashing may result in BIOS Setup.
...the BIOS, the Q-Flash tool frees you to update the system BIOS while in RAID/AHCI mode or a hard drive attached to access Q-Flash. GA-P35-DQ6 Motherboard - 68 - What is Q-FlashTM? GIGABYTE Q-Flash and @BIOS are easy-to-use and allow you can access Q-Flash by adding one more physical BIOS chip. Additionally, this...and copy the BIOS file to the main BIOS to enter MSDOS mode. For the sake of system safety, users cannot update the backup BIOS manually. What is Dual BIOS ? What is saved to enter Q-Flash. Before You Begin: 1. Inadequate BIOS flashing may result in BIOS Setup.

Manual
Page 72
... in an unbootable system. • If the BIOS update file for your motherboard model. P35DQ6.f1) obtained from GIGABYTE's website and follow the instructions in "Update the BIOS without Using the Internet...the model name on the screen is not present on the @BIOS server site, please manually download the BIOS update file from the Internet or through other source. Step 4: As ...result in the Files of type list. Make sure the extracted BIOS file matches your system. GA-P35-DQ6 Motherboard - 72 - Select Load Optimized Defaults and press to enter the BIOS Setup program. Step...
... in an unbootable system. • If the BIOS update file for your motherboard model. P35DQ6.f1) obtained from GIGABYTE's website and follow the instructions in "Update the BIOS without Using the Internet...the model name on the screen is not present on the @BIOS server site, please manually download the BIOS update file from the Internet or through other source. Step 4: As ...result in the Files of type list. Make sure the extracted BIOS file matches your system. GA-P35-DQ6 Motherboard - 72 - Select Load Optimized Defaults and press to enter the BIOS Setup program. Step...

Manual
Page 88
... driver. Windows Setup Press F6 if you need to install a 3rd party SCSI or RAID driver" (Figure 1). S=Specify Additional Device ENTER=Continue F3=Exit Figure 2 GA-P35-DQ6 Motherboard - 88 - Step 1: Restart your hard drive(s). Windows Setup Setup could not determine the type of one or more mass storage devices installed in your system... that you are ready to install Windows Vista/XP/2000 onto your system to boot from a mass storage device manufacturer, or do not want to manually specify an adapter.
... driver. Windows Setup Press F6 if you need to install a 3rd party SCSI or RAID driver" (Figure 1). S=Specify Additional Device ENTER=Continue F3=Exit Figure 2 GA-P35-DQ6 Motherboard - 88 - Step 1: Restart your hard drive(s). Windows Setup Setup could not determine the type of one or more mass storage devices installed in your system... that you are ready to install Windows Vista/XP/2000 onto your system to boot from a mass storage device manufacturer, or do not want to manually specify an adapter.

Manual
Page 92
... use Windows XP as the example operating system.) Step 1: After installing the audio driver, the Audio Manager icon will appear in jack and manually configure the jack for multi-channel speaker configurations. • 2 channel audio: Headphone or Line out. • 4 channel audio: Front ...the function for each jack through the audio driver. Before installing the audio driver, make a telephone call over the Internet, and etc. GA-P35-DQ6 Motherboard - 92 - all at the same time. The integrated HD (High Definition) audio provides Center/Subwoofer Speaker Out Rear Speaker Out Line ...
... use Windows XP as the example operating system.) Step 1: After installing the audio driver, the Audio Manager icon will appear in jack and manually configure the jack for multi-channel speaker configurations. • 2 channel audio: Headphone or Line out. • 4 channel audio: Front ...the function for each jack through the audio driver. Before installing the audio driver, make a telephone call over the Internet, and etc. GA-P35-DQ6 Motherboard - 92 - all at the same time. The integrated HD (High Definition) audio provides Center/Subwoofer Speaker Out Rear Speaker Out Line ...


