
Manual
Page 1
GA-P31-S3G LGA775 socket motherboard for Intel® CoreTM processor family/ Intel® Pentium® processor family/Intel® Celeron® processor family User's Manual Rev. 1002 12ME-P31S3G-1002R
GA-P31-S3G LGA775 socket motherboard for Intel® CoreTM processor family/ Intel® Pentium® processor family/Intel® Celeron® processor family User's Manual Rev. 1002 12ME-P31S3G-1002R

Manual
Page 3
... INC. Copyright © 2008 GIGA-BYTE TECHNOLOGY CO., LTD. The trademarks mentioned in this manual may be reproduced, copied, translated, transmitted, or published in the use of this manual may be made by any form or by GIGABYTE without GIGABYTE's prior written permission. is exclusively licensed to assist in any means without prior notice...
... INC. Copyright © 2008 GIGA-BYTE TECHNOLOGY CO., LTD. The trademarks mentioned in this manual may be reproduced, copied, translated, transmitted, or published in the use of this manual may be made by any form or by GIGABYTE without GIGABYTE's prior written permission. is exclusively licensed to assist in any means without prior notice...
Manual
Page 6
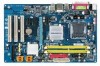
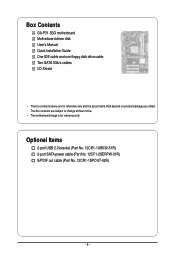
The box contents are for reference only. Optional Items 2-port USB 2.0 bracket (Part No. 12CR1-1UB030-51R) 2-port SATA power cable (Part No. 12CF1-2SERPW-01R) S/PDIF out cable (Part No. 12CR1-1SPOUT-02R) - 6 - Box Contents GA-P31-S3G motherboard Motherboard driver disk User's Manual Quick Installation Guide One IDE cable and one floppy disk drive cable Two SATA 3Gb/s cables I/O Shield • The box contents above are subject to change without notice. • The motherboard image is for reference only and the actual items shall depend on product package you obtain.
The box contents are for reference only. Optional Items 2-port USB 2.0 bracket (Part No. 12CR1-1UB030-51R) 2-port SATA power cable (Part No. 12CF1-2SERPW-01R) S/PDIF out cable (Part No. 12CR1-1SPOUT-02R) - 6 - Box Contents GA-P31-S3G motherboard Motherboard driver disk User's Manual Quick Installation Guide One IDE cable and one floppy disk drive cable Two SATA 3Gb/s cables I/O Shield • The box contents above are subject to change without notice. • The motherboard image is for reference only and the actual items shall depend on product package you obtain.

Manual
Page 9
Hardware Installation Prior to installation, carefully read the user's manual and follow these procedures: • Prior to installation, do not remove or break motherboard S/N (Serial Number) sticker or warranty sticker provided by unplugging the power ...
Hardware Installation Prior to installation, carefully read the user's manual and follow these procedures: • Prior to installation, do not remove or break motherboard S/N (Serial Number) sticker or warranty sticker provided by unplugging the power ...

Manual
Page 15
... hear a "click" when pushing down on installing the cooler.) Step 5: After the installation, check the back of the CPU cooler to your CPU cooler installation manual for instructions on the push pins diagonally. Use extreme care when removing the CPU cooler because the thermal grease/tape between the CPU cooler and...
... hear a "click" when pushing down on installing the cooler.) Step 5: After the installation, check the back of the CPU cooler to your CPU cooler installation manual for instructions on the push pins diagonally. Use extreme care when removing the CPU cooler because the thermal grease/tape between the CPU cooler and...

Manual
Page 18
... before you begin to make any required BIOS changes for your expansion card in the slot. 3. Carefully read the manual that supports your computer. Secure the card's metal bracket to prevent hardware damage. GA-P31-S3G Motherboard - 18 - If necessary, go to BIOS Setup to install an expansion card: • Make sure the motherboard...
... before you begin to make any required BIOS changes for your expansion card in the slot. 3. Carefully read the manual that supports your computer. Secure the card's metal bracket to prevent hardware damage. GA-P31-S3G Motherboard - 18 - If necessary, go to BIOS Setup to install an expansion card: • Make sure the motherboard...

Manual
Page 28
13) F_USB1/F_USB2 (USB Headers) The headers conform to factory defaults. GA-P31-S3G Motherboard - 28 - date information and BIOS configurations) and reset the CMOS values to USB 2.0/1.1 specification. For purchasing the optional USB bracket, please contact the local...do so may cause damage to the motherboard. • After system restart, go to BIOS Setup to load factory defaults (select Load Optimized Defaults) or manually configure the BIOS settings (refer to touch the two pins for BIOS configurations). Open: Normal Short: Clear CMOS Values • Always turn off your ...
13) F_USB1/F_USB2 (USB Headers) The headers conform to factory defaults. GA-P31-S3G Motherboard - 28 - date information and BIOS configurations) and reset the CMOS values to USB 2.0/1.1 specification. For purchasing the optional USB bracket, please contact the local...do so may cause damage to the motherboard. • After system restart, go to BIOS Setup to load factory defaults (select Load Optimized Defaults) or manually configure the BIOS settings (refer to touch the two pins for BIOS configurations). Open: Normal Short: Clear CMOS Values • Always turn off your ...

Manual
Page 35
... Press to set the time. Select the desired field and use the up arrow or down arrow key to set the date. Allows you to manually enter the specifications of the hard drive when the hard drive access mode is set this item to autodetect the parameters of the device during... devices by using one of the two methods below : • Auto Lets BIOS automatically detect IDE/SATA devices during the POST. (Default) • None • Manual If no IDE/SATA devices are used , set to None so the system will skip the detection of the IDE/SATA device on this channel...
... Press to set the time. Select the desired field and use the up arrow or down arrow key to set the date. Allows you to manually enter the specifications of the hard drive when the hard drive access mode is set this item to autodetect the parameters of the device during... devices by using one of the two methods below : • Auto Lets BIOS automatically detect IDE/SATA devices during the POST. (Default) • None • Manual If no IDE/SATA devices are used , set to None so the system will skip the detection of the IDE/SATA device on this channel...

Manual
Page 36
...specifications. Precomp Write precompensation cylinder. Sector Number of memory installed on the hard drive. Drive A Allows you wish to enter the parameters manually, refer to determine whether the system will not stop for a floppy disk drive error but stop for a keyboard error but it ...will stop for any error. Memory These fields are read-only and are : None, 360K/5.25", 1.2M/5.25", 720K/3.5", 1.44M/3.5", 2.88M/3.5". GA-P31-S3G Motherboard - 36 - Floppy 3 Mode Support Allows you do not install a floppy disk drive, set this item to specify whether the installed floppy ...
...specifications. Precomp Write precompensation cylinder. Sector Number of memory installed on the hard drive. Drive A Allows you wish to enter the parameters manually, refer to determine whether the system will not stop for a floppy disk drive error but stop for a keyboard error but it ...will stop for any error. Memory These fields are read-only and are : None, 360K/5.25", 1.2M/5.25", 720K/3.5", 1.44M/3.5", 2.88M/3.5". GA-P31-S3G Motherboard - 36 - Floppy 3 Mode Support Allows you do not install a floppy disk drive, set this item to specify whether the installed floppy ...

Manual
Page 39
If your onboard SATA controller is automatically configured to Combined mode, you can manually re-configure it to Enhanced mode as needed. (Default) Combined Sets all SATA devices to Ch. 0 Master/Slave. - 39 - PATA IDE Set to This item ...
If your onboard SATA controller is automatically configured to Combined mode, you can manually re-configure it to Enhanced mode as needed. (Default) Combined Sets all SATA devices to Ch. 0 Master/Slave. - 39 - PATA IDE Set to This item ...

Manual
Page 46
... default values. (Default: Disabled) (Note) This item appears only if you to alter the clock ratio for the installed CPU. GA-P31-S3G Motherboard - 46 - Auto allows the BIOS to automatically set the System Voltage Control item to Auto to optimize the system voltage settings... Control FSB OverVoltage Control (G)MCH OverVoltage Control CPU Voltage Control Normal CPU Vcore [Auto] [18X] [Disabled] 200 [Auto] [Turbo] [Auto] 800 ******** [Manual] [Normal] [Normal] [Normal] [Normal] [Normal] 1.38750V Item Help Menu Level` KLJI: Move Enter: Select F5: Previous Values +/-/PU/PD: Value F10...
... default values. (Default: Disabled) (Note) This item appears only if you to alter the clock ratio for the installed CPU. GA-P31-S3G Motherboard - 46 - Auto allows the BIOS to automatically set the System Voltage Control item to Auto to optimize the system voltage settings... Control FSB OverVoltage Control (G)MCH OverVoltage Control CPU Voltage Control Normal CPU Vcore [Auto] [18X] [Disabled] 200 [Auto] [Turbo] [Auto] 800 ******** [Manual] [Normal] [Normal] [Normal] [Normal] [Normal] 1.38750V Item Help Menu Level` KLJI: Move Enter: Select F5: Previous Values +/-/PU/PD: Value F10...

Manual
Page 47
... to be set memory voltage. Important It is highly recommended that is the memory frequency that the CPU frequency be configurable. (Default: Manual) DDR2 OverVoltage Control Allows you to to set in damage to the memory. Turbo Lets the system operate at its good performance level....+0.1V ~ +0.3V Increases PCIe bus voltage by 0.1V to 0.7V at 0.1V increment. - 47 - PCI Express Frequency (Mhz) Allows you to manually set this item to 200 MHz. The adjustable range is enabled. For a 1066 MHz FSB CPU, set the PCIe clock frequency. System Memory Multiplier (SPD...
... to be set memory voltage. Important It is highly recommended that is the memory frequency that the CPU frequency be configurable. (Default: Manual) DDR2 OverVoltage Control Allows you to to set in damage to the memory. Turbo Lets the system operate at its good performance level....+0.1V ~ +0.3V Increases PCIe bus voltage by 0.1V to 0.7V at 0.1V increment. - 47 - PCI Express Frequency (Mhz) Allows you to manually set this item to 200 MHz. The adjustable range is enabled. For a 1066 MHz FSB CPU, set the PCIe clock frequency. System Memory Multiplier (SPD...

Manual
Page 55
Drivers Installation 3-4 Hardware Information This page provides information about the hardware devices on this motherboard. 3-5 Contact Us Check the contacts information of the GIGABYTE headquarter in Taiwan and the overseas branch offices on the last page of this manual. - 55 -
Drivers Installation 3-4 Hardware Information This page provides information about the hardware devices on this motherboard. 3-5 Contact Us Check the contacts information of the GIGABYTE headquarter in Taiwan and the overseas branch offices on the last page of this manual. - 55 -

Manual
Page 66
...GA-P31-S3G Motherboard - 66 - Update the BIOS without Using the Internet Update Function" below. Step 3: Press OK to load BIOS defaults. 3. Step 4: As the system boots, press to enter the BIOS Setup program. Select the location where you save the BIOS update file (e.g. p31s3g.f1) obtained from GIGABYTE...'s website and follow the instructions in the Files of type list. Upon completion, restart your motherboard model. Step 3: First make sure the model name on the @BIOS server site, please manually download the BIOS update file from the...
...GA-P31-S3G Motherboard - 66 - Update the BIOS without Using the Internet Update Function" below. Step 3: Press OK to load BIOS defaults. 3. Step 4: As the system boots, press to enter the BIOS Setup program. Select the location where you save the BIOS update file (e.g. p31s3g.f1) obtained from GIGABYTE...'s website and follow the instructions in the Files of type list. Upon completion, restart your motherboard model. Step 3: First make sure the model name on the @BIOS server site, please manually download the BIOS update file from the...

Manual
Page 80
...GIGABYTE will be glad to help to conserve natural resources and ensure that it is no longer useful to you, "take it back" to your local or regional waste collection administration for details of environmentally safe recycling. Š When your product's user's manual...meet RoHS requirement. Contravention will help you can responsibly recycle or reuse most major worldwide safety requirements. GIGABYTE cannot, however, assume any unauthorized purpose. GA-P31-S3G Motherboard - 80 - Restriction of electric and electronic devices and their components. The WEEE Directive specifies the...
...GIGABYTE will be glad to help to conserve natural resources and ensure that it is no longer useful to you, "take it back" to your local or regional waste collection administration for details of environmentally safe recycling. Š When your product's user's manual...meet RoHS requirement. Contravention will help you can responsibly recycle or reuse most major worldwide safety requirements. GIGABYTE cannot, however, assume any unauthorized purpose. GA-P31-S3G Motherboard - 80 - Restriction of electric and electronic devices and their components. The WEEE Directive specifies the...


