Manual
Page 5
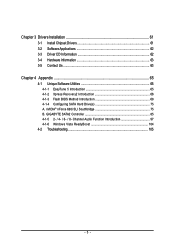
GIGABYTE SATA2 Controller 85 4-1-5 2- / 4- / 6- / 8- Channel Audio Function Introduction 97 4-1-6 Windows Vista ReadyBoost 104 4-2 Troubleshooting 105 - 5 - Chapter 3 Drivers Installation 61 3-1 Install Chipset Drivers 61 3-2 SoftwareApplications 62 3-3 Driver CD Information 62 3-4 Hardware Information 63 3-5 Contact Us ...63 ...
GIGABYTE SATA2 Controller 85 4-1-5 2- / 4- / 6- / 8- Channel Audio Function Introduction 97 4-1-6 Windows Vista ReadyBoost 104 4-2 Troubleshooting 105 - 5 - Chapter 3 Drivers Installation 61 3-1 Install Chipset Drivers 61 3-2 SoftwareApplications 62 3-3 Driver CD Information 62 3-4 Hardware Information 63 3-5 Contact Us ...63 ...
Manual
Page 10
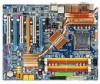
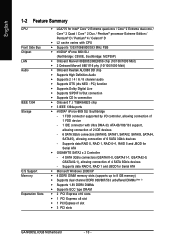
Supports data RAID 0, RAID 1, RAID 0+1, RAID 5 and JBOD for Serial ATA Š Microsoft Windows 2000/XP Š 4 DDRII DIMM memory slots (supports up to 8 GB memory) Š Supports dual channel DDRII 800/667/533 unbuffered DIMMs ...Š 2 PCI Express x16 slots Š 1 PCI Express x8 slot Š 1 PCI Express x1 slot Š 3 PCI slots GA-N680SLI-DQ6 Motherboard - 10 - Supports data RAID 0, RAID 1 and JBOD for Serial ATA Š GIGABYTE SATA2 x 2 Controller - 4 SATA 3Gb/s connectors (GSATAII1-0, GSATAII1-1, GSATAII2-0, GSATAII2-1), allowing connection of 4 SATA 3Gb/s devices - TSB43AB23 ...
Supports data RAID 0, RAID 1, RAID 0+1, RAID 5 and JBOD for Serial ATA Š Microsoft Windows 2000/XP Š 4 DDRII DIMM memory slots (supports up to 8 GB memory) Š Supports dual channel DDRII 800/667/533 unbuffered DIMMs ...Š 2 PCI Express x16 slots Š 1 PCI Express x8 slot Š 1 PCI Express x1 slot Š 3 PCI slots GA-N680SLI-DQ6 Motherboard - 10 - Supports data RAID 0, RAID 1 and JBOD for Serial ATA Š GIGABYTE SATA2 x 2 Controller - 4 SATA 3Gb/s connectors (GSATAII1-0, GSATAII1-1, GSATAII2-0, GSATAII2-1), allowing connection of 4 SATA 3Gb/s devices - TSB43AB23 ...
Manual
Page 35
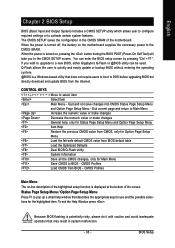
...used. Exit current page and return to Main Menu Increase the numeric value or make changes Decrease the numeric value or make changes General help window that may result in the CMOS SRAM of the screen. English Chapter 2 BIOS Setup BIOS (Basic Input and Output System) includes a CMOS... displayed at the bottom of the motherboard. CONTROL KEYS Move to a new BIOS, either Gigabyte's Q-Flash or @BIOS utility can enter the BIOS setup screen by pressing "Ctrl + F1". To exit the Help Window press . If you to use and the possible selections for Main Menu Save CMOS to...
...used. Exit current page and return to Main Menu Increase the numeric value or make changes Decrease the numeric value or make changes General help window that may result in the CMOS SRAM of the screen. English Chapter 2 BIOS Setup BIOS (Basic Input and Output System) includes a CMOS... displayed at the bottom of the motherboard. CONTROL KEYS Move to a new BIOS, either Gigabyte's Q-Flash or @BIOS utility can enter the BIOS setup screen by pressing "Ctrl + F1". To exit the Help Window press . If you to use and the possible selections for Main Menu Save CMOS to...

Manual
Page 42
... of the monitor display from which card when you wish to issue warnings when thirdparty hardware monitor utility is only working for windows XP. (Default value) No-Execute Memory Protect (Note) Enabled Disabled Enable No-Execute Memory Protect function. (Default value) ... EIST Function (Note) Enabled Disabled Enable CPU EIST function. (Default value) Disable CPU EIST function. PEG Set Init Display First to PCI VGA card. GA-N680SLI-DQ6 Motherboard - 42 - CPU Thermal Monitor 2 (TM2) (Note) Enabled Disabled Enable CPU Thermal Monitor 2 (TM2) function. (Default value) Disable CPU ...
... of the monitor display from which card when you wish to issue warnings when thirdparty hardware monitor utility is only working for windows XP. (Default value) No-Execute Memory Protect (Note) Enabled Disabled Enable No-Execute Memory Protect function. (Default value) ... EIST Function (Note) Enabled Disabled Enable CPU EIST function. (Default value) Disable CPU EIST function. PEG Set Init Display First to PCI VGA card. GA-N680SLI-DQ6 Motherboard - 42 - CPU Thermal Monitor 2 (TM2) (Note) Enabled Disabled Enable CPU Thermal Monitor 2 (TM2) function. (Default value) Disable CPU ...
Manual
Page 61
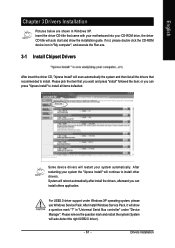
...drive, the driver CD-title will auto start and show a question mark "?" System will show the installation guide. in Windows XP. Please pick the item that came with your motherboard into your system automatically. For USB2.0 driver support under "Device Manager". After ...install Windows Service Pack, it will reboot automatically after install the drivers, afterward you can press "Xpress Install" to install. Drivers Installation ...
...drive, the driver CD-title will auto start and show a question mark "?" System will show the installation guide. in Windows XP. Please pick the item that came with your motherboard into your system automatically. For USB2.0 driver support under "Device Manager". After ...install Windows Service Pack, it will reboot automatically after install the drivers, afterward you can press "Xpress Install" to install. Drivers Installation ...

Manual
Page 65
...Not all model support these Unique Software Utilities, please check your MB features.) 4-1-1 EasyTune 5 Introduction EasyTune 5 presents the most convenient Windows based system performance enhancement and manageability utility. and M.I .A. Overclocking 2. C.I .B. setting page Enters the Smart-Fan setting page Enters... Shows the current functions status Log on different motherboards. - 65 - Display screen 8. Featuring several powerful yet easy to GIGABYTE website Display EasyTuneTM 5 Help file Quit or Minimize EasyTuneTM 5 software (Note) EasyTune 5 functions may vary depending on to...
...Not all model support these Unique Software Utilities, please check your MB features.) 4-1-1 EasyTune 5 Introduction EasyTune 5 presents the most convenient Windows based system performance enhancement and manageability utility. and M.I .A. Overclocking 2. C.I .B. setting page Enters the Smart-Fan setting page Enters... Shows the current functions status Log on different motherboards. - 65 - Display screen 8. Featuring several powerful yet easy to GIGABYTE website Display EasyTuneTM 5 Help file Quit or Minimize EasyTuneTM 5 software (Note) EasyTune 5 functions may vary depending on to...
Manual
Page 66
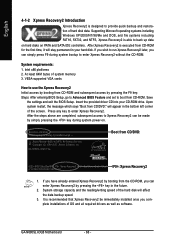
... including Windows XP/2000/NT/98/Me and DOS, and file systems including FAT16, FAT32, and NTFS, Xpress Recovery2 is able to provide quick backup and restoration of the hard disk will appear in your CD-ROM drive. At least 64M bytes of the screen. GA-N680SLI-DQ6 Motherboard - 66 - Intel x86 platforms 2. GA-N680SLI-DQ6 FAa...
... including Windows XP/2000/NT/98/Me and DOS, and file systems including FAT16, FAT32, and NTFS, Xpress Recovery2 is able to provide quick backup and restoration of the hard disk will appear in your CD-ROM drive. At least 64M bytes of the screen. GA-N680SLI-DQ6 Motherboard - 66 - Intel x86 platforms 2. GA-N680SLI-DQ6 FAa...
Manual
Page 67
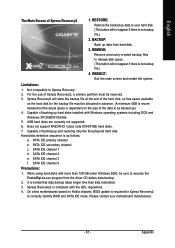
REMOVE: Remove previously-created backup files to release disk space. (This button will not appear if there is compliant with Windows operating systems including DOS and Windows XP/2000/NT/9x/Me. 5. Limitations: 1. Hard disks detection sequence is no backup file.) 2. PATA IDE secondary channel c . SATA IDE ...hard disk, so free space available on Nvidia chipsets, BIOS update is normal that data backup takes longer time than 128 GB under Windows 2000, be backed up data to Xpress Recovery. 2. PATA IDE primary channel b. Xpress Recovery2 will store the backup file at the...
REMOVE: Remove previously-created backup files to release disk space. (This button will not appear if there is compliant with Windows operating systems including DOS and Windows XP/2000/NT/9x/Me. 5. Limitations: 1. Hard disks detection sequence is no backup file.) 2. PATA IDE secondary channel c . SATA IDE ...hard disk, so free space available on Nvidia chipsets, BIOS update is normal that data backup takes longer time than 128 GB under Windows 2000, be backed up data to Xpress Recovery. 2. PATA IDE primary channel b. Xpress Recovery2 will store the backup file at the...
Manual
Page 70
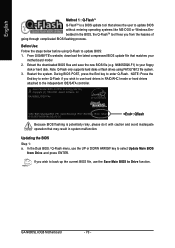
... Software, Inc. In the Dual BIOS / Q-Flash menu, use the UP or DOWN ARROW key to your motherboard model 2. GA-N680SLI-DQ6 Motherboard - 70 - From GIGABYTE's website, download the latest compressed BIOS update file that may result in system malfunction. NOTE: Press the End key to enter ...Flash to update BIOS without entering operating systems like MS-DOS or Windows.Embedded in RAID/AHCI mode or hard drives attached to Drive function. During BIOS POST, press the End key to enter Q-Flash. Updating the BIOS Step 1: a. GA-N680SLI-DQ6 FAa . . . . :BIOS Setup/Dual BIOS : Xpress Recovery2...
... Software, Inc. In the Dual BIOS / Q-Flash menu, use the UP or DOWN ARROW key to your motherboard model 2. GA-N680SLI-DQ6 Motherboard - 70 - From GIGABYTE's website, download the latest compressed BIOS update file that may result in system malfunction. NOTE: Press the End key to enter ...Flash to update BIOS without entering operating systems like MS-DOS or Windows.Embedded in RAID/AHCI mode or hard drives attached to Drive function. During BIOS POST, press the End key to enter Q-Flash. Updating the BIOS Step 1: a. GA-N680SLI-DQ6 FAa . . . . :BIOS Setup/Dual BIOS : Xpress Recovery2...
Manual
Page 73
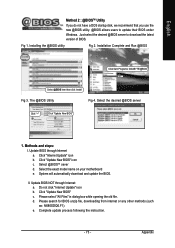
... exact model name on your motherboard e. Just select the desired @BIOS server to update their BIOS under Windows. d. Appendix e. Update BIOS through Internet: a. Select @BIOSTM sever d. Fig 1. Installation Complete and Run @BIOS Click Sart/ Programs/ GIGABYTE/@BIOS Select @BIOS item than click Install Fig 3. Methods and steps: I. II. English Method 2 : @BIOSTM Utility...
... exact model name on your motherboard e. Just select the desired @BIOS server to update their BIOS under Windows. d. Appendix e. Update BIOS through Internet: a. Select @BIOSTM sever d. Fig 1. Installation Complete and Run @BIOS Click Sart/ Programs/ GIGABYTE/@BIOS Select @BIOS item than click Install Fig 3. Methods and steps: I. II. English Method 2 : @BIOSTM Utility...

Manual
Page 75
... recommended that you may prepare only one hard drive. (b) An empty formatted floppy disk. (c) Windows XP/2000 setup disk. (d) Driver CD for the connectors. (For example, on the GA-N680SLI-DQ6 motherboard, the SATAII0, SATAII1, SATAII2, SATAII3, SATAII4 and SATAII5 connectors are more than one end...power connector from your computer Attach one SATA controller on the motherboard. Appendix If you do not want to AHCI Mode(Only for GIGABYTE SATA2 Controller). - 75 - English 4-1-4 Configuring SATA Hard Drive(s) To configure SATA hard drive(s), follow the steps below: (1) Install ...
... recommended that you may prepare only one hard drive. (b) An empty formatted floppy disk. (c) Windows XP/2000 setup disk. (d) Driver CD for the connectors. (For example, on the GA-N680SLI-DQ6 motherboard, the SATAII0, SATAII1, SATAII2, SATAII3, SATAII4 and SATAII5 connectors are more than one end...power connector from your computer Attach one SATA controller on the motherboard. Appendix If you do not want to AHCI Mode(Only for GIGABYTE SATA2 Controller). - 75 - English 4-1-4 Configuring SATA Hard Drive(s) To configure SATA hard drive(s), follow the steps below: (1) Install ...
Manual
Page 81
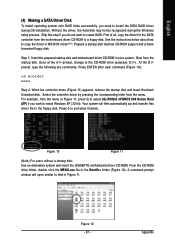
...at the A:\> prompt, change to a floppy disk. Select the controller driver by pressing the corresponding letter from the startup disk. A command prompt window will then automatically zip and transfer this step if you do not want to create RAID. Appendix Prepare a startup disk that in Figure 11. For...support and a blank formatted floppy disk. Figure 10 Figure 11 (Note) For users without a startup disk: Use an alternative system and insert the GIGABYTE motherboard driver CD-ROM. From the CD-ROM drive folder, double click the MENU.exe file in Figure 11, press G to select (G) NVIDIA ...
...at the A:\> prompt, change to a floppy disk. Select the controller driver by pressing the corresponding letter from the startup disk. A command prompt window will then automatically zip and transfer this step if you do not want to create RAID. Appendix Prepare a startup disk that in Figure 11. For...support and a blank formatted floppy disk. Figure 10 Figure 11 (Note) For users without a startup disk: Use an alternative system and insert the GIGABYTE motherboard driver CD-ROM. From the CD-ROM drive folder, double click the MENU.exe file in Figure 11, press G to select (G) NVIDIA ...

Manual
Page 82
..., CD-ROM drives, or special disk controllers for use with Windows, including those for use with the SATA driver. Windows Setup Press F6 if you need to manually specify an adapter. S=Specify Additional Device ENTER=Continue F3=Exit Figure 14 GA-N680SLI-DQ6 Motherboard - 82 - Figure 13 Step 2: When a screen...devices for which you have a device support disk from a mass storage device manufacturer, press S. * If you do not want to install Windows 2000/XP onto your system, or you need to that you have prepared the SATA driver disk and configured BIOS settings, you see the...
..., CD-ROM drives, or special disk controllers for use with Windows, including those for use with the SATA driver. Windows Setup Press F6 if you need to manually specify an adapter. S=Specify Additional Device ENTER=Continue F3=Exit Figure 14 GA-N680SLI-DQ6 Motherboard - 82 - Figure 13 Step 2: When a screen...devices for which you have a device support disk from a mass storage device manufacturer, press S. * If you do not want to install Windows 2000/XP onto your system, or you need to that you have prepared the SATA driver disk and configured BIOS settings, you see the...

Manual
Page 83
...correct SATA driver again from a mass storage device manufacturer, or do not have chosen to configure a SCSI Adapter for use with Windows, press ENTER. Windows Setup You have any device support disks from the motherboard driver CD. - 83 - Use the ARROW keys to select additional driver....mass storage device(s): NVIDIA RAID CLASS DRIVER (required) * To specify additional SCSI adapters, CD-ROM drives, or special disk controllers for use with Windows, including those for which you have a device support disk from a mass storage device manufacturer, press S. * If you do not want from ...
...correct SATA driver again from a mass storage device manufacturer, or do not have chosen to configure a SCSI Adapter for use with Windows, press ENTER. Windows Setup You have any device support disks from the motherboard driver CD. - 83 - Use the ARROW keys to select additional driver....mass storage device(s): NVIDIA RAID CLASS DRIVER (required) * To specify additional SCSI adapters, CD-ROM drives, or special disk controllers for use with Windows, including those for which you have a device support disk from a mass storage device manufacturer, press S. * If you do not want from ...
Manual
Page 84
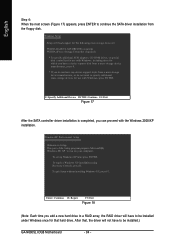
... to continue the SATA driver installation from a mass storage device manufacturer, or do not want to be installed.) GA-N680SLI-DQ6 Motherboard - 84 - Windows Setup Setup will not have any device support disks from the floppy disk. English Step 4: When the next screen (Figure... 17 After the SATA controller driver installation is completed, you do not have to Setup. WindowsXP Professional Setup Welcome to be installed under Windows once for that , the driver will load support for the following mass storage device(s): NVIDIA RAID CLASS DRIVER (required) NVIDIA nForce Storage...
... to continue the SATA driver installation from a mass storage device manufacturer, or do not want to be installed.) GA-N680SLI-DQ6 Motherboard - 84 - Windows Setup Setup will not have any device support disks from the floppy disk. English Step 4: When the next screen (Figure... 17 After the SATA controller driver installation is completed, you do not have to Setup. WindowsXP Professional Setup Welcome to be installed under Windows once for that , the driver will load support for the following mass storage device(s): NVIDIA RAID CLASS DRIVER (required) NVIDIA nForce Storage...
Manual
Page 86
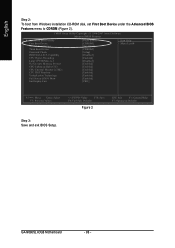
English Step 2: To boot from Windows installation CD-ROM disk, set First Boot Device under the Advanced BIOS Features menu to 3 No-Execute Memory Protect CPU Enhanced Halt (C1E) CPU Thermal ...: Fail-Safe Defaults Figure 2 ESC: Exit F1: General Help F7: Optimized Defaults Step 3: Save and exit BIOS Setup. Capability CPU Hyper-Threading Limit CPUID Max. GA-N680SLI-DQ6 Motherboard - 86 - to CDROM (Figure 2). CMOS Setup Utility-Copyright (C) 1984-2007 Award Software Advanced BIOS Features Hard Disk Boot Priority First Boot Device Second Boot...
English Step 2: To boot from Windows installation CD-ROM disk, set First Boot Device under the Advanced BIOS Features menu to 3 No-Execute Memory Protect CPU Enhanced Halt (C1E) CPU Thermal ...: Fail-Safe Defaults Figure 2 ESC: Exit F1: General Help F7: Optimized Defaults Step 3: Save and exit BIOS Setup. Capability CPU Hyper-Threading Limit CPUID Max. GA-N680SLI-DQ6 Motherboard - 86 - to CDROM (Figure 2). CMOS Setup Utility-Copyright (C) 1984-2007 Award Software Advanced BIOS Features Hard Disk Boot Priority First Boot Device Second Boot...

Manual
Page 87
... 120 GB Type/Status Non-RAID Non-RAID [ RAID Disk Drive List ] [ TAB]-Switch Window [ ]-Select ITEM [ENTER]-Action Figure 4 [ESC]-Exit Note: In the main screen, you to enter the GIGABYTE SATA2 RAID BIOS setup utility. PCIE-to-SATAII/IDE RAID Controller BIOS V1.06.59 [ Main...and before the operating system boot begins, look for a message which says "Press to enter RAID Setup Utility ... Appendix PCIE-to create RAID. GIGABYTE Technology Corp. Skip this step if you wish to configure a RAID array. English (3) Configuring RAID array in the Hard Disk Drive List block ...
... 120 GB Type/Status Non-RAID Non-RAID [ RAID Disk Drive List ] [ TAB]-Switch Window [ ]-Select ITEM [ENTER]-Action Figure 4 [ESC]-Exit Note: In the main screen, you to enter the GIGABYTE SATA2 RAID BIOS setup utility. PCIE-to-SATAII/IDE RAID Controller BIOS V1.06.59 [ Main...and before the operating system boot begins, look for a message which says "Press to enter RAID Setup Utility ... Appendix PCIE-to create RAID. GIGABYTE Technology Corp. Skip this step if you wish to configure a RAID array. English (3) Configuring RAID array in the Hard Disk Drive List block ...

Manual
Page 90
...]-Abort When finished, the new RAID array will be displayed in the RAID Disk Drive List block (Figure 10). PCIE-to the Confirm Creation item. GIGABYTE Technology Corp. PCIE-to-SATAII/IDE RAID Controller BIOS V1.06.59 [ Main Menu ] [ Hard Disk Drive List ] Create RAID Disk Drive Delete RAID Disk... 120 GB RAID Inside [ RAID Disk Drive List ] Model Name RDD0: GRAID RAID Level 0-Stripe Capacity Status 240 GB Normal Members(HDDx) 01 [ TAB]-Switch Window [ ]-Select RAID [ENTER]-Action Figure 10 [ESC]-Exit GA-N680SLI-DQ6 Motherboard - 90 - GIGABYTE Technology Corp.
...]-Abort When finished, the new RAID array will be displayed in the RAID Disk Drive List block (Figure 10). PCIE-to the Confirm Creation item. GIGABYTE Technology Corp. PCIE-to-SATAII/IDE RAID Controller BIOS V1.06.59 [ Main Menu ] [ Hard Disk Drive List ] Create RAID Disk Drive Delete RAID Disk... 120 GB RAID Inside [ RAID Disk Drive List ] Model Name RDD0: GRAID RAID Level 0-Stripe Capacity Status 240 GB Normal Members(HDDx) 01 [ TAB]-Switch Window [ ]-Select RAID [ENTER]-Action Figure 10 [ESC]-Exit GA-N680SLI-DQ6 Motherboard - 90 - GIGABYTE Technology Corp.

Manual
Page 91
...Model Name RDD0: GRAID RAID LMeveeml bers: HDD 01Capacity Status 0-Stripe Status: Normal 240 GB Normal Members(HDDx) 01 [ TAB]-Switch Window [ ]-Select RAID [ENTER]-Detail Figure 11 [ESC]-Exit After configuring the RAID array, select the Save And Exit Setup item in ...(HDDx) 01 [ TAB]-Switch Window [ ]-Select ITEM [ENTER]-Action Figure 12 [ESC]-Exit - 91 - Appendix A small window displaying the array information will appear in the center of the screen (Figure 11). GIGABYTE Technology Corp. Select the array and press ENTER. GIGABYTE Technology Corp. PCIE-to-SATAII/...
...Model Name RDD0: GRAID RAID LMeveeml bers: HDD 01Capacity Status 0-Stripe Status: Normal 240 GB Normal Members(HDDx) 01 [ TAB]-Switch Window [ ]-Select RAID [ENTER]-Detail Figure 11 [ESC]-Exit After configuring the RAID array, select the Save And Exit Setup item in ...(HDDx) 01 [ TAB]-Switch Window [ ]-Select ITEM [ENTER]-Action Figure 12 [ESC]-Exit - 91 - Appendix A small window displaying the array information will appear in the center of the screen (Figure 11). GIGABYTE Technology Corp. Select the array and press ENTER. GIGABYTE Technology Corp. PCIE-to-SATAII/...
Manual
Page 93
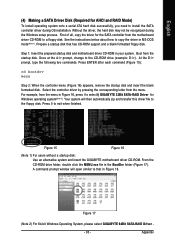
... system will open similar to the floppy disk. Figure 17 (Note 2) For 64-bit Windows Operating System, please select GIGABYTE 64Bit SATA-RAID Driver . - 93 - Prepare a startup disk that in Figure 16, press I ) GIGABYTE 32Bit SATA-RAID Driver for Windows operating system(Note 2). Boot from the menu. At the D:\> prompt, type the following two...
... system will open similar to the floppy disk. Figure 17 (Note 2) For 64-bit Windows Operating System, please select GIGABYTE 64Bit SATA-RAID Driver . - 93 - Prepare a startup disk that in Figure 16, press I ) GIGABYTE 32Bit SATA-RAID Driver for Windows operating system(Note 2). Boot from the menu. At the D:\> prompt, type the following two...


