Manual
Page 72
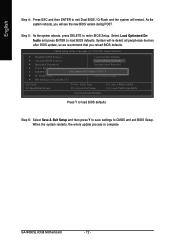
... BIOS defaults Step 6: Select Save & Exit Setup and then press Y to save settings to enter BIOS Setup. As the system reboots, you reload BIOS defaults. GA-N680SLI-DQ6 Motherboard - 72 - System will re-detect all peripherals devices after BIOS update, so we recommend that you will restart. Step 5: As the system reboots, press... whole update process is complete. Select Load Optimized Defaults and press ENTER to exit Dual BIOS / Q-Flash and the system will see the new BIOS version during POST.
... BIOS defaults Step 6: Select Save & Exit Setup and then press Y to save settings to enter BIOS Setup. As the system reboots, you reload BIOS defaults. GA-N680SLI-DQ6 Motherboard - 72 - System will re-detect all peripherals devices after BIOS update, so we recommend that you will restart. Step 5: As the system reboots, press... whole update process is complete. Select Load Optimized Defaults and press ENTER to exit Dual BIOS / Q-Flash and the system will see the new BIOS version during POST.
Manual
Page 73
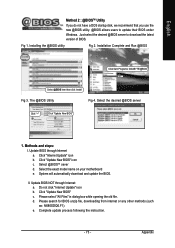
Installation Complete and Run @BIOS Click Sart/ Programs/ GIGABYTE/@BIOS Select @BIOS item than click Install Fig 3. The @BIOS Utility Fig 4. Click "Update New BIOS" icon c . II. Click "Update New BIOS" c. Please search for ... Utility If you do not have a DOS startup disk, we recommend that you use the new @BIOS utility. @BIOS allows users to download the latest version of BIOS. e. Methods and steps: I. Do not click "Internet Update" icon b. Fig 1. Select the exact model name on your motherboard e.
Installation Complete and Run @BIOS Click Sart/ Programs/ GIGABYTE/@BIOS Select @BIOS item than click Install Fig 3. The @BIOS Utility Fig 4. Click "Update New BIOS" icon c . II. Click "Update New BIOS" c. Please search for ... Utility If you do not have a DOS startup disk, we recommend that you use the new @BIOS utility. @BIOS allows users to download the latest version of BIOS. e. Methods and steps: I. Do not click "Internet Update" icon b. Fig 1. Select the exact model name on your motherboard e.
Manual
Page 74
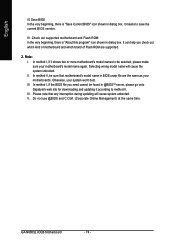
... be found in @BIOSTM server, please go onto Gigabyte's web site for downloading and updating it shows two or more motherboard's model names to save the current BIOS version. In method I, if it according to method II. Otherwise, your motherboard's model name again. In method I . GA-N680SLI-DQ6 Motherboard - 74 - Save BIOS In the very...
... be found in @BIOSTM server, please go onto Gigabyte's web site for downloading and updating it shows two or more motherboard's model names to save the current BIOS version. In method I, if it according to method II. Otherwise, your motherboard's model name again. In method I . GA-N680SLI-DQ6 Motherboard - 74 - Save BIOS In the very...

Manual
Page 76
... Values +/-/PU/PD: Value F10: Save F6: Fail-Safe Defaults ESC: Exit F1: General Help F7: Optimized Defaults Figure 1 To set the first boot device. GA-N680SLI-DQ6 Motherboard - 76 - In the example in this section may not show the exact settings for example, NV SATA1 Primary RAID controls the SATAII0 connector and... Setup and set up a RAID array, ensure that NV SATA RAID function is enabled. The actual BIOS Setup menu options you have and the BIOS version.
... Values +/-/PU/PD: Value F10: Save F6: Fail-Safe Defaults ESC: Exit F1: General Help F7: Optimized Defaults Figure 1 To set the first boot device. GA-N680SLI-DQ6 Motherboard - 76 - In the example in this section may not show the exact settings for example, NV SATA1 Primary RAID controls the SATAII0 connector and... Setup and set up a RAID array, ensure that NV SATA RAID function is enabled. The actual BIOS Setup menu options you have and the BIOS version.
Manual
Page 85
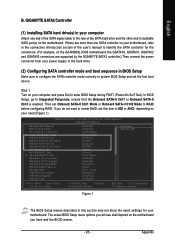
...Ctrl1 or Onboard SATA-II Ctrl2 is enabled. English B. The actual BIOS Setup menu options you have and the BIOS version. - 85 - If there are supported by the GIGABYTE SATA2 controller.) Then connect the power connector from your power supply to the hard drive. (2) Configuring SATA controller mode ... and press Del to identify the SATA controller for the connectors. (For example, on the motherboard you will see shall depend on the GA-N680SLI-DQ6 motherboard, the GSATAII0, GSATAII1, GSATAII2 and GSATAII3 connectors are more than one end of the SATA signal cable to the rear of the ...
...Ctrl1 or Onboard SATA-II Ctrl2 is enabled. English B. The actual BIOS Setup menu options you have and the BIOS version. - 85 - If there are supported by the GIGABYTE SATA2 controller.) Then connect the power connector from your power supply to the hard drive. (2) Configuring SATA controller mode ... and press Del to identify the SATA controller for the connectors. (For example, on the motherboard you will see shall depend on the GA-N680SLI-DQ6 motherboard, the GSATAII0, GSATAII1, GSATAII2 and GSATAII3 connectors are more than one end of the SATA signal cable to the rear of the ...
Manual
Page 105
... and negative pins in the manual. Turn off the on-board battery to leak voltage to the Clear CMOS steps in the battery holder to GIGABYTE's website. Question 5: Sometimes I cannot see these beeps usually stand for about 1 minute (Or you can take off power. 2. Question 1: I ...Appendix English 4-2 Troubleshooting Below is a collection of my keyboard/optical mouse still on after computer shuts down and that were included in new BIOS version. Questions 2: Why is equipped with power/amplifier and try again later. If your board has a Clear CMOS jumper, please refer to clear CMOS...
... and negative pins in the manual. Turn off the on-board battery to leak voltage to the Clear CMOS steps in the battery holder to GIGABYTE's website. Question 5: Sometimes I cannot see these beeps usually stand for about 1 minute (Or you can take off power. 2. Question 1: I ...Appendix English 4-2 Troubleshooting Below is a collection of my keyboard/optical mouse still on after computer shuts down and that were included in new BIOS version. Questions 2: Why is equipped with power/amplifier and try again later. If your board has a Clear CMOS jumper, please refer to clear CMOS...

