Manual
Page 5
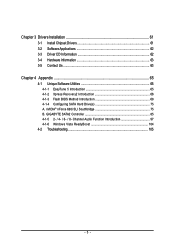
... ReadyBoost 104 4-2 Troubleshooting 105 - 5 - Chapter 3 Drivers Installation 61 3-1 Install Chipset Drivers 61 3-2 SoftwareApplications 62 3-3 Driver CD Information 62 3-4 Hardware Information 63 3-5 Contact Us ...63 Chapter 4 Appendix 65 4-1 Unique Software Utilities 65 4-1-1 EasyTune 5 Introduction 65 4-1-2 Xpress Recovery2 Introduction 66 4-1-3 Flash BIOS Method Introduction 68 4-1-4 Configuring SATA Hard Drive(s 75 A. GIGABYTE SATA2 Controller 85 4-1-5 2- / 4- / 6- / 8- nVIDIA®...
... ReadyBoost 104 4-2 Troubleshooting 105 - 5 - Chapter 3 Drivers Installation 61 3-1 Install Chipset Drivers 61 3-2 SoftwareApplications 62 3-3 Driver CD Information 62 3-4 Hardware Information 63 3-5 Contact Us ...63 Chapter 4 Appendix 65 4-1 Unique Software Utilities 65 4-1-1 EasyTune 5 Introduction 65 4-1-2 Xpress Recovery2 Introduction 66 4-1-3 Flash BIOS Method Introduction 68 4-1-4 Configuring SATA Hard Drive(s 75 A. GIGABYTE SATA2 Controller 85 4-1-5 2- / 4- / 6- / 8- nVIDIA®...

Manual
Page 17
... its power source and read the expansion card's installation manual before installing the expansion card in the motherboard. 4. Disconnect your computer's chassis cover. 7. Install related driver in system BIOS Setup. 8. Hardware Installation Replace the screw to release the card. For example: Installing a PCI Express x16 VGA card: To install the VGA...
... its power source and read the expansion card's installation manual before installing the expansion card in the motherboard. 4. Disconnect your computer's chassis cover. 7. Install related driver in system BIOS Setup. 8. Hardware Installation Replace the screw to release the card. For example: Installing a PCI Express x16 VGA card: To install the VGA...
Manual
Page 21
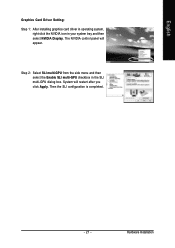
English Graphics Card Driver Setting: Step 1: After installing graphics card driver in operating system, right-click the NVIDIA icon in the SLI multi-GPU dialog box. Then the SLI configuration is completed. - 21 - System will appear. Hardware Installation Step 2: Select SLI multi-GPU from the side menu and then select the Enable SLI multi-GPU checkbox in your system tray and then select NVIDIA Display. The NVIDIA control panel will restart after you click Apply.
English Graphics Card Driver Setting: Step 1: After installing graphics card driver in operating system, right-click the NVIDIA icon in the SLI multi-GPU dialog box. Then the SLI configuration is completed. - 21 - System will appear. Hardware Installation Step 2: Select SLI multi-GPU from the side menu and then select the Enable SLI multi-GPU checkbox in your system tray and then select NVIDIA Display. The NVIDIA control panel will restart after you click Apply.
Manual
Page 22
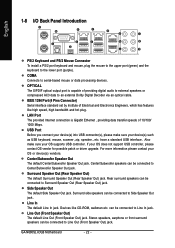
... default Line Out (Front Speaker Out) jack. Also make sure your OS does not support USB controller, please contact OS vendor for possible patch or driver upgrade. Center/Subwoofer speakers can be connected to Center/Subwoofer Speaker Out jack. Surround Speaker Out (Rear Speaker Out) The default Surround Speaker Out (Rear.... If your device(s) such as USB keyboard, mouse, scanner, zip, speaker...etc. can be connected to an external Dolby Digital Decoder via an optical cable. GA-N680SLI-DQ6 Motherboard - 22 -
... default Line Out (Front Speaker Out) jack. Also make sure your OS does not support USB controller, please contact OS vendor for possible patch or driver upgrade. Center/Subwoofer speakers can be connected to Center/Subwoofer Speaker Out jack. Surround Speaker Out (Rear Speaker Out) The default Surround Speaker Out (Rear.... If your device(s) such as USB keyboard, mouse, scanner, zip, speaker...etc. can be connected to an external Dolby Digital Decoder via an optical cable. GA-N680SLI-DQ6 Motherboard - 22 -
Manual
Page 27
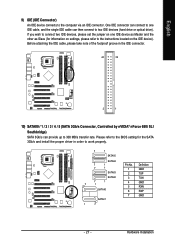
... - 27 - One IDE connector can connect to one IDE device as Master and the other as Slave (for the SATA 3Gb/s and install the proper driver in the IDE connector. 40 39 2 1 10) SATAII0 / 1 / 2 / 3 / 4 / 5 (SATA 3Gb/s Connector, Controlled by nVIDIA® nForce 680i SLI Southbridge) SATA 3Gb/s can then connect to...
... - 27 - One IDE connector can connect to one IDE device as Master and the other as Slave (for the SATA 3Gb/s and install the proper driver in the IDE connector. 40 39 2 1 10) SATAII0 / 1 / 2 / 3 / 4 / 5 (SATA 3Gb/s Connector, Controlled by nVIDIA® nForce 680i SLI Southbridge) SATA 3Gb/s can then connect to...
Manual
Page 28
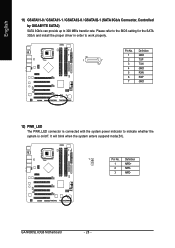
... will blink when the system enters suspend mode(S1). 1 Pin No. Please refer to the BIOS setting for the SATA 3Gb/s and install the proper driver in order to work properly. 1 7 Pin No. 1 2 3 4 5 6 7 Definition GND TXP TXN GND RXN RXP GND 12) PWR_LED The... on/off. Definition 1 MPD+ 2 MPD- 3 MPD- English 11) GSATAII1-0 / GSATAII1-1 / GSATAII2-0 / GSATAII2-1 (SATA 3Gb/s Connector, Controlled by GIGABYTE SATA2) SATA 3Gb/s can provide up to indicate whether the system is connected with the system power indicator to 300 MB/s transfer rate. GA-N680SLI-DQ6 Motherboard - 28 -
... will blink when the system enters suspend mode(S1). 1 Pin No. Please refer to the BIOS setting for the SATA 3Gb/s and install the proper driver in order to work properly. 1 7 Pin No. 1 2 3 4 5 6 7 Definition GND TXP TXN GND RXN RXP GND 12) PWR_LED The... on/off. Definition 1 MPD+ 2 MPD- 3 MPD- English 11) GSATAII1-0 / GSATAII1-1 / GSATAII2-0 / GSATAII2-1 (SATA 3Gb/s Connector, Controlled by GIGABYTE SATA2) SATA 3Gb/s can provide up to indicate whether the system is connected with the system power indicator to 300 MB/s transfer rate. GA-N680SLI-DQ6 Motherboard - 28 -
Manual
Page 30
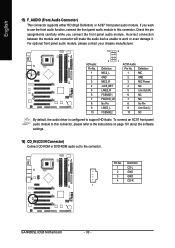
Definition 1 CD-L 2 GND 3 GND 4 CD-R 1 GA-N680SLI-DQ6 Motherboard - 30 - Incorrect connection between the module and connector will make the audio device unable to support HD Audio. Pin No. English 15) F_AUDIO (Front ... audio out to this connector. Definition 1 MIC 2 GND 3 MIC Power 4 NC 5 Line Out (R) 6 NC 7 NC 8 No Pin 9 Line Out (L) 10 NC By default, the audio driver is configured to work or even damage it.
Definition 1 CD-L 2 GND 3 GND 4 CD-R 1 GA-N680SLI-DQ6 Motherboard - 30 - Incorrect connection between the module and connector will make the audio device unable to support HD Audio. Pin No. English 15) F_AUDIO (Front ... audio out to this connector. Definition 1 MIC 2 GND 3 MIC Power 4 NC 5 Line Out (R) 6 NC 7 NC 8 No Pin 9 Line Out (L) 10 NC By default, the audio driver is configured to work or even damage it.

Manual
Page 45
...Mode This function allows users to decide the operating mode of the SATA-II Ctrl2 (GSATAII2-0 / GSATAII2-1) ports controlled by the Gigabyte SATA2 controller. For more details about AHCI, please visit Intel's website. Onboard SATA-II Ctrl1 Mode This function allows users to... Disabled Disable onboard LAN1 chip function. - 45 - Advanced Host Controller Inteface (AHCI) is an interface specification that allows the storage driver to enable advanced Serial ATA features such as Native Command Queuing and hot plug. For more details about AHCI, please visit Intel's website...
...Mode This function allows users to decide the operating mode of the SATA-II Ctrl2 (GSATAII2-0 / GSATAII2-1) ports controlled by the Gigabyte SATA2 controller. For more details about AHCI, please visit Intel's website. Onboard SATA-II Ctrl1 Mode This function allows users to... Disabled Disable onboard LAN1 chip function. - 45 - Advanced Host Controller Inteface (AHCI) is an interface specification that allows the storage driver to enable advanced Serial ATA features such as Native Command Queuing and hot plug. For more details about AHCI, please visit Intel's website...
Manual
Page 61
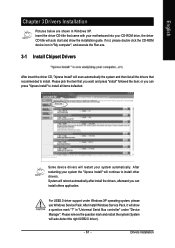
... item that recommended to install. in "Universal Serial Bus controller" under Windows XP operating system, please use Windows Service Pack. Some device drivers will auto-detect the right USB2.0 driver). - 61 - Please remove the question mark and restart the system (System will restart your system the "Xpress Install" will reboot automatically after...
... item that recommended to install. in "Universal Serial Bus controller" under Windows XP operating system, please use Windows Service Pack. Some device drivers will auto-detect the right USB2.0 driver). - 61 - Please remove the question mark and restart the system (System will restart your system the "Xpress Install" will reboot automatically after...

Manual
Page 62
English 3-2 Software Applications This page displays all the tools that Gigabyte developed and some free software, you can choose anyone you want and press "install" to install them. 3-3 Driver CD Information This page lists the contents of software and drivers in this CD-title. GA-N680SLI-DQ6 Motherboard - 62 -
English 3-2 Software Applications This page displays all the tools that Gigabyte developed and some free software, you can choose anyone you want and press "install" to install them. 3-3 Driver CD Information This page lists the contents of software and drivers in this CD-title. GA-N680SLI-DQ6 Motherboard - 62 -

Manual
Page 63
English 3-4 Hardware Information This page lists all device you have for this motherboard. 3-5 Contact Us Please see the last page for details. - 63 - Drivers Installation
English 3-4 Hardware Information This page lists all device you have for this motherboard. 3-5 Contact Us Please see the last page for details. - 63 - Drivers Installation
Manual
Page 66
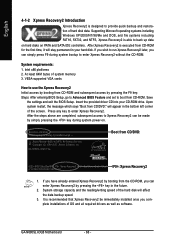
...have already entered Xpress Recovery2 by booting from the CD-ROM, you complete installations of OS and all required drivers as well as software. System storage capacity and the reading/writing speed of the screen. System requirements: 1....hard disk will stay permanent in the future. 2. Save the settings and exit the BIOS Setup. Insert the provided driver CD into your hard disk. GA-N680SLI-DQ6 FAa . . . . :BIOS Setup/Dual BIOS : Xpress Recovery2 : Boot Menu : Qflash 4/12/2007-NF68...system bootup to enter Xpress Recovery2 without the CD-ROM. GA-N680SLI-DQ6 Motherboard - 66 -
...have already entered Xpress Recovery2 by booting from the CD-ROM, you complete installations of OS and all required drivers as well as software. System storage capacity and the reading/writing speed of the screen. System requirements: 1....hard disk will stay permanent in the future. 2. Save the settings and exit the BIOS Setup. Insert the provided driver CD into your hard disk. GA-N680SLI-DQ6 FAa . . . . :BIOS Setup/Dual BIOS : Xpress Recovery2 : Boot Menu : Qflash 4/12/2007-NF68...system bootup to enter Xpress Recovery2 without the CD-ROM. GA-N680SLI-DQ6 Motherboard - 66 -
Manual
Page 67
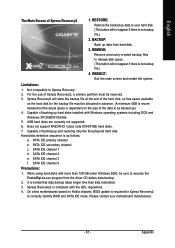
... channel 1 d. Appendix REMOVE: Remove previously-created backup files to execute the EnableBigLba.exe program from hard disk. 3. Limitations: 1. Capable of backing up data from the driver CD before data backup. 2. Hard disks detection sequence is compliant with Windows operating systems including DOS and Windows XP/2000/NT/9x/Me. 5. RESTORE: Restore...
... channel 1 d. Appendix REMOVE: Remove previously-created backup files to execute the EnableBigLba.exe program from hard disk. 3. Limitations: 1. Capable of backing up data from the driver CD before data backup. 2. Hard disks detection sequence is compliant with Windows operating systems including DOS and Windows XP/2000/NT/9x/Me. 5. RESTORE: Restore...

Manual
Page 75
...your motherboard, refer to the connectors introduction section of the SATA hard drive and the other end to available SATA port(s) on the GA-N680SLI-DQ6 motherboard, the SATAII0, SATAII1, SATAII2, SATAII3, SATAII4 and SATAII5 connectors are supported by the nVIDIA® nForce 680i SLI Southbridge.)... 1), (Note 2) (5) Install the SATA controller driver during OS installation. (Note 1), (Note 2) Before you begin Please prepare: (a) At least two SATA hard drives (to ensure optimal performance, it is set to AHCI Mode(Only for GIGABYTE SATA2 Controller). - 75 - If you do not want to create...
...your motherboard, refer to the connectors introduction section of the SATA hard drive and the other end to available SATA port(s) on the GA-N680SLI-DQ6 motherboard, the SATAII0, SATAII1, SATAII2, SATAII3, SATAII4 and SATAII5 connectors are supported by the nVIDIA® nForce 680i SLI Southbridge.)... 1), (Note 2) (5) Install the SATA controller driver during OS installation. (Note 1), (Note 2) Before you begin Please prepare: (a) At least two SATA hard drives (to ensure optimal performance, it is set to AHCI Mode(Only for GIGABYTE SATA2 Controller). - 75 - If you do not want to create...
Manual
Page 80
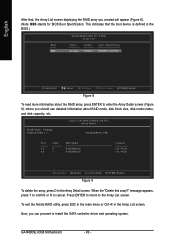
... in the main menu or Ctrl+X in the Array Detail screen. GA-N680SLI-DQ6 Motherboard - 80 - This indicates that , the Array List screen displaying the RAID array you should see detailed information about the RAID array, press ENTER to install the SATA controller driver and operating system. message appears, press Y to confirm or N to...
... in the main menu or Ctrl+X in the Array Detail screen. GA-N680SLI-DQ6 Motherboard - 80 - This indicates that , the Array List screen displaying the RAID array you should see detailed information about the RAID array, press ENTER to install the SATA controller driver and operating system. message appears, press Y to confirm or N to...
Manual
Page 81
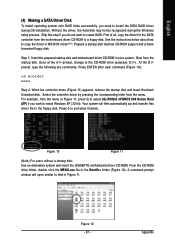
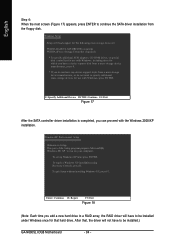
...type the following two commands. Figure 10 Figure 11 (Note) For users without a startup disk: Use an alternative system and insert the GIGABYTE motherboard driver CD-ROM. Press ENTER after each command (Figure 10): cd bootdrv menu Step 2: When the controller menu (Figure 11) appears, remove...not be recognized during OS installation. For example, from the motherboard driver CD-ROM to install the SATA RAID driver during the Windows setup process. Step 1: Insert the prepared startup disk and motherboard driver CD-ROM in the BootDrv folder (Figure 12). From the CD-...
...type the following two commands. Figure 10 Figure 11 (Note) For users without a startup disk: Use an alternative system and insert the GIGABYTE motherboard driver CD-ROM. Press ENTER after each command (Figure 10): cd bootdrv menu Step 2: When the controller menu (Figure 11) appears, remove...not be recognized during OS installation. For example, from the motherboard driver CD-ROM to install the SATA RAID driver during the Windows setup process. Step 1: Insert the prepared startup disk and motherboard driver CD-ROM in the BootDrv folder (Figure 12). From the CD-...

Manual
Page 82
...installation Now that below appears, insert the floppy disk containing the SATA driver and press S (Figure 14). Windows Setup Press F6 if you see the next screen. S=Specify Additional Device ENTER=Continue F3=Exit Figure 14 GA-N680SLI-DQ6 Motherboard - 82 - After pressing F6, there will load support for... the following is an example of some files being loaded before you see the "Press F6 if you need to that you have prepared the SATA driver disk and configured BIOS settings...
...installation Now that below appears, insert the floppy disk containing the SATA driver and press S (Figure 14). Windows Setup Press F6 if you see the next screen. S=Specify Additional Device ENTER=Continue F3=Exit Figure 14 GA-N680SLI-DQ6 Motherboard - 82 - After pressing F6, there will load support for... the following is an example of some files being loaded before you see the "Press F6 if you need to that you have prepared the SATA driver disk and configured BIOS settings...

Manual
Page 83
...or some file(s) cannot be found, please check the floppy disk or copy the correct SATA driver again from a mass storage device manufacturer, or do not have chosen to select additional driver. Appendix Later, when a screen similar to Figure 16 appears, you want from the following ... manufacturer, press S. * If you do not want to specify additional mass storage devices for use with Windows, press ENTER. NVIDIA RAID CLASS DRIVER (required) NVIDIA nForce Storage Controller (required) ENTER=Select F3=Exit Figure 15 Windows Setup Setup will return to the previous screen. Use the...
...or some file(s) cannot be found, please check the floppy disk or copy the correct SATA driver again from a mass storage device manufacturer, or do not have chosen to select additional driver. Appendix Later, when a screen similar to Figure 16 appears, you want from the following ... manufacturer, press S. * If you do not want to specify additional mass storage devices for use with Windows, press ENTER. NVIDIA RAID CLASS DRIVER (required) NVIDIA nForce Storage Controller (required) ENTER=Select F3=Exit Figure 15 Windows Setup Setup will return to the previous screen. Use the...
Manual
Page 84
...you add a new hard drive to a RAID array, the RAID driver will have to be installed under Windows once for that , the driver will load support for the following mass storage device(s): NVIDIA RAID CLASS DRIVER (required) NVIDIA nForce Storage Controller (required) * To specify additional ... driver installation from a mass storage device manufacturer, or do not want to specify additional mass storage devices for use with Windows, including those for which you have a device support disk from a mass storage device manufacturer, press S. * If you do not have to be installed.) GA-N680SLI-DQ6 ...
...you add a new hard drive to a RAID array, the RAID driver will have to be installed under Windows once for that , the driver will load support for the following mass storage device(s): NVIDIA RAID CLASS DRIVER (required) NVIDIA nForce Storage Controller (required) * To specify additional ... driver installation from a mass storage device manufacturer, or do not want to specify additional mass storage devices for use with Windows, including those for which you have a device support disk from a mass storage device manufacturer, press S. * If you do not have to be installed.) GA-N680SLI-DQ6 ...

Manual
Page 92
Press the SPACEBAR on the array to install the SATA controller driver and operating system. GIGABYTE Technology Corp. ARE YOU SURE TO DELETE (Y/N)? N RAID Level Capacity Status 0-Stripe 240 GB Normal Members(HDDx) 01 [ ]-Select RAID [SPACE]-Mark Delete [...appear to the RAID Disk Drive List block. GA-N680SLI-DQ6 Motherboard - 92 - a small triangle will move to mark the selected array (Figure 13). Press Del. Delete Array: To delete the array, select Delete RAID Disk Drive in the main menu and press ENTER. GIGABYTE Technology Corp. PCIE-to-SATAII/IDE RAID ...
Press the SPACEBAR on the array to install the SATA controller driver and operating system. GIGABYTE Technology Corp. ARE YOU SURE TO DELETE (Y/N)? N RAID Level Capacity Status 0-Stripe 240 GB Normal Members(HDDx) 01 [ ]-Select RAID [SPACE]-Mark Delete [...appear to the RAID Disk Drive List block. GA-N680SLI-DQ6 Motherboard - 92 - a small triangle will move to mark the selected array (Figure 13). Press Del. Delete Array: To delete the array, select Delete RAID Disk Drive in the main menu and press ENTER. GIGABYTE Technology Corp. PCIE-to-SATAII/IDE RAID ...


