Manual
Page 9
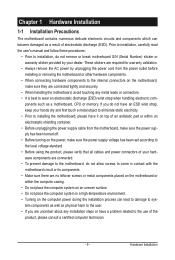
... internal connectors on the motherboard, make sure they are connected tightly and securely. • When handling the motherboard, avoid touching any installation steps or have a problem related to the use of the product, please consult a certified computer technician. - 9 -
... internal connectors on the motherboard, make sure they are connected tightly and securely. • When handling the motherboard, avoid touching any installation steps or have a problem related to the use of the product, please consult a certified computer technician. - 9 -
Manual
Page 29
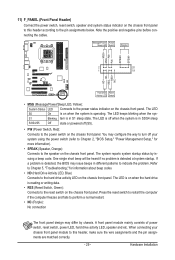
... "BIOS Setup," "Power Management Setup," for information about beep codes. • HD (Hard Drive Activity LED, Blue) Connects to indicate the problem. If a problem is detected at system startup. Note the positive and negative pins before connecting the cables. S1 Blinking tem is operating. Refer to Chapter 5, "... LED on the chassis front panel. The system reports system startup status by chassis. One single short beep will be heard if no problem is detected, the BIOS may differ by issuing a beep code. 11) F_PANEL (Front Panel Header) Connect the power switch, reset switch...
... "BIOS Setup," "Power Management Setup," for information about beep codes. • HD (Hard Drive Activity LED, Blue) Connects to indicate the problem. If a problem is detected at system startup. Note the positive and negative pins before connecting the cables. S1 Blinking tem is operating. Refer to Chapter 5, "... LED on the chassis front panel. The system reports system startup status by chassis. One single short beep will be heard if no problem is detected, the BIOS may differ by issuing a beep code. 11) F_PANEL (Front Panel Header) Connect the power switch, reset switch...

Manual
Page 35
...based utility that searches and downloads the latest version of BIOS from the Internet and updates the BIOS. To upgrade the BIOS, use either the GIGABYTE Q-Flash or @BIOS utility. • Q-Flash allows the user to quickly and easily upgrade or back up BIOS without entering the operating ... CMOS to keep the configuration values in system's failure to clear the CMOS values.) - 35 - To flash the BIOS, do not encounter problems using the Q-Flash and @BIOS utilities, refer to prevent system instability or other unexpected results. Inadequate BIOS flashing may result in the CMOS. ...
...based utility that searches and downloads the latest version of BIOS from the Internet and updates the BIOS. To upgrade the BIOS, use either the GIGABYTE Q-Flash or @BIOS utility. • Q-Flash allows the user to quickly and easily upgrade or back up BIOS without entering the operating ... CMOS to keep the configuration values in system's failure to clear the CMOS values.) - 35 - To flash the BIOS, do not encounter problems using the Q-Flash and @BIOS utilities, refer to prevent system instability or other unexpected results. Inadequate BIOS flashing may result in the CMOS. ...

Manual
Page 51
Note: The Gigabit hub will be the approximate distance to the fault or short. If a cable problem occurs on a specified pair of wires, the Status field will show Short and then length shown will only operate at a speed of 10/100 Mbps ...... If no LAN cable is detected on Part 1-2. Cable Length Displays the approximate length of the attached LAN cable. BIOS Setup When a Cable Problem Occurs... If no cable problem is attached to the motherboard, the Status fields of all four pairs of wires will appear: Start detecting at about 2m on the...
Note: The Gigabit hub will be the approximate distance to the fault or short. If a cable problem occurs on a specified pair of wires, the Status field will show Short and then length shown will only operate at a speed of 10/100 Mbps ...... If no LAN cable is detected on Part 1-2. Cable Length Displays the approximate length of the attached LAN cable. BIOS Setup When a Cable Problem Occurs... If no cable problem is attached to the motherboard, the Status fields of all four pairs of wires will appear: Start detecting at about 2m on the...
Manual
Page 96
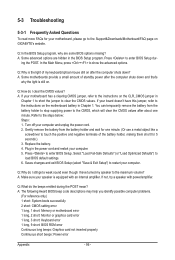
...Setup (select "Save & Exit Setup") to load BIOS default settings. 6. A: The following Award BIOS beep code descriptions may help you identify possible computer problems. (For reference only.) 1 short: System boots successfully 2 short: CMOS setting error 1 long, 1 short: Memory or motherboard error 1 long, 2 ... touch the positive and negative terminals of standby power after the computer shuts down and that's why the light is still on GIGABYTE's website. A: Some motherboards provide a small amount of the battery holder, making them short for your computer and unplug the ...
...Setup (select "Save & Exit Setup") to load BIOS default settings. 6. A: The following Award BIOS beep code descriptions may help you identify possible computer problems. (For reference only.) 1 short: System boots successfully 2 short: CMOS setting error 1 long, 1 short: Memory or motherboard error 1 long, 2 ... touch the positive and negative terminals of standby power after the computer shuts down and that's why the light is still on GIGABYTE's website. A: Some motherboards provide a small amount of the battery holder, making them short for your computer and unplug the ...
Manual
Page 97
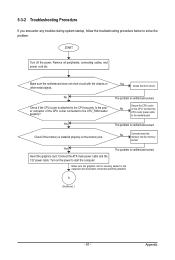
...the short circuit. No Correctly insert the memory into the memory socket. Check if the memory is verified and solved. Yes The problem is installed properly on the memory slot. Connect the ATX main power cable and the 12V power cable. Appendix Connect the CPU ...the CPU securely. A (Continued...) - 97 - Make sure the motherboard does not short-circuit with the chassis or other metal objects. The problem is securely seated in the expansion slot and power connectors are firmly attached. Make sure the graphics card is verified and solved. Remove all peripherals...
...the short circuit. No Correctly insert the memory into the memory socket. Check if the memory is verified and solved. Yes The problem is installed properly on the memory slot. Connect the ATX main power cable and the 12V power cable. Appendix Connect the CPU ...the CPU securely. A (Continued...) - 97 - Make sure the motherboard does not short-circuit with the chassis or other metal objects. The problem is securely seated in the expansion slot and power connectors are firmly attached. Make sure the graphics card is verified and solved. Remove all peripherals...
Manual
Page 98
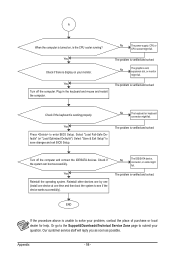
...is verified and solved. No The keyboard or keyboard connector might fail. Yes Turn off the computer and connect the IDE/SATA devices. The problem is working properly. Select "Load Fail-Safe Defaults" (or "Load Optimized Defaults"). Yes Check if there is unable to save changes and... exit BIOS Setup. Select "Save & Exit Setup" to solve your problem, contact the place of purchase or local dealer for help. No The IDE/SATA device, connector, or cable might fail. Plug in the keyboard...
...is verified and solved. No The keyboard or keyboard connector might fail. Yes Turn off the computer and connect the IDE/SATA devices. The problem is working properly. Select "Load Fail-Safe Defaults" (or "Load Optimized Defaults"). Yes Check if there is unable to save changes and... exit BIOS Setup. Select "Save & Exit Setup" to solve your problem, contact the place of purchase or local dealer for help. No The IDE/SATA device, connector, or cable might fail. Plug in the keyboard...


