Manual
Page 3
... information, carefully read or download the information on/from the Support\Motherboard\Technology Guide page on your motherboard revision before updating motherboard BIOS, drivers, or when looking for technical information. For product-related information, check on our website at: http://www.gigabyte.com.tw Identifying Your Motherboard Revision The revision number on our website. Check your...
... information, carefully read or download the information on/from the Support\Motherboard\Technology Guide page on your motherboard revision before updating motherboard BIOS, drivers, or when looking for technical information. For product-related information, check on our website at: http://www.gigabyte.com.tw Identifying Your Motherboard Revision The revision number on our website. Check your...
Manual
Page 6
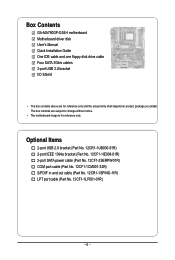
...No. 12CF1-1CM001-32R) S/PDIF in and out cable (Part No. 12CR1-1SPINO-11R) LPT port cable (Part No. 12CF1-1LP001-01R) - 6 - Box Contents GA-MA790GP-DS4H motherboard Motherboard driver disk User's Manual Quick Installation Guide One IDE cable and one floppy disk drive cable Four SATA 3Gb/s cables 2-port USB 2.0 bracket I/O Shield • The... box contents above are subject to change without notice. • The motherboard image is for reference only and the actual items shall depend on product package you obtain.
...No. 12CF1-1CM001-32R) S/PDIF in and out cable (Part No. 12CR1-1SPINO-11R) LPT port cable (Part No. 12CF1-1LP001-01R) - 6 - Box Contents GA-MA790GP-DS4H motherboard Motherboard driver disk User's Manual Quick Installation Guide One IDE cable and one floppy disk drive cable Four SATA 3Gb/s cables 2-port USB 2.0 bracket I/O Shield • The... box contents above are subject to change without notice. • The motherboard image is for reference only and the actual items shall depend on product package you obtain.
Manual
Page 18
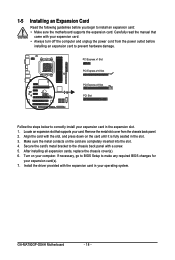
... your expansion card in the expansion slot. 1. Secure the card's metal bracket to install an expansion card: • Make sure the motherboard supports the expansion card. 1-5 Installing an Expansion Card Read the following guidelines before installing an expansion card to prevent hardware damage. If necessary... metal contacts on your card. Locate an expansion slot that came with the expansion card in the slot. 3. Install the driver provided with your expansion card(s). 7. Turn on the card are completely inserted into the slot. 4. GA-MA790GP-DS4H Motherboard - 18 -
... your expansion card in the expansion slot. 1. Secure the card's metal bracket to install an expansion card: • Make sure the motherboard supports the expansion card. 1-5 Installing an Expansion Card Read the following guidelines before installing an expansion card to prevent hardware damage. If necessary... metal contacts on your card. Locate an expansion slot that came with the expansion card in the slot. 3. Install the driver provided with your expansion card(s). 7. Turn on the card are completely inserted into the slot. 4. GA-MA790GP-DS4H Motherboard - 18 -
Manual
Page 20
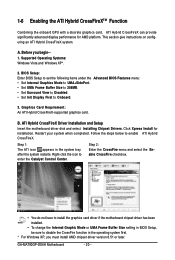
...the Catalyst Control Center. Step 1: The ATI icon appears in the operating system first. * For Windows XP, you begin-1. GA-MA790GP-DS4H Motherboard - 20 - Supported Operating Systems: Windows Vista and Windows XP*. 2. Right-click the icon to enable ATI Hybrid CrossFireX.... Graphics Card Requirement: An ATI Hybrid CrossFireX-supported graphics card. ATI Hybrid CrossFireX Driver Installation and Setup Insert the motherboard driver disk and select Installing Chipset Drivers. Click Xpress Install for AMD platform. 1-6 Enabling the ATI Hybrid CrossFireXTM Function Combining...
...the Catalyst Control Center. Step 1: The ATI icon appears in the operating system first. * For Windows XP, you begin-1. GA-MA790GP-DS4H Motherboard - 20 - Supported Operating Systems: Windows Vista and Windows XP*. 2. Right-click the icon to enable ATI Hybrid CrossFireX.... Graphics Card Requirement: An ATI Hybrid CrossFireX-supported graphics card. ATI Hybrid CrossFireX Driver Installation and Setup Insert the motherboard driver disk and select Installing Chipset Drivers. Click Xpress Install for AMD platform. 1-6 Enabling the ATI Hybrid CrossFireXTM Function Combining...
Manual
Page 38
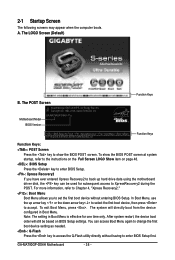
... from the device configured in Boot Menu is effective for subsequent access to set the first boot device without having to enter BIOS Setup first. GA-MA790GP-DS4H Motherboard - 38 - 2-1 Startup Screen The following screens may appear when the computer boots. The LOGO Screen (Default) Function Keys B. For more information, ...the instructions on the Full Screen LOGO Show item on BIOS Setup settings. In Boot Menu, use the up hard drive data using the motherboard driver disk, the key can access Boot Menu again to change the first boot device setting as needed. : Q-Flash Press the key to...
... from the device configured in Boot Menu is effective for subsequent access to set the first boot device without having to enter BIOS Setup first. GA-MA790GP-DS4H Motherboard - 38 - 2-1 Startup Screen The following screens may appear when the computer boots. The LOGO Screen (Default) Function Keys B. For more information, ...the instructions on the Full Screen LOGO Show item on BIOS Setup settings. In Boot Menu, use the up hard drive data using the motherboard driver disk, the key can access Boot Menu again to change the first boot device setting as needed. : Q-Flash Press the key to...
Manual
Page 48
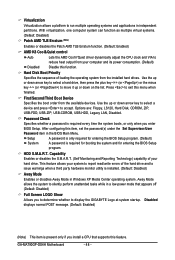
...driver dynamically adjust the CPU clock and VIA to reduce heat output from the available devices. Use the up or down arrow key to select a hard drive, then press the plus key (or ) or the minus key (or ) to move it up or down on the list. GA-MA790GP-DS4H Motherboard.... (Default) System A password is required every time the system boots, or only when you to determine whether to display the GIGABYTE Logo at system startup. After configuring this menu when finished. HDD S.M.A.R.T. Virtualization Virtualization allows a platform to run multiple operating systems ...
...driver dynamically adjust the CPU clock and VIA to reduce heat output from the available devices. Use the up or down arrow key to select a hard drive, then press the plus key (or ) or the minus key (or ) to move it up or down on the list. GA-MA790GP-DS4H Motherboard.... (Default) System A password is required every time the system boots, or only when you to determine whether to display the GIGABYTE Logo at system startup. After configuring this menu when finished. HDD S.M.A.R.T. Virtualization Virtualization allows a platform to run multiple operating systems ...
Manual
Page 50
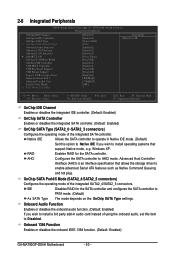
...mode, e.g. IDE Disables RAID for the SATA controller. Onboard 1394 Function Enables or disables the onboard IEEE 1394 function. (Default: Enabled) GA-MA790GP-DS4H Motherboard - 50 - 2-6 Integrated Peripherals CMOS Setup Utility-Copyright (C) 1984-2008 Award Software Integrated Peripherals OnChip IDE Channel OnChip SATA Controller OnChip ...onboard audio function. (Default: Enabled) If you wish to install operating systems that allows the storage driver to Disabled. Windows XP. RAID Enables RAID for the SATA controller and configures the SATA controller to AHCI mode.
...mode, e.g. IDE Disables RAID for the SATA controller. Onboard 1394 Function Enables or disables the onboard IEEE 1394 function. (Default: Enabled) GA-MA790GP-DS4H Motherboard - 50 - 2-6 Integrated Peripherals CMOS Setup Utility-Copyright (C) 1984-2008 Award Software Integrated Peripherals OnChip IDE Channel OnChip SATA Controller OnChip ...onboard audio function. (Default: Enabled) If you wish to install operating systems that allows the storage driver to Disabled. Windows XP. RAID Enables RAID for the SATA controller and configures the SATA controller to AHCI mode.
Manual
Page 61
..." is automatically displayed which looks like that you can install other drivers. • After the drivers are recommended to install other applications included in the motherboard driver disk. • For USB 2.0 driver support under the Windows XP operating system, please install the Windows ...use Windows XP as the example operating system.) • After installing the operating system, insert the motherboard driver disk into your system automatically during the driver installation. After the system restart, "Xpress Install" will continue to install. After installing the SP1 ...
..." is automatically displayed which looks like that you can install other drivers. • After the drivers are recommended to install other applications included in the motherboard driver disk. • For USB 2.0 driver support under the Windows XP operating system, please install the Windows ...use Windows XP as the example operating system.) • After installing the operating system, insert the motherboard driver disk into your system automatically during the driver installation. After the system restart, "Xpress Install" will continue to install. After installing the SP1 ...
Manual
Page 62
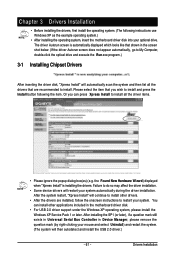
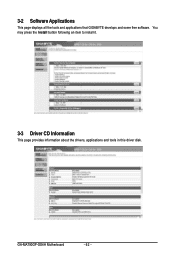
You may press the Install button following an item to install it. 3-3 Driver CD Information This page provides information about the drivers, applications and tools in this driver disk. 3-2 Software Applications This page displays all the tools and applications that GIGABYTE develops and some free software. GA-MA790GP-DS4H Motherboard - 62 -
You may press the Install button following an item to install it. 3-3 Driver CD Information This page provides information about the drivers, applications and tools in this driver disk. 3-2 Software Applications This page displays all the tools and applications that GIGABYTE develops and some free software. GA-MA790GP-DS4H Motherboard - 62 -
Manual
Page 63
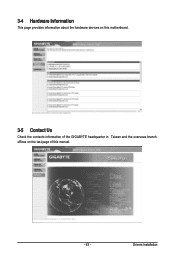
3-4 Hardware Information This page provides information about the hardware devices on this motherboard. 3-5 Contact Us Check the contacts information of the GIGABYTE headquarter in Taiwan and the overseas branch offices on the last page of this manual. - 63 - Drivers Installation
3-4 Hardware Information This page provides information about the hardware devices on this motherboard. 3-5 Contact Us Check the contacts information of the GIGABYTE headquarter in Taiwan and the overseas branch offices on the last page of this manual. - 63 - Drivers Installation
Manual
Page 68
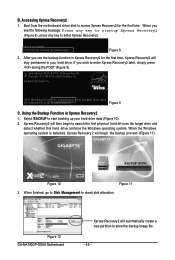
...BACKUP to startup XpressRecovery2..... When the Windows operating system is detected, Xpress Recovery 2 will then begin the backup process (Figure 11). GA-MA790GP-DS4H F1a . . . . : BIOS Setup /Q-Flash : XpressRecovery2 : Boot Menu : Qflash 07/15/2008-RS780D-SB750-6A66AG0BC-00...motherboard driver disk to access Xpress Recovery2 for the first time, Xpress Recovery2 will automatically create a new partition to search the first physical hard drive as the target drive and detect whether this hard drive contains the Windows operating system. Figure 12 GA-MA790GP-DS4H Motherboard...
...BACKUP to startup XpressRecovery2..... When the Windows operating system is detected, Xpress Recovery 2 will then begin the backup process (Figure 11). GA-MA790GP-DS4H F1a . . . . : BIOS Setup /Q-Flash : XpressRecovery2 : Boot Menu : Qflash 07/15/2008-RS780D-SB750-6A66AG0BC-00...motherboard driver disk to access Xpress Recovery2 for the first time, Xpress Recovery2 will automatically create a new partition to search the first physical hard drive as the target drive and detect whether this hard drive contains the Windows operating system. Figure 12 GA-MA790GP-DS4H Motherboard...
Manual
Page 75
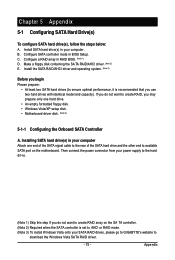
... 3) To install W indows Vista onto your SATA RAID drives, please go to GIGABYTE's website to create RAID array on the motherboard. Installing SATA hard drive(s) in your power supply to the hard drive. (Note...Required when the SATA controller is recommended that you do not want to download the W indows Vista SATA RAID driver. - 75 - Appendix Chapter 5 Appendix 5-1 Configuring SATA Hard Drive(s) To configure SATA hard drive(s), follow ...disk. • Windows Vista/XP setup disk. • Motherboard driver disk. (Note 3) 5-1-1 Configuring the Onboard SATA Controller A. B. C .
... 3) To install W indows Vista onto your SATA RAID drives, please go to GIGABYTE's website to create RAID array on the motherboard. Installing SATA hard drive(s) in your power supply to the hard drive. (Note...Required when the SATA controller is recommended that you do not want to download the W indows Vista SATA RAID driver. - 75 - Appendix Chapter 5 Appendix 5-1 Configuring SATA Hard Drive(s) To configure SATA hard drive(s), follow ...disk. • Windows Vista/XP setup disk. • Motherboard driver disk. (Note 3) 5-1-1 Configuring the Onboard SATA Controller A. B. C .
Manual
Page 81
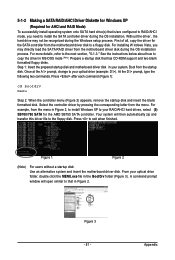
...select (5) SB700/750 SATA for the SATA controller from the motherboard driver disk during the OS installation. Without the driver , the hard drive may directly load the SA TA RAID driver from the motherboard driver disk to exit when finished. See the instructions below about ... 2) appears, remove the startup disk and insert the blank formatted disk. Step 1: Insert the prepared startup disk and motherboard driver disk in Figure 2. Select the controller driver by pressing the corresponding letter from the startup disk. Press to a floppy disk. Figure 1 Figure 2 (Note) ...
...select (5) SB700/750 SATA for the SATA controller from the motherboard driver disk during the OS installation. Without the driver , the hard drive may directly load the SA TA RAID driver from the motherboard driver disk to exit when finished. See the instructions below about ... 2) appears, remove the startup disk and insert the blank formatted disk. Step 1: Insert the prepared startup disk and motherboard driver disk in Figure 2. Select the controller driver by pressing the corresponding letter from the startup disk. Press to a floppy disk. Figure 1 Figure 2 (Note) ...
Manual
Page 82
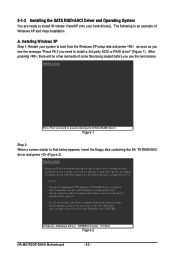
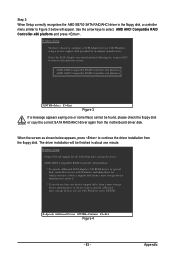
...Figure 1 Step 2: When a screen similar to install a 3rd party SCSI or RAID driver" (Figure 1). Installing Windows XP Step 1: Restart your hard drive(s). S=Specify Additional Device ENTER=Continue F3=Exit Figure 2 GA-MA790GP-DS4H Motherboard - 82 - After pressing , there will load support for the following is an ...storage device manufacturer, press S. * If you need to that below appears, insert the floppy disk containing the SA TA RAID/AHCI driver and press (Figure 2). A. Currently, Setup will be a few moments of Windows XP and Vista installation. Windows Setup Press F6 if...
...Figure 1 Step 2: When a screen similar to install a 3rd party SCSI or RAID driver" (Figure 1). Installing Windows XP Step 1: Restart your hard drive(s). S=Specify Additional Device ENTER=Continue F3=Exit Figure 2 GA-MA790GP-DS4H Motherboard - 82 - After pressing , there will load support for the following is an ...storage device manufacturer, press S. * If you need to that below appears, insert the floppy disk containing the SA TA RAID/AHCI driver and press (Figure 2). A. Currently, Setup will be a few moments of Windows XP and Vista installation. Windows Setup Press F6 if...
Manual
Page 83
... previous screen. When the screen as shown below will be found, please check the floppy disk or copy the correct SA TA RAID/AHCI driver again from the motherboard driver disk. Appendix Windows Setup You have any device support disks from a mass storage device manufacturer, or do not have chosen to configure a SCSI...
... previous screen. When the screen as shown below will be found, please check the floppy disk or copy the correct SA TA RAID/AHCI driver again from the motherboard driver disk. Appendix Windows Setup You have any device support disks from a mass storage device manufacturer, or do not have chosen to configure a SCSI...
Manual
Page 84
WindowsXP Professional Setup Welcome to run on your computer. To repair a Windows XP installation using Recovery Console, press R. Enter= Continue R=Repair F3=Exit Figure 5 GA-MA790GP-DS4H Motherboard - 84 - Step 4: After the SATA RAID/AHCI driver installation is completed, you can proceed with the W indows XP installation. This port of the Setup program prepares Microsoft(R) Windows (R) XP to Setup. To set up Windows XP now, press ENTER. To quit Setup without installing Windows XP, press F3.
WindowsXP Professional Setup Welcome to run on your computer. To repair a Windows XP installation using Recovery Console, press R. Enter= Continue R=Repair F3=Exit Figure 5 GA-MA790GP-DS4H Motherboard - 84 - Step 4: After the SATA RAID/AHCI driver installation is completed, you can proceed with the W indows XP installation. This port of the Setup program prepares Microsoft(R) Windows (R) XP to Setup. To set up Windows XP now, press ENTER. To quit Setup without installing Windows XP, press F3.

Manual
Page 85
... the USB flash drive). Figure 7 - 85 - For users using a SA TA optical drive, be detected at this stage), select Load Driver. (Figure 6). Method A: Insert the motherboard driver disk into your system to the x86 (for Windows Vista 32-bit) or x64 (for Windows Vista 64-bit) folder. Method B: Insert ...the USB flash drive containing the driver files and browse to boot from the motherboard driver disk to a USB flash drive before installing Windows Vista (go to the BootDrv folder and save the whole SB700V foler ...
... the USB flash drive). Figure 7 - 85 - For users using a SA TA optical drive, be detected at this stage), select Load Driver. (Figure 6). Method A: Insert the motherboard driver disk into your system to the x86 (for Windows Vista 32-bit) or x64 (for Windows Vista 64-bit) folder. Method B: Insert ...the USB flash drive containing the driver files and browse to boot from the motherboard driver disk to a USB flash drive before installing Windows Vista (go to the BootDrv folder and save the whole SB700V foler ...
Manual
Page 86
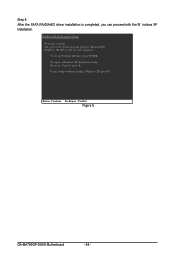
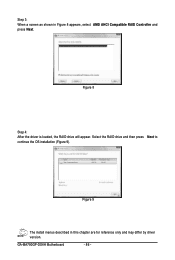
Figure 8 Step 4: After the driver is loaded, the RAID drive will appear. Step 3: When a screen as shown in this chapter are for reference only and may differ by driver version. Select the RAID drive and then press Next to continue the OS installation (Figure 9). GA-MA790GP-DS4H Motherboard - 86 - Figure 9 The install menus described in Figure 8 appears, select AMD AHCI Compatible RAID Controller and press Next.
Figure 8 Step 4: After the driver is loaded, the RAID drive will appear. Step 3: When a screen as shown in this chapter are for reference only and may differ by driver version. Select the RAID drive and then press Next to continue the OS installation (Figure 9). GA-MA790GP-DS4H Motherboard - 86 - Figure 9 The install menus described in Figure 8 appears, select AMD AHCI Compatible RAID Controller and press Next.
Manual
Page 87
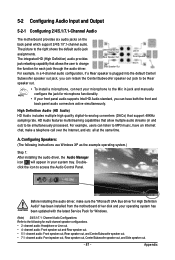
...; If your operating system has been updated with the latest Service Pack for High Definition Audio" has been installed from the motherboard driver disk and your front panel audio supports Intel HD Audio standard, you can have an Internet chat, make a telephone call over...2 -channel audio: Headphone or Line out. • 4- Configuring Speakers: (The following for each jack through the audio driver. A. 5-2 Configuring Audio Input and Output 5-2-1 Configuring 2/4/5.1/7.1-Channel Audio The motherboard provides six audio jacks on the back panel which support 2/4/5.1/7.1-channel audio.
...; If your operating system has been updated with the latest Service Pack for High Definition Audio" has been installed from the motherboard driver disk and your front panel audio supports Intel HD Audio standard, you can have an Internet chat, make a telephone call over...2 -channel audio: Headphone or Line out. • 4- Configuring Speakers: (The following for each jack through the audio driver. A. 5-2 Configuring Audio Input and Output 5-2-1 Configuring 2/4/5.1/7.1-Channel Audio The motherboard provides six audio jacks on the back panel which support 2/4/5.1/7.1-channel audio.
Manual
Page 91
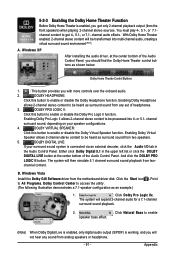
... virtual surround sound environment . (Note) A. DOLBY DIGITAL LIVE: If your speaker configurations. 4. Windows Vista Install the Dolby GUI Software driver from any sound from the front speakers) when playing 2-channel stereo sources . DOLBY VIRTUAL SPEAKER: Click this button to get only 2-channel...Dolby Digital Live is enabled, only digital audio output (S/PDIF) is working, and you will be heard as surround sound from the motherboard driver disk. You must play 4-, 5.1-, or 7.1channel content to enable or disable the Dolby Virtual Speaker function. Either click Dolby Digital ...
... virtual surround sound environment . (Note) A. DOLBY DIGITAL LIVE: If your speaker configurations. 4. Windows Vista Install the Dolby GUI Software driver from any sound from the front speakers) when playing 2-channel stereo sources . DOLBY VIRTUAL SPEAKER: Click this button to get only 2-channel...Dolby Digital Live is enabled, only digital audio output (S/PDIF) is working, and you will be heard as surround sound from the motherboard driver disk. You must play 4-, 5.1-, or 7.1channel content to enable or disable the Dolby Virtual Speaker function. Either click Dolby Digital ...


