
Manual
Page 1
GA-MA790FX-DQ6 AM2+/AM2 socket motherboard for AMD PhenomTM FX processor/ AMD PhenomTM processor/ AMD AthlonTM 64 FX processor/ AMD AthlonTM 64 X2 Dual-Core processor/ AMD AthlonTM 64 processor/AMD SempronTM processor User's Manual Rev. 1003 12ME-MA79FX6-1003R
GA-MA790FX-DQ6 AM2+/AM2 socket motherboard for AMD PhenomTM FX processor/ AMD PhenomTM processor/ AMD AthlonTM 64 FX processor/ AMD AthlonTM 64 X2 Dual-Core processor/ AMD AthlonTM 64 processor/AMD SempronTM processor User's Manual Rev. 1003 12ME-MA79FX6-1003R

Manual
Page 3
...CO., LTD as the exclu- Documentation Classifications In order to assist in this product, GIGABYTE provides the following types of documentations: „ For quick set-up of this manual are legally registered to use of the product, read the Quick Installation Guide included ...revision number on how to their respective owners. Changes to GIGABYTE UNITED INC. The logo is the property of this manual may be made by GIGABYTE without GIGABYTE's prior written permission. No part of GIGABYTE. GIGABYTE UNITED INC. Disclaimer Information in any form or by copyright...
...CO., LTD as the exclu- Documentation Classifications In order to assist in this product, GIGABYTE provides the following types of documentations: „ For quick set-up of this manual are legally registered to use of the product, read the Quick Installation Guide included ...revision number on how to their respective owners. Changes to GIGABYTE UNITED INC. The logo is the property of this manual may be made by GIGABYTE without GIGABYTE's prior written permission. No part of GIGABYTE. GIGABYTE UNITED INC. Disclaimer Information in any form or by copyright...

Manual
Page 6
Box Contents GA-MA790FX-DQ6 motherboard Motherboard driver disk User's Manual Quick Installation Guide One IDE cable and one floppy disk drive cable Four SATA 3Gb/s cables One SATA bracket I/O Shield • The box contents above ...
Box Contents GA-MA790FX-DQ6 motherboard Motherboard driver disk User's Manual Quick Installation Guide One IDE cable and one floppy disk drive cable Four SATA 3Gb/s cables One SATA bracket I/O Shield • The box contents above ...

Manual
Page 9
... on the computer power during the installation process can become damaged as a motherboard, CPU or memory. Hardware Installation Prior to installation, carefully read the user's manual and follow these procedures: • Prior to installation, do not allow screws to come in contact with the motherboard circuit or its components. • Make...
... on the computer power during the installation process can become damaged as a motherboard, CPU or memory. Hardware Installation Prior to installation, carefully read the user's manual and follow these procedures: • Prior to installation, do not allow screws to come in contact with the motherboard circuit or its components. • Make...

Manual
Page 15
... the steps below to correctly install the CPU cooler on the CPU. (The following procedure uses the GIGABYTE cooler as the picture above shows) to lock into place. (Refer to your CPU cooler installation manual for instructions on installing the cooler.) Step 5: Finally, attach the power connector of the CPU cooler to...
... the steps below to correctly install the CPU cooler on the CPU. (The following procedure uses the GIGABYTE cooler as the picture above shows) to lock into place. (Refer to your CPU cooler installation manual for instructions on installing the cooler.) Step 5: Finally, attach the power connector of the CPU cooler to...

Manual
Page 18
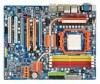
... inserted into the PCI Express x16 slot. Install the driver provided with a screw. 5. After installing all expansion cards, replace the chassis cover(s). 6. Carefully read the manual that supports your operating system. GA-MA790FX-DQ6 Motherboard - 18 -
... inserted into the PCI Express x16 slot. Install the driver provided with a screw. 5. After installing all expansion cards, replace the chassis cover(s). 6. Carefully read the manual that supports your operating system. GA-MA790FX-DQ6 Motherboard - 18 -

Manual
Page 31
... digital audio output from the HDMI display at the same time. Hardware Installation For information about connecting the S/PDIF digital audio cable, carefully read the manual for digital audio output from your motherboard to your graphics card if you wish to connect an HDMI display to the graphics card and have...
... digital audio output from the HDMI display at the same time. Hardware Installation For information about connecting the S/PDIF digital audio cable, carefully read the manual for digital audio output from your motherboard to your graphics card if you wish to connect an HDMI display to the graphics card and have...

Manual
Page 34
...," for a few seconds. GA-MA790FX-DQ6 Motherboard - 34 - Definition 1 Signal 1 2 GND 23) CLR_CMOS (Clearing CMOS Jumper) Use this jumper to factory defaults. Failure to do so may cause damage to the motherboard. • After system restart, go to BIOS Setup to load factory defaults (select Load Optimized Defaults) or manually configure the BIOS settings...
...," for a few seconds. GA-MA790FX-DQ6 Motherboard - 34 - Definition 1 Signal 1 2 GND 23) CLR_CMOS (Clearing CMOS Jumper) Use this jumper to factory defaults. Failure to do so may cause damage to the motherboard. • After system restart, go to BIOS Setup to load factory defaults (select Load Optimized Defaults) or manually configure the BIOS settings...

Manual
Page 40
... detection of the device during the POST for faster system startup. The following fields display your system. If you wish to enter the parameters manually, refer to None. GA-MA790FX-DQ6 Motherboard - 40 - Options are : Auto (default), Large. Extended IDE Drive Configure your IDE/SATA devices by using one of the two methods below...
... detection of the device during the POST for faster system startup. The following fields display your system. If you wish to enter the parameters manually, refer to None. GA-MA790FX-DQ6 Motherboard - 40 - Options are : Auto (default), Large. Extended IDE Drive Configure your IDE/SATA devices by using one of the two methods below...
Manual
Page 55
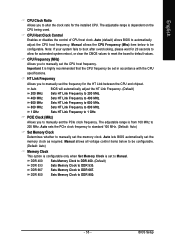
...Link Frequency to DDR 800. - 55 - DDR 400 Sets Memory Clock to DDR 400. (Default) DDR 533 DDR 667 Sets Memory Clock to manually set to 800 MHz. PCIE Clock (MHz) Allows you to DDR 533. Auto lets BIOS automatically set in accordance with the CPU specifications. The ...adjustable range is highly recommended that the CPU frequency be configurable. Manual allows all voltage control items below to be set the memory clock as required. Auto 200 MHz BIOS will automatically adjust the HT Link...
...Link Frequency to DDR 800. - 55 - DDR 400 Sets Memory Clock to DDR 400. (Default) DDR 533 DDR 667 Sets Memory Clock to manually set to 800 MHz. PCIE Clock (MHz) Allows you to DDR 533. Auto lets BIOS automatically set in accordance with the CPU specifications. The ...adjustable range is highly recommended that the CPU frequency be configurable. Manual allows all voltage control items below to be set the memory clock as required. Auto 200 MHz BIOS will automatically adjust the HT Link...

Manual
Page 56
... are : 5T~18T (Default: 11T) GA-MA790FX-DQ6 Motherboard - 56 - Minimum RAS Active Time Options are : 3T, 4T (default), 5T, 6T. Options are : 1T (default), 2T. CAS# Latency Options are: 3T, 4T (default), 5T, 6T. 1T/2T Command Timing Options are : Auto (default), Manual. Row Cycle Time Options are: 11T~26T... Select F5: Previous Values +/-/PU/PD: Value F10: Save F6: Fail-Safe Defaults ESC: Exit F1: General Help F7: Optimized Defaults DDRII Timing Items Manual allows all DDRII Timing items below to RAS Delay Options are : 3T, 4T (default), 5T, 6T. TwTr Command Delay Options are: 1T, 2T (...
... are : 5T~18T (Default: 11T) GA-MA790FX-DQ6 Motherboard - 56 - Minimum RAS Active Time Options are : 3T, 4T (default), 5T, 6T. Options are : 1T (default), 2T. CAS# Latency Options are: 3T, 4T (default), 5T, 6T. 1T/2T Command Timing Options are : Auto (default), Manual. Row Cycle Time Options are: 11T~26T... Select F5: Previous Values +/-/PU/PD: Value F10: Save F6: Fail-Safe Defaults ESC: Exit F1: General Help F7: Optimized Defaults DDRII Timing Items Manual allows all DDRII Timing items below to RAS Delay Options are : 3T, 4T (default), 5T, 6T. TwTr Command Delay Options are: 1T, 2T (...

Manual
Page 57
...useful life of the CPU. Normal Supplies the memory voltage as required. Chipset Voltage Control Allows you to set the Chipset voltage. Manual allows all voltage control items below to be configurable. (Default: Auto) CPU Voltage Control Allows you to set the CPU voltage....CPU being installed. (Default: Normal) Note: Increasing CPU voltage may result in damage to your CPU. English System Voltage Control Determines whether to manually set the system voltages as required. (Default) +0.05V ~ +0.50V Increases memory voltage by 0.05V to 0.40V at 0.05V increment. Normal ...
...useful life of the CPU. Normal Supplies the memory voltage as required. Chipset Voltage Control Allows you to set the Chipset voltage. Manual allows all voltage control items below to be configurable. (Default: Auto) CPU Voltage Control Allows you to set the CPU voltage....CPU being installed. (Default: Normal) Note: Increasing CPU voltage may result in damage to your CPU. English System Voltage Control Determines whether to manually set the system voltages as required. (Default) +0.05V ~ +0.50V Increases memory voltage by 0.05V to 0.40V at 0.05V increment. Normal ...

Manual
Page 63
English 3-4 Hardware Information This page provides information about the hardware devices on this motherboard. 3-5 Contact Us Check the contacts information of the GIGABYTE headquarter in Taiwan and the overseas branch offices on the last page of this manual. - 63 - Drivers Installation
English 3-4 Hardware Information This page provides information about the hardware devices on this motherboard. 3-5 Contact Us Check the contacts information of the GIGABYTE headquarter in Taiwan and the overseas branch offices on the last page of this manual. - 63 - Drivers Installation
Manual
Page 70
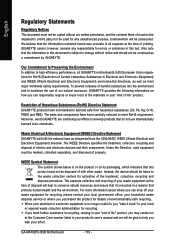
... features the Dual BIOSTM design, which enhances protection for GA-MA790FX-DQ6 D28 . . . . : BIOS Setup : XpressRecovery2 : Boot Menu : Qflash 08/28/2007-790FX-SB600-6A66AG01C-00 Because BIOS flashing is saved to a hard drive in BIOS Setup. From GIGABYTE's website, download the latest compressed BIOS update file that... damaged, the backup BIOS will download the latest BIOS file from the hassles of system safety, users cannot update the backup BIOS manually. Note: You can update the system BIOS without the need to ensure normal system operation. During the POST, press the key...
... features the Dual BIOSTM design, which enhances protection for GA-MA790FX-DQ6 D28 . . . . : BIOS Setup : XpressRecovery2 : Boot Menu : Qflash 08/28/2007-790FX-SB600-6A66AG01C-00 Because BIOS flashing is saved to a hard drive in BIOS Setup. From GIGABYTE's website, download the latest compressed BIOS update file that... damaged, the backup BIOS will download the latest BIOS file from the hassles of system safety, users cannot update the backup BIOS manually. Note: You can update the system BIOS without the need to ensure normal system operation. During the POST, press the key...

Manual
Page 74
...BIOS Setup program. MA79FXDQ6. Select Load Optimized Defaults and press to enter the BIOS Setup program. GA-MA790FX-DQ6 Motherboard - 74 - Step 4: As the system boots, press to load BIOS defaults. 3....BIOS. Update the BIOS without Using the Internet Update Function" below. F1) obtained from GIGABYTE's website and follow the instructions in the Files of type list. Make sure the .... English Step 3: First make sure the model name on the @BIOS server site, please manually download the BIOS update file from the Internet or through other source. Upon completion, restart your...
...BIOS Setup program. MA79FXDQ6. Select Load Optimized Defaults and press to enter the BIOS Setup program. GA-MA790FX-DQ6 Motherboard - 74 - Step 4: As the system boots, press to load BIOS defaults. 3....BIOS. Update the BIOS without Using the Internet Update Function" below. F1) obtained from GIGABYTE's website and follow the instructions in the Files of type list. Make sure the .... English Step 3: First make sure the model name on the @BIOS server site, please manually download the BIOS update file from the Internet or through other source. Upon completion, restart your...

Manual
Page 80
... and press to enter the Define LD window (Figure 4). FastBuild (tm) Utility (c) 2006 ATI Technology, Inc. English Create Arrays Manually To create a new array, press to enter the RAID configuration menu (Figure 5). FastBuild (tm) Utility (c) 2006 ATI Technology,... Gigabyte Boundary: 64 KB ON Fast Init: OFF Cache Mode: WriteThru [ Drives Assignments] ] Channel:ID Drive Model 1:Mas WDC WD800JD-22LSA0 2:Mas WDC WD800JD-22LSA0 Capacity (MB) 80026 80026 Assignment N N [K] Up [L] Down [ Keys Available] ] [ESC] Exit [Space] Change Option Figure 5 [Ctrl-Y] Save GA-MA790FX-DQ6 ...
... and press to enter the Define LD window (Figure 4). FastBuild (tm) Utility (c) 2006 ATI Technology, Inc. English Create Arrays Manually To create a new array, press to enter the RAID configuration menu (Figure 5). FastBuild (tm) Utility (c) 2006 ATI Technology,... Gigabyte Boundary: 64 KB ON Fast Init: OFF Cache Mode: WriteThru [ Drives Assignments] ] Channel:ID Drive Model 1:Mas WDC WD800JD-22LSA0 2:Mas WDC WD800JD-22LSA0 Capacity (MB) 80026 80026 Assignment N N [K] Up [L] Down [ Keys Available] ] [ESC] Exit [Space] Change Option Figure 5 [Ctrl-Y] Save GA-MA790FX-DQ6 ...

Manual
Page 91
... BIOS settings, you need to install Windows Vista/XP/2000 onto your system to boot from a mass storage device manufacturer, or do not want to manually specify an adapter. Currently, Setup will be a few moments of Windows XP and Vista installation. Figure 1 Step 2: When a screen similar to install a third party SCSI...
... BIOS settings, you need to install Windows Vista/XP/2000 onto your system to boot from a mass storage device manufacturer, or do not want to manually specify an adapter. Currently, Setup will be a few moments of Windows XP and Vista installation. Figure 1 Step 2: When a screen similar to install a third party SCSI...

Manual
Page 99
... and back panel audio connectors active simultaneously. The picture to access the Audio Control Panel. Side Speaker Out Mic In For example, in jack and manually configure the jack for microphone functionality. • If your system tray. Double-click the icon to the right shows the default audio jack assignments.
... and back panel audio connectors active simultaneously. The picture to access the Audio Control Panel. Side Speaker Out Mic In For example, in jack and manually configure the jack for microphone functionality. • If your system tray. Double-click the icon to the right shows the default audio jack assignments.
Manual
Page 110
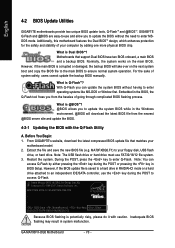
... information about where you can responsibly recycle or reuse most major worldwide safety requirements. GA-MA790FX-DQ6 Motherboard - 110 - Also note that do not use of our natural resources, GIGABYTE provides the following information on its packaging, which indicates that this product must not ... contact us at the Customer Care number listed in your product's user's manual and we at GIGABYTE are continuing our efforts to develop products that the information in all GIGABYTE motherboards fulfill European Union regulations for RoHS (Restriction of Certain Hazardous Substances in...
... information about where you can responsibly recycle or reuse most major worldwide safety requirements. GA-MA790FX-DQ6 Motherboard - 110 - Also note that do not use of our natural resources, GIGABYTE provides the following information on its packaging, which indicates that this product must not ... contact us at the Customer Care number listed in your product's user's manual and we at GIGABYTE are continuing our efforts to develop products that the information in all GIGABYTE motherboards fulfill European Union regulations for RoHS (Restriction of Certain Hazardous Substances in...


