
Manual
Page 1
GA-MA790FX-DQ6 AM2+/AM2 socket motherboard for AMD PhenomTM FX processor/ AMD PhenomTM processor/ AMD AthlonTM 64 FX processor/ AMD AthlonTM 64 X2 Dual-Core processor/ AMD AthlonTM 64 processor/AMD SempronTM processor User's Manual Rev. 1003 12ME-MA79FX6-1003R
GA-MA790FX-DQ6 AM2+/AM2 socket motherboard for AMD PhenomTM FX processor/ AMD PhenomTM processor/ AMD AthlonTM 64 FX processor/ AMD AthlonTM 64 X2 Dual-Core processor/ AMD AthlonTM 64 processor/AMD SempronTM processor User's Manual Rev. 1003 12ME-MA79FX6-1003R

Manual
Page 2
Motherboard GA-MA790FX-DQ6 Sept. 28, 2007 Motherboard GA-MA790FX-DQ6 Sept. 28, 2007
Motherboard GA-MA790FX-DQ6 Sept. 28, 2007 Motherboard GA-MA790FX-DQ6 Sept. 28, 2007
Manual
Page 4
Table of Contents Box Contents ...6 OptionalItems ...6 GA-MA790FX-DQ6 Motherboard Layout 7 Block Diagram ...8 Chapter 1 Hardware Installation 9 1-1 Installation Precautions 9 1-2 Product Specifications 10 1-3 Installing the CPU and CPU Cooler 13 1-3-1 Installing the CPU 13 1-3-2 Installing the ...
Table of Contents Box Contents ...6 OptionalItems ...6 GA-MA790FX-DQ6 Motherboard Layout 7 Block Diagram ...8 Chapter 1 Hardware Installation 9 1-1 Installation Precautions 9 1-2 Product Specifications 10 1-3 Installing the CPU and CPU Cooler 13 1-3-1 Installing the CPU 13 1-3-2 Installing the ...

Manual
Page 6
Box Contents GA-MA790FX-DQ6 motherboard Motherboard driver disk User's Manual Quick Installation Guide One IDE cable and one floppy disk drive cable Four SATA 3Gb/s cables One SATA bracket I/O ...
Box Contents GA-MA790FX-DQ6 motherboard Motherboard driver disk User's Manual Quick Installation Guide One IDE cable and one floppy disk drive cable Four SATA 3Gb/s cables One SATA bracket I/O ...

Manual
Page 7
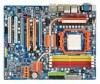
... KB_MS OPTICAL ATX_12V_2X CPU_FAN Socket AM2 COMA COAXIAL ATX V1394 USB_LAN1 PWR_FAN USB_LAN2 USB_ESATA GA-MA790FX-DQ6 AUDIO RTL8111B F_AUDIO RTL8111B PCIE_1 PCIE_16_A NB_FAN GIGABYTE SATA2 PCIE_8_A SPDIF_IN CODEC PCIE_8_B CD_IN SPDIF_OUT PCIE_16_B TSB43AB23 PCI1 PCI2 F2_1394 SYS_FAN2 AMD 790FX DDRII_1 DDRII_2 DDRII_3 DDRII_4 IDE FDD CLR_CMOS AMD SB600 BATTERY ...
... KB_MS OPTICAL ATX_12V_2X CPU_FAN Socket AM2 COMA COAXIAL ATX V1394 USB_LAN1 PWR_FAN USB_LAN2 USB_ESATA GA-MA790FX-DQ6 AUDIO RTL8111B F_AUDIO RTL8111B PCIE_1 PCIE_16_A NB_FAN GIGABYTE SATA2 PCIE_8_A SPDIF_IN CODEC PCIE_8_B CD_IN SPDIF_OUT PCIE_16_B TSB43AB23 PCI1 PCI2 F2_1394 SYS_FAN2 AMD 790FX DDRII_1 DDRII_2 DDRII_3 DDRII_4 IDE FDD CLR_CMOS AMD SB600 BATTERY ...

Manual
Page 10
...memory (Note 1) Dual channel memory architecture Support for DDR2 1066 (Note 2)/800/667 MHz memory modules (Go to GIGABYTE's website for the latest memory support list.) Support for ECC memory (Note 3) Realtek ALC889A codec High Definition Audio ...GIGABYTE SATA2 chip: - 2 x SATA 3Gb/s connectors (GSATAII_1, GSATAII_2) supporting up to 2 SATA 3Gb/s devices - 2 x eSATA 3Gb/s ports on the back panel, 2 via the IEEE 1394a bracket connected to 2 SATA 3Gb/s devices - TSB43AB23 chip Up to 3 IEEE 1394a ports (1 on the back panel supporting up to the internal IEEE 1394a headers) GA-MA790FX-DQ6...
...memory (Note 1) Dual channel memory architecture Support for DDR2 1066 (Note 2)/800/667 MHz memory modules (Go to GIGABYTE's website for the latest memory support list.) Support for ECC memory (Note 3) Realtek ALC889A codec High Definition Audio ...GIGABYTE SATA2 chip: - 2 x SATA 3Gb/s connectors (GSATAII_1, GSATAII_2) supporting up to 2 SATA 3Gb/s devices - 2 x eSATA 3Gb/s ports on the back panel, 2 via the IEEE 1394a bracket connected to 2 SATA 3Gb/s devices - TSB43AB23 chip Up to 3 IEEE 1394a ports (1 on the back panel supporting up to the internal IEEE 1394a headers) GA-MA790FX-DQ6...

Manual
Page 12
... on the CPU/ system cooler you install. (Note 6) Available functions in BIOS Setup (CPU/HT Link/PCIE/DDR2) allow you to 0.35V with 1 MHz increment - GA-MA790FX-DQ6 Motherboard - 12 - English BIOS Unique Features Bundled Software Overclocking Operating System Form Factor Š 2 x 4 Mbit flash Š Use of a CPU that supports ECC is required...
... on the CPU/ system cooler you install. (Note 6) Available functions in BIOS Setup (CPU/HT Link/PCIE/DDR2) allow you to 0.35V with 1 MHz increment - GA-MA790FX-DQ6 Motherboard - 12 - English BIOS Unique Features Bundled Software Overclocking Operating System Form Factor Š 2 x 4 Mbit flash Š Use of a CPU that supports ECC is required...

Manual
Page 14
... CPU orientation if this occurs. Step 2: Align the CPU pin one finger down on the CPU socket and gently insert the CPU into their holes. GA-MA790FX-DQ6 Motherboard - 14 - Once the CPU is positioned into its socket, place one (small triangle marking) with the triangle mark on the middle of the CPU...
... CPU orientation if this occurs. Step 2: Align the CPU pin one finger down on the CPU socket and gently insert the CPU into their holes. GA-MA790FX-DQ6 Motherboard - 14 - Once the CPU is positioned into its socket, place one (small triangle marking) with the triangle mark on the middle of the CPU...

Manual
Page 16
... two or four memory modules, it is installed. 2. GA-MA790FX-DQ6 Motherboard - 16 - English 1-4 Installing the Memory Read the following guidelines before you begin to install the memory: • Make sure that memory of the same capacity, brand, speed, and chips be used . (Go to GIGABYTE's website for optimum performance. Dual Channel mode cannot...
... two or four memory modules, it is installed. 2. GA-MA790FX-DQ6 Motherboard - 16 - English 1-4 Installing the Memory Read the following guidelines before you begin to install the memory: • Make sure that memory of the same capacity, brand, speed, and chips be used . (Go to GIGABYTE's website for optimum performance. Dual Channel mode cannot...

Manual
Page 18
... to prevent hardware damage. Example: Installing and Removing a PCI Express x16 Graphics Card: • Installing a Graphics Card: Gently insert the graphics card into the slot. 4. GA-MA790FX-DQ6 Motherboard - 18 - English 1-5 Installing an Expansion Card Read the following guidelines before installing an expansion card to make any required BIOS changes for your operating...
... to prevent hardware damage. Example: Installing and Removing a PCI Express x16 Graphics Card: • Installing a Graphics Card: Gently insert the graphics card into the slot. 4. GA-MA790FX-DQ6 Motherboard - 18 - English 1-5 Installing an Expansion Card Read the following guidelines before installing an expansion card to make any required BIOS changes for your operating...

Manual
Page 20
... and SATA power cable to prevent damage to hardware. • Insert the SATA signal cable and SATA power cable securely into to the power supply. GA-MA790FX-DQ6 Motherboard - 20 - Follow the steps below to install the SATA bracket: Step 1: Locate one SATA power cable. nector on Step 5: the bracket. Step 2: Connect the...
... and SATA power cable to prevent damage to hardware. • Insert the SATA signal cable and SATA power cable securely into to the power supply. GA-MA790FX-DQ6 Motherboard - 20 - Follow the steps below to install the SATA bracket: Step 1: Locate one SATA power cable. nector on Step 5: the bracket. Step 2: Connect the...

Manual
Page 22
... Jack (Pink) The default Mic in devices such as an optical drive, walkman, etc. Refer to connect rear speakers in Chapter 5, "Configuring 2/4/5.1/7.1-Channel Audio." GA-MA790FX-DQ6 Motherboard - 22 - Rear Speaker Out Jack (Black) Use this audio jack for a headphone or 2-channel speaker. Line Out Jack (Green) The default line ... to SATA 3Gb/s standard and is compatible with SATA 1.5Gb/s standard. English eSATA 3Gb/s Port The eSATA 3Gb/s port supported by the GIGABYTE SATA2 chip conforms to the default Mic in jack ( ). Use the port to this audio jack for line in jack.
... Jack (Pink) The default Mic in devices such as an optical drive, walkman, etc. Refer to connect rear speakers in Chapter 5, "Configuring 2/4/5.1/7.1-Channel Audio." GA-MA790FX-DQ6 Motherboard - 22 - Rear Speaker Out Jack (Black) Use this audio jack for a headphone or 2-channel speaker. Line Out Jack (Green) The default line ... to SATA 3Gb/s standard and is compatible with SATA 1.5Gb/s standard. English eSATA 3Gb/s Port The eSATA 3Gb/s port supported by the GIGABYTE SATA2 chip conforms to the default Mic in jack ( ). Use the port to this audio jack for line in jack.

Manual
Page 24
... 3.3V -12V GND PS_ON(soft On/Off) GND GND GND -5V +5V +5V +5V (Only for 2x12 pin ATX) GND (Only for 2x12 pin ATX) GA-MA790FX-DQ6 Motherboard - 24 - If the 12V power connector is not connected, the computer will not start. • To meet expansion requirements, it is turned off and...
... 3.3V -12V GND PS_ON(soft On/Off) GND GND GND -5V +5V +5V +5V (Only for 2x12 pin ATX) GND (Only for 2x12 pin ATX) GA-MA790FX-DQ6 Motherboard - 24 - If the 12V power connector is not connected, the computer will not start. • To meet expansion requirements, it is turned off and...

Manual
Page 26
... may lead to connect a floppy disk drive. The types of the connector and the floppy disk drive cable. The pin 1 of different color. 34 33 2 1 GA-MA790FX-DQ6 Motherboard - 26 - Definition 1 1 NC 2 GND 3 GND 4 +12V 8) FDD (Floppy Disk Drive Connector) This connector is typically designated by a stripe of the cable is used to...
... may lead to connect a floppy disk drive. The types of the connector and the floppy disk drive cable. The pin 1 of different color. 34 33 2 1 GA-MA790FX-DQ6 Motherboard - 26 - Definition 1 1 NC 2 GND 3 GND 4 +12V 8) FDD (Floppy Disk Drive Connector) This connector is typically designated by a stripe of the cable is used to...

Manual
Page 28
... in S1 sleep state. The LED is off (S5). System Status LED S0 On S1 Blinking S3/S4/S5 Off GA-MA790FX-DQ6 Motherboard - 28 - English 11) GSATAII_1/GSATAII_2 (SATA 3Gb/s Connectors, Controlled by GIGABYTE SATA2, Purple) The SATA connectors conform to your SATA hard drive. Definition 1 GND 2 TXP 3 TXN 4 GND 5 RXN 7 17 1 6 RXP... be used to connect a system power LED on the chassis to Chapter 5, "Configuring SATA Hard Drive(s)," for instructions on when the system is operating. The GIGABYTE SATA2 controller supports RAID 0 and RAID 1. Pin No.
... in S1 sleep state. The LED is off (S5). System Status LED S0 On S1 Blinking S3/S4/S5 Off GA-MA790FX-DQ6 Motherboard - 28 - English 11) GSATAII_1/GSATAII_2 (SATA 3Gb/s Connectors, Controlled by GIGABYTE SATA2, Purple) The SATA connectors conform to your SATA hard drive. Definition 1 GND 2 TXP 3 TXN 4 GND 5 RXN 7 17 1 6 RXP... be used to connect a system power LED on the chassis to Chapter 5, "Configuring SATA Hard Drive(s)," for instructions on when the system is operating. The GIGABYTE SATA2 controller supports RAID 0 and RAID 1. Pin No.

Manual
Page 30
For HD Front Panel Audio: For AC'97 Front Panel Audio: 10 9 Pin No. Definition 1 CD-L 2 GND 3 GND 4 CD-R GA-MA790FX-DQ6 Motherboard - 30 - Make sure the wire assignments of the module connector match the pin assignments of a single plug. English 14) F_AUDIO (Front Panel Audio Header) ...
For HD Front Panel Audio: For AC'97 Front Panel Audio: 10 9 Pin No. Definition 1 CD-L 2 GND 3 GND 4 CD-R GA-MA790FX-DQ6 Motherboard - 30 - Make sure the wire assignments of the module connector match the pin assignments of a single plug. English 14) F_AUDIO (Front Panel Audio Header) ...

Manual
Page 32
... bracket. • To connect an IEEE 1394a device, attach one IEEE 1394a ports via an optional USB bracket. Ensure that the cable is securely connected. GA-MA790FX-DQ6 Motherboard - 32 - Each USB header can provide one end of the device cable to your computer and unplug the power cord from the power outlet...
... bracket. • To connect an IEEE 1394a device, attach one IEEE 1394a ports via an optional USB bracket. Ensure that the cable is securely connected. GA-MA790FX-DQ6 Motherboard - 32 - Each USB header can provide one end of the device cable to your computer and unplug the power cord from the power outlet...

Manual
Page 34
...) CLR_CMOS (Clearing CMOS Jumper) Use this jumper to factory defaults. date information and BIOS configurations) and reset the CMOS values to clear the CMOS values (e.g. GA-MA790FX-DQ6 Motherboard - 34 - Pin No. To clear the CMOS values, place a jumper cap on your computer and unplug the power cord from the jumper. Failure to...
...) CLR_CMOS (Clearing CMOS Jumper) Use this jumper to factory defaults. date information and BIOS configurations) and reset the CMOS values to clear the CMOS values (e.g. GA-MA790FX-DQ6 Motherboard - 34 - Pin No. To clear the CMOS values, place a jumper cap on your computer and unplug the power cord from the jumper. Failure to...

Manual
Page 36
... BIOS for one time only. After system restart, the device boot order will directly boot from the device configured in Boot Menu is effective for GA-MA790FX-DQ6 D28 . . . . : BIOS Setup : XpressRecovery2 : Boot Menu : Qflash 08/28/2007-790FX-SB600-6A66AG01C-00 Function Keys Function Keys:...key can access Boot Menu again to change the first boot device setting as needed. : Q-Flash Press the key to enter BIOS Setup first. GA-MA790FX-DQ6 Motherboard - 36 - English 2-1 Startup Screen The following screen may appear when the computer boots. For more information, refer to Chapter 4, "...
... BIOS for one time only. After system restart, the device boot order will directly boot from the device configured in Boot Menu is effective for GA-MA790FX-DQ6 D28 . . . . : BIOS Setup : XpressRecovery2 : Boot Menu : Qflash 08/28/2007-790FX-SB600-6A66AG01C-00 Function Keys Function Keys:...key can access Boot Menu again to change the first boot device setting as needed. : Q-Flash Press the key to enter BIOS Setup first. GA-MA790FX-DQ6 Motherboard - 36 - English 2-1 Startup Screen The following screen may appear when the computer boots. For more information, refer to Chapter 4, "...
Manual
Page 38
... optimal-performance system operations. „ Set Supervisor Password Change, set , or disable password. An user password only allows you can also carry out this task.) GA-MA790FX-DQ6 Motherboard - 38 - It allows you wish to load, then press to complete. „ Standard CMOS Features Use this menu to configure the system time and...
... optimal-performance system operations. „ Set Supervisor Password Change, set , or disable password. An user password only allows you can also carry out this task.) GA-MA790FX-DQ6 Motherboard - 38 - It allows you wish to load, then press to complete. „ Standard CMOS Features Use this menu to configure the system time and...
