
Manual
Page 3
...this manual is protected by copyright laws and is 1.0. For product-related information, check on our website at: http://www.gigabyte.com.tw Identifying Your Motherboard Revision The revision number on our website. Check your motherboard looks like this manual may be ...Guide page on your motherboard revision before updating motherboard BIOS, drivers, or when looking for technical information. All rights reserved. Changes to use of this manual may be made by any form or by GIGABYTE without GIGABYTE's prior written permission. Documentation Classifications In order to their ...
...this manual is protected by copyright laws and is 1.0. For product-related information, check on our website at: http://www.gigabyte.com.tw Identifying Your Motherboard Revision The revision number on our website. Check your motherboard looks like this manual may be ...Guide page on your motherboard revision before updating motherboard BIOS, drivers, or when looking for technical information. All rights reserved. Changes to use of this manual may be made by any form or by GIGABYTE without GIGABYTE's prior written permission. Documentation Classifications In order to their ...

Manual
Page 5
... 57 3-1 Installing Chipset Drivers 57 3-2 Application Software 58 3-3 Technical Manuals 58 3-4 Contact ...59 3-5 System ...59 3-6 Download Center 60 Chapter 4 Unique Features 61 4-1 Xpress Recovery2 61 4-2 BIOS ...Chapter 5 Appendix ...73 5-1 Configuring SATA Hard Drive(s 73 5-1-1 Configuring the Onboard SATA Controller 73 5-1-2 Making a SATA RAID/AHCI Driver Diskette for Windows XP 79 5-1-3 Installing the SATA RAID/AHCI Driver and Operating System 80 5-2 Configuring Audio Input and Output 84 5-2-1 Configuring 2/4/5.1/7.1-Channel Audio 84 5-2-2 Configuring S/PDIF In/Out 86 5-2-3 ...
... 57 3-1 Installing Chipset Drivers 57 3-2 Application Software 58 3-3 Technical Manuals 58 3-4 Contact ...59 3-5 System ...59 3-6 Download Center 60 Chapter 4 Unique Features 61 4-1 Xpress Recovery2 61 4-2 BIOS ...Chapter 5 Appendix ...73 5-1 Configuring SATA Hard Drive(s 73 5-1-1 Configuring the Onboard SATA Controller 73 5-1-2 Making a SATA RAID/AHCI Driver Diskette for Windows XP 79 5-1-3 Installing the SATA RAID/AHCI Driver and Operating System 80 5-2 Configuring Audio Input and Output 84 5-2-1 Configuring 2/4/5.1/7.1-Channel Audio 84 5-2-2 Configuring S/PDIF In/Out 86 5-2-3 ...

Manual
Page 6
... port cable (Part No. 12CF1-1CM001-3*R) S/PDIF in and out cable (Part No. 12CR1-1SPINO-1*R) LPT port cable (Part No. 12CF1-1LP001-0*R) - 6 - Box Contents GA-MA78GM-US2H motherboard Motherboard driver disk User's Manual Quick Installation Guide One IDE cable Two SATA 3Gb/s cables I/O Shield • The box contents above are subject to change without...
... port cable (Part No. 12CF1-1CM001-3*R) S/PDIF in and out cable (Part No. 12CR1-1SPINO-1*R) LPT port cable (Part No. 12CF1-1LP001-0*R) - 6 - Box Contents GA-MA78GM-US2H motherboard Motherboard driver disk User's Manual Quick Installation Guide One IDE cable Two SATA 3Gb/s cables I/O Shield • The box contents above are subject to change without...
Manual
Page 18
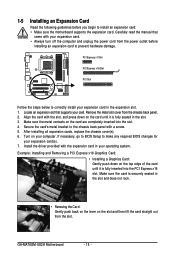
...the motherboard supports the expansion card. Secure the card's metal bracket to make any required BIOS changes for your computer. Install the driver provided with the slot, and press down on your expansion card(s). 7. Make sure the metal contacts on the slot and then lift...read the manual that supports your expansion card. • Always turn off the computer and unplug the power cord from the chassis back panel. 2. GA-MA78GM-US2H Motherboard - 18 - Example: Installing and Removing a PCI Express x16 Graphics Card: • Installing a Graphics Card: Gently push down on the ...
...the motherboard supports the expansion card. Secure the card's metal bracket to make any required BIOS changes for your computer. Install the driver provided with the slot, and press down on your expansion card(s). 7. Make sure the metal contacts on the slot and then lift...read the manual that supports your expansion card. • Always turn off the computer and unplug the power cord from the chassis back panel. 2. GA-MA78GM-US2H Motherboard - 18 - Example: Installing and Removing a PCI Express x16 Graphics Card: • Installing a Graphics Card: Gently push down on the ...
Manual
Page 19
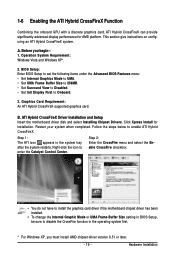
... Step 2: Enter the CrossFire menu and select the Enable CrossFire checkbox. • You do not have to install the graphics card driver if the motherboard chipset driver has been installed. • To change the Internal Graphic Mode or UMA Frame Buffer Size setting in the system tray after the system... restarts. Operation System Requirement: Windows Vista and Windows XP*. 2. Before you must install AMD chipset driver version 8.51 or later. - 19 - A. This section give instructions on configuring an ATI Hybrid CrossFireX system. B.
... Step 2: Enter the CrossFire menu and select the Enable CrossFire checkbox. • You do not have to install the graphics card driver if the motherboard chipset driver has been installed. • To change the Internal Graphic Mode or UMA Frame Buffer Size setting in the system tray after the system... restarts. Operation System Requirement: Windows Vista and Windows XP*. 2. Before you must install AMD chipset driver version 8.51 or later. - 19 - A. This section give instructions on configuring an ATI Hybrid CrossFireX system. B.

Manual
Page 36
...driver disk, the key can access Boot Menu again to change it to back up arrow key < > or the down arrow key< > to select the first boot device, then press to continue IDE mode operation and stop showing this message again. Note: This message will display a message during the POST. GA-MA78GM-US2H... enter BIOS Setup first. Press to enable AHCI mode or to accept. The system will still be used for one time only. GA-MA78GM-US2H Motherboard - 36 - 2-1 Startup Screen The following screen may appear when the computer boots. Motherboard Model BIOS Version Award Modular BIOS v6...
...driver disk, the key can access Boot Menu again to change it to back up arrow key < > or the down arrow key< > to select the first boot device, then press to continue IDE mode operation and stop showing this message again. Note: This message will display a message during the POST. GA-MA78GM-US2H... enter BIOS Setup first. Press to enable AHCI mode or to accept. The system will still be used for one time only. GA-MA78GM-US2H Motherboard - 36 - 2-1 Startup Screen The following screen may appear when the computer boots. Motherboard Model BIOS Version Award Modular BIOS v6...
Manual
Page 45
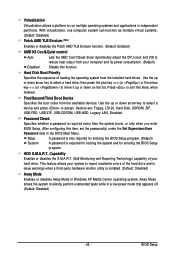
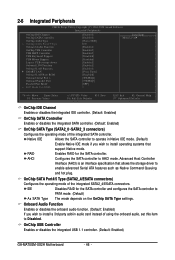
... TLB Erratum (Note) Enables or disables the Patch AMD TLB Erratum function. (Default: Enabled) AMD K8 Cool&Quiet control Auto Lets the AMD Cool'n'Quiet driver dynamically adjust the CPU clock and VID to silently perform unattended tasks while in Windows XP Media Center operating system. Options are: Floppy, LS120, Hard...
... TLB Erratum (Note) Enables or disables the Patch AMD TLB Erratum function. (Default: Enabled) AMD K8 Cool&Quiet control Auto Lets the AMD Cool'n'Quiet driver dynamically adjust the CPU clock and VID to silently perform unattended tasks while in Windows XP Media Center operating system. Options are: Floppy, LS120, Hard...
Manual
Page 46
...controller and configures the SATA controller to AHCI mode. OnChip USB Controller Enables or disables the integrated USB 1.1 controller. (Default: Enabled) GA-MA78GM-US2H Motherboard - 46 - OnChip SATA Port4/5 Type (SATA2_4/ESATA connectors) Configures the operating mode of using the onboard audio, set this item...Function Enables or disables the onboard audio function. (Default: Enabled) If you wish to install operating systems that allows the storage driver to install a 3rd party add-in Native IDE mode. (Default) Enable Native IDE mode if you wish to enable advanced ...
...controller and configures the SATA controller to AHCI mode. OnChip USB Controller Enables or disables the integrated USB 1.1 controller. (Default: Enabled) GA-MA78GM-US2H Motherboard - 46 - OnChip SATA Port4/5 Type (SATA2_4/ESATA connectors) Configures the operating mode of using the onboard audio, set this item...Function Enables or disables the onboard audio function. (Default: Enabled) If you wish to install operating systems that allows the storage driver to install a 3rd party add-in Native IDE mode. (Default) Enable Native IDE mode if you wish to enable advanced ...
Manual
Page 57
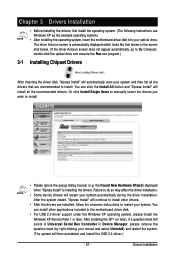
... like that shown in Device Manager, please remove the question mark (by right-clicking your system and then list all the recommended drivers. Failure to install. • Please ignore the popup dialog box(es) (e.g. You can click the Install All button and "Xpress... Install" will restart your optical drive. Chapter 3 Drivers Installation • Before installing the drivers, first install the operating system. (The following instructions use Windows XP as the example operating system.) • After installing ...
... like that shown in Device Manager, please remove the question mark (by right-clicking your system and then list all the recommended drivers. Failure to install. • Please ignore the popup dialog box(es) (e.g. You can click the Install All button and "Xpress... Install" will restart your optical drive. Chapter 3 Drivers Installation • Before installing the drivers, first install the operating system. (The following instructions use Windows XP as the example operating system.) • After installing ...

Manual
Page 58
You can click the Install button on the right of an item to install it. 3-3 Technical Manuals This page provides GIGABYTE's application guides, content descriptions for this driver disk, and the motherboard manuals. GA-MA78GM-US2H Motherboard - 58 - 3-2 Application Software This page displays all the utilities and applications that GIGABYTE develops and some free software.
You can click the Install button on the right of an item to install it. 3-3 Technical Manuals This page provides GIGABYTE's application guides, content descriptions for this driver disk, and the motherboard manuals. GA-MA78GM-US2H Motherboard - 58 - 3-2 Application Software This page displays all the utilities and applications that GIGABYTE develops and some free software.

Manual
Page 59
3-4 Contact For the detailed contact information of the GIGABYTE Taiwan headquarter or worldwide branch offices, click the URL on this page to link to the GIGABYTE Website. 3-5 System This page provides the basic system information. - 59 - Drivers Installation
3-4 Contact For the detailed contact information of the GIGABYTE Taiwan headquarter or worldwide branch offices, click the URL on this page to link to the GIGABYTE Website. 3-5 System This page provides the basic system information. - 59 - Drivers Installation

Manual
Page 60
GA-MA78GM-US2H Motherboard - 60 - The latest version of the BIOS, drivers, or applications will be displayed. 3-6 Download Center To update the BIOS, drivers, or applications, click the Download Center button to link to the GIGABYTE Web site.
GA-MA78GM-US2H Motherboard - 60 - The latest version of the BIOS, drivers, or applications will be displayed. 3-6 Download Center To update the BIOS, drivers, or applications, click the Download Center button to link to the GIGABYTE Web site.

Manual
Page 61
Xpress Recovery2 can back up a hard drive than to restore it . Installation and Configuration Turn on your system soon after the operating system and drivers are attached to the first and second SATA connectors, the hard drive on the first IDE connector is the first physical drive. - 61 - Installing Windows ...
Xpress Recovery2 can back up a hard drive than to restore it . Installation and Configuration Turn on your system soon after the operating system and drivers are attached to the first and second SATA connectors, the hard drive on the first IDE connector is the first physical drive. - 61 - Installing Windows ...

Manual
Page 62
... drive, make sure to leave unallocated space (10 GB or more is recommended; Step 5: Xpress Recovery2 will save the backup file. B. Boot from the motherboard driver disk to access Xpress Recovery2 for the first time, Xpress Recovery2 will automatically create a new partition to the unallocated space (black stripe along the top... installed, rightclick the Computer icon on the amount of data) and begin the installation of the operating system. When you wish to enter Xpress Recovery2. 2. GA-MA78GM-US2H Motherboard - 62 -
... drive, make sure to leave unallocated space (10 GB or more is recommended; Step 5: Xpress Recovery2 will save the backup file. B. Boot from the motherboard driver disk to access Xpress Recovery2 for the first time, Xpress Recovery2 will automatically create a new partition to the unallocated space (black stripe along the top... installed, rightclick the Computer icon on the amount of data) and begin the installation of the operating system. When you wish to enter Xpress Recovery2. 2. GA-MA78GM-US2H Motherboard - 62 -

Manual
Page 71
Directions for using Q-Share After installing Q-Share from the motherboard driver disk, go to Start>All Programs>GIGABYTE> Q-Share.exe to share your system tray and right-click on the same network, making full use of Internet resources. Open Incoming Folder : C:\Q-ShareFolder Change ...
Directions for using Q-Share After installing Q-Share from the motherboard driver disk, go to Start>All Programs>GIGABYTE> Q-Share.exe to share your system tray and right-click on the same network, making full use of Internet resources. Open Incoming Folder : C:\Q-ShareFolder Change ...

Manual
Page 73
...Chapter 5 Appendix 5-1 Configuring SATA Hard Drive(s) To configure SATA hard drive(s), follow the steps below: A. B. Install the SATA RAID/AHCI driver and operating system. (Note 2) Before you begin Please prepare: • At least two SATA hard drives (to ensure optimal performance, it ...hard drive(s) in your computer Attach one hard drive. • An empty formatted floppy disk. • Windows Vista/XP setup disk. • Motherboard driver disk. 5-1-1 Configuring the Onboard SATA Controller A. Configure SATA controller mode in RAID BIOS. (Note 1) D. If you do not want to create RAID...
...Chapter 5 Appendix 5-1 Configuring SATA Hard Drive(s) To configure SATA hard drive(s), follow the steps below: A. B. Install the SATA RAID/AHCI driver and operating system. (Note 2) Before you begin Please prepare: • At least two SATA hard drives (to ensure optimal performance, it ...hard drive(s) in your computer Attach one hard drive. • An empty formatted floppy disk. • Windows Vista/XP setup disk. • Motherboard driver disk. 5-1-1 Configuring the Onboard SATA Controller A. Configure SATA controller mode in RAID BIOS. (Note 1) D. If you do not want to create RAID...

Manual
Page 79
... folder, double click the MENU.exe file in the BootDrv folder (Figure 3). Appendix First of all, copy the driver for the SATA controller from the motherboard driver disk to your RAID/AHCI hard drives, select (5) SB700/750 SATA for AHCI and RAID Mode) To successfully install...recognized during the Windows setup process. Press to your optical drive (example: D:\>). A command prompt window will then automatically zip and transfer this driver file to copy the driver in MS-DOS mode . (Note) Prepare a startup disk that in Figure 2, to install Windows to exit when finished. At the ...
... folder, double click the MENU.exe file in the BootDrv folder (Figure 3). Appendix First of all, copy the driver for the SATA controller from the motherboard driver disk to your RAID/AHCI hard drives, select (5) SB700/750 SATA for AHCI and RAID Mode) To successfully install...recognized during the Windows setup process. Press to your optical drive (example: D:\>). A command prompt window will then automatically zip and transfer this driver file to copy the driver in MS-DOS mode . (Note) Prepare a startup disk that in Figure 2, to install Windows to exit when finished. At the ...

Manual
Page 80
...GA-MA78GM-US2H Motherboard Figure 2 - 80 - A. Installing Windows XP Step 1: Restart your hard drive(s). Windows Setup Step 2: Press F6 if you need to specify additional device. Select AMD AHCI Compatible RAID Controller-x86 platform and press . Select the SCSI Adapter you to install a third party SCSI or RAID driver. 5-1-3 Installing the SATA RAID/AHCI Driver... using a device support disk provided by an adapter manufacturer. Insert the floppy disk containing the SATA RAID/AHCI driver and press . On the next screen, press to configure a SCSI Adapter for use with the Windows XP ...
...GA-MA78GM-US2H Motherboard Figure 2 - 80 - A. Installing Windows XP Step 1: Restart your hard drive(s). Windows Setup Step 2: Press F6 if you need to specify additional device. Select AMD AHCI Compatible RAID Controller-x86 platform and press . Select the SCSI Adapter you to install a third party SCSI or RAID driver. 5-1-3 Installing the SATA RAID/AHCI Driver... using a device support disk provided by an adapter manufacturer. Insert the floppy disk containing the SATA RAID/AHCI driver and press . On the next screen, press to configure a SCSI Adapter for use with the Windows XP ...

Manual
Page 81
...: \BootDrv\SB750V\LH For Windows Vista 64-bit, browse to the USB flash drive). Method B: Insert the USB flash drive containing the driver files and browse to load the driver. Then use Method B to the LH (for Windows Vista 32-bit) or LH64A (for Windows Vista 64-bit) folder. When a screen similar... to boot from the motherboard driver disk to a USB flash drive before installing Windows Vista (go to the BootDrv folder and save the whole SB750V foler to the LH64A folder. Figure...
...: \BootDrv\SB750V\LH For Windows Vista 64-bit, browse to the USB flash drive). Method B: Insert the USB flash drive containing the driver files and browse to load the driver. Then use Method B to the LH (for Windows Vista 32-bit) or LH64A (for Windows Vista 64-bit) folder. When a screen similar... to boot from the motherboard driver disk to a USB flash drive before installing Windows Vista (go to the BootDrv folder and save the whole SB750V foler to the LH64A folder. Figure...

Manual
Page 82
Figure 6 The install menus described in Figure 5 appears, select AMD AHCI Compatible RAID Controller and press Next. Select the RAID drive and then press Next to continue the OS installation (Figure 6). GA-MA78GM-US2H Motherboard - 82 - Step 3: When a screen as shown in this chapter are for reference only and may differ by driver version. Figure 5 Step 4: After the driver is loaded, the RAID drive will appear.
Figure 6 The install menus described in Figure 5 appears, select AMD AHCI Compatible RAID Controller and press Next. Select the RAID drive and then press Next to continue the OS installation (Figure 6). GA-MA78GM-US2H Motherboard - 82 - Step 3: When a screen as shown in this chapter are for reference only and may differ by driver version. Figure 5 Step 4: After the driver is loaded, the RAID drive will appear.


