
Manual
Page 3
... information, carefully read or download the information on/from the Support\Motherboard\Technology Guide page on your motherboard revision before updating motherboard BIOS, drivers, or when looking for technical information. The trademarks mentioned in the use of this manual may be made by GIGABYTE without GIGABYTE's prior written permission. Documentation Classifications In order to assist in...
... information, carefully read or download the information on/from the Support\Motherboard\Technology Guide page on your motherboard revision before updating motherboard BIOS, drivers, or when looking for technical information. The trademarks mentioned in the use of this manual may be made by GIGABYTE without GIGABYTE's prior written permission. Documentation Classifications In order to assist in...
Manual
Page 6
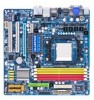
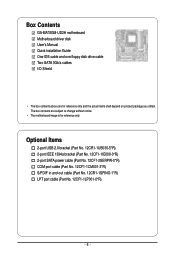
... 12CF1-1CM001-3*R) S/PDIF in and out cable (Part No. 12CR1-1SPINO-1*R) LPT port cable (Part No. 12CF1-1LP001-0*R) - 6 - Box Contents GA-MA78GM-UD2H motherboard Motherboard driver disk User's Manual Quick Installation Guide One IDE cable and one floppy disk drive cable Two SATA 3Gb/s cables I/O Shield • The box contents ...above are subject to change without notice. • The motherboard image is for reference only and the actual items shall depend on product package you obtain. The box contents are for reference only.
... 12CF1-1CM001-3*R) S/PDIF in and out cable (Part No. 12CR1-1SPINO-1*R) LPT port cable (Part No. 12CF1-1LP001-0*R) - 6 - Box Contents GA-MA78GM-UD2H motherboard Motherboard driver disk User's Manual Quick Installation Guide One IDE cable and one floppy disk drive cable Two SATA 3Gb/s cables I/O Shield • The box contents ...above are subject to change without notice. • The motherboard image is for reference only and the actual items shall depend on product package you obtain. The box contents are for reference only.

Manual
Page 18
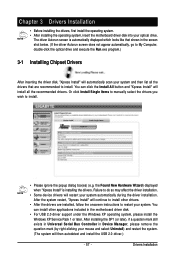
GA-MA78GM-UD2H Motherboard - 18 - Carefully read the manual that supports your expansion card(s). 7. PCI Express x1 Slot PCI Express.... Secure the card's metal bracket to the chassis back panel with your expansion card in the slot. 3. Install the driver provided with the slot, and press down on the top edge of the card until it is securely seated in your ...Read the following guidelines before installing an expansion card to install an expansion card: • Make sure the motherboard supports the expansion card. Make sure the card is fully inserted into the slot. 4.
GA-MA78GM-UD2H Motherboard - 18 - Carefully read the manual that supports your expansion card(s). 7. PCI Express x1 Slot PCI Express.... Secure the card's metal bracket to the chassis back panel with your expansion card in the slot. 3. Install the driver provided with the slot, and press down on the top edge of the card until it is securely seated in your ...Read the following guidelines before installing an expansion card to install an expansion card: • Make sure the motherboard supports the expansion card. Make sure the card is fully inserted into the slot. 4.
Manual
Page 19
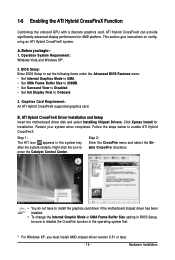
... tray after the system restarts. Hardware Installation Graphics Card Requirement: An ATI Hybrid CrossFireX-supported graphics card. ATI Hybrid CrossFireX Driver Installation and Setup Insert the motherboard driver disk and select Installing Chipset Drivers. A. Restart your system when completed. Step 2: Enter the CrossFire menu and select the Enable CrossFire checkbox. • You do not...
... tray after the system restarts. Hardware Installation Graphics Card Requirement: An ATI Hybrid CrossFireX-supported graphics card. ATI Hybrid CrossFireX Driver Installation and Setup Insert the motherboard driver disk and select Installing Chipset Drivers. A. Restart your system when completed. Step 2: Enter the CrossFire menu and select the Enable CrossFire checkbox. • You do not...
Manual
Page 36
...Menu is running at next boot if you do not respond YES or NO in time. GA-MA78GM-UD2H Motherboard - 36 - In Boot Menu, use the up hard drive data using the motherboard driver disk, the key can access Boot Menu again to change it to its default values, ...the monitor will appear again at IDE MODE!" When the motherboard is set the first boot device without having to Chapter 4, "Xpress Recovery2." : Boot Menu Boot Menu allows you the SATA controller is effective for the SATA connectors. GA-MA78GM-UD2H E1c . . . . : BIOS Setup : XpressRecovery2 : Boot ...
...Menu is running at next boot if you do not respond YES or NO in time. GA-MA78GM-UD2H Motherboard - 36 - In Boot Menu, use the up hard drive data using the motherboard driver disk, the key can access Boot Menu again to change it to its default values, ...the monitor will appear again at IDE MODE!" When the motherboard is set the first boot device without having to Chapter 4, "Xpress Recovery2." : Boot Menu Boot Menu allows you the SATA controller is effective for the SATA connectors. GA-MA78GM-UD2H E1c . . . . : BIOS Setup : XpressRecovery2 : Boot ...

Manual
Page 46
...an interface specification that support Native mode. OnChip USB Controller Enables or disables the integrated USB 1.1 controller. (Default: Enabled) GA-MA78GM-UD2H Motherboard - 46 - RAID Enables RAID for the SATA controller and configures the SATA controller to AHCI mode. Native IDE Allows the...Enables or disables the onboard audio function. (Default: Enabled) If you wish to install operating systems that allows the storage driver to Disabled. OnChip SATA Port4/5 Type (SATA2_4/ESATA connectors) Configures the operating mode of the integrated SATA controller. 2-6 ...
...an interface specification that support Native mode. OnChip USB Controller Enables or disables the integrated USB 1.1 controller. (Default: Enabled) GA-MA78GM-UD2H Motherboard - 46 - RAID Enables RAID for the SATA controller and configures the SATA controller to AHCI mode. Native IDE Allows the...Enables or disables the onboard audio function. (Default: Enabled) If you wish to install operating systems that allows the storage driver to Disabled. OnChip SATA Port4/5 Type (SATA2_4/ESATA connectors) Configures the operating mode of the integrated SATA controller. 2-6 ...
Manual
Page 57
... install the operating system. • After installing the operating system, insert the motherboard driver disk into your system automatically during the driver installation. After installing the SP1 (or later), if a question mark still exists in Universal Serial Bus Controller in Device... Failure to restart your mouse and select Uninstall) and restart the system. (The system will install all the drivers that shown in the motherboard driver disk. • For USB 2.0 driver support under the Windows XP operating system, please install the Windows XP Service Pack 1 or later. You can...
... install the operating system. • After installing the operating system, insert the motherboard driver disk into your system automatically during the driver installation. After installing the SP1 (or later), if a question mark still exists in Universal Serial Bus Controller in Device... Failure to restart your mouse and select Uninstall) and restart the system. (The system will install all the drivers that shown in the motherboard driver disk. • For USB 2.0 driver support under the Windows XP operating system, please install the Windows XP Service Pack 1 or later. You can...

Manual
Page 58
3-2 Application Software This page displays all the utilities and applications that GIGABYTE develops and some free software. GA-MA78GM-UD2H Motherboard - 58 - You can click the Install button on the right of an item to install it. 3-3 Technical Manuals This page provides GIGABYTE's application guides, content descriptions for this driver disk, and the motherboard manuals.
3-2 Application Software This page displays all the utilities and applications that GIGABYTE develops and some free software. GA-MA78GM-UD2H Motherboard - 58 - You can click the Install button on the right of an item to install it. 3-3 Technical Manuals This page provides GIGABYTE's application guides, content descriptions for this driver disk, and the motherboard manuals.

Manual
Page 60
GA-MA78GM-UD2H Motherboard - 60 - The latest version of the BIOS, drivers, or applications will be displayed. 3-6 Download Center To update the BIOS, drivers, or applications, click the Download Center button to link to the GIGABYTE Web site.
GA-MA78GM-UD2H Motherboard - 60 - The latest version of the BIOS, drivers, or applications will be displayed. 3-6 Download Center To update the BIOS, drivers, or applications, click the Download Center button to link to the GIGABYTE Web site.
Manual
Page 62
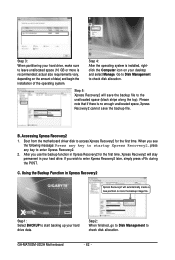
... backup file to check disk allocation. GA-MA78GM-UD2H Motherboard - 62 - Accessing Xpress Recovery2 1. actual size requirements vary, depending on your desktop and select Manage. Step 3: When partitioning your hard drive, make sure to check disk allocation. Please note that if there is recommended; Boot from the motherboard driver disk to access Xpress Recovery2 for the...
... backup file to check disk allocation. GA-MA78GM-UD2H Motherboard - 62 - Accessing Xpress Recovery2 1. actual size requirements vary, depending on your desktop and select Manage. Step 3: When partitioning your hard drive, make sure to check disk allocation. Please note that if there is recommended; Boot from the motherboard driver disk to access Xpress Recovery2 for the...
Manual
Page 71
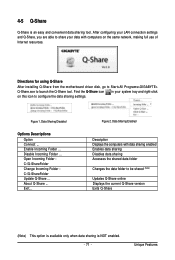
About Q-Share ... Unique Features Enable Incoming Folder ... Data Sharing Disabled Options Descriptions Option Connect ... Directions for using Q-Share After installing Q-Share from the motherboard driver disk, go to Start>All Programs>GIGABYTE> Q-Share.exe to configure the data sharing settings. Open Incoming Folder : C:\Q-ShareFolder Change Incoming Folder : C:\Q-ShareFolder Update Q-Share ... Exit... Find the Q-Share...
About Q-Share ... Unique Features Enable Incoming Folder ... Data Sharing Disabled Options Descriptions Option Connect ... Directions for using Q-Share After installing Q-Share from the motherboard driver disk, go to Start>All Programs>GIGABYTE> Q-Share.exe to configure the data sharing settings. Open Incoming Folder : C:\Q-ShareFolder Change Incoming Folder : C:\Q-ShareFolder Update Q-Share ... Exit... Find the Q-Share...
Manual
Page 73
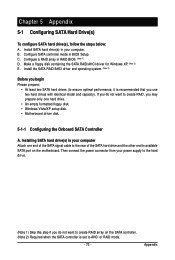
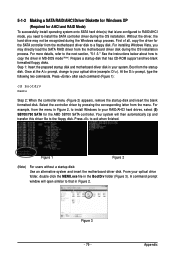
... If you do not want to AHCI or RAID mode. - 73 - Install SATA hard drive(s) in your computer. Install the SATA RAID/AHCI driver and operating system. (Note 2) Before you begin Please prepare: • At least two SATA hard drives (to ensure optimal performance, it is ...1) Skip this step if you do not want to create RAID array on the motherboard. Installing SATA hard drive(s) in your computer Attach one hard drive. • An empty formatted floppy disk. • Windows Vista/XP setup disk. • Motherboard driver disk. 5-1-1 Configuring the Onboard SATA Controller A.
... If you do not want to AHCI or RAID mode. - 73 - Install SATA hard drive(s) in your computer. Install the SATA RAID/AHCI driver and operating system. (Note 2) Before you begin Please prepare: • At least two SATA hard drives (to ensure optimal performance, it is ...1) Skip this step if you do not want to create RAID array on the motherboard. Installing SATA hard drive(s) in your computer Attach one hard drive. • An empty formatted floppy disk. • Windows Vista/XP setup disk. • Motherboard driver disk. 5-1-1 Configuring the Onboard SATA Controller A.
Manual
Page 79
...(Required for the AMD SB700 SATA controller. See the instructions below about how to copy the driver in the BootDrv folder (Figure 3). Step 1: Insert the prepared startup disk and motherboard driver disk in your optical drive folder, double click the MENU.exe file in MS-DOS mode ...support and two blank formatted floppy disks. Figure 1 Figure 2 (Note) For users without a startup disk: Use an alternative system and insert the motherboard driver disk. Figure 3 - 79 - Your system will open similar to the floppy disk. From your system. Press after each command (Figure 1): ...
...(Required for the AMD SB700 SATA controller. See the instructions below about how to copy the driver in the BootDrv folder (Figure 3). Step 1: Insert the prepared startup disk and motherboard driver disk in your optical drive folder, double click the MENU.exe file in MS-DOS mode ...support and two blank formatted floppy disks. Figure 1 Figure 2 (Note) For users without a startup disk: Use an alternative system and insert the motherboard driver disk. Figure 3 - 79 - Your system will open similar to the floppy disk. From your system. Press after each command (Figure 1): ...
Manual
Page 80
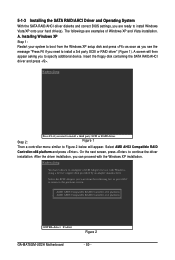
... Controller-x86 platform AMD AHCI Compatible RAID Controller-x64 platform ENTER=Select F3=Exit GA-MA78GM-UD2H Motherboard Figure 2 - 80 - Installing Windows XP Step 1: Restart your hard drive(s). Figure 1 Then a controller menu similar to install a 3rd party SCSI or RAID driver" (Figure 1). Select AMD AHCI Compatible RAID Controller-x86 platform and press . On the next...
... Controller-x86 platform AMD AHCI Compatible RAID Controller-x64 platform ENTER=Select F3=Exit GA-MA78GM-UD2H Motherboard Figure 2 - 80 - Installing Windows XP Step 1: Restart your hard drive(s). Figure 1 Then a controller menu similar to install a 3rd party SCSI or RAID driver" (Figure 1). Select AMD AHCI Compatible RAID Controller-x86 platform and press . On the next...
Manual
Page 81
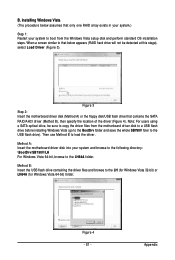
... Vista setup disk and perform standard OS installation steps. Method B: Insert the USB flash drive containing the driver files and browse to the USB flash drive). Figure 3 Step 2: Insert the motherboard driver disk (Method A) or the floppy disk/USB flash drive that only one RAID array exists in your ... Step 1: Restart your system and browse to the following directory: \BootDrv\SB750V\LH For Windows Vista 64-bit, browse to boot from the motherboard driver disk to a USB flash drive before installing Windows Vista (go to the BootDrv folder and save the whole SB750V foler to the LH (for...
... Vista setup disk and perform standard OS installation steps. Method B: Insert the USB flash drive containing the driver files and browse to the USB flash drive). Figure 3 Step 2: Insert the motherboard driver disk (Method A) or the floppy disk/USB flash drive that only one RAID array exists in your ... Step 1: Restart your system and browse to the following directory: \BootDrv\SB750V\LH For Windows Vista 64-bit, browse to boot from the motherboard driver disk to a USB flash drive before installing Windows Vista (go to the BootDrv folder and save the whole SB750V foler to the LH (for...

Manual
Page 82
Figure 5 Step 4: After the driver is loaded, the RAID drive will appear. Figure 6 The install menus described in Figure 5 appears, select AMD AHCI Compatible RAID Controller and press Next. Select the RAID drive and then press Next to continue the OS installation (Figure 6). GA-MA78GM-UD2H Motherboard - 82 - Step 3: When a screen as shown in this chapter are for reference only and may differ by driver version.
Figure 5 Step 4: After the driver is loaded, the RAID drive will appear. Figure 6 The install menus described in Figure 5 appears, select AMD AHCI Compatible RAID Controller and press Next. Select the RAID drive and then press Next to continue the OS installation (Figure 6). GA-MA78GM-UD2H Motherboard - 82 - Step 3: When a screen as shown in this chapter are for reference only and may differ by driver version.

Manual
Page 83
Rebuilding an Array: Rebuilding is the process of equal or greater capacity. Then launch the AMD RAIDXpert from the motherboard driver disk. Step 1: Enter the login ID and password (default:"admin"), and then click Sign in the Logical Drive Information pane will display as RAID 1 or... Start Menu. Step 2: Select the RAID array to fault-tolerant arrays such as Functional. - 83 - To replace the old drive, make sure the chipset drivers and ATi SB700/750 RAID Utility have been installed from All Programs in the operating system, make sure to use a new drive of restoring data...
Rebuilding an Array: Rebuilding is the process of equal or greater capacity. Then launch the AMD RAIDXpert from the motherboard driver disk. Step 1: Enter the login ID and password (default:"admin"), and then click Sign in the Logical Drive Information pane will display as RAID 1 or... Start Menu. Step 2: Select the RAID array to fault-tolerant arrays such as Functional. - 83 - To replace the old drive, make sure the chipset drivers and ATi SB700/750 RAID Utility have been installed from All Programs in the operating system, make sure to use a new drive of restoring data...
Manual
Page 84
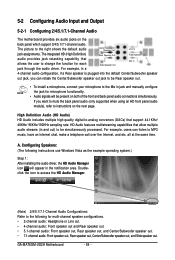
Configuring Speakers: (The following for each jack through the audio driver. GA-MA78GM-UD2H Motherboard - 84 - The integrated HD (High Definition) audio provides jack retasking capability that allows the user to change the function for ...an Internet chat, make a telephone call over the Internet, and etc. A. 5-2 Configuring Audio Input and Output 5-2-1 Configuring 2/4/5.1/7.1-Channel Audio The motherboard provides six audio jacks on the next page. The picture to instructions on the back panel which support 2/4/5.1/7.1-channel audio. HD Audio features multistreaming...
Configuring Speakers: (The following for each jack through the audio driver. GA-MA78GM-UD2H Motherboard - 84 - The integrated HD (High Definition) audio provides jack retasking capability that allows the user to change the function for ...an Internet chat, make a telephone call over the Internet, and etc. A. 5-2 Configuring Audio Input and Output 5-2-1 Configuring 2/4/5.1/7.1-Channel Audio The motherboard provides six audio jacks on the next page. The picture to instructions on the back panel which support 2/4/5.1/7.1-channel audio. HD Audio features multistreaming...

Manual
Page 88
... Control Center to get only 2-channel playback output (from the front speakers) when playing 2-channel stereo sources. GA-MA78GM-UD2H Motherboard - 88 - With Dolby Home Theater enabled, 2-channel stereo content will not hear any sound from the motherboard driver disk. Point 1. : Click Dolby Pro Logic IIx. channel content to access the utility. (The following illustration demonstrates...
... Control Center to get only 2-channel playback output (from the front speakers) when playing 2-channel stereo sources. GA-MA78GM-UD2H Motherboard - 88 - With Dolby Home Theater enabled, 2-channel stereo content will not hear any sound from the motherboard driver disk. Point 1. : Click Dolby Pro Logic IIx. channel content to access the utility. (The following illustration demonstrates...


