Manual
Page 3
... order to the specifications and features in the use GIGABYTE's unique features, read or download the information on/from the Support&Downloads\Motherboard\Technology Guide page on your motherboard revision before updating motherboard BIOS, drivers, or when looking for technical information. Copyright...protected by any means without prior notice. For example, "REV: 1.0" means the revision of this product, GIGABYTE provides the following types of GIGABYTE. Example: The trademarks mentioned in this manual are legally registered to use of this manual may be reproduced, ...
... order to the specifications and features in the use GIGABYTE's unique features, read or download the information on/from the Support&Downloads\Motherboard\Technology Guide page on your motherboard revision before updating motherboard BIOS, drivers, or when looking for technical information. Copyright...protected by any means without prior notice. For example, "REV: 1.0" means the revision of this product, GIGABYTE provides the following types of GIGABYTE. Example: The trademarks mentioned in this manual are legally registered to use of this manual may be reproduced, ...
Manual
Page 5
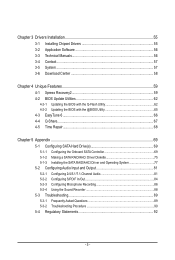
... 3-2 Application Software 56 3-3 Technical Manuals 56 3-4 Contact...57 3-5 System...57 3-6 Download Center 58 Chapter 4 Unique Features 59 4-1 Xpress Recovery2 59 4-2 BIOS Update Utilities 62 4-2-1 Updating the BIOS with the Q-Flash Utility 62 4-2-2 Updating the BIOS with the @BIOS Utility 65 4-3 EasyTune 6...66 4-4 Q-Share...67 4-5 Time Repair...68 Chapter 5 Appendix...69 5-1 Configuring SATA Hard Drive(s 69 5-1-1 Configuring the...
... 3-2 Application Software 56 3-3 Technical Manuals 56 3-4 Contact...57 3-5 System...57 3-6 Download Center 58 Chapter 4 Unique Features 59 4-1 Xpress Recovery2 59 4-2 BIOS Update Utilities 62 4-2-1 Updating the BIOS with the Q-Flash Utility 62 4-2-2 Updating the BIOS with the @BIOS Utility 65 4-3 EasyTune 6...66 4-4 Q-Share...67 4-5 Time Repair...68 Chapter 5 Appendix...69 5-1 Configuring SATA Hard Drive(s 69 5-1-1 Configuring the...

Manual
Page 31
...system parameters and loading operating system, etc. To flash the BIOS, do not encounter problems using the Q-Flash and @BIOS utilities, refer to Chapter 4, "BIOS Update Utilities." • Because BIOS flashing is potentially risky, if you not flash the BIOS. Refer to Chapter 5, "Troubleshooting," for how to clear...activate certain system features. To upgrade the BIOS, use either the GIGABYTE Q-Flash or @BIOS utility. • Q-Flash allows the user to quickly and easily upgrade or back up BIOS without entering the operating system. • @BIOS is recommended that allows the user to...
...system parameters and loading operating system, etc. To flash the BIOS, do not encounter problems using the Q-Flash and @BIOS utilities, refer to Chapter 4, "BIOS Update Utilities." • Because BIOS flashing is potentially risky, if you not flash the BIOS. Refer to Chapter 5, "Troubleshooting," for how to clear...activate certain system features. To upgrade the BIOS, use either the GIGABYTE Q-Flash or @BIOS utility. • Q-Flash allows the user to quickly and easily upgrade or back up BIOS without entering the operating system. • @BIOS is recommended that allows the user to...
Manual
Page 36
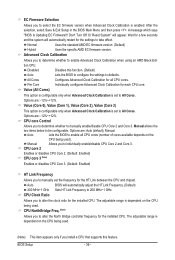
After the selection, select Save & Exit Setup in the BIOS Main Menu and then press . A message which says "BIOS Is Updating EC Firmware!!! Wait for a few seconds and the system will automatically adjust the HT Link Frequency. (Default) 200 MHz~1 GHz Sets HT Link ... Core Disables this feature. Advanced Clock Calibration Allows you to alter the clock ratio for the installed CPU. Options are : -12%~+12%. Auto BIOS will automatically restart for the settings to take effect. CPU Clock Ratio Allows you to determine whether to enable Advanced Clock Calibration when using an...
After the selection, select Save & Exit Setup in the BIOS Main Menu and then press . A message which says "BIOS Is Updating EC Firmware!!! Wait for a few seconds and the system will automatically adjust the HT Link Frequency. (Default) 200 MHz~1 GHz Sets HT Link ... Core Disables this feature. Advanced Clock Calibration Allows you to alter the clock ratio for the installed CPU. Options are : -12%~+12%. Auto BIOS will automatically restart for the settings to take effect. CPU Clock Ratio Allows you to determine whether to enable Advanced Clock Calibration when using an...

Manual
Page 52
...Award Software MB Intelligent Tweaker(M.I .T.) Load Fail-Safe Defaults Standard CMOS Features Load Optimized Defaults Advanced BIOS Features Set Supervisor Password Integrated Peripherals Set User Password Power Management Setup PnP/PCI Configurations Save & ... to BIOS F12: Load CMOS from BIOS Press on this item and then press the key to load the optimal BIOS default settings. Always load the Optimized defaults after updating the BIOS or after clearing the CMOS values. BIOS Setup - 52 - The BIOS defaults ...
...Award Software MB Intelligent Tweaker(M.I .T.) Load Fail-Safe Defaults Standard CMOS Features Load Optimized Defaults Advanced BIOS Features Set Supervisor Password Integrated Peripherals Set User Password Power Management Setup PnP/PCI Configurations Save & ... to BIOS F12: Load CMOS from BIOS Press on this item and then press the key to load the optimal BIOS default settings. Always load the Optimized defaults after updating the BIOS or after clearing the CMOS values. BIOS Setup - 52 - The BIOS defaults ...
Manual
Page 58
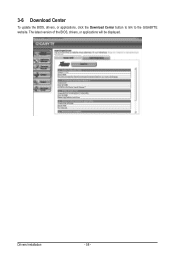
3-6 Download Center To update the BIOS, drivers, or applications, click the Download Center button to link to the GIGABYTE website. Drivers Installation - 58 - The latest version of the BIOS, drivers, or applications will be displayed.
3-6 Download Center To update the BIOS, drivers, or applications, click the Download Center button to link to the GIGABYTE website. Drivers Installation - 58 - The latest version of the BIOS, drivers, or applications will be displayed.
Manual
Page 62
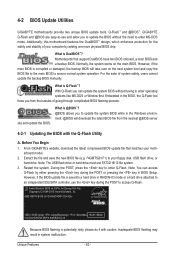
... (C) 1984-2009, Award Software, Inc. 4-2 BIOS Update Utilities GIGABYTE motherboards provide two unique BIOS update tools, Q-Flash™ and @BIOS™. Additionally, this motherboard features the DualBIOS™ design, which enhances protection for GA-MA74GMT-S2H E3c . . . . : BIOS Setup : XpressRecovery2 : Boot Menu : Qflash 11/02/2009-RS740-SB710-6A669G0CC-00 Because BIOS flashing is @BIOS™? @BIOS allows you can access Q-Flash...
... (C) 1984-2009, Award Software, Inc. 4-2 BIOS Update Utilities GIGABYTE motherboards provide two unique BIOS update tools, Q-Flash™ and @BIOS™. Additionally, this motherboard features the DualBIOS™ design, which enhances protection for GA-MA74GMT-S2H E3c . . . . : BIOS Setup : XpressRecovery2 : Boot Menu : Qflash 11/02/2009-RS740-SB710-6A669G0CC-00 Because BIOS flashing is @BIOS™? @BIOS allows you can access Q-Flash...

Manual
Page 63
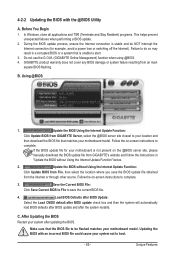
... using FAT32/16/12 file system. • If the BIOS update file is displayed on the screen. B. Updating the BIOS When updating the BIOS, choose the location where the BIOS file is updat- The following procedure assumes that you to save the BIOS file to access Q-Flash. 2. Step 1: 1. Make sure the BIOS update file matches your motherboard model. Step 2: The process...
... using FAT32/16/12 file system. • If the BIOS update file is displayed on the screen. B. Updating the BIOS When updating the BIOS, choose the location where the BIOS file is updat- The following procedure assumes that you to save the BIOS file to access Q-Flash. 2. Step 1: 1. Make sure the BIOS update file matches your motherboard model. Step 2: The process...

Manual
Page 64
... During the POST, press to load BIOS defaults. System will re-detect all peripheral devices after the system restarts. As the system boots, you should see the new BIOS version is complete after a BIOS update, so we recommend that you reload BIOS defaults. Select Load Optimized Defaults and press... to enter BIOS Setup. Step 4: Press and then to CMOS and exit BIOS Setup. CMOS Setup Utility-Copyright (C) 1984-2009...
... During the POST, press to load BIOS defaults. System will re-detect all peripheral devices after the system restarts. As the system boots, you should see the new BIOS version is complete after a BIOS update, so we recommend that you reload BIOS defaults. Select Load Optimized Defaults and press... to enter BIOS Setup. Step 4: Press and then to CMOS and exit BIOS Setup. CMOS Setup Utility-Copyright (C) 1984-2009...
Manual
Page 65
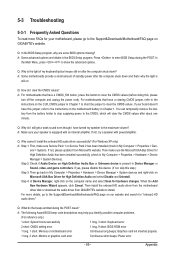
... the on -screen instructions to complete. 3. Load BIOS Defaults after BIOS Update: Select the Load CMOS default after BIOS update check box and then the system will automatically load BIOS defaults after BIOS update and after updating the BIOS. Do not use the G.O.M. (GIGABYTE Online Management) function when using @BIOS. 4. Update the BIOS without Using the Internet Update Function" below. 2. Unique Features Failure to do...
... the on -screen instructions to complete. 3. Load BIOS Defaults after BIOS Update: Select the Load CMOS default after BIOS update check box and then the system will automatically load BIOS defaults after BIOS update and after updating the BIOS. Do not use the G.O.M. (GIGABYTE Online Management) function when using @BIOS. 4. Update the BIOS without Using the Internet Update Function" below. 2. Unique Features Failure to do...
Manual
Page 89
...in Device Manager or Sound, video, and game controllers. A: Make sure your speaker is present in Chapter 1. If not, please update it from GIGABYTE's website to clear the CMOS values. If yes, please disable this device. (If not, skip this jumper, refer to the ...computer problems. (For reference only.) 1 short: System boots successfully 1 long, 3 short: Keyboard error 2 short: CMOS setting error 1 long, 9 short: BIOS ROM error 1 long, 1 short: Memory or motherboard error Continuous long beeps: Graphics card not inserted properly 1 long, 2 short: Monitor or graphics card ...
...in Device Manager or Sound, video, and game controllers. A: Make sure your speaker is present in Chapter 1. If not, please update it from GIGABYTE's website to clear the CMOS values. If yes, please disable this device. (If not, skip this jumper, refer to the ...computer problems. (For reference only.) 1 short: System boots successfully 1 long, 3 short: Keyboard error 2 short: CMOS setting error 1 long, 9 short: BIOS ROM error 1 long, 1 short: Memory or motherboard error Continuous long beeps: Graphics card not inserted properly 1 long, 2 short: Monitor or graphics card ...


