Manual
Page 25
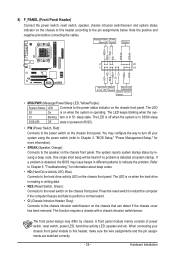
... to the hard drive activity LED on the chassis front panel. When connecting your system using the power switch (refer to Chapter 2, "BIOS Setup," "Power Management Setup," for information about beep codes. • HD (Hard Drive Activity LED, Blue) Connects to indicate the problem...when the sys- This function requires a chassis with a chassis intrusion switch/sensor. 8) F_PANEL (Front Panel Header) Connect the power switch, reset switch, speaker, chassis intrusion switch/sensor and system status indicator on the chassis that can detect if the chassis cover has been removed. ...
... to the hard drive activity LED on the chassis front panel. When connecting your system using the power switch (refer to Chapter 2, "BIOS Setup," "Power Management Setup," for information about beep codes. • HD (Hard Drive Activity LED, Blue) Connects to indicate the problem...when the sys- This function requires a chassis with a chassis intrusion switch/sensor. 8) F_PANEL (Front Panel Header) Connect the power switch, reset switch, speaker, chassis intrusion switch/sensor and system status indicator on the chassis that can detect if the chassis cover has been removed. ...
Manual
Page 28
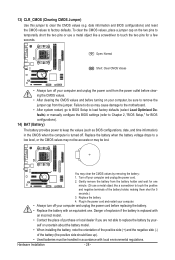
...load factory defaults (select Load Optimized Defaults) or manually configure the BIOS settings (refer to Chapter 2, "BIOS Setup," for BIOS configurations). 14) BAT (Battery) The battery provides power to keep the values (such as BIOS configurations, date, and time information) in the CMOS when the ... jumper. 13) CLR_CMOS (Clearing CMOS Jumper) Use this jumper to factory defaults. Hardware Installation - 28 - date information and BIOS configurations) and reset the CMOS values to clear the CMOS values (e.g. To clear the CMOS values, place a jumper cap on your computer and ...
...load factory defaults (select Load Optimized Defaults) or manually configure the BIOS settings (refer to Chapter 2, "BIOS Setup," for BIOS configurations). 14) BAT (Battery) The battery provides power to keep the values (such as BIOS configurations, date, and time information) in the CMOS when the ... jumper. 13) CLR_CMOS (Clearing CMOS Jumper) Use this jumper to factory defaults. Hardware Installation - 28 - date information and BIOS configurations) and reset the CMOS values to clear the CMOS values (e.g. To clear the CMOS values, place a jumper cap on your computer and ...
Manual
Page 29
...to clear the CMOS values and reset the board to default values. (Refer to the "Load Optimized Defaults" section in this chapter or introductions of the battery/ clearing CMOS jumper in the CMOS. To upgrade the BIOS, use either the GIGABYTE Q-Flash or @BIOS utility. • Q-Flash allows... the user to keep the configuration values in Chapter 1 for the beep codes description. • It is recommended that searches and downloads the latest version of the BIOS Setup program. Refer to ...
...to clear the CMOS values and reset the board to default values. (Refer to the "Load Optimized Defaults" section in this chapter or introductions of the battery/ clearing CMOS jumper in the CMOS. To upgrade the BIOS, use either the GIGABYTE Q-Flash or @BIOS utility. • Q-Flash allows... the user to keep the configuration values in Chapter 1 for the beep codes description. • It is recommended that searches and downloads the latest version of the BIOS Setup program. Refer to ...

Manual
Page 33
... DDR 400 Sets Memory Clock to DDR 400. DDR 533 Sets Memory Clock to DDR 667. DDR 667 Sets Memory Clock to DDR 533. BIOS Setup Auto lets BIOS automatically set the memory clock. X4.00 Sets Memory Clock to DDR 800. - 33 - DDR 800 Sets Memory Clock to X4.00. ...these components. When you use an AM3/AM2+ CPU: X2.00 Sets Memory Clock to X2.00. If this occurs, clear the CMOS values and reset the board to default values.) Set Memory Clock Determines whether to manually set the memory clock as required. 2-3 MB Intelligent Tweaker(M.I.T.) CMOS Setup Utility-...
... DDR 400 Sets Memory Clock to DDR 400. DDR 533 Sets Memory Clock to DDR 667. DDR 667 Sets Memory Clock to DDR 533. BIOS Setup Auto lets BIOS automatically set the memory clock. X4.00 Sets Memory Clock to DDR 800. - 33 - DDR 800 Sets Memory Clock to X4.00. ...these components. When you use an AM3/AM2+ CPU: X2.00 Sets Memory Clock to X2.00. If this occurs, clear the CMOS values and reset the board to default values.) Set Memory Clock Determines whether to manually set the memory clock as required. 2-3 MB Intelligent Tweaker(M.I.T.) CMOS Setup Utility-...

Manual
Page 45
... System/CPU Temperature Displays current system/CPU temperature. You can adjust the fan speed with EasyTune based on system requirements. BIOS Setup Enabled clears the record of previous chassis intrusion status and the Case Opened field will show "No". System/CPU Warning... Displays current CPU/system fan speed. 2-9 PC Health Status CMOS Setup Utility-Copyright (C) 1984-2009 Award Software PC Health Status Reset Case Open Status Case Opened Vcore DDR2 1.8V +3.3V +12V Current System Temperature Current CPU Temperature Current CPU FAN Speed Current SYSTEM...
... System/CPU Temperature Displays current system/CPU temperature. You can adjust the fan speed with EasyTune based on system requirements. BIOS Setup Enabled clears the record of previous chassis intrusion status and the Case Opened field will show "No". System/CPU Warning... Displays current CPU/system fan speed. 2-9 PC Health Status CMOS Setup Utility-Copyright (C) 1984-2009 Award Software PC Health Status Reset Case Open Status Case Opened Vcore DDR2 1.8V +3.3V +12V Current System Temperature Current CPU Temperature Current CPU FAN Speed Current SYSTEM...

Manual
Page 59
...MXIC 25L8005 1M Keep0 DfilMe(Is)DfaotuandEnable Floppy A Loa d CMO S Default Enable HDD 1-0 Upda te BIOS from Drive Please SparevsesBaInOySketoy Dtoricvoentinue Enter : Run hi:Move ESC:Reset F10:Power Off - 59 - The monitor will display the update process. • Do not turn off...independent IDE/SATA controller, use the up or down arrow key to select Update BIOS from the floppy disk is saved. CoaodpyCMBIOOSS DcoemfapuletteEdn-aPbaless !! appears, press to Drive Enter : Run hi:Move ESC:Reset F10:Power Off Total size : 0 Free size : 0 3. Insert the floppy...
...MXIC 25L8005 1M Keep0 DfilMe(Is)DfaotuandEnable Floppy A Loa d CMO S Default Enable HDD 1-0 Upda te BIOS from Drive Please SparevsesBaInOySketoy Dtoricvoentinue Enter : Run hi:Move ESC:Reset F10:Power Off - 59 - The monitor will display the update process. • Do not turn off...independent IDE/SATA controller, use the up or down arrow key to select Update BIOS from the floppy disk is saved. CoaodpyCMBIOOSS DcoemfapuletteEdn-aPbaless !! appears, press to Drive Enter : Run hi:Move ESC:Reset F10:Power Off Total size : 0 Free size : 0 3. Insert the floppy...


