Manual
Page 10
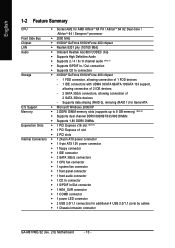
Supports data striping (RAID 0), mirroring (RAID 1) for Serial ATA O.S Support Š Microsoft Windows 2000/XP Memory Š 2 DDRII DIMM memory slots (supports up to 8 GB memory) (Note 2) Š Supports dual channel DDRII 800/667/533/400 DIMMs Š ... 3Gb/s connectors, allowing connection of 2 SATA 3Gb/s devices - English 1-2 Feature Summary CPU Š Socket AM2 for additional 4 USB 2.0/1.1 ports by cables Š 1 Chassis Intrusion connector GA-M61VME-S2 (rev. 2.0) Motherboard - 10 -
Supports data striping (RAID 0), mirroring (RAID 1) for Serial ATA O.S Support Š Microsoft Windows 2000/XP Memory Š 2 DDRII DIMM memory slots (supports up to 8 GB memory) (Note 2) Š Supports dual channel DDRII 800/667/533/400 DIMMs Š ... 3Gb/s connectors, allowing connection of 2 SATA 3Gb/s devices - English 1-2 Feature Summary CPU Š Socket AM2 for additional 4 USB 2.0/1.1 ports by cables Š 1 Chassis Intrusion connector GA-M61VME-S2 (rev. 2.0) Motherboard - 10 -
Manual
Page 11
Hardware Installation Windows 64-bit operating system doesn't have such limitation. (Note 3) The GA-M61VME-S2 supports up an 8 channel audio configuration, you must use 5.1/7.1 Surround Cable (optional). (Note 2) Due to the VGA cards support list on page 16~17) (Note 4) ... Factor Š Micro ATX form factor; 24.4cm x 22.5cm (Note 1) To set up to PCI Express x1 mode. (please refer to the limitation of Windows 32-bit operating system, when more than 4 GB of physical memory is supported will be less than 4 GB;
Hardware Installation Windows 64-bit operating system doesn't have such limitation. (Note 3) The GA-M61VME-S2 supports up an 8 channel audio configuration, you must use 5.1/7.1 Surround Cable (optional). (Note 2) Due to the VGA cards support list on page 16~17) (Note 4) ... Factor Š Micro ATX form factor; 24.4cm x 22.5cm (Note 1) To set up to PCI Express x1 mode. (please refer to the limitation of Windows 32-bit operating system, when more than 4 GB of physical memory is supported will be less than 4 GB;
Manual
Page 16
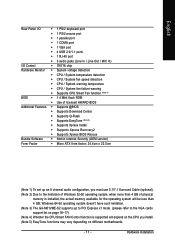
... ATi Maker Gigabyte Gigabyte Gigabyte Gigabyte Gigabyte Gigabyte Gigabyte Gigabyte Gigabyte Gigabyte Gigabyte Gigabyte Gigabyte Gigabyte Gigabyte Gigabyte Gigabyte Gigabyte Gigabyte Nvidia Nvidia ASUS ASUS MSI Leadtek ELSA ELSA Gigabyte Gigabyte Gigabyte Gigabyte Gigabyte Gigabyte Gigabyte Gigabyte Gigabyte Gigabyte Gigabyte Gigabyte Gigabyte Gigabyte Gigabyte Gigabyte Gigabyte Model Name ...RX18L256V-B GV-RX18T512V-B GA-M61VME-S2 (rev. 2.0) Motherboard - 16 - English PCI Express x16 Graphics Card Support List The items below are all supported under the Windows XP operating system. When...
... ATi Maker Gigabyte Gigabyte Gigabyte Gigabyte Gigabyte Gigabyte Gigabyte Gigabyte Gigabyte Gigabyte Gigabyte Gigabyte Gigabyte Gigabyte Gigabyte Gigabyte Gigabyte Gigabyte Gigabyte Nvidia Nvidia ASUS ASUS MSI Leadtek ELSA ELSA Gigabyte Gigabyte Gigabyte Gigabyte Gigabyte Gigabyte Gigabyte Gigabyte Gigabyte Gigabyte Gigabyte Gigabyte Gigabyte Gigabyte Gigabyte Gigabyte Gigabyte Model Name ...RX18L256V-B GV-RX18T512V-B GA-M61VME-S2 (rev. 2.0) Motherboard - 16 - English PCI Express x16 Graphics Card Support List The items below are all supported under the Windows XP operating system. When...
Manual
Page 29
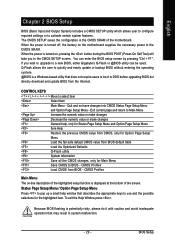
... - When the power is displayed at the bottom of the motherboard. CMOS Profiles Load CMOS from the Internet. To exit the Help Window press . When the power is turned on -line description of the highlighted setup function is turned off, the battery on the motherboard ...supplies the necessary power to a new BIOS, either Gigabyte's Q-Flash or @BIOS utility can enter the BIOS setup screen by pressing "Ctrl + F1". Because BIOS flashing is a Windows-based utility that describes the appropriate keys to activate certain system features. The CMOS ...
... - When the power is displayed at the bottom of the motherboard. CMOS Profiles Load CMOS from the Internet. To exit the Help Window press . When the power is turned on -line description of the highlighted setup function is turned off, the battery on the motherboard ...supplies the necessary power to a new BIOS, either Gigabyte's Q-Flash or @BIOS utility can enter the BIOS setup screen by pressing "Ctrl + F1". Because BIOS flashing is a Windows-based utility that describes the appropriate keys to activate certain system features. The CMOS ...

Manual
Page 35
..., whether or not a PCI Express card is installed. capability. capability. (Default value) Away Mode Disabled Disable this function. (Default value) Enabled Enable Away Mode in Windows XP Media Center operating system. (Away Mode: Enables the system to silently perform unattended tasks while in a low-power mode that appears off. ) Init Display...
..., whether or not a PCI Express card is installed. capability. capability. (Default value) Away Mode Disabled Disable this function. (Default value) Enabled Enable Away Mode in Windows XP Media Center operating system. (Away Mode: Enables the system to silently perform unattended tasks while in a low-power mode that appears off. ) Init Display...
Manual
Page 47
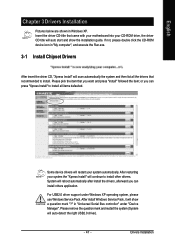
...title that came with your motherboard into your system automatically. or you want and press "install" followed the item; After install Windows Service Pack, it will reboot automatically after install the drivers, afterward you can press "Xpress Install" to install all the drivers... the driver CD, "Xpress Install" will auto start and show a question mark "?" English Chapter 3 Drivers Installation Pictures below are shown in Windows XP. After restarting your system the "Xpress Install" will auto-detect the right USB2.0 driver). - 47 - System will show the installation ...
...title that came with your motherboard into your system automatically. or you want and press "install" followed the item; After install Windows Service Pack, it will reboot automatically after install the drivers, afterward you can press "Xpress Install" to install all the drivers... the driver CD, "Xpress Install" will auto start and show a question mark "?" English Chapter 3 Drivers Installation Pictures below are shown in Windows XP. After restarting your system the "Xpress Install" will auto-detect the right USB2.0 driver). - 47 - System will show the installation ...
Manual
Page 51
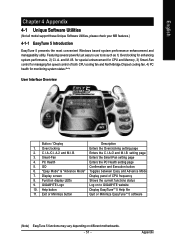
... the PC Health setting page 5. setting page 3. GO Confirmation and Execution button 6. "Easy Mode" & "Advance Mode" Toggles between Easy and Advance Mode 7. GIGABYTE Logo Log on different motherboards. - 51 - Exit or Minimize button Quit or Minimize EasyTuneTM 5 software (Note) EasyTune 5 functions may vary depending on to use... Software Utilities (Not all model support these Unique Software Utilities, please check your MB features.) 4-1-1 EasyTune 5 Introduction EasyTune 5 presents the most convenient Windows based system performance enhancement and manageability utility.
... the PC Health setting page 5. setting page 3. GO Confirmation and Execution button 6. "Easy Mode" & "Advance Mode" Toggles between Easy and Advance Mode 7. GIGABYTE Logo Log on different motherboards. - 51 - Exit or Minimize button Quit or Minimize EasyTuneTM 5 software (Note) EasyTune 5 functions may vary depending on to use... Software Utilities (Not all model support these Unique Software Utilities, please check your MB features.) 4-1-1 EasyTune 5 Introduction EasyTune 5 presents the most convenient Windows based system performance enhancement and manageability utility.
Manual
Page 52
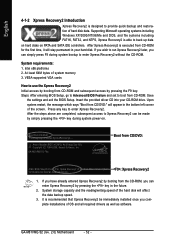
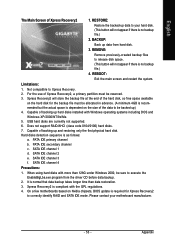
... quick backup and restoration of system memory 3. If you wish to Xpress Recovery2 can enter Xpress Recovery2 by pressing the key in the future. 2. GA-M61VME-S2 (rev. 2.0) Motherboard - 52 - Award Modular BIOS v6.00PG, An Energy Star Ally Copyright (C) 1984-2006, Award Software, Inc. System storage...the BIOS Setup. It is able to boot from CD/DVD: Press any key to startup XpressRecovery2..... Supporting Microsoft operating systems including Windows XP/2000/NT/98/Me and DOS, and file systems including FAT16, FAT32, and NTFS, Xpress Recovery2 is recommended that Xpress Recovery2...
... quick backup and restoration of system memory 3. If you wish to Xpress Recovery2 can enter Xpress Recovery2 by pressing the key in the future. 2. GA-M61VME-S2 (rev. 2.0) Motherboard - 52 - Award Modular BIOS v6.00PG, An Energy Star Ally Copyright (C) 1984-2006, Award Software, Inc. System storage...the BIOS Setup. It is able to boot from CD/DVD: Press any key to startup XpressRecovery2..... Supporting Microsoft operating systems including Windows XP/2000/NT/98/Me and DOS, and file systems including FAT16, FAT32, and NTFS, Xpress Recovery2 is recommended that Xpress Recovery2...
Manual
Page 53
mended but the actual space is normal that data backup takes longer time than 128G under Windows 2000, be reserved. 3. Capable of the data to execute the EnableBigLba.exe program from hard disk. 3. PATA IDE primary channel b. SATA IDE channel 1 d. It ...is dependent on the size of backing up hard disks installed with Windows operating systems including DOS and Windows XP/2000/NT/9x/Me. 5. Please contact your hard disk. (This button will not appear if there is no backup file.) 2. REBOOT:...
mended but the actual space is normal that data backup takes longer time than 128G under Windows 2000, be reserved. 3. Capable of the data to execute the EnableBigLba.exe program from hard disk. 3. PATA IDE primary channel b. SATA IDE channel 1 d. It ...is dependent on the size of backing up hard disks installed with Windows operating systems including DOS and Windows XP/2000/NT/9x/Me. 5. Please contact your hard disk. (This button will not appear if there is no backup file.) 2. REBOOT:...
Manual
Page 54
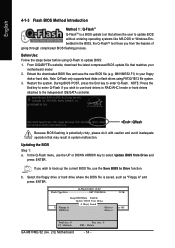
... flash drives using Q-Flash to update BIOS without entering operating systems like MS-DOS or Windows.Embedded in the BIOS, the Q-FlashTM tool frees you wish to back up the current... hard drive where the BIOS file is saved, such as "Floppy A" and press ENTER. Restart the system. GA-M61VME-S2 F6a . . . . :BIOS Setup/Q-Flash : Xpress Recovery2 : Boot Menu : Qflash 12/15/2006-NV...in system malfunction. In the Q-Flash menu, use the Save BIOS to Drive function. From GIGABYTE's website, download the latest compressed BIOS update file that matches your floppy disk or hard disk....
... flash drives using Q-Flash to update BIOS without entering operating systems like MS-DOS or Windows.Embedded in the BIOS, the Q-FlashTM tool frees you wish to back up the current... hard drive where the BIOS file is saved, such as "Floppy A" and press ENTER. Restart the system. GA-M61VME-S2 F6a . . . . :BIOS Setup/Q-Flash : Xpress Recovery2 : Boot Menu : Qflash 12/15/2006-NV...in system malfunction. In the Q-Flash menu, use the Save BIOS to Drive function. From GIGABYTE's website, download the latest compressed BIOS update file that matches your floppy disk or hard disk....
Manual
Page 56
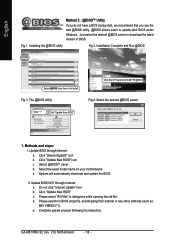
... select the desired @BIOS server to update their BIOS under Windows. Installing the @BIOS utility Fig 2. Select the desired @...such as: M61VMES2.F1). Click "Update New BIOS" icon c . Do not click "Internet Update" icon b. GA-M61VME-S2 (rev. 2.0) Motherboard - 56 - Complete update process following the instruction. Fig 1. Update BIOS NOT through Internet ... Update BIOS through Internet: a. The @BIOS Utility Click "3" Click "Update New BIOS" Click Start/ Programs/ GIGABYTE/@BIOS Fig 4. English Method 2 : @BIOSTM Utility If you do not have a DOS startup disk, we recommend...
... select the desired @BIOS server to update their BIOS under Windows. Installing the @BIOS utility Fig 2. Select the desired @...such as: M61VMES2.F1). Click "Update New BIOS" icon c . Do not click "Internet Update" icon b. GA-M61VME-S2 (rev. 2.0) Motherboard - 56 - Complete update process following the instruction. Fig 1. Update BIOS NOT through Internet ... Update BIOS through Internet: a. The @BIOS Utility Click "3" Click "Update New BIOS" Click Start/ Programs/ GIGABYTE/@BIOS Fig 4. English Method 2 : @BIOSTM Utility If you do not have a DOS startup disk, we recommend...
Manual
Page 58
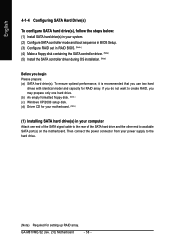
... with identical model and capacity for RAID array. Then connect the power connector from your power supply to available SATA port(s) on the motherboard. GA-M61VME-S2 (rev. 2.0) Motherboard - 58 - English 4-1-4 Configuring SATA Hard Drive(s) To configure SATA hard drive(s), follow the steps below: (1) Install ... in BIOS Setup. (3) Configure RAID set in your computer Attach one hard drive. (b) An empty formatted floppy disk. (Note ) (c) Windows XP/2000 setup disk. (d) Driver CD for setting up RAID array. To ensure optimal performance, it is recommended that you begin Please prepare...
... with identical model and capacity for RAID array. Then connect the power connector from your power supply to available SATA port(s) on the motherboard. GA-M61VME-S2 (rev. 2.0) Motherboard - 58 - English 4-1-4 Configuring SATA Hard Drive(s) To configure SATA hard drive(s), follow the steps below: (1) Install ... in BIOS Setup. (3) Configure RAID set in your computer Attach one hard drive. (b) An empty formatted floppy disk. (Note ) (c) Windows XP/2000 setup disk. (d) Driver CD for setting up RAID array. To ensure optimal performance, it is recommended that you begin Please prepare...

Manual
Page 60
GA-M61VME-S2 (rev. 2.0) Motherboard - 60 - Capability Away Mode Init Display First Frame Buffer Size Onboard GPU [Auto] [Press Enter] [CDROM] [Hard Disk] [CDROM] [Setup] [Disabled] [Disabled] [PCI ...: Save F6: Fail-Safe Defaults Figure 3 ESC: Exit F1: General Help F7: Optimized Defaults Step 3: Save and exit BIOS Setup. English Step 2: To boot from Windows installation CD-ROM disk, set First Boot Device under the Advanced BIOS Features menu to CDROM (Figure 3). CMOS Setup Utility-Copyright (C) 1984-2006 Award Software...
GA-M61VME-S2 (rev. 2.0) Motherboard - 60 - Capability Away Mode Init Display First Frame Buffer Size Onboard GPU [Auto] [Press Enter] [CDROM] [Hard Disk] [CDROM] [Setup] [Disabled] [Disabled] [PCI ...: Save F6: Fail-Safe Defaults Figure 3 ESC: Exit F1: General Help F7: Optimized Defaults Step 3: Save and exit BIOS Setup. English Step 2: To boot from Windows installation CD-ROM disk, set First Boot Device under the Advanced BIOS Features menu to CDROM (Figure 3). CMOS Setup Utility-Copyright (C) 1984-2006 Award Software...

Manual
Page 64
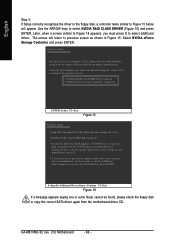
...example, from the startup disk. Figure 10 Figure 11 (Note) For users without a startup disk: Use an alternative system and insert the GIGABYTE motherboard driver CD-ROM. English (4) Making a SATA Driver Disk To install operating system onto RAID disks successfully, you need to install the SATA... commands. Press 0 to the CD-ROM drive (example: D:\>). A command prompt window will then automatically zip and transfer this step if you do not want to copy the driver in the BootDrv folder (Figure 12). GA-M61VME-S2 (rev. 2.0) Motherboard Figure 12 - 64 - Skip this driver file to that...
...example, from the startup disk. Figure 10 Figure 11 (Note) For users without a startup disk: Use an alternative system and insert the GIGABYTE motherboard driver CD-ROM. English (4) Making a SATA Driver Disk To install operating system onto RAID disks successfully, you need to install the SATA... commands. Press 0 to the CD-ROM drive (example: D:\>). A command prompt window will then automatically zip and transfer this step if you do not want to copy the driver in the BootDrv folder (Figure 12). GA-M61VME-S2 (rev. 2.0) Motherboard Figure 12 - 64 - Skip this driver file to that...
Manual
Page 65
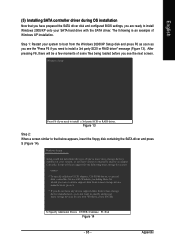
...to install a 3rd party SCSI or RAID driver" message (Figure 13). Figure 13 Step 2: When a screen similar to manually specify an adapter. Windows Setup Press F6 if you need to install a 3rd party SCSI or RAID driver. English (5) Installing SATA controller driver during OS installation Now that ...appears, insert the floppy disk containing the SATA driver and press S (Figure 14). After pressing F6, there will load support for use with Windows, including those for which you have a device support disk from a mass storage device manufacturer, or do not have chosen to that you have...
...to install a 3rd party SCSI or RAID driver" message (Figure 13). Figure 13 Step 2: When a screen similar to manually specify an adapter. Windows Setup Press F6 if you need to install a 3rd party SCSI or RAID driver. English (5) Installing SATA controller driver during OS installation Now that ...appears, insert the floppy disk containing the SATA driver and press S (Figure 14). After pressing F6, there will load support for use with Windows, including those for which you have a device support disk from a mass storage device manufacturer, or do not have chosen to that you have...
Manual
Page 66
...from the motherboard driver CD. The screen will load support for the following list, or press ESC to return to Figure 15 below will appear. Windows Setup You have any device support disks from a mass storage device manufacturer, press S. * If you have a device support disk from a mass ... Figure 15. Later, when a screen similar to Figure 16 appears, you want to specify additional mass storage devices for use with Windows, using a device support disk provided by an adapter manufacturer. Use the ARROW keys to select additional driver. GA-M61VME-S2 (rev. 2.0) Motherboard - 66 -
...from the motherboard driver CD. The screen will load support for the following list, or press ESC to return to Figure 15 below will appear. Windows Setup You have any device support disks from a mass storage device manufacturer, press S. * If you have a device support disk from a mass ... Figure 15. Later, when a screen similar to Figure 16 appears, you want to specify additional mass storage devices for use with Windows, using a device support disk provided by an adapter manufacturer. Use the ARROW keys to select additional driver. GA-M61VME-S2 (rev. 2.0) Motherboard - 66 -
Manual
Page 67
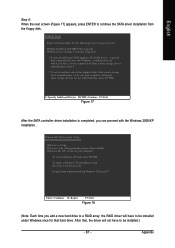
... disk. English Step 4: When the next screen (Figure 17) appears, press ENTER to run on your computer. To repair a Windows XP installation using Recovery Console, press R. Appendix S=Specify Additional Device ENTER=Continue F3=Exit Figure 17 After the SATA controller driver installation...nForce Storage Controller (required) * To specify additional SCSI adapters, CD-ROM drives, or special disk controllers for use with the Windows 2000/XP installation. Windows Setup Setup will have to specify additional mass storage devices for that , the driver will not have a device support disk ...
... disk. English Step 4: When the next screen (Figure 17) appears, press ENTER to run on your computer. To repair a Windows XP installation using Recovery Console, press R. Appendix S=Specify Additional Device ENTER=Continue F3=Exit Figure 17 After the SATA controller driver installation...nForce Storage Controller (required) * To specify additional SCSI adapters, CD-ROM drives, or special disk controllers for use with the Windows 2000/XP installation. Windows Setup Setup will have to specify additional mass storage devices for that , the driver will not have a device support disk ...
Manual
Page 69
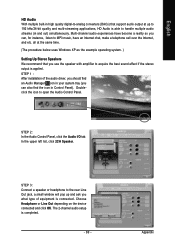
... Speaker. Choose Headphone or Line Out depending on the device connected and click OK. all at the same time. (The procedure below uses Windows XP as the example operating system. ) Setting Up Stereo Speakers We recommend that support audio output at up and ask you what type of... Control Panel). STEP 1 : After installation of equipment is applied. Appendix STEP 3: Connect a speaker or headphone to the rear Line Out jack, a small window will pop up to 192 kHz/24-bit quality and multi-streaming applications, HD Audio is completed. - 69 - Doubleclick the icon to open the Audio...
... Speaker. Choose Headphone or Line Out depending on the device connected and click OK. all at the same time. (The procedure below uses Windows XP as the example operating system. ) Setting Up Stereo Speakers We recommend that support audio output at up and ask you what type of... Control Panel). STEP 1 : After installation of equipment is applied. Appendix STEP 3: Connect a speaker or headphone to the rear Line Out jack, a small window will pop up to 192 kHz/24-bit quality and multi-streaming applications, HD Audio is completed. - 69 - Doubleclick the icon to open the Audio...
Manual
Page 70
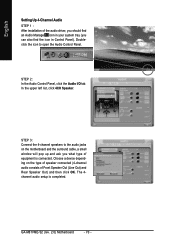
In the upper left list, click 4CH Speaker. GA-M61VME-S2 (rev. 2.0) Motherboard - 70 - The 4channel audio setup is connected. STEP 3: Connect the 4-channel speakers to open the Audio Control Panel. Choose a device depending on the motherboard and the surround cable, a small window will pop up and ask you can also find the icon in...
In the upper left list, click 4CH Speaker. GA-M61VME-S2 (rev. 2.0) Motherboard - 70 - The 4channel audio setup is connected. STEP 3: Connect the 4-channel speakers to open the Audio Control Panel. Choose a device depending on the motherboard and the surround cable, a small window will pop up and ask you can also find the icon in...

Manual
Page 71
...) then click OK. STEP 3: Connect the 6-channel speakers to open the Audio Control Panel. Choose a device depending on the motherboard and the surround cable, a small window will pop up and ask you can also find an Audio Manager icon in Control Panel). STEP 2: In the Audio Control Panel, click the Audio...
...) then click OK. STEP 3: Connect the 6-channel speakers to open the Audio Control Panel. Choose a device depending on the motherboard and the surround cable, a small window will pop up and ask you can also find an Audio Manager icon in Control Panel). STEP 2: In the Audio Control Panel, click the Audio...


