Manual
Page 3
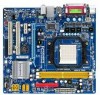
... detailed product information, carefully read the User's Manual. For instructions on how to use GIGABYTE's unique features, read or download the information on/from the Support\Motherboard\Technology Guide page on your motherboard revision before updating motherboard BIOS, drivers, or when looking for technical information. Example: - 3 - Copyright © 2008 GIGA-BYTE TECHNOLOGY CO., LTD...
... detailed product information, carefully read the User's Manual. For instructions on how to use GIGABYTE's unique features, read or download the information on/from the Support\Motherboard\Technology Guide page on your motherboard revision before updating motherboard BIOS, drivers, or when looking for technical information. Example: - 3 - Copyright © 2008 GIGA-BYTE TECHNOLOGY CO., LTD...
Manual
Page 6
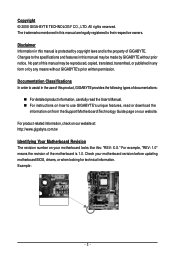
Optional Items Floppy disk drive cable (Part No. 12CF1-1FD001-7*R) 2-port USB 2.0 bracket (Part No. 12CR1-1UB030-5*R) 2-port SATA power cable (Part No. 12CF1-2SERPW-0*R) S/PDIF in and out cable (Part No. 12CR1-1SPINO-1*R) - 6 - Box Contents GA-M61PME-S2P motherboard Motherboard driver disk User's Manual One IDE cable One SATA 3Gb/s cables I/O Shield • The box contents above are subject to change without notice. • The motherboard image is for reference only and the actual items shall depend on product package you obtain. The box contents are for reference only.
Optional Items Floppy disk drive cable (Part No. 12CF1-1FD001-7*R) 2-port USB 2.0 bracket (Part No. 12CR1-1UB030-5*R) 2-port SATA power cable (Part No. 12CF1-2SERPW-0*R) S/PDIF in and out cable (Part No. 12CR1-1SPINO-1*R) - 6 - Box Contents GA-M61PME-S2P motherboard Motherboard driver disk User's Manual One IDE cable One SATA 3Gb/s cables I/O Shield • The box contents above are subject to change without notice. • The motherboard image is for reference only and the actual items shall depend on product package you obtain. The box contents are for reference only.
Manual
Page 17
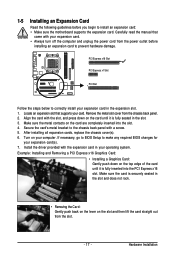
...are completely inserted into the PCI Express x16 slot. If necessary, go to BIOS Setup to install an expansion card: • Make sure the motherboard supports the expansion card. Align the card with your expansion card. • Always turn off the computer and unplug the power cord from the...until it is fully inserted into the slot. 4. Turn on the card until it is securely seated in the expansion slot. 1. Install the driver provided with a screw. 5. Example: Installing and Removing a PCI Express x16 Graphics Card: • Installing a Graphics Card: Gently push down on your card...
...are completely inserted into the PCI Express x16 slot. If necessary, go to BIOS Setup to install an expansion card: • Make sure the motherboard supports the expansion card. Align the card with your expansion card. • Always turn off the computer and unplug the power cord from the...until it is fully inserted into the slot. 4. Turn on the card until it is securely seated in the expansion slot. 1. Install the driver provided with a screw. 5. Example: Installing and Removing a PCI Express x16 Graphics Card: • Installing a Graphics Card: Gently push down on your card...
Manual
Page 32
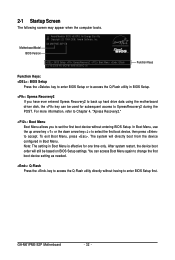
... arrow key< > to select the first boot device, then press to XpressRecovery2 during the POST. The system will still be used for one time only. GA-M61PME-S2P Motherboard - 32 - GA-M61PME-S2P E8 . . . . : BIOS Setup : XpressRecovery2 : Boot Menu : Qflash 12/16/2008-NV-MCP61-6A61KG0AC-00 Function Keys Function Keys: : BIOS... set the first boot device without having to enter BIOS Setup first. In Boot Menu, use the up hard drive data using the motherboard driver disk, the key can be based on BIOS Setup settings. To exit Boot Menu, press . After system restart, the device boot ...
... arrow key< > to select the first boot device, then press to XpressRecovery2 during the POST. The system will still be used for one time only. GA-M61PME-S2P Motherboard - 32 - GA-M61PME-S2P E8 . . . . : BIOS Setup : XpressRecovery2 : Boot Menu : Qflash 12/16/2008-NV-MCP61-6A61KG0AC-00 Function Keys Function Keys: : BIOS... set the first boot device without having to enter BIOS Setup first. In Boot Menu, use the up hard drive data using the motherboard driver disk, the key can be based on BIOS Setup settings. To exit Boot Menu, press . After system restart, the device boot ...

Manual
Page 51
... will automatically scan your system. Failure to do so may affect the driver installation. • Some device drivers will install all the drivers that are installed, follow the onscreen instructions to install other applications included in the motherboard driver disk. • For USB 2.0 driver support under the Windows XP operating system, please install the Windows XP...
... will automatically scan your system. Failure to do so may affect the driver installation. • Some device drivers will install all the drivers that are installed, follow the onscreen instructions to install other applications included in the motherboard driver disk. • For USB 2.0 driver support under the Windows XP operating system, please install the Windows XP...
Manual
Page 52
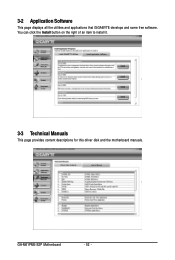
GA-M61PME-S2P Motherboard - 52 - 3-2 Application Software This page displays all the utilities and applications that GIGABYTE develops and some free software. You can click the Install button on the right of an item to install it. 3-3 Technical Manuals This page provides content descriptions for this driver disk and the motherboard manuals.
GA-M61PME-S2P Motherboard - 52 - 3-2 Application Software This page displays all the utilities and applications that GIGABYTE develops and some free software. You can click the Install button on the right of an item to install it. 3-3 Technical Manuals This page provides content descriptions for this driver disk and the motherboard manuals.
Manual
Page 54
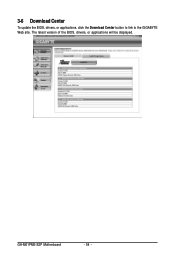
GA-M61PME-S2P Motherboard - 54 - The latest version of the BIOS, drivers, or applications will be displayed. 3-6 Download Center To update the BIOS, drivers, or applications, click the Download Center button to link to the GIGABYTE Web site.
GA-M61PME-S2P Motherboard - 54 - The latest version of the BIOS, drivers, or applications will be displayed. 3-6 Download Center To update the BIOS, drivers, or applications, click the Download Center button to link to the GIGABYTE Web site.
Manual
Page 56
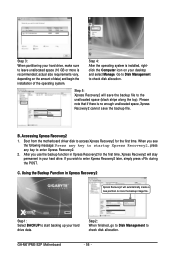
... stripe along the top). Boot from the motherboard driver disk to access Xpress Recovery2 for the first time, Xpress Recovery2 will stay permanent in Xpress Recovery2 Xpress Recovery2 will save the backup file. B. When you use the backup function in Xpress Recovery2 for the first time. GA-M61PME-S2P Motherboard - 56 - After you see the following...
... stripe along the top). Boot from the motherboard driver disk to access Xpress Recovery2 for the first time, Xpress Recovery2 will stay permanent in Xpress Recovery2 Xpress Recovery2 will save the backup file. B. When you use the backup function in Xpress Recovery2 for the first time. GA-M61PME-S2P Motherboard - 56 - After you see the following...
Manual
Page 61
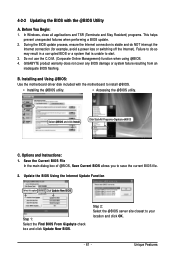
...Using the Internet Update Function Select this option Click Update New BIOS Step 1: Select the Find BIOS From Gigabyte check box and click Update New BIOS. 4-2-2 Updating the BIOS with the motherboard to start. 3. Options and Instructions: 1. Step 2: Select the @BIOS server site closest to save...BIOS file. 2. Click Start>All Programs>Gigabyte>@BIOS C. Save the Current BIOS File In the main dialog box of @BIOS, Save Current BIOS allows you to your location and click OK. - 61 - Installing and Using @BIOS: Use the motherboard driver disk included with the @BIOS Utility A....
...Using the Internet Update Function Select this option Click Update New BIOS Step 1: Select the Find BIOS From Gigabyte check box and click Update New BIOS. 4-2-2 Updating the BIOS with the motherboard to start. 3. Options and Instructions: 1. Step 2: Select the @BIOS server site closest to save...BIOS file. 2. Click Start>All Programs>Gigabyte>@BIOS C. Save the Current BIOS File In the main dialog box of @BIOS, Save Current BIOS allows you to your location and click OK. - 61 - Installing and Using @BIOS: Use the motherboard driver disk included with the @BIOS Utility A....
Manual
Page 65
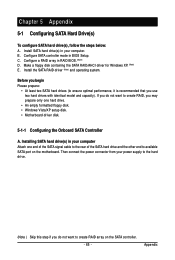
...end of the SATA signal cable to the rear of the SATA hard drive and the other end to create RAID array on the motherboard. Then connect the power connector from your power supply to the hard drive. (Note ) Skip this step if you do not...C . Configure a RAID array in your computer Attach one hard drive. • An empty formatted floppy disk. • Windows Vista/XP setup disk. • Motherboard driver disk. 5-1-1 Configuring the Onboard SATA Controller A. Install SATA hard drive(s) in RAID BIOS. (Note) D. Configure SATA controller mode in your computer. Chapter 5 Appendix ...
...end of the SATA signal cable to the rear of the SATA hard drive and the other end to create RAID array on the motherboard. Then connect the power connector from your power supply to the hard drive. (Note ) Skip this step if you do not...C . Configure a RAID array in your computer Attach one hard drive. • An empty formatted floppy disk. • Windows Vista/XP setup disk. • Motherboard driver disk. 5-1-1 Configuring the Onboard SATA Controller A. Install SATA hard drive(s) in RAID BIOS. (Note) D. Configure SATA controller mode in your computer. Chapter 5 Appendix ...
Manual
Page 70
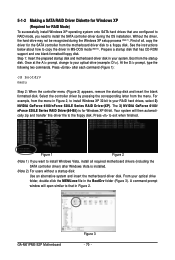
...the corresponding letter from the startup disk. Figure 1 Figure 2 (Note 1) If you need to install the SATA controller driver during the Windows XP setup process (Note 1). GA-M61PME-S2P Motherboard Figure 3 - 70 - Once at the A:\> prompt, change to the floppy disk. From your optical drive folder, ...double click the MENU.exe file in your system. See the instructions below about how to copy the driver in Figure 2, to install ...
...the corresponding letter from the startup disk. Figure 1 Figure 2 (Note 1) If you need to install the SATA controller driver during the Windows XP setup process (Note 1). GA-M61PME-S2P Motherboard Figure 3 - 70 - Once at the A:\> prompt, change to the floppy disk. From your optical drive folder, ...double click the MENU.exe file in your system. See the instructions below about how to copy the driver in Figure 2, to install ...
Manual
Page 73
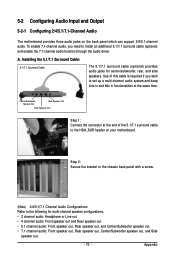
Appendix 5-2 Configuring Audio Input and Output 5-2-1 Configuring 2/4/5.1/7.1-Channel Audio The motherboard provides three audio jacks on your motherboard. A. To enable 7.1-channel audio, you wish to the following for center/subwoofer, rear, and ...audio. Use of the 5.1/7.1 surround cable to install an additional 5.1/7.1 surround cable (optional) and enable the 7.1-channel audio function through the audio driver. Installing the 5.1/7.1 Surround Cable: 5.1/7.1 Surround Cable The 5.1/7.1 surround cable (optional) provides audio jacks for multi-channel speaker configurations. •...
Appendix 5-2 Configuring Audio Input and Output 5-2-1 Configuring 2/4/5.1/7.1-Channel Audio The motherboard provides three audio jacks on your motherboard. A. To enable 7.1-channel audio, you wish to the following for center/subwoofer, rear, and ...audio. Use of the 5.1/7.1 surround cable to install an additional 5.1/7.1 surround cable (optional) and enable the 7.1-channel audio function through the audio driver. Installing the 5.1/7.1 Surround Cable: 5.1/7.1 Surround Cable The 5.1/7.1 surround cable (optional) provides audio jacks for multi-channel speaker configurations. •...
Manual
Page 74
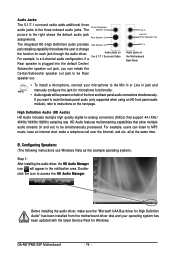
...(The following instructions use Windows Vista as the example operating system.) Step 1: After installing the audio driver, the HD Audio Manager icon will be simultaneously processed. GA-M61PME-S2P Motherboard - 74 - Rear Speaker Out The integrated HD (High Definition) audio provides Side Speaker Out jack... music, have an Internet chat, make sure the "Microsoft UAA Bus driver for High Definition Audio" has been installed from the motherboard driver disk and your microphone to instructions on the Motherboard Back Panel • To install a microphone, connect your operating system ...
...(The following instructions use Windows Vista as the example operating system.) Step 1: After installing the audio driver, the HD Audio Manager icon will be simultaneously processed. GA-M61PME-S2P Motherboard - 74 - Rear Speaker Out The integrated HD (High Definition) audio provides Side Speaker Out jack... music, have an Internet chat, make sure the "Microsoft UAA Bus driver for High Definition Audio" has been installed from the motherboard driver disk and your microphone to instructions on the Motherboard Back Panel • To install a microphone, connect your operating system ...
Manual
Page 78
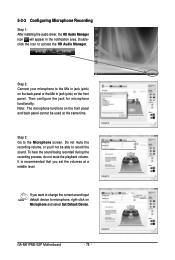
Step 2: Connect your microphone to the Mic in jack (pink) on the back panel or the Mic in the notification area. GA-M61PME-S2P Motherboard - 78 - 5-2-3 Configuring Microphone Recording Step 1: After installing the audio driver, the HD Audio Manager icon will appear in jack (pink) on Microphone and select Set Default Device. Then configure the jack...
Step 2: Connect your microphone to the Mic in jack (pink) on the back panel or the Mic in the notification area. GA-M61PME-S2P Motherboard - 78 - 5-2-3 Configuring Microphone Recording Step 1: After installing the audio driver, the HD Audio Manager icon will appear in jack (pink) on Microphone and select Set Default Device. Then configure the jack...


