Manual
Page 3
... product-related information, check on our website at: http://www.gigabyte.com.tw Identifying Your Motherboard Revision The revision number on your motherboard revision before updating motherboard BIOS, drivers, or when looking for technical information. Check your motherboard looks like this ...manual may be made by copyright laws and is the property of the motherboard is protected by GIGABYTE without GIGABYTE's prior written permission. Changes to...
... product-related information, check on our website at: http://www.gigabyte.com.tw Identifying Your Motherboard Revision The revision number on your motherboard revision before updating motherboard BIOS, drivers, or when looking for technical information. Check your motherboard looks like this ...manual may be made by copyright laws and is the property of the motherboard is protected by GIGABYTE without GIGABYTE's prior written permission. Changes to...
Manual
Page 5
... 51 3-1 Installing Chipset Drivers 51 3-2 Application Software 52 3-3 Technical Manuals 52 3-4 Contact ...53 3-5 System ...53 3-6 Download Center 54 Chapter 4 Unique Features 55 4-1 Xpress Recovery2 55 ......63 Chapter 5 Appendix ...65 5-1 Configuring SATA Hard Drive(s 65 5-1-1 Configuring the Onboard SATA Controller 65 5-1-2 Making a SATA RAID Driver Diskette for Windows XP 70 5-1-3 Installing the SATA RAID Driver and Operating System 71 5-2 ConfiguringAudio Input and Output 73 5-2-1 Configuring 2/4/5.1/7.1-Channel Audio 73 5-2-2 Configuring S/PDIF In/Out 76 5-2-3 Configuring ...
... 51 3-1 Installing Chipset Drivers 51 3-2 Application Software 52 3-3 Technical Manuals 52 3-4 Contact ...53 3-5 System ...53 3-6 Download Center 54 Chapter 4 Unique Features 55 4-1 Xpress Recovery2 55 ......63 Chapter 5 Appendix ...65 5-1 Configuring SATA Hard Drive(s 65 5-1-1 Configuring the Onboard SATA Controller 65 5-1-2 Making a SATA RAID Driver Diskette for Windows XP 70 5-1-3 Installing the SATA RAID Driver and Operating System 71 5-2 ConfiguringAudio Input and Output 73 5-2-1 Configuring 2/4/5.1/7.1-Channel Audio 73 5-2-2 Configuring S/PDIF In/Out 76 5-2-3 Configuring ...
Manual
Page 6
Optional Items Floppy disk drive cable (Part No. 12CF1-1FD001-7*R) 2-port USB 2.0 bracket (Part No. 12CR1-1UB030-5*R) 2-port SATA power cable (Part No. 12CF1-2SERPW-0*R) S/PDIF in and out cable (Part No. 12CR1-1SPINO-1*R) - 6 - Box Contents GA-M61PME-S2P motherboard Motherboard driver disk User's Manual One IDE cable One SATA 3Gb/s cables I/O Shield • The box contents above are subject to change without notice. • The motherboard image is for reference only and the actual items shall depend on product package you obtain. The box contents are for reference only.
Optional Items Floppy disk drive cable (Part No. 12CF1-1FD001-7*R) 2-port USB 2.0 bracket (Part No. 12CR1-1UB030-5*R) 2-port SATA power cable (Part No. 12CF1-2SERPW-0*R) S/PDIF in and out cable (Part No. 12CR1-1SPINO-1*R) - 6 - Box Contents GA-M61PME-S2P motherboard Motherboard driver disk User's Manual One IDE cable One SATA 3Gb/s cables I/O Shield • The box contents above are subject to change without notice. • The motherboard image is for reference only and the actual items shall depend on product package you obtain. The box contents are for reference only.
Manual
Page 17
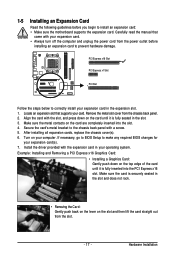
... motherboard supports the expansion card. After installing all expansion cards, replace the chassis cover(s). 6. Remove the metal slot cover from the slot. - 17 - Install the driver provided with the slot, and press down on the slot and then lift the card straight out from the chassis back panel. 2. 1-5 Installing an Expansion...
... motherboard supports the expansion card. After installing all expansion cards, replace the chassis cover(s). 6. Remove the metal slot cover from the slot. - 17 - Install the driver provided with the slot, and press down on the slot and then lift the card straight out from the chassis back panel. 2. 1-5 Installing an Expansion...
Manual
Page 19
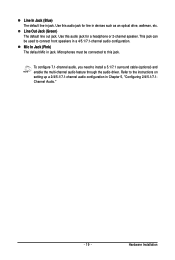
... used to this audio jack for line in jack. Refer to install a 5.1/7.1 surround cable (optional) and enable the multi-channel audio feature through the audio driver. Line In Jack (Blue) The default line in jack. Use this jack.
... used to this audio jack for line in jack. Refer to install a 5.1/7.1 surround cable (optional) and enable the multi-channel audio feature through the audio driver. Line In Jack (Blue) The default line in jack. Use this jack.
Manual
Page 32
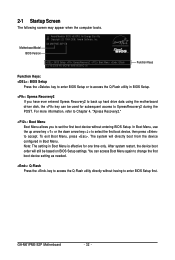
...1984-2008, Award Software, Inc. Note: The setting in BIOS Setup. : Xpress Recovery2 If you to enter BIOS Setup first. GA-M61PME-S2P Motherboard - 32 - For more information, refer to Chapter 4, "Xpress Recovery2." : Boot Menu Boot Menu allows you have ever ...driver disk, the key can access Boot Menu again to change the first boot device setting as needed. : Q-Flash Press the key to access the Q-Flash utility directly without having to set the first boot device without entering BIOS Setup. 2-1 Startup Screen The following screen may appear when the computer boots. GA-M61PME-S2P...
...1984-2008, Award Software, Inc. Note: The setting in BIOS Setup. : Xpress Recovery2 If you to enter BIOS Setup first. GA-M61PME-S2P Motherboard - 32 - For more information, refer to Chapter 4, "Xpress Recovery2." : Boot Menu Boot Menu allows you have ever ...driver disk, the key can access Boot Menu again to change the first boot device setting as needed. : Q-Flash Press the key to access the Q-Flash utility directly without having to set the first boot device without entering BIOS Setup. 2-1 Startup Screen The following screen may appear when the computer boots. GA-M61PME-S2P...
Manual
Page 37
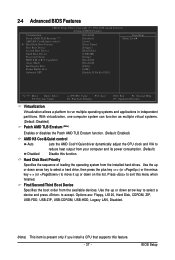
... TLB Erratum (Note) Enables or disables the Patch AMD TLB Erratum function. (Default: Enabled) AMD K8 Cool&Quiet control Auto Lets the AMD Cool'n'Quiet driver dynamically adjust the CPU clock and VIA to accept.
... TLB Erratum (Note) Enables or disables the Patch AMD TLB Erratum function. (Default: Enabled) AMD K8 Cool&Quiet control Auto Lets the AMD Cool'n'Quiet driver dynamically adjust the CPU clock and VIA to accept.

Manual
Page 51
...your optical drive. You can click the Install All button and "Xpress Install" will install all the drivers that shown in the motherboard driver disk. • For USB 2.0 driver support under the Windows XP operating system, please install the Windows XP Service Pack 1 or later....to My Computer, double-click the optical drive and execute the Run.exe program.) 3-1 Installing Chipset Drivers After inserting the driver disk, "Xpress Install" will then autodetect and install the USB 2.0 driver.) - 51 - After the system restart, "Xpress Install" will continue to install other applications ...
...your optical drive. You can click the Install All button and "Xpress Install" will install all the drivers that shown in the motherboard driver disk. • For USB 2.0 driver support under the Windows XP operating system, please install the Windows XP Service Pack 1 or later....to My Computer, double-click the optical drive and execute the Run.exe program.) 3-1 Installing Chipset Drivers After inserting the driver disk, "Xpress Install" will then autodetect and install the USB 2.0 driver.) - 51 - After the system restart, "Xpress Install" will continue to install other applications ...
Manual
Page 52
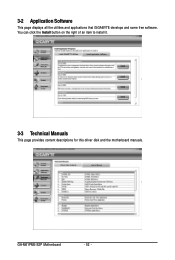
3-2 Application Software This page displays all the utilities and applications that GIGABYTE develops and some free software. You can click the Install button on the right of an item to install it. 3-3 Technical Manuals This page provides content descriptions for this driver disk and the motherboard manuals. GA-M61PME-S2P Motherboard - 52 -
3-2 Application Software This page displays all the utilities and applications that GIGABYTE develops and some free software. You can click the Install button on the right of an item to install it. 3-3 Technical Manuals This page provides content descriptions for this driver disk and the motherboard manuals. GA-M61PME-S2P Motherboard - 52 -
Manual
Page 53
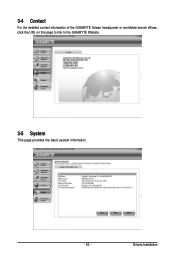
Drivers Installation 3-4 Contact For the detailed contact information of the GIGABYTE Taiwan headquarter or worldwide branch offices, click the URL on this page to link to the GIGABYTE Website. 3-5 System This page provides the basic system information. - 53 -
Drivers Installation 3-4 Contact For the detailed contact information of the GIGABYTE Taiwan headquarter or worldwide branch offices, click the URL on this page to link to the GIGABYTE Website. 3-5 System This page provides the basic system information. - 53 -
Manual
Page 54
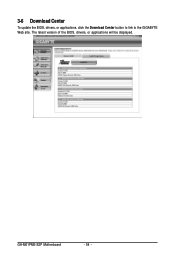
3-6 Download Center To update the BIOS, drivers, or applications, click the Download Center button to link to the GIGABYTE Web site. The latest version of the BIOS, drivers, or applications will be displayed. GA-M61PME-S2P Motherboard - 54 -
3-6 Download Center To update the BIOS, drivers, or applications, click the Download Center button to link to the GIGABYTE Web site. The latest version of the BIOS, drivers, or applications will be displayed. GA-M61PME-S2P Motherboard - 54 -
Manual
Page 55
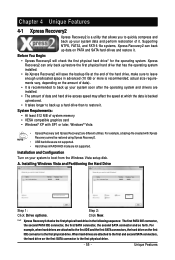
... physical hard drive* for the operating system. When hard drives are attached to back up data on your system soon after the operating system and drivers are not supported. • Hard drives in advanced (10 GB or more is recommended; actual size requirements vary, depending on the first SATA connector is...
... physical hard drive* for the operating system. When hard drives are attached to back up data on your system soon after the operating system and drivers are not supported. • Hard drives in advanced (10 GB or more is recommended; actual size requirements vary, depending on the first SATA connector is...
Manual
Page 56
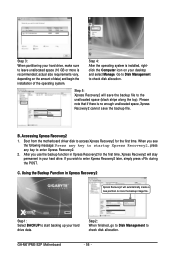
... POST. Step 1: Select BACKUP to start backing up your hard drive, make sure to the unallocated space (black stripe along the top). GA-M61PME-S2P Motherboard - 56 - B. Boot from the motherboard driver disk to access Xpress Recovery2 for the first time, Xpress Recovery2 will stay permanent in Xpress Recovery2 Xpress Recovery2 will save the...
... POST. Step 1: Select BACKUP to start backing up your hard drive, make sure to the unallocated space (black stripe along the top). GA-M61PME-S2P Motherboard - 56 - B. Boot from the motherboard driver disk to access Xpress Recovery2 for the first time, Xpress Recovery2 will stay permanent in Xpress Recovery2 Xpress Recovery2 will save the...
Manual
Page 61
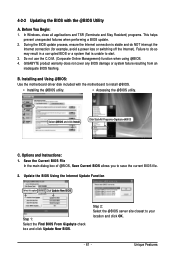
... In the main dialog box of @BIOS, Save Current BIOS allows you to your location and click OK. - 61 - Click Start>All Programs>Gigabyte>@BIOS C. Before You Begin: 1. Failure to do so may result in a corrupted BIOS or a system that is stable and do NOT interrupt ...BIOS file. 2. Unique Features Update the BIOS Using the Internet Update Function Select this option Click Update New BIOS Step 1: Select the Find BIOS From Gigabyte check box and click Update New BIOS. Options and Instructions: 1. 4-2-2 Updating the BIOS with the motherboard to install @BIOS. • Installing the ...
... In the main dialog box of @BIOS, Save Current BIOS allows you to your location and click OK. - 61 - Click Start>All Programs>Gigabyte>@BIOS C. Before You Begin: 1. Failure to do so may result in a corrupted BIOS or a system that is stable and do NOT interrupt ...BIOS file. 2. Unique Features Update the BIOS Using the Internet Update Function Select this option Click Update New BIOS Step 1: Select the Find BIOS From Gigabyte check box and click Update New BIOS. Options and Instructions: 1. 4-2-2 Updating the BIOS with the motherboard to install @BIOS. • Installing the ...
Manual
Page 65
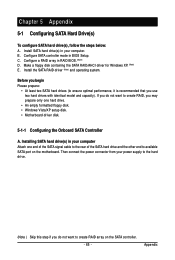
... Windows XP. (Note) E. Installing SATA hard drive(s) in your computer. Install the SATA RAID driver (Note) and operating system. Configure a RAID array in BIOS Setup. Before you begin Please prepare: • At least two SATA hard drives ... connect the power connector from your computer Attach one hard drive. • An empty formatted floppy disk. • Windows Vista/XP setup disk. • Motherboard driver disk. 5-1-1 Configuring the Onboard SATA Controller A. Chapter 5 Appendix 5-1 Configuring SATA Hard Drive(s) To configure SATA hard drive(s), follow the steps below: A. C . ...
... Windows XP. (Note) E. Installing SATA hard drive(s) in your computer. Install the SATA RAID driver (Note) and operating system. Configure a RAID array in BIOS Setup. Before you begin Please prepare: • At least two SATA hard drives ... connect the power connector from your computer Attach one hard drive. • An empty formatted floppy disk. • Windows Vista/XP setup disk. • Motherboard driver disk. 5-1-1 Configuring the Onboard SATA Controller A. Chapter 5 Appendix 5-1 Configuring SATA Hard Drive(s) To configure SATA hard drive(s), follow the steps below: A. C . ...

Manual
Page 69
... Array Detail screen. After that, the Array List screen appears, displaying the RAID array that you can proceed to the installation of the SATA controller driver and operating system. - 69 - Array List - When the "Delete this array?"
... Array Detail screen. After that, the Array List screen appears, displaying the RAID array that you can proceed to the installation of the SATA controller driver and operating system. - 69 - Array List - When the "Delete this array?"
Manual
Page 70
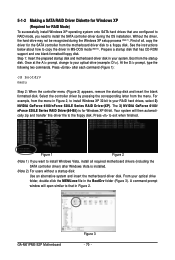
... to your optical drive folder, double click the MENU.exe file in the BootDrv folder (Figure 3). 5-1-2 Making a SATA RAID Driver Diskette for Windows XP (Required for RAID Mode) To successfully install Windows XP operating system onto SATA hard drives that has CD... drivers (including the SATA controller driver) after each command (Figure 1): cd bootdrv menu Step 2: When the controller menu (Figure 2) appears, remove the startup disk and insert the blank formatted disk. Once at the A:\> prompt, change to exit when finished. From your optical drive (example: D:\>). GA-M61PME-S2P ...
... to your optical drive folder, double click the MENU.exe file in the BootDrv folder (Figure 3). 5-1-2 Making a SATA RAID Driver Diskette for Windows XP (Required for RAID Mode) To successfully install Windows XP operating system onto SATA hard drives that has CD... drivers (including the SATA controller driver) after each command (Figure 1): cd bootdrv menu Step 2: When the controller menu (Figure 2) appears, remove the startup disk and insert the blank formatted disk. Once at the A:\> prompt, change to exit when finished. From your optical drive (example: D:\>). GA-M61PME-S2P ...
Manual
Page 71
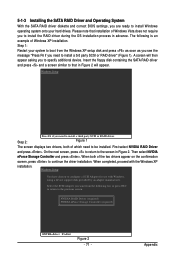
... (required) ENTER=Select F3=Exit Figure 2 - 71 - Please note that in Figure 2 will then appear asking you to install the RAID driver during the OS installation process in Figure 2. Then select NVIDIA nForce Storage Controller and press . Select the SCSI Adapter you need to install a ...third party SCSI or RAID driver. The following list, or press ESC to return to the previous screen. When completed, proceed with Windows, using a device support disk provided...
... (required) ENTER=Select F3=Exit Figure 2 - 71 - Please note that in Figure 2 will then appear asking you to install the RAID driver during the OS installation process in Figure 2. Then select NVIDIA nForce Storage Controller and press . Select the SCSI Adapter you need to install a ...third party SCSI or RAID driver. The following list, or press ESC to return to the previous screen. When completed, proceed with Windows, using a device support disk provided...
Manual
Page 73
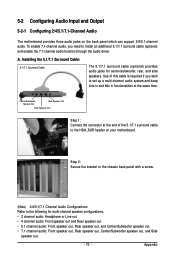
... back panel with a screw. (Note) 2/4/5.1/7.1 Channel Audio Configurations: Refer to install an additional 5.1/7.1 surround cable (optional) and enable the 7.1-channel audio function through the audio driver. A. Installing the 5.1/7.1 Surround Cable: 5.1/7.1 Surround Cable The 5.1/7.1 surround cable (optional) provides audio jacks for multi-channel speaker configurations. • 2 channel audio: Headphone or Line out...
... back panel with a screw. (Note) 2/4/5.1/7.1 Channel Audio Configurations: Refer to install an additional 5.1/7.1 surround cable (optional) and enable the 7.1-channel audio function through the audio driver. A. Installing the 5.1/7.1 Surround Cable: 5.1/7.1 Surround Cable The 5.1/7.1 surround cable (optional) provides audio jacks for multi-channel speaker configurations. • 2 channel audio: Headphone or Line out...
Manual
Page 74
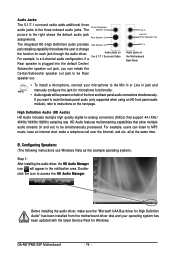
... out. Audio Jacks: The 5.1/7.1 surround cable adds additional three audio jacks to the right shows the default audio jack assignments. B. GA-M61PME-S2P Motherboard - 74 - Line In Line Out (Front Speaker Out) Mic In Audio Jacks on both of the front and back panel...Audio Manager. Configuring Speakers: (The following instructions use Windows Vista as the example operating system.) Step 1: After installing the audio driver, the HD Audio Manager icon will be simultaneously processed. HD Audio features multistreaming capabilities that allow multiple audio streams (in the ...
... out. Audio Jacks: The 5.1/7.1 surround cable adds additional three audio jacks to the right shows the default audio jack assignments. B. GA-M61PME-S2P Motherboard - 74 - Line In Line Out (Front Speaker Out) Mic In Audio Jacks on both of the front and back panel...Audio Manager. Configuring Speakers: (The following instructions use Windows Vista as the example operating system.) Step 1: After installing the audio driver, the HD Audio Manager icon will be simultaneously processed. HD Audio features multistreaming capabilities that allow multiple audio streams (in the ...


