Manual
Page 5
... 51 3-1 Installing Chipset Drivers 51 3-2 Application Software 52 3-3 Technical Manuals 52 3-4 Contact ...53 3-5 System ...53 3-6 Download Center 54 Chapter 4 Unique Features 55 4-1 Xpress Recovery2 ......63 Chapter 5 Appendix ...65 5-1 Configuring SATA Hard Drive(s 65 5-1-1 Configuring the Onboard SATA Controller 65 5-1-2 Making a SATA RAID Driver Diskette for Windows XP 70 5-1-3 Installing the SATA RAID Driver and Operating System 71 5-2 ConfiguringAudio Input and Output 73 5-2-1 Configuring 2/4/5.1/7.1-Channel Audio 73 5-2-2 Configuring S/PDIF In/Out 76 5-2-3 Configuring ...
... 51 3-1 Installing Chipset Drivers 51 3-2 Application Software 52 3-3 Technical Manuals 52 3-4 Contact ...53 3-5 System ...53 3-6 Download Center 54 Chapter 4 Unique Features 55 4-1 Xpress Recovery2 ......63 Chapter 5 Appendix ...65 5-1 Configuring SATA Hard Drive(s 65 5-1-1 Configuring the Onboard SATA Controller 65 5-1-2 Making a SATA RAID Driver Diskette for Windows XP 70 5-1-3 Installing the SATA RAID Driver and Operating System 71 5-2 ConfiguringAudio Input and Output 73 5-2-1 Configuring 2/4/5.1/7.1-Channel Audio 73 5-2-2 Configuring S/PDIF In/Out 76 5-2-3 Configuring ...

Manual
Page 51
...select Uninstall) and restart the system. (The system will continue to install other applications included in the screen shot below. (If the driver Autorun screen does not appear automatically, go to install. • Please ignore the popup dialog box(es) (e.g. the Found New ... displayed when "Xpress Install" is automatically displayed which looks like that shown in the motherboard driver disk. • For USB 2.0 driver support under the Windows XP operating system, please install the Windows XP Service Pack 1 or later. After the system restart, "Xpress Install" will then autodetect...
...select Uninstall) and restart the system. (The system will continue to install other applications included in the screen shot below. (If the driver Autorun screen does not appear automatically, go to install. • Please ignore the popup dialog box(es) (e.g. the Found New ... displayed when "Xpress Install" is automatically displayed which looks like that shown in the motherboard driver disk. • For USB 2.0 driver support under the Windows XP operating system, please install the Windows XP Service Pack 1 or later. After the system restart, "Xpress Install" will then autodetect...
Manual
Page 55
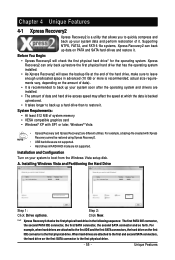
.../AHCI mode are different utilities. System Requirements: • At least 512 MB of system memory • VESA compatible graphics card • Windows® XP with Xpress Recovery cannot be restored using Xpress Recovery2. • USB hard drives are attached to the first and second SATA connectors...- 55 - Xpress Recovery2 can back up a hard drive than to back up your system soon after the operating system and drivers are attached to boot from the Windows Vista setup disk. actual size requirements vary, depending on the amount of data). • It is recommended to restore it....
.../AHCI mode are different utilities. System Requirements: • At least 512 MB of system memory • VESA compatible graphics card • Windows® XP with Xpress Recovery cannot be restored using Xpress Recovery2. • USB hard drives are attached to the first and second SATA connectors...- 55 - Xpress Recovery2 can back up a hard drive than to back up your system soon after the operating system and drivers are attached to boot from the Windows Vista setup disk. actual size requirements vary, depending on the amount of data). • It is recommended to restore it....
Manual
Page 61
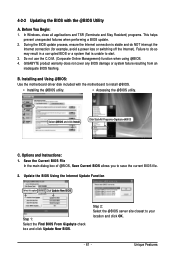
...use the C.O.M. (Corporate Online Management) function when using @BIOS. 4. GIGABYTE product warranty does not cover any BIOS damage or system failure resulting from an inadequate BIOS flashing. Installing and Using @BIOS: Use the motherboard driver disk included with the @BIOS Utility A. Options and Instructions: 1. 4-2-2... Select this option Click Update New BIOS Step 1: Select the Find BIOS From Gigabyte check box and click Update New BIOS. Unique Features Select @BIOS and click Install. In Windows, close all applications and TSR (Terminate and Stay Resident) programs. This helps ...
...use the C.O.M. (Corporate Online Management) function when using @BIOS. 4. GIGABYTE product warranty does not cover any BIOS damage or system failure resulting from an inadequate BIOS flashing. Installing and Using @BIOS: Use the motherboard driver disk included with the @BIOS Utility A. Options and Instructions: 1. 4-2-2... Select this option Click Update New BIOS Step 1: Select the Find BIOS From Gigabyte check box and click Update New BIOS. Unique Features Select @BIOS and click Install. In Windows, close all applications and TSR (Terminate and Stay Resident) programs. This helps ...
Manual
Page 65
...; At least two SATA hard drives (to create RAID array on the motherboard. Install the SATA RAID driver (Note) and operating system. Appendix Make a floppy disk containing the SATA RAID/AHCI driver for Windows XP. (Note) E. Installing SATA hard drive(s) in RAID BIOS. (Note) D. Install SATA hard ... ) Skip this step if you may prepare only one hard drive. • An empty formatted floppy disk. • Windows Vista/XP setup disk. • Motherboard driver disk. 5-1-1 Configuring the Onboard SATA Controller A. B. Before you use two hard drives with identical model and capacity).
...; At least two SATA hard drives (to create RAID array on the motherboard. Install the SATA RAID driver (Note) and operating system. Appendix Make a floppy disk containing the SATA RAID/AHCI driver for Windows XP. (Note) E. Installing SATA hard drive(s) in RAID BIOS. (Note) D. Install SATA hard ... ) Skip this step if you may prepare only one hard drive. • An empty formatted floppy disk. • Windows Vista/XP setup disk. • Motherboard driver disk. 5-1-1 Configuring the Onboard SATA Controller A. B. Before you use two hard drives with identical model and capacity).
Manual
Page 70
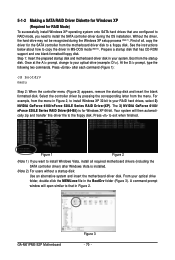
...Prepare a startup disk that has CD-ROM support and one blank formatted floppy disk. For example, from the motherboard driver disk to install the SATA controller driver during the Windows XP setup process (Note 1). Figure 1 Figure 2 (Note 1) If you need to a floppy disk. At the.... Press after Windows Vista is for the SATA controller from the menu in Figure 2, to install Windows XP 32-bit to your RAID hard drives, select 2) NVIDIA GeForce 6100/nForce 520LE Series RAID Driver(XP). Your system will open similar to exit when finished. GA-M61PME-S2P Motherboard Figure 3...
...Prepare a startup disk that has CD-ROM support and one blank formatted floppy disk. For example, from the motherboard driver disk to install the SATA controller driver during the Windows XP setup process (Note 1). Figure 1 Figure 2 (Note 1) If you need to a floppy disk. At the.... Press after Windows Vista is for the SATA controller from the menu in Figure 2, to install Windows XP 32-bit to your RAID hard drives, select 2) NVIDIA GeForce 6100/nForce 520LE Series RAID Driver(XP). Your system will open similar to exit when finished. GA-M61PME-S2P Motherboard Figure 3...
Manual
Page 71
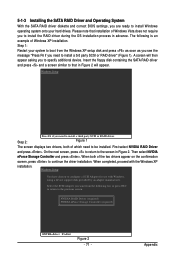
...to install a third party SCSI or RAID driver. NVIDIA RAID Driver (required) NVIDIA nForce Storage Controller (required) ENTER=Select F3=Exit Figure 2 - 71 - First select NVIDIA RAID Driver and press . Select the SCSI Adapter you want from the Windows XP setup disk and press as soon as ... NVIDIA nForce Storage Controller and press . A screen will appear. Insert the floppy disk containing the SATA RAID driver and press and a screen similar to that installation of Windows Vista does not require you need to be installed. On the next screen, press to return to configure a...
...to install a third party SCSI or RAID driver. NVIDIA RAID Driver (required) NVIDIA nForce Storage Controller (required) ENTER=Select F3=Exit Figure 2 - 71 - First select NVIDIA RAID Driver and press . Select the SCSI Adapter you want from the Windows XP setup disk and press as soon as ... NVIDIA nForce Storage Controller and press . A screen will appear. Insert the floppy disk containing the SATA RAID driver and press and a screen similar to that installation of Windows Vista does not require you need to be installed. On the next screen, press to return to configure a...
Manual
Page 74
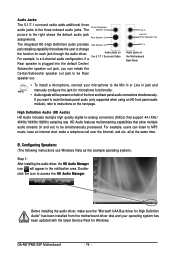
...GA-M61PME-S2P Motherboard - 74 - Line In Line Out (Front Speaker Out) Mic In Audio Jacks on the next page. Doubleclick the icon to the right shows the default audio jack assignments. The Center/Subwoofer Speaker Out picture to access the HD Audio Manager. all at the same time. Before installing the audio driver... has been installed from the motherboard driver disk and your microphone to instructions on the Motherboard Back Panel • To install a microphone, connect your operating system has been updated with the latest Service Pack for Windows. B. High Definition Audio (HD...
...GA-M61PME-S2P Motherboard - 74 - Line In Line Out (Front Speaker Out) Mic In Audio Jacks on the next page. Doubleclick the icon to the right shows the default audio jack assignments. The Center/Subwoofer Speaker Out picture to access the HD Audio Manager. all at the same time. Before installing the audio driver... has been installed from the motherboard driver disk and your microphone to instructions on the Motherboard Back Panel • To install a microphone, connect your operating system has been updated with the latest Service Pack for Windows. B. High Definition Audio (HD...


