Manual
Page 3
... information, carefully read or download the information on/from the Support\Motherboard\Technology Guide page on your motherboard revision before updating motherboard BIOS, drivers, or when looking for technical information. The trademarks mentioned in this manual are legally registered to assist in the use GIGABYTE's unique features, read the User's Manual. For instructions on...
... information, carefully read or download the information on/from the Support\Motherboard\Technology Guide page on your motherboard revision before updating motherboard BIOS, drivers, or when looking for technical information. The trademarks mentioned in this manual are legally registered to assist in the use GIGABYTE's unique features, read the User's Manual. For instructions on...
Manual
Page 6
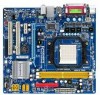
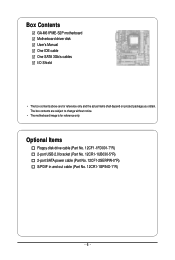
Box Contents GA-M61PME-S2P motherboard Motherboard driver disk User's Manual One IDE cable One SATA 3Gb/s cables I/O Shield • The box contents above are subject to change without notice. • The motherboard image is for reference only and the actual items shall depend on product package you obtain. Optional Items Floppy disk drive cable (Part No. 12CF1-1FD001-7*R) 2-port USB 2.0 bracket (Part No. 12CR1-1UB030-5*R) 2-port SATA power cable (Part No. 12CF1-2SERPW-0*R) S/PDIF in and out cable (Part No. 12CR1-1SPINO-1*R) - 6 - The box contents are for reference only.
Box Contents GA-M61PME-S2P motherboard Motherboard driver disk User's Manual One IDE cable One SATA 3Gb/s cables I/O Shield • The box contents above are subject to change without notice. • The motherboard image is for reference only and the actual items shall depend on product package you obtain. Optional Items Floppy disk drive cable (Part No. 12CF1-1FD001-7*R) 2-port USB 2.0 bracket (Part No. 12CR1-1UB030-5*R) 2-port SATA power cable (Part No. 12CF1-2SERPW-0*R) S/PDIF in and out cable (Part No. 12CR1-1SPINO-1*R) - 6 - The box contents are for reference only.
Manual
Page 17
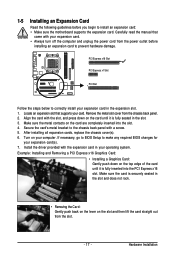
...'s metal bracket to the chassis back panel with the expansion card in the slot. 3. After installing all expansion cards, replace the chassis cover(s). 6. Install the driver provided with a screw. 5. Turn on your expansion card in the slot and does not rock. • Removing the Card: Gently push back on the lever... turn off the computer and unplug the power cord from the power outlet before you begin to install an expansion card: • Make sure the motherboard supports the expansion card. If necessary, go to BIOS Setup to correctly install your computer.
...'s metal bracket to the chassis back panel with the expansion card in the slot. 3. After installing all expansion cards, replace the chassis cover(s). 6. Install the driver provided with a screw. 5. Turn on your expansion card in the slot and does not rock. • Removing the Card: Gently push back on the lever... turn off the computer and unplug the power cord from the power outlet before you begin to install an expansion card: • Make sure the motherboard supports the expansion card. If necessary, go to BIOS Setup to correctly install your computer.
Manual
Page 32
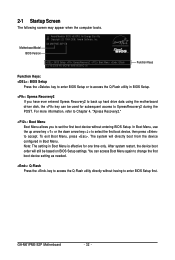
...motherboard driver disk, the key can access Boot Menu again to change the first boot device setting as needed. : Q-Flash Press the key to access the Q-Flash utility directly without having to set the first boot device without entering BIOS Setup. The system will still be used for one time only. GA-M61PME-S2P Motherboard... - 32 - 2-1 Startup Screen The following screen may appear when the computer boots. GA-M61PME-S2P E8 . . . . : BIOS Setup : XpressRecovery2 : Boot Menu : Qflash...
...motherboard driver disk, the key can access Boot Menu again to change the first boot device setting as needed. : Q-Flash Press the key to access the Q-Flash utility directly without having to set the first boot device without entering BIOS Setup. The system will still be used for one time only. GA-M61PME-S2P Motherboard... - 32 - 2-1 Startup Screen The following screen may appear when the computer boots. GA-M61PME-S2P E8 . . . . : BIOS Setup : XpressRecovery2 : Boot Menu : Qflash...

Manual
Page 51
... My Computer, double-click the optical drive and execute the Run.exe program.) 3-1 Installing Chipset Drivers After inserting the driver disk, "Xpress Install" will continue to install other applications included in the motherboard driver disk. • For USB 2.0 driver support under the Windows XP operating system, please install the Windows XP Service Pack 1 or later...
... My Computer, double-click the optical drive and execute the Run.exe program.) 3-1 Installing Chipset Drivers After inserting the driver disk, "Xpress Install" will continue to install other applications included in the motherboard driver disk. • For USB 2.0 driver support under the Windows XP operating system, please install the Windows XP Service Pack 1 or later...
Manual
Page 52
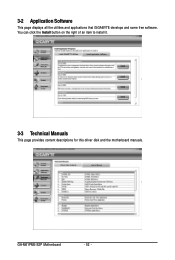
You can click the Install button on the right of an item to install it. 3-3 Technical Manuals This page provides content descriptions for this driver disk and the motherboard manuals. GA-M61PME-S2P Motherboard - 52 - 3-2 Application Software This page displays all the utilities and applications that GIGABYTE develops and some free software.
You can click the Install button on the right of an item to install it. 3-3 Technical Manuals This page provides content descriptions for this driver disk and the motherboard manuals. GA-M61PME-S2P Motherboard - 52 - 3-2 Application Software This page displays all the utilities and applications that GIGABYTE develops and some free software.
Manual
Page 54
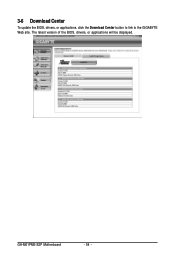
3-6 Download Center To update the BIOS, drivers, or applications, click the Download Center button to link to the GIGABYTE Web site. The latest version of the BIOS, drivers, or applications will be displayed. GA-M61PME-S2P Motherboard - 54 -
3-6 Download Center To update the BIOS, drivers, or applications, click the Download Center button to link to the GIGABYTE Web site. The latest version of the BIOS, drivers, or applications will be displayed. GA-M61PME-S2P Motherboard - 54 -
Manual
Page 56
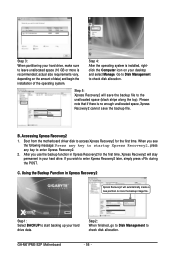
... of data) and begin the installation of the operating system. Boot from the motherboard driver disk to leave unallocated space (10 GB or more is no enough unallocated space, Xpress Recovery2 cannot save the backup file to enter Xpress Recovery2. 2. GA-M61PME-S2P Motherboard - 56 - Step 3: When partitioning your hard drive, make sure to access Xpress...
... of data) and begin the installation of the operating system. Boot from the motherboard driver disk to leave unallocated space (10 GB or more is no enough unallocated space, Xpress Recovery2 cannot save the backup file to enter Xpress Recovery2. 2. GA-M61PME-S2P Motherboard - 56 - Step 3: When partitioning your hard drive, make sure to access Xpress...
Manual
Page 61
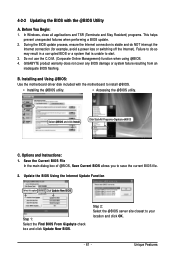
4-2-2 Updating the BIOS with the motherboard to install @BIOS. • Installing the @BIOS utility. • Accessing the @BIOS utility. Click Start>All Programs>Gigabyte>@BIOS C. Failure to start. 3. Do not use the C.O.M. (Corporate Online Management) function when using @BIOS. 4....Current BIOS allows you to your location and click OK. - 61 - Installing and Using @BIOS: Use the motherboard driver disk included with the @BIOS Utility A. GIGABYTE product warranty does not cover any BIOS damage or system failure resulting from an inadequate BIOS flashing. Select @BIOS ...
4-2-2 Updating the BIOS with the motherboard to install @BIOS. • Installing the @BIOS utility. • Accessing the @BIOS utility. Click Start>All Programs>Gigabyte>@BIOS C. Failure to start. 3. Do not use the C.O.M. (Corporate Online Management) function when using @BIOS. 4....Current BIOS allows you to your location and click OK. - 61 - Installing and Using @BIOS: Use the motherboard driver disk included with the @BIOS Utility A. GIGABYTE product warranty does not cover any BIOS damage or system failure resulting from an inadequate BIOS flashing. Select @BIOS ...
Manual
Page 65
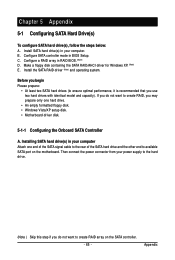
.... Then connect the power connector from your computer Attach one hard drive. • An empty formatted floppy disk. • Windows Vista/XP setup disk. • Motherboard driver disk. 5-1-1 Configuring the Onboard SATA Controller A. Before you begin Please prepare: • At least two SATA hard drives (to ensure optimal performance, it is recommended...you do not want to create RAID, you use two hard drives with identical model and capacity). C . Make a floppy disk containing the SATA RAID/AHCI driver for Windows XP. (Note) E. If you do not want to create RAID array on the...
.... Then connect the power connector from your computer Attach one hard drive. • An empty formatted floppy disk. • Windows Vista/XP setup disk. • Motherboard driver disk. 5-1-1 Configuring the Onboard SATA Controller A. Before you begin Please prepare: • At least two SATA hard drives (to ensure optimal performance, it is recommended...you do not want to create RAID, you use two hard drives with identical model and capacity). C . Make a floppy disk containing the SATA RAID/AHCI driver for Windows XP. (Note) E. If you do not want to create RAID array on the...
Manual
Page 70
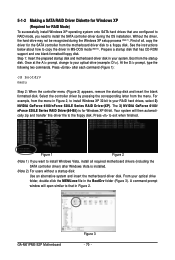
At the D:\> prompt, type the following two commands. GA-M61PME-S2P Motherboard Figure 3 - 70 - Prepare a startup disk that in Figure 2, to install Windows XP 32-bit to install the SATA controller driver during the Windows XP setup process (Note 1). From your optical drive ...during the OS installation. Step 1: Insert the prepared startup disk and motherboard driver disk in the BootDrv folder (Figure 3). Press to a floppy disk. First of all required motherboard drivers (including the SATA controller driver) after each command (Figure 1): cd bootdrv menu Step 2: When ...
At the D:\> prompt, type the following two commands. GA-M61PME-S2P Motherboard Figure 3 - 70 - Prepare a startup disk that in Figure 2, to install Windows XP 32-bit to install the SATA controller driver during the Windows XP setup process (Note 1). From your optical drive ...during the OS installation. Step 1: Insert the prepared startup disk and motherboard driver disk in the BootDrv folder (Figure 3). Press to a floppy disk. First of all required motherboard drivers (including the SATA controller driver) after each command (Figure 1): cd bootdrv menu Step 2: When ...
Manual
Page 73
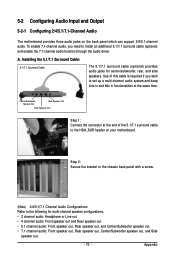
...required if you wish to install an additional 5.1/7.1 surround cable (optional) and enable the 7.1-channel audio function through the audio driver. Installing the 5.1/7.1 Surround Cable: 5.1/7.1 Surround Cable The 5.1/7.1 surround cable (optional) provides audio jacks for multi-channel speaker ...which can support 2/4/5.1-channel audio. 5-2 Configuring Audio Input and Output 5-2-1 Configuring 2/4/5.1/7.1-Channel Audio The motherboard provides three audio jacks on your motherboard. Center/Subwoofer Speaker Out Side Speaker Out Rear Speaker Out Step 1: Connect the connector at the ...
...required if you wish to install an additional 5.1/7.1 surround cable (optional) and enable the 7.1-channel audio function through the audio driver. Installing the 5.1/7.1 Surround Cable: 5.1/7.1 Surround Cable The 5.1/7.1 surround cable (optional) provides audio jacks for multi-channel speaker ...which can support 2/4/5.1-channel audio. 5-2 Configuring Audio Input and Output 5-2-1 Configuring 2/4/5.1/7.1-Channel Audio The motherboard provides three audio jacks on your motherboard. Center/Subwoofer Speaker Out Side Speaker Out Rear Speaker Out Step 1: Connect the connector at the ...
Manual
Page 74
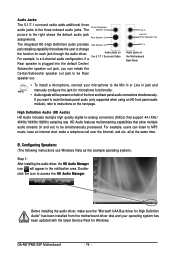
If you can listen to MP3 music, have an Internet chat, make sure the "Microsoft UAA Bus driver for High Definition Audio" has been installed from the motherboard driver disk and your microphone to the Mic in or Line in a 4-channel audio configuration, if a the 5.1/7.1 ... 1: After installing the audio driver, the HD Audio Manager icon will be simultaneously processed. Doubleclick the icon to the three onboard audio jacks. Audio Jacks: The 5.1/7.1 surround cable adds additional three audio jacks to access the HD Audio Manager. GA-M61PME-S2P Motherboard - 74 - The Center/Subwoofer...
If you can listen to MP3 music, have an Internet chat, make sure the "Microsoft UAA Bus driver for High Definition Audio" has been installed from the motherboard driver disk and your microphone to the Mic in or Line in a 4-channel audio configuration, if a the 5.1/7.1 ... 1: After installing the audio driver, the HD Audio Manager icon will be simultaneously processed. Doubleclick the icon to the three onboard audio jacks. Audio Jacks: The 5.1/7.1 surround cable adds additional three audio jacks to access the HD Audio Manager. GA-M61PME-S2P Motherboard - 74 - The Center/Subwoofer...
Manual
Page 78
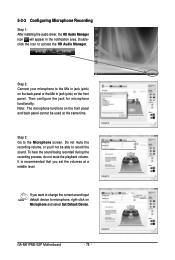
5-2-3 Configuring Microphone Recording Step 1: After installing the audio driver, the HD Audio Manager icon will appear in jack (pink) on Microphone and select Set Default Device. Then configure the jack for microphone functionality. Note: ... your microphone to microphone, right-click on the front panel. Do not mute the recording volume, or you'll not be used at a middle level. GA-M61PME-S2P Motherboard - 78 - Doubleclick the icon to the Microphone screen. Step 3: Go to access the HD Audio Manager. To hear the sound being recorded during the recording...
5-2-3 Configuring Microphone Recording Step 1: After installing the audio driver, the HD Audio Manager icon will appear in jack (pink) on Microphone and select Set Default Device. Then configure the jack for microphone functionality. Note: ... your microphone to microphone, right-click on the front panel. Do not mute the recording volume, or you'll not be used at a middle level. GA-M61PME-S2P Motherboard - 78 - Doubleclick the icon to the Microphone screen. Step 3: Go to access the HD Audio Manager. To hear the sound being recorded during the recording...


