
User Manual
Page 17
... slot when you try to install / uninstall the AGP card. Replace your AGP card is locked by the small white-drawable bar. - 17 - Install related driver from BIOS. 8. English Step 3: Install expansion cards 1. Replace the screw to the onboard AGP slot and press firmly down on the slot. Power on the...
... slot when you try to install / uninstall the AGP card. Replace your AGP card is locked by the small white-drawable bar. - 17 - Install related driver from BIOS. 8. English Step 3: Install expansion cards 1. Replace the screw to the onboard AGP slot and press firmly down on the slot. Power on the...

User Manual
Page 18
.../2 mouse. / USB/LAN Connector USB 0 USB 1 LAN USB 2 USB 3 Before you connect your device(s) into USB connector(s), please make sure your OS supports USB controller. GA-K8VM800M Motherboard - 18 - If your OS or device (s) vendors. Also make sure your device (s) such as USB keyboard,mouse, scanner, zip, speaker...etc. Have a standard USB... with 10/100 Mbps speed. For more information please contact your OS does not support USB controller, please contact OS vendor for possible patch or driver upgrade.
.../2 mouse. / USB/LAN Connector USB 0 USB 1 LAN USB 2 USB 3 Before you connect your device(s) into USB connector(s), please make sure your OS supports USB controller. GA-K8VM800M Motherboard - 18 - If your OS or device (s) vendors. Also make sure your device (s) such as USB keyboard,mouse, scanner, zip, speaker...etc. Have a standard USB... with 10/100 Mbps speed. For more information please contact your OS does not support USB controller, please contact OS vendor for possible patch or driver upgrade.
User Manual
Page 19
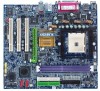
... SUR_CEN cable. COMA Serial Port (9 pin Male) VGA VGA Port (15 pin Female) Audio Connectors Line In Line Out MIC In After install onboard audio driver, you may connect speaker to Line Out jack, microphone to Line-In jack. can refer to "MIC In ". Method1: Connect "Front Speaker" to "Line Out...
... SUR_CEN cable. COMA Serial Port (9 pin Male) VGA VGA Port (15 pin Female) Audio Connectors Line In Line Out MIC In After install onboard audio driver, you may connect speaker to Line Out jack, microphone to Line-In jack. can refer to "MIC In ". Method1: Connect "Front Speaker" to "Line Out...
User Manual
Page 24
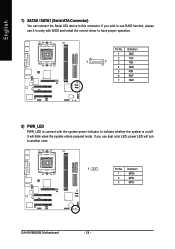
... whether the system is connect with BIOS and install the correct driver to another color. 1 Pin No. Pin No. If you wish to use RAID function, please use dual color LED, power LED will blink when the system enters suspend mode. GA-K8VM800M Motherboard - 24 - If you use it in unity with the...
... whether the system is connect with BIOS and install the correct driver to another color. 1 Pin No. Pin No. If you wish to use RAID function, please use dual color LED, power LED will blink when the system enters suspend mode. GA-K8VM800M Motherboard - 24 - If you use it in unity with the...

User Manual
Page 53
...why motherboard vendors could help you update the wrong BIOS, it will be carefully to store the BIOS source code correctly in the attached driver CD. It could not just do something right to save your BIOS easily. Besides, no more than a click. It's free!... accordingly. Secondly, use "Internet Update" to download and update your BIOS smartly. The above process is a smart BIOS update software. Again, Gigabyte's innovative product erects a milestone in BIOS updating and spend quite a lot of "@BIOS", BIOS updating is unnecessary and actually you ever updated ...
...why motherboard vendors could help you update the wrong BIOS, it will be carefully to store the BIOS source code correctly in the attached driver CD. It could not just do something right to save your BIOS easily. Besides, no more than a click. It's free!... accordingly. Secondly, use "Internet Update" to download and update your BIOS smartly. The above process is a smart BIOS update software. Again, Gigabyte's innovative product erects a milestone in BIOS updating and spend quite a lot of "@BIOS", BIOS updating is unnecessary and actually you ever updated ...

User Manual
Page 65
STEP 2 : After installation of the audio driver, you use the speaker with amplifier to acqiire the best sound effect if the stereo output is very simple. English R2-e/4v-is/6io-CnhHainsntoerlyAudio ...
STEP 2 : After installation of the audio driver, you use the speaker with amplifier to acqiire the best sound effect if the stereo output is very simple. English R2-e/4v-is/6io-CnhHainsntoerlyAudio ...

User Manual
Page 66
Click the audio icon "Sound Effect" from the windows tray at the bottom of the audio driver, you'll find an icon on the taskbar's status area. Disable "Only SURROUND-KIT", and press "OK". GA-K8VM800M Motherboard - 66 - English 4 Channel Analog Audio Output Mode STEP 1 : Connect the front channels to "Line Out", the rear...
Click the audio icon "Sound Effect" from the windows tray at the bottom of the audio driver, you'll find an icon on the taskbar's status area. Disable "Only SURROUND-KIT", and press "OK". GA-K8VM800M Motherboard - 66 - English 4 Channel Analog Audio Output Mode STEP 1 : Connect the front channels to "Line Out", the rear...

User Manual
Page 67
... Configuration", and choose the "6 channel for 5.1 speakers out put". Click the audio icon "Sound Effect" from the windows tray at the bottom of the audio driver, you'll find an icon on the taskbar's status area. Technical Reference
... Configuration", and choose the "6 channel for 5.1 speakers out put". Click the audio icon "Sound Effect" from the windows tray at the bottom of the audio driver, you'll find an icon on the taskbar's status area. Technical Reference

User Manual
Page 73
... Supports FAT16, FAT32, and NTFS formats 2. Must be set to boot from CD: Xpress Recovery V1.0 (C) Copy Right 2003. Insert the provided driver CD into your CD drive, then save and exit the BIOS menu. Once you have completed this step, subsequent access to Xpress Recovery can restore... Allows installation of the screen. Execute Restore Utility 3. How to the IDE1 Master 3. Verifying DMI Pool Data Boot from CD: Boot from CD-ROM. GIGABYTE Technology CO. , Ltd. 1. The first partition must be used to back up , please do not alter its original state. 1. Boot from CD-ROM...
... Supports FAT16, FAT32, and NTFS formats 2. Must be set to boot from CD: Xpress Recovery V1.0 (C) Copy Right 2003. Insert the provided driver CD into your CD drive, then save and exit the BIOS menu. Once you have completed this step, subsequent access to Xpress Recovery can restore... Allows installation of the screen. Execute Restore Utility 3. How to the IDE1 Master 3. Verifying DMI Pool Data Boot from CD: Boot from CD-ROM. GIGABYTE Technology CO. , Ltd. 1. The first partition must be used to back up , please do not alter its original state. 1. Boot from CD-ROM...
User Manual
Page 74
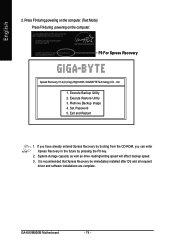
... pressing the F9 key. 2. GA-K8VM800M Motherboard - 74 - English 2. Intel 865PE AGPSet BIOS for 8IPE1000MT F1 Check System Health OK . . . Execute Backup Utility 2. Set Password 5. GIGABYTE Technology CO. , Ltd. 1. Execute Restore Utility 3. Exit and Restart 1. It is recommended that Xpress Recovery be immediately installed after OS and all required driver and software installations are...
... pressing the F9 key. 2. GA-K8VM800M Motherboard - 74 - English 2. Intel 865PE AGPSet BIOS for 8IPE1000MT F1 Check System Health OK . . . Execute Backup Utility 2. Set Password 5. GIGABYTE Technology CO. , Ltd. 1. Execute Restore Utility 3. Exit and Restart 1. It is recommended that Xpress Recovery be immediately installed after OS and all required driver and software installations are...
User Manual
Page 77
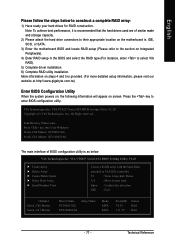
... hard drives used are of BIOS configuration utility is provided. (For more detailed setup information, please visit our website at http:\\www.gigabyte.com.tw) Enter BIOS Configuration Utility When the system powers on, the following information will appear on Integrated Peripherals). 4) Enter RAID .... IDE, SCSI, or SATA. 3) Enter the motherboard BIOS and locate RAID setup (Please refer to select VIA RAID). 5) Complete driver installation. 6) Complete RAID utility installation. Press the key to next item Enter : Confirm the selection ESC : Exit Channel Serial_Ch0 Master Serial_Ch1 Master...
... hard drives used are of BIOS configuration utility is provided. (For more detailed setup information, please visit our website at http:\\www.gigabyte.com.tw) Enter BIOS Configuration Utility When the system powers on, the following information will appear on Integrated Peripherals). 4) Enter RAID .... IDE, SCSI, or SATA. 3) Enter the motherboard BIOS and locate RAID setup (Please refer to select VIA RAID). 5) Complete driver installation. 6) Complete RAID utility installation. Press the key to next item Enter : Confirm the selection ESC : Exit Channel Serial_Ch0 Master Serial_Ch1 Master...
User Manual
Page 78
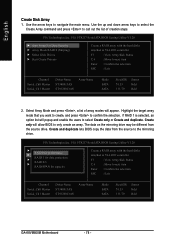
...Move to next item Enter : Confirm the selection ESC : Exit Channel Serial_Ch0 Master Serial_Ch1 Master Driver Name ST380013AS ST9120023AS Array Name Mode SATA SATA Size(GB) 74.53 111.79 Status Hdd Hdd GA-K8VM800M Motherboard - 78 - English Create Disk Array 1. VIA Technologies,Inc. Select Array Mode and...View Array/disk Status K, L : Move to next item Enter : Confirm the selection ESC : Exit Channel Serial_Ch0 Master Serial_Ch1 Master Driver Name ST380013AS ST9120023AS Array Name Mode SATA SATA Size(GB) 74.53 111.79 Status Hdd Hdd 2. Create and duplicate lets BIOS...
...Move to next item Enter : Confirm the selection ESC : Exit Channel Serial_Ch0 Master Serial_Ch1 Master Driver Name ST380013AS ST9120023AS Array Name Mode SATA SATA Size(GB) 74.53 111.79 Status Hdd Hdd GA-K8VM800M Motherboard - 78 - English Create Disk Array 1. VIA Technologies,Inc. Select Array Mode and...View Array/disk Status K, L : Move to next item Enter : Confirm the selection ESC : Exit Channel Serial_Ch0 Master Serial_Ch1 Master Driver Name ST380013AS ST9120023AS Array Name Mode SATA SATA Size(GB) 74.53 111.79 Status Hdd Hdd 2. Create and duplicate lets BIOS...
User Manual
Page 79
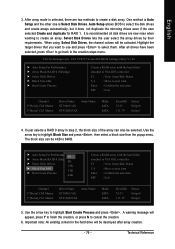
... you want to use and press to next item Enter : Confirm the selection ESC : Exit Channel [*]Serial_Ch0 Master [*]Serial_Ch1 Master Driver Name ST380013AS ST9120023AS Array Name Mode SATA SATA Size(GB) 74.53 111.79 Status Stripe0 Stripe1 4. VIA Technologies,Inc. Important ... finish the creation, or press N to next item Enter : Confirm the selection ESC : Exit Channel [*]Serial_Ch0 Master [*]Serial_Ch1 Master Driver Name ST380013AS ST9120023AS Array Name Mode SATA SATA Size(GB) 74.53 111.79 Status Stripe0 Stripe1 5. VIA VT8237 Serial ATA BIOS Setting...
... you want to use and press to next item Enter : Confirm the selection ESC : Exit Channel [*]Serial_Ch0 Master [*]Serial_Ch1 Master Driver Name ST380013AS ST9120023AS Array Name Mode SATA SATA Size(GB) 74.53 111.79 Status Stripe0 Stripe1 4. VIA Technologies,Inc. Important ... finish the creation, or press N to next item Enter : Confirm the selection ESC : Exit Channel [*]Serial_Ch0 Master [*]Serial_Ch1 Master Driver Name ST380013AS ST9120023AS Array Name Mode SATA SATA Size(GB) 74.53 111.79 Status Stripe0 Stripe1 5. VIA VT8237 Serial ATA BIOS Setting...
User Manual
Page 80
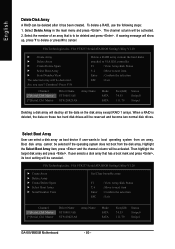
...next item : Confirm the selection : Exit Channel [*]Serial_Ch0 Master [*]Serial_Ch1 Master Driver Name ST380013AS ST9120023AS Array Name Mode SATA SATA Size(GB) 74.53 111.79 Status Stripe0 Stripe1 GA-K8VM800M Motherboard - 80 - Boot disk array cannot be deleted after it has been ...View Array/disk Status K, L : Move to next item Enter : Confirm the selection ESC : Exit Channel [*]Serial_Ch0 Master [*]Serial_Ch1 Master Driver Name ST380013AS ST9120023AS Array Name Mode SATA SATA Size(GB) 74.53 111.79 Status Stripe0 Stripe1 Deleting a disk array will be canceled....
...next item : Confirm the selection : Exit Channel [*]Serial_Ch0 Master [*]Serial_Ch1 Master Driver Name ST380013AS ST9120023AS Array Name Mode SATA SATA Size(GB) 74.53 111.79 Status Stripe0 Stripe1 GA-K8VM800M Motherboard - 80 - Boot disk array cannot be deleted after it has been ...View Array/disk Status K, L : Move to next item Enter : Confirm the selection ESC : Exit Channel [*]Serial_Ch0 Master [*]Serial_Ch1 Master Driver Name ST380013AS ST9120023AS Array Name Mode SATA SATA Size(GB) 74.53 111.79 Status Stripe0 Stripe1 Deleting a disk array will be canceled....
User Manual
Page 82
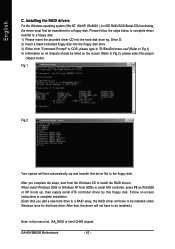
... Fig.1 Fig.2 (Note) Your system will not have to the floppy disk. After that, the driver will then automatically zip and transfer this floppy disk. Installing the RAID drivers For the Windows operating system (Win NT, WinXP, Win2000 ), for that hard drive. After you ...floppy disk. English C. Drive D: 2) Insert a blank formatted floppy disk into the hard disk drive eg. GA-K8VM800M Motherboard - 82 - Follow on the screen (Refer to install the RAID drivers. When install Windows 2000 or Windows XP from the Windows CD to Fig.2), please select the proper chipset ...
... Fig.1 Fig.2 (Note) Your system will not have to the floppy disk. After that, the driver will then automatically zip and transfer this floppy disk. Installing the RAID drivers For the Windows operating system (Win NT, WinXP, Win2000 ), for that hard drive. After you ...floppy disk. English C. Drive D: 2) Insert a blank formatted floppy disk into the hard disk drive eg. GA-K8VM800M Motherboard - 82 - Follow on the screen (Refer to install the RAID drivers. When install Windows 2000 or Windows XP from the Windows CD to Fig.2), please select the proper chipset ...

User Manual
Page 83
... restarting your system automatically. Appendix INSTALL CHIPSET DRIVER This page shows the drivers that you install all components in the list. - 83 - Massage: Some device drivers will auto start and show the installation guide. English RCehvaispiotenrH5istAoprypendix Install Drivers Pictures below are shown in Windows XP Insert the driver CD-title that came with your motherboard...
... restarting your system automatically. Appendix INSTALL CHIPSET DRIVER This page shows the drivers that you install all components in the list. - 83 - Massage: Some device drivers will auto start and show the installation guide. English RCehvaispiotenrH5istAoprypendix Install Drivers Pictures below are shown in Windows XP Insert the driver CD-title that came with your motherboard...

User Manual
Page 84
...Please upgrade to reboot system ! in "Universal Serial Bus controller" under Windows XP operating system, please use the inbox driver in Device Manage. Please remove the question mark and restart the system (System will show a question mark "?" You ...Driver RealTek 10/100 LAN driver „ RealTek AC97 Codec Driver Realtek Audio Driver „ VIA 8237 Serial ATA Driver For VIA 8237 SATA Driver „ VIA USB 2.0 Controller VIA USB 2.0 Host Controller use Windows Service Pack. For USB2.0 driver support under "Device Manager". GA-K8VM800M Motherboard - 84 - English Driver...
...Please upgrade to reboot system ! in "Universal Serial Bus controller" under Windows XP operating system, please use the inbox driver in Device Manage. Please remove the question mark and restart the system (System will show a question mark "?" You ...Driver RealTek 10/100 LAN driver „ RealTek AC97 Codec Driver Realtek Audio Driver „ VIA 8237 Serial ATA Driver For VIA 8237 SATA Driver „ VIA USB 2.0 Controller VIA USB 2.0 Host Controller use Windows Service Pack. For USB2.0 driver support under "Device Manager". GA-K8VM800M Motherboard - 84 - English Driver...

User Manual
Page 86
CONTACT US Please see the last page for this CD title. HARDWARE INFORMATION This page lists all device you have for details. GA-K8VM800M Motherboard - 86 - English SOFTWARE INFORMATION This page list the contects of softwares and drivers in this motherboard.
CONTACT US Please see the last page for this CD title. HARDWARE INFORMATION This page lists all device you have for details. GA-K8VM800M Motherboard - 86 - English SOFTWARE INFORMATION This page list the contects of softwares and drivers in this motherboard.

User Manual
Page 87
... will not be able to see some options that support RAID function after computer shuts down and that you refer to a floppy disk before installing drivers. Connect power cord to solve the problem. Question 6: Why does system seem unstable after turning up the speaker to http://tw.giga-byte.com/...F1 keys after computer shuts down ? Answer: First of my keyboard/optical mouse still on after I use all , you need to install RAID and ATA drivers under Win 2000 and XP on boards that were included in the manual. Disconnect the power cord from MB. 3. Press Del to the Clear CMOS...
... will not be able to see some options that support RAID function after computer shuts down and that you refer to a floppy disk before installing drivers. Connect power cord to solve the problem. Question 6: Why does system seem unstable after turning up the speaker to http://tw.giga-byte.com/...F1 keys after computer shuts down ? Answer: First of my keyboard/optical mouse still on after I use all , you need to install RAID and ATA drivers under Win 2000 and XP on boards that were included in the manual. Disconnect the power cord from MB. 3. Press Del to the Clear CMOS...


