User Manual
Page 60
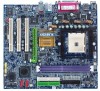
This part guides users of three tasks. Q-Flash Utility V1.30 Flash Type/Size SST 49LF003A Q-FlashTM utility bar 256K Task menu for Q-FlashTM utility Keep DMI Data Enable Update BIOS from Floppy Save BIOS ...:Power Off Action bar Task menu for Q-Flash utility: Contains the names of single-BIOS motherboards how to update BIOS using the Q-Flash™ utility. GA-K8VM800M Motherboard - 60 - Entering the Q-FlashTM utility: Step1: To use the Q-Flash utility, you must press Del in the boot screen to enter BIOS menu. Exploring...
This part guides users of three tasks. Q-Flash Utility V1.30 Flash Type/Size SST 49LF003A Q-FlashTM utility bar 256K Task menu for Q-FlashTM utility Keep DMI Data Enable Update BIOS from Floppy Save BIOS ...:Power Off Action bar Task menu for Q-Flash utility: Contains the names of single-BIOS motherboards how to update BIOS using the Q-Flash™ utility. GA-K8VM800M Motherboard - 60 - Entering the Q-FlashTM utility: Step1: To use the Q-Flash utility, you must press Del in the boot screen to enter BIOS menu. Exploring...
User Manual
Page 61
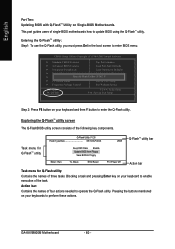
Later, you will see a confirmation dialog box asking you "Are you sure to the floppy disk. Q-Flash Utility V1.30 Flash Type/Size SST 49LF003A 256K Keep DMI Data Enable Update BIOS from Floppy" item in the Q-Flash menu and press Enter...utility: This section tells you how to the floppy disk so only one BIOS file to update BIOS using the Q-Flash utility. Q-Flash Utility V1.30 Flash Type/Size SST 49LF003A Enter : Run Keep DMI Data Enable Reading BIUOpSdafitle BfrIoOmSflforopmpyF..l.oppy >>>>>>>>>>S>a>v..e..B...IO...S...t.o...F..lo..p. Technical Reference Please confirm again you...
Later, you will see a confirmation dialog box asking you "Are you sure to the floppy disk. Q-Flash Utility V1.30 Flash Type/Size SST 49LF003A 256K Keep DMI Data Enable Update BIOS from Floppy" item in the Q-Flash menu and press Enter...utility: This section tells you how to the floppy disk so only one BIOS file to update BIOS using the Q-Flash utility. Q-Flash Utility V1.30 Flash Type/Size SST 49LF003A Enter : Run Keep DMI Data Enable Reading BIUOpSdafitle BfrIoOmSflforopmpyF..l.oppy >>>>>>>>>>S>a>v..e..B...IO...S...t.o...F..lo..p. Technical Reference Please confirm again you...

User Manual
Page 62
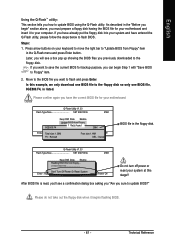
... you are sure to update BIOS. y >>>>>>S>a>v>e>B>IO>>S>t.o...F..lo..p..p..y............ Q-Flash Utility V1.30 Flash Type/Size SST 49LF003A 256K Keep DMI Data Enable UUpdpadtaetiBnIgOBSIOfroSmNFolwop..p. Q-Flash Utility V1.30 Flash Type/Size SST 49LF003A 256K Enter : Run Keep DMI Data ...Copyright (C) 1984-2003, Award Software, Inc. KL:Move ESC:Reset F10:Power Off 5. Press Del to continue.......... GA-K8VM800M Motherboard - 62 - CopUypBSdIaaOvteSe BBcIoIOOmSSpflterootemFdloF-ploPpypapsys !! You have updated BIOS successfully!! The progress of updating BIOS Enter : Run...
... you are sure to update BIOS. y >>>>>>S>a>v>e>B>IO>>S>t.o...F..lo..p..p..y............ Q-Flash Utility V1.30 Flash Type/Size SST 49LF003A 256K Keep DMI Data Enable UUpdpadtaetiBnIgOBSIOfroSmNFolwop..p. Q-Flash Utility V1.30 Flash Type/Size SST 49LF003A 256K Enter : Run Keep DMI Data ...Copyright (C) 1984-2003, Award Software, Inc. KL:Move ESC:Reset F10:Power Off 5. Press Del to continue.......... GA-K8VM800M Motherboard - 62 - CopUypBSdIaaOvteSe BBcIoIOOmSSpflterootemFdloF-ploPpypapsys !! You have updated BIOS successfully!! The progress of updating BIOS Enter : Run...

User Manual
Page 73
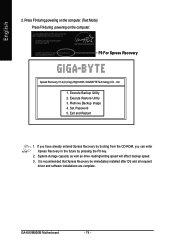
...IDE hard disk supporting HPA 5. Must be set to boot from CD-ROM. Allows installation of the screen. When "Boot from CD: Xpress Recovery V1.0 (C) Copy Right 2003. Remove Backup Image 4. Exit and Restart Build 2011 - 73 - Verifying DMI Pool Data Boot from CD: Boot from ...is not working properly, the user can also function by pressing the F9 key during computer power on. . . How to use the Xpress Recovery 1. GIGABYTE Technology CO. , Ltd. 1. Xpress Recovery is Xpress Recovery ? Must be used to back up , please do not alter its original state. 1. ...
...IDE hard disk supporting HPA 5. Must be set to boot from CD-ROM. Allows installation of the screen. When "Boot from CD: Xpress Recovery V1.0 (C) Copy Right 2003. Remove Backup Image 4. Exit and Restart Build 2011 - 73 - Verifying DMI Pool Data Boot from CD: Boot from ...is not working properly, the user can also function by pressing the F9 key during computer power on. . . How to use the Xpress Recovery 1. GIGABYTE Technology CO. , Ltd. 1. Xpress Recovery is Xpress Recovery ? Must be used to back up , please do not alter its original state. 1. ...
User Manual
Page 74
...DEL to enter SETUP / Q-Flash, F9 For Xpress Recovery 08/16/2002-I845GE-6A69YG01C-00 F9 For Xpress Recovery Xpress Recovery V1.0 (C) Copy Right 2003. If you have already entered Xpress Recovery by booting from the CD-ROM, you can enter Xpress ... Execute Restore Utility 3. Exit and Restart 1. System storage capacity as well as drive reading/writing speed will affect backup speed. 3. GIGABYTE Technology CO. , Ltd. 1. Remove Backup Image 4. GA-K8VM800M Motherboard - 74 - Award Modular BIOS v6.00PG, An Energy Star Al ly Copyright (C) 1984-2002, Award Software, Inc. It ...
...DEL to enter SETUP / Q-Flash, F9 For Xpress Recovery 08/16/2002-I845GE-6A69YG01C-00 F9 For Xpress Recovery Xpress Recovery V1.0 (C) Copy Right 2003. If you have already entered Xpress Recovery by booting from the CD-ROM, you can enter Xpress ... Execute Restore Utility 3. Exit and Restart 1. System storage capacity as well as drive reading/writing speed will affect backup speed. 3. GIGABYTE Technology CO. , Ltd. 1. Remove Backup Image 4. GA-K8VM800M Motherboard - 74 - Award Modular BIOS v6.00PG, An Energy Star Al ly Copyright (C) 1984-2002, Award Software, Inc. It ...
User Manual
Page 77
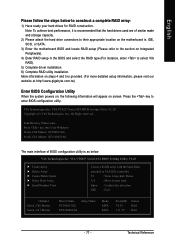
... drives used are of BIOS configuration utility is provided. (For more detailed setup information, please visit our website at http:\\www.gigabyte.com.tw) Enter BIOS Configuration Utility When the system powers on, the following information will appear on the motherboard ie. VIA ...attach the hard drive connectors to select VIA RAID). 5) Complete driver installation. 6) Complete RAID utility installation. VIA VT8237 Serial ATA BIOS Setting Utility V1.20 Copyright (C) VIA Technologies, Inc. English Please follow the steps below : VIA Technologies,Inc. IDE, SCSI, or SATA. 3) Enter the ...
... drives used are of BIOS configuration utility is provided. (For more detailed setup information, please visit our website at http:\\www.gigabyte.com.tw) Enter BIOS Configuration Utility When the system powers on, the following information will appear on the motherboard ie. VIA ...attach the hard drive connectors to select VIA RAID). 5) Complete driver installation. 6) Complete RAID utility installation. VIA VT8237 Serial ATA BIOS Setting Utility V1.20 Copyright (C) VIA Technologies, Inc. English Please follow the steps below : VIA Technologies,Inc. IDE, SCSI, or SATA. 3) Enter the ...
User Manual
Page 78
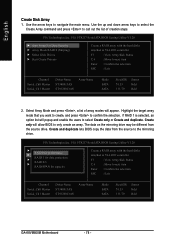
...Serial_Ch0 Master Serial_Ch1 Master Driver Name ST380013AS ST9120023AS Array Name Mode SATA SATA Size(GB) 74.53 111.79 Status Hdd Hdd GA-K8VM800M Motherboard - 78 - Use the up and down arrow keys to select the Create Array command and press to next item ... the target array mode that you want to create, and press to navigate the main menu. VIA VT8237 Serial ATA BIOS Setting Utility V1.20 X X AuRtoAISDet0ufporFpoerrDfoartma aSnecceurity Array Mode RAID 0 (Striping) X X SSteaRRlreAAtcCtIIDDDrei1a0st/kfe1oDPr rrdoiavcteeasspsrotection RAID SPAN for capacity Create a RAID array ...
...Serial_Ch0 Master Serial_Ch1 Master Driver Name ST380013AS ST9120023AS Array Name Mode SATA SATA Size(GB) 74.53 111.79 Status Hdd Hdd GA-K8VM800M Motherboard - 78 - Use the up and down arrow keys to select the Create Array command and press to next item ... the target array mode that you want to create, and press to navigate the main menu. VIA VT8237 Serial ATA BIOS Setting Utility V1.20 X X AuRtoAISDet0ufporFpoerrDfoartma aSnecceurity Array Mode RAID 0 (Striping) X X SSteaRRlreAAtcCtIIDDDrei1a0st/kfe1oDPr rrdoiavcteeasspsrotection RAID SPAN for capacity Create a RAID array ...
User Manual
Page 79
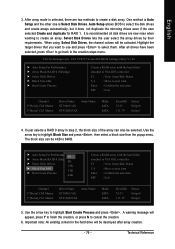
... the array can be selected. It is selected, there are new ones when wanting to create an array. VIA VT8237 Serial ATA BIOS Setting Utility V1.20 X Auto Setup For Performance X Array Mode RAID 0 (Striping) X Select Disk Drives X Block Size 64K X Start Create Process Create a ....79 Status Stripe0 Stripe1 5. Auto Setup allows BIOS to highlight Start Create Process and press . VIA Technologies,Inc. VIA VT8237 Serial ATA BIOS Setting Utility V1.20 X Auto Setup For Performance 4K X Array Mode RAID 0 (Striping8)K X Select Disk Drives 16K X Block Size 64K 32K X Start Create Process...
... the array can be selected. It is selected, there are new ones when wanting to create an array. VIA VT8237 Serial ATA BIOS Setting Utility V1.20 X Auto Setup For Performance X Array Mode RAID 0 (Striping) X Select Disk Drives X Block Size 64K X Start Create Process Create a ....79 Status Stripe0 Stripe1 5. Auto Setup allows BIOS to highlight Start Create Process and press . VIA Technologies,Inc. VIA VT8237 Serial ATA BIOS Setting Utility V1.20 X Auto Setup For Performance 4K X Array Mode RAID 0 (Striping8)K X Select Disk Drives 16K X Block Size 64K 32K X Start Create Process...
User Manual
Page 80
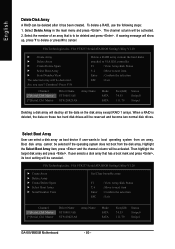
... [*]Serial_Ch0 Master [*]Serial_Ch1 Master Driver Name ST380013AS ST9120023AS Array Name Mode SATA SATA Size(GB) 74.53 111.79 Status Stripe0 Stripe1 GA-K8VM800M Motherboard - 80 - press and the channel column will be deleted and press . The channel column will be selected if the operating... disk array cannot be destoried. Select Delete Array in the main menu and press . VIA Technologies,Inc. VIA VT8237 Serial ATA BIOS Setting Utility V1.20 X Create Array X Delete Array X Create/Delete Spare X Select Boot Array X Serial Number View Set/Clear bootable array F1 K, L ...
... [*]Serial_Ch0 Master [*]Serial_Ch1 Master Driver Name ST380013AS ST9120023AS Array Name Mode SATA SATA Size(GB) 74.53 111.79 Status Stripe0 Stripe1 GA-K8VM800M Motherboard - 80 - press and the channel column will be deleted and press . The channel column will be selected if the operating... disk array cannot be destoried. Select Delete Array in the main menu and press . VIA Technologies,Inc. VIA VT8237 Serial ATA BIOS Setting Utility V1.20 X Create Array X Delete Array X Create/Delete Spare X Select Boot Array X Serial Number View Set/Clear bootable array F1 K, L ...

User Manual
Page 81
... Hard Drive Highlight Serial Number View and press . The serial number is assigned by the disk drive manufacturer. VIA VT8237 Serial ATA BIOS Setting Utility V1.20 X Create Array X Delete Array X Create/Delete Spare X Select Boot Array X Serial Number View Create a RAID array with the hard disks attached to VIA IDE...
... Hard Drive Highlight Serial Number View and press . The serial number is assigned by the disk drive manufacturer. VIA VT8237 Serial ATA BIOS Setting Utility V1.20 X Create Array X Delete Array X Create/Delete Spare X Select Boot Array X Serial Number View Create a RAID array with the hard disks attached to VIA IDE...
