
User Manual
Page 14
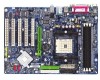
...steps outlined below: 1. Installing a AGP VGA card: Please carefully pull out the small whitedrawable bar at the end of the expansion card. 6. GA-K8U Motherboard - 14 - Power on the computer, if necessary, setup BIOS utility of expansion card from the operating system. Please align the VGA card to... computer. 2. Read the related expansion card's instruction document before install the expansion card into expansion slot in the slot. 5. Install related driver from BIOS. 8. Replace the screw to secure the slot bracket of the AGP slot when you try to the onboard AGP slot and...
...steps outlined below: 1. Installing a AGP VGA card: Please carefully pull out the small whitedrawable bar at the end of the expansion card. 6. GA-K8U Motherboard - 14 - Power on the computer, if necessary, setup BIOS utility of expansion card from the operating system. Please align the VGA card to... computer. 2. Read the related expansion card's instruction document before install the expansion card into expansion slot in the slot. 5. Install related driver from BIOS. 8. Replace the screw to secure the slot bracket of the AGP slot when you try to the onboard AGP slot and...

User Manual
Page 45
... controller" under Windows XP operating system, please use Windows Service Pack. The "Xpress Install" will auto-detect the right USB2.0 driver). - 45 - Please remove the question mark and restart the system (System will execute the installation for you want then click the "GO" ...question mark "?" After install Windows Service Pack, it will restart your CD-ROM drive, the driver CD-title will scan automatically the system and then list all the drivers that came with your motherboard into your system automatically. The "Xpress Install" uses the"Click and Go" technology to install...
... controller" under Windows XP operating system, please use Windows Service Pack. The "Xpress Install" will auto-detect the right USB2.0 driver). - 45 - Please remove the question mark and restart the system (System will execute the installation for you want then click the "GO" ...question mark "?" After install Windows Service Pack, it will restart your CD-ROM drive, the driver CD-title will scan automatically the system and then list all the drivers that came with your motherboard into your system automatically. The "Xpress Install" uses the"Click and Go" technology to install...

User Manual
Page 46
English 3-2 Software Application This page displays all the tools that Gigabyte developed and some free software, you can choose anyone you want and press "install" to install them. 3-3 Software Information This page lists the contents of software and drivers in this CD-title. GA-K8U Motherboard - 46 -
English 3-2 Software Application This page displays all the tools that Gigabyte developed and some free software, you can choose anyone you want and press "install" to install them. 3-3 Software Information This page lists the contents of software and drivers in this CD-title. GA-K8U Motherboard - 46 -

User Manual
Page 47
Drivers Installation English 3-4 Hardware Information This page lists all device you have for this motherboard. 3-5 Contact Us Please see the last page for details. - 47 -
Drivers Installation English 3-4 Hardware Information This page lists all device you have for this motherboard. 3-5 Contact Us Please see the last page for details. - 47 -

User Manual
Page 50
... NTFS format. Exit and Restart Build 2011 GA-K8U Motherboard - 50 - Insert the provided driver CD into your CD drive, then save and exit the BIOS menu. English 4-1-2 Xpress Recovery Introduction What is backed up and restore an OS partition. Must be used to the IDE1 Master 3. GIGABYTE Technology CO. , Ltd. 1. If the hard drive...
... NTFS format. Exit and Restart Build 2011 GA-K8U Motherboard - 50 - Insert the provided driver CD into your CD drive, then save and exit the BIOS menu. English 4-1-2 Xpress Recovery Introduction What is backed up and restore an OS partition. Must be used to the IDE1 Master 3. GIGABYTE Technology CO. , Ltd. 1. If the hard drive...
User Manual
Page 63
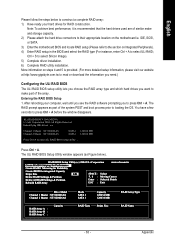
... BIOS and select the RAID type (For instance, enter Ctrl + A to select Silicon Image). 5) Complete driver installation. 6) Complete RAID utility installation. ALi RAID BIOS V1.04 (M5289) (c) ALi Corporation 2004, All...is provided. (For more detailed setup information, please visit our website at http:\\www.gigabyte.com.tw to read or download the information you need.) Configuring the ULi RAID ...utility lets you choose the RAID array type and which hard drives you to the section on the motherboard ie. Channel 1 Master : ST3120026AS Channel 2 Master : ST3120026AS SATA 1 120034 MB SATA 1 ...
... BIOS and select the RAID type (For instance, enter Ctrl + A to select Silicon Image). 5) Complete driver installation. 6) Complete RAID utility installation. ALi RAID BIOS V1.04 (M5289) (c) ALi Corporation 2004, All...is provided. (For more detailed setup information, please visit our website at http:\\www.gigabyte.com.tw to read or download the information you need.) Configuring the ULi RAID ...utility lets you choose the RAID array type and which hard drives you to the section on the motherboard ie. Channel 1 Master : ST3120026AS Channel 2 Master : ST3120026AS SATA 1 120034 MB SATA 1 ...

User Manual
Page 69
... hard drive. Step 1: Find an available Operation System and insert the motherboard driver CD into the floppy disk drive. Step 2: Go to copy the driver. After you complete the steps, boot from HDDs in the driver CD. Appendix See the instructions below about how to My Computer and right... ATA controller, press F6 as Win2000 or XP boots up, then supply serial ATA controller driver by this driver file to a floppy disk. Follow on your motherboard from the motherboard driver CD to the floppy disk. Without the driver, the hard disk may not be recognized during OS installation.
... hard drive. Step 1: Find an available Operation System and insert the motherboard driver CD into the floppy disk drive. Step 2: Go to copy the driver. After you complete the steps, boot from HDDs in the driver CD. Appendix See the instructions below about how to My Computer and right... ATA controller, press F6 as Win2000 or XP boots up, then supply serial ATA controller driver by this driver file to a floppy disk. Follow on your motherboard from the motherboard driver CD to the floppy disk. Without the driver, the hard disk may not be recognized during OS installation.
User Manual
Page 70
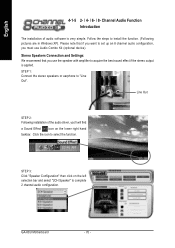
... select "2CH Speaker" to "Line Out". Line Out STEP 2: Following installation of audio software is applied. Channel Audio Function Introduction The installation of the audio driver, you want to install the function. (Following pictures are in Windows XP). Click the icon to acquire the best sound effect if the stereo output.... STEP 1: Connect the stereo speakers or earphone to complete 2 channel audio configuration. English 4-1-5 2- / 4- / 6- / 8- STEP 3: Click "Speaker Configuration" then click on the lower right hand taskbar. GA-K8U Motherboard - 70 -
... select "2CH Speaker" to "Line Out". Line Out STEP 2: Following installation of audio software is applied. Channel Audio Function Introduction The installation of the audio driver, you want to install the function. (Following pictures are in Windows XP). Click the icon to acquire the best sound effect if the stereo output.... STEP 1: Connect the stereo speakers or earphone to complete 2 channel audio configuration. English 4-1-5 2- / 4- / 6- / 8- STEP 3: Click "Speaker Configuration" then click on the lower right hand taskbar. GA-K8U Motherboard - 70 -
User Manual
Page 72
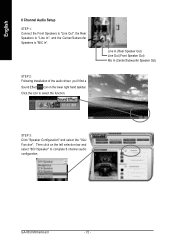
...(Rear Speaker Out) Line Out (Front Speaker Out) Mic In (Center/Subwoofer Speaker Out) STEP 3: Click "Speaker Configuration" and select the "UAJ Function". GA-K8U Motherboard - 72 - Then click on the lower right hand taskbar. English 6 Channel Audio Setup STEP 1: Connect the Front Speakers to "Line Out", the Rear ...Speakers to "Line In", and the Center/Subwoofer Speakers to select the function. STEP 2: Following installation of the audio driver, you'll find a Sound Effect icon on the left selection bar and select "6CH Speaker" to complete 6 channel audio configuration.
...(Rear Speaker Out) Line Out (Front Speaker Out) Mic In (Center/Subwoofer Speaker Out) STEP 3: Click "Speaker Configuration" and select the "UAJ Function". GA-K8U Motherboard - 72 - Then click on the lower right hand taskbar. English 6 Channel Audio Setup STEP 1: Connect the Front Speakers to "Line Out", the Rear ...Speakers to "Line In", and the Center/Subwoofer Speakers to select the function. STEP 2: Following installation of the audio driver, you'll find a Sound Effect icon on the left selection bar and select "6CH Speaker" to complete 6 channel audio configuration.

User Manual
Page 74
...Kit". Sound Effect Configuration: At the sound effect menu, users can adjust sound option settings as desired. Click the icon to the "Line In" port. GA-K8U Motherboard - 74 - Connect the center/subwoofer channels to the "MIC In" port located on the lower right hand taskbar. Then click on the left selection ...bar and select "8CH Speaker" to the Surround-Kit "SUR BACK" port. (This method requires UAJ function) STEP 4: Following installation of the audio driver, you'll find a Sound Effect icon on the audio panel and the R/L channels to complete 8 channel audio configuration.
...Kit". Sound Effect Configuration: At the sound effect menu, users can adjust sound option settings as desired. Click the icon to the "Line In" port. GA-K8U Motherboard - 74 - Connect the center/subwoofer channels to the "MIC In" port located on the lower right hand taskbar. Then click on the left selection ...bar and select "8CH Speaker" to the Surround-Kit "SUR BACK" port. (This method requires UAJ function) STEP 4: Following installation of the audio driver, you'll find a Sound Effect icon on the audio panel and the R/L channels to complete 8 channel audio configuration.


