User Manual
Page 16
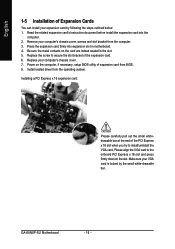
Press the expansion card firmly into the computer. 2. Be sure the metal contacts on the card are indeed seated in motherboard. 4. Install related driver from BIOS. 8. Installing a PCI Express x 16 expansion card: Please carefully pull out the small whitedrawable bar at the ..., setup BIOS utility of expansion card from the operating system. Make sure your VGA card is locked by following the steps outlined below: 1. GA-K8NXP-SLI Motherboard - 16 - Replace your computer's chassis cover, screws and slot bracket from the computer. 3. Remove your computer's chassis cover. 7. Please ...
Press the expansion card firmly into the computer. 2. Be sure the metal contacts on the card are indeed seated in motherboard. 4. Install related driver from BIOS. 8. Installing a PCI Express x 16 expansion card: Please carefully pull out the small whitedrawable bar at the ..., setup BIOS utility of expansion card from the operating system. Make sure your VGA card is locked by following the steps outlined below: 1. GA-K8NXP-SLI Motherboard - 16 - Replace your computer's chassis cover, screws and slot bracket from the computer. 3. Remove your computer's chassis cover. 7. Please ...
User Manual
Page 20
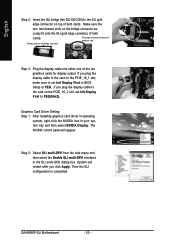
... the bridge connector Gold edge connector on the bridge connector se- Graphics Card Driver Setting: Step 1: After installing graphics card driver in operating system, right-click the NVIDIA icon in the SLI multi-GPU dialog box. GA-K8NXP-SLI Motherboard - 20 - curely fit onto the SLI gold edge connetors of both cards. Make sure the two mini female...
... the bridge connector Gold edge connector on the bridge connector se- Graphics Card Driver Setting: Step 1: After installing graphics card driver in operating system, right-click the NVIDIA icon in the SLI multi-GPU dialog box. GA-K8NXP-SLI Motherboard - 20 - curely fit onto the SLI gold edge connetors of both cards. Make sure the two mini female...
User Manual
Page 26
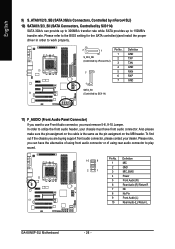
English 9) S_ATA0/1/2/3_SB (SATA 3Gb/s Connectors, Controlled by nForce4 SLI) 10) SATA0/1/2/3_SII (SATA Connectors, Controlled by Sil3114) Definition GND TXP TXN GND RXN RXP GND 11) F_AUDIO (Front Audio Panel Connector) If... Front Audio (R) Rear Audio (R)/ Return R NC No Pin Front Audio (L) Rear Audio (L)/ Return L GA-K8NXP-SLI Motherboard - 26 - Please refer to the BIOS setting for the SATA controller(s)and install the proper driver in order to work properly. 7 1 S_ATA_SB (Controlled by nForce4 SLI) 7 1 Pin No. 1 2 3 4 5 6 7 SATA_SII (Controlled by Sil3114) SATA 3Gb/s can have ...
English 9) S_ATA0/1/2/3_SB (SATA 3Gb/s Connectors, Controlled by nForce4 SLI) 10) SATA0/1/2/3_SII (SATA Connectors, Controlled by Sil3114) Definition GND TXP TXN GND RXN RXP GND 11) F_AUDIO (Front Audio Panel Connector) If... Front Audio (R) Rear Audio (R)/ Return R NC No Pin Front Audio (L) Rear Audio (L)/ Return L GA-K8NXP-SLI Motherboard - 26 - Please refer to the BIOS setting for the SATA controller(s)and install the proper driver in order to work properly. 7 1 S_ATA_SB (Controlled by nForce4 SLI) 7 1 Pin No. 1 2 3 4 5 6 7 SATA_SII (Controlled by Sil3114) SATA 3Gb/s can have ...

User Manual
Page 51
... device icon in "My computer", and execute the Setup.exe. 3-1 Install Chipset Drivers After insert the driver CD, "Xpress Install" will scan automatically the system and then list all the drivers that came with your motherboard into your system automatically. English Chapter 3 Drivers Installation Pictures below are shown in "Universal Serial Bus controller" under Windows...
... device icon in "My computer", and execute the Setup.exe. 3-1 Install Chipset Drivers After insert the driver CD, "Xpress Install" will scan automatically the system and then list all the drivers that came with your motherboard into your system automatically. English Chapter 3 Drivers Installation Pictures below are shown in "Universal Serial Bus controller" under Windows...
User Manual
Page 52
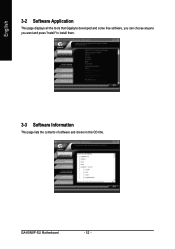
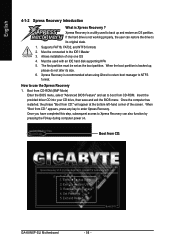
GA-K8NXP-SLI Motherboard - 52 - English 3-2 Software Application This page displays all the tools that Gigabyte developed and some free software, you can choose anyone you want and press "install" to install them. 3-3 Software Information This page lists the contents of software and drivers in this CD-title.
GA-K8NXP-SLI Motherboard - 52 - English 3-2 Software Application This page displays all the tools that Gigabyte developed and some free software, you can choose anyone you want and press "install" to install them. 3-3 Software Information This page lists the contents of software and drivers in this CD-title.

User Manual
Page 53
English 3-4 Hardware Information This page lists all device you have for this motherboard. 3-5 Contact Us Please see the last page for details. - 53 - Drivers Installation
English 3-4 Hardware Information This page lists all device you have for this motherboard. 3-5 Contact Us Please see the last page for details. - 53 - Drivers Installation
User Manual
Page 56
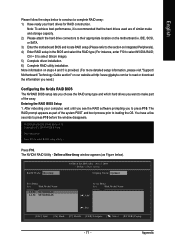
...Verifying DMI Pool Data Boot from CD: Boot from CD:" will appear at the bottom left-hand corner of only one OS 4. GIGABYTE Technology CO. , Ltd. 1. Remove Backup Image 4. Xpress Recovery is Xpress Recovery ? Once the computer has restarted, the phrase ... to NTFS format. How to back up , please do not alter its original state. 1. Insert the provided driver CD into your CD drive, then save and exit the BIOS menu. Once you have completed this step, subsequent... Must be used to use the Xpress Recovery 1. Exit and Restart Build 2011 GA-K8NXP-SLI Motherboard - 56 -
...Verifying DMI Pool Data Boot from CD: Boot from CD:" will appear at the bottom left-hand corner of only one OS 4. GIGABYTE Technology CO. , Ltd. 1. Remove Backup Image 4. Xpress Recovery is Xpress Recovery ? Once the computer has restarted, the phrase ... to NTFS format. How to back up , please do not alter its original state. 1. Insert the provided driver CD into your CD drive, then save and exit the BIOS menu. Once you have completed this step, subsequent... Must be used to use the Xpress Recovery 1. Exit and Restart Build 2011 GA-K8NXP-SLI Motherboard - 56 -
User Manual
Page 71
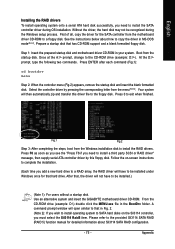
... and storage capacity. 2) Please attach the hard drive connectors to loading the OS. More information on our website at http:\\www.gigabyte.com.tw to read or download the information you need.) Configuring the Nvidia RAID BIOS The NVRAID BIOS setup lets you choose the... the steps below ). The RAID prompt appears as Figure below to select Silicon Image). 5) Complete driver installation. 6) Complete RAID utility installation. RAID Mode: Mirroring NVIDIA RAID Utility Nov 5 2004 - IDE, SCSI, or SATA. 3) Enter the motherboard BIOS and locate RAID setup (Please refer to the section on the...
... and storage capacity. 2) Please attach the hard drive connectors to loading the OS. More information on our website at http:\\www.gigabyte.com.tw to read or download the information you need.) Configuring the Nvidia RAID BIOS The NVRAID BIOS setup lets you choose the... the steps below ). The RAID prompt appears as Figure below to select Silicon Image). 5) Complete driver installation. 6) Complete RAID utility installation. RAID Mode: Mirroring NVIDIA RAID Utility Nov 5 2004 - IDE, SCSI, or SATA. 3) Enter the motherboard BIOS and locate RAID setup (Please refer to the section on the...
User Manual
Page 74
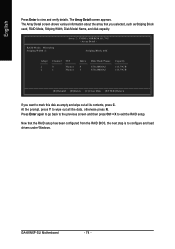
The Array Detail screen appears. Now that you want to exit the RAID setup. At the prompt, press Y to configure and load drivers under Windows. GA-K8NXP-SLI Motherboard - 74 - Press Enter again to go back to the previous screen and then press Ctrl + X to mark this disk as Striping Block used, RAID Mode, ...
The Array Detail screen appears. Now that you want to exit the RAID setup. At the prompt, press Y to configure and load drivers under Windows. GA-K8NXP-SLI Motherboard - 74 - Press Enter again to go back to the previous screen and then press Ctrl + X to mark this disk as Striping Block used, RAID Mode, ...
User Manual
Page 75
...Step 3: After completing the steps, boot from the startup disk. Use an alternative system and insert the GIGABYTE motherboard driver CD-ROM. Boot from the Windows installation disk to install the RAID drivers. Once at the A:\> prompt, change to exit when finished. At the D:\> prompt, type the following...(example: D:\>). Follow the on the Sil3114 controller, you must select the Sil3114 Raid5 item. Step 1: Insert the prepared startup disk and motherboard driver CD-ROM in Fig. 2. (Note 2): If you wish to install operating system to SATA hard disks on -screen instructions to complete ...
...Step 3: After completing the steps, boot from the startup disk. Use an alternative system and insert the GIGABYTE motherboard driver CD-ROM. Boot from the Windows installation disk to install the RAID drivers. Once at the A:\> prompt, change to exit when finished. At the D:\> prompt, type the following...(example: D:\>). Follow the on the Sil3114 controller, you must select the Sil3114 Raid5 item. Step 1: Insert the prepared startup disk and motherboard driver CD-ROM in Fig. 2. (Note 2): If you wish to install operating system to SATA hard disks on -screen instructions to complete ...
User Manual
Page 76
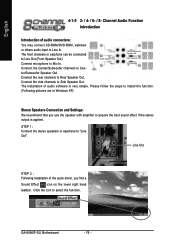
... you find a Sound Effect icon on the lower right hand taskbar. GA-K8NXP-SLI Motherboard - 76 - STEP 1: Connect the stereo speakers or earphone to Mic In. Mic In Side Speaker Out ter/Subwoofer Speaker Out. Channel Audio Function Introduction Introduction of the audio driver, you use the speaker with amplifier to Rear Speaker Out. The...
... you find a Sound Effect icon on the lower right hand taskbar. GA-K8NXP-SLI Motherboard - 76 - STEP 1: Connect the stereo speakers or earphone to Mic In. Mic In Side Speaker Out ter/Subwoofer Speaker Out. Channel Audio Function Introduction Introduction of the audio driver, you use the speaker with amplifier to Rear Speaker Out. The...
User Manual
Page 78
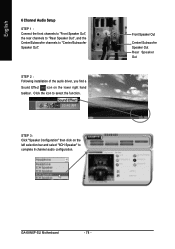
... the lower right hand taskbar. STEP 2 : Following installation of the audio driver, you find a Sound Effect icon on the left selection bar and select "6CH Speaker" to complete 6 channel audio configuration. Front Speaker Out Center/Subwoofer Speaker Out Rear Speaker Out GA-K8NXP-SLI Motherboard - 78 - Click the icon to "Center/Subwoofer Speaker Out". English...
... the lower right hand taskbar. STEP 2 : Following installation of the audio driver, you find a Sound Effect icon on the left selection bar and select "6CH Speaker" to complete 6 channel audio configuration. Front Speaker Out Center/Subwoofer Speaker Out Rear Speaker Out GA-K8NXP-SLI Motherboard - 78 - Click the icon to "Center/Subwoofer Speaker Out". English...


