User Manual
Page 19
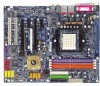
... is to take out the module from the socket and insert it is locked in the SLI Mode direction. Make sure the gold edge connectors are fully inserted. Supported Operating Systems: Only Windows XP operating system is attached.) Connecting Two Graphics Cards: Step 1: Observe the steps in... "1-5 Installation of Expansion Cards" on the two ends of the module into the socket. Enabling SLI Mode-Follow the steps below to the PCIE_16_1...
... is to take out the module from the socket and insert it is locked in the SLI Mode direction. Make sure the gold edge connectors are fully inserted. Supported Operating Systems: Only Windows XP operating system is attached.) Connecting Two Graphics Cards: Step 1: Observe the steps in... "1-5 Installation of Expansion Cards" on the two ends of the module into the socket. Enabling SLI Mode-Follow the steps below to the PCIE_16_1...
User Manual
Page 33
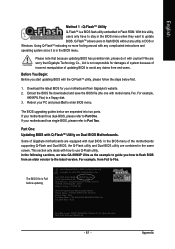
... and Option Page Setup Menu Item Help Restore the previous CMOS value from the Internet. CONTROL KEYS Enter> Move to a new BIOS, either Gigabyte's Q-Flash or @BIOS utility can enter the BIOS setup screen by pressing "Ctrl + F1". If you to DOS before upgrading BIOS but ...easily update or backup BIOS without entering the operating system. @BIOS is displayed at the bottom of the highlighted setup function is a Windows-based utility that describes the appropriate keys to use and the possible selections for the highlighted item. When the power is recommended that you...
... and Option Page Setup Menu Item Help Restore the previous CMOS value from the Internet. CONTROL KEYS Enter> Move to a new BIOS, either Gigabyte's Q-Flash or @BIOS utility can enter the BIOS setup screen by pressing "Ctrl + F1". If you to DOS before upgrading BIOS but ...easily update or backup BIOS without entering the operating system. @BIOS is displayed at the bottom of the highlighted setup function is a Windows-based utility that describes the appropriate keys to use and the possible selections for the highlighted item. When the power is recommended that you...

User Manual
Page 51
...". English Chapter 3 Drivers Installation Pictures below are shown in "Universal Serial Bus controller" under Windows XP operating system, please use Windows Service Pack. After install Windows Service Pack, it will auto-detect the right USB2.0 driver). - 51 - in Windows XP. Some device drivers will continue to install. The "Xpress Install" uses the"Click and...
...". English Chapter 3 Drivers Installation Pictures below are shown in "Universal Serial Bus controller" under Windows XP operating system, please use Windows Service Pack. After install Windows Service Pack, it will auto-detect the right USB2.0 driver). - 51 - in Windows XP. Some device drivers will continue to install. The "Xpress Install" uses the"Click and...
User Manual
Page 55
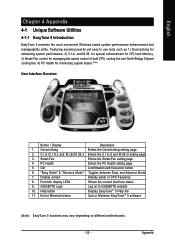
...frequency 8. GO Confirmation and Execution button 6. Help button Display EasyTuneTM 5 Help file 11. Featuring several powerful yet easy to GIGABYTE website 10. "Easy Mode" & "Advance Mode" Toggles between Easy and Advance Mode 7. PC Health Enters the PC Health... C.I.A./2 and M.I .B. English Chapter 4 Appendix 4-1 Unique Software Utilities 4-1-1 EasyTune 5 Introduction EasyTune 5 presents the most convenient Windows based system performance enhancement and manageability utility. Display screen Display panel of both CPU cooling fan and North-Bridge Chipset cooling fan...
...frequency 8. GO Confirmation and Execution button 6. Help button Display EasyTuneTM 5 Help file 11. Featuring several powerful yet easy to GIGABYTE website 10. "Easy Mode" & "Advance Mode" Toggles between Easy and Advance Mode 7. PC Health Enters the PC Health... C.I.A./2 and M.I .B. English Chapter 4 Appendix 4-1 Unique Software Utilities 4-1-1 EasyTune 5 Introduction EasyTune 5 presents the most convenient Windows based system performance enhancement and manageability utility. Display screen Display panel of both CPU cooling fan and North-Bridge Chipset cooling fan...
User Manual
Page 61
....Fba) to a floppy disk. 3. In the following sections, we take GA-8KNXP Ultra as the example to guide you start updating BIOS with any utility in the BIOS menu. In the BIOS menu of Gigabyte motherboards are combined in Single Channel Primary Master : FUJITSU MPE3170AT ED-03-08...FlashTM utility, please follow the steps below are sorry that because updating BIOS has potential risk, please do it is in DOS or Windows. Q-FlashTM allows users to flash BIOS without any complicated instructions and operating system since it with model name.Fxx. Reboot your motherboard has...
....Fba) to a floppy disk. 3. In the following sections, we take GA-8KNXP Ultra as the example to guide you start updating BIOS with any utility in the BIOS menu. In the BIOS menu of Gigabyte motherboards are combined in Single Channel Primary Master : FUJITSU MPE3170AT ED-03-08...FlashTM utility, please follow the steps below are sorry that because updating BIOS has potential risk, please do it is in DOS or Windows. Q-FlashTM allows users to flash BIOS without any complicated instructions and operating system since it with model name.Fxx. Reboot your motherboard has...
User Manual
Page 68
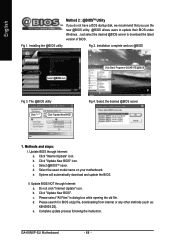
..."Update New BIOS". d. GA-K8NXP-SLI Motherboard - 68 - Installation complete and run @BIOS Select @BIOS item. Methods and steps: I. b. b. c. Please select "All Files" in dialog box while opening the old file. Click Start/ Programs/ GIGABYTE/@BIOS Fig 3. The @...BIOS utility Click " " Click "Update New BIOS" Fig 4. Select the desired @BIOS server 1. e. Complete update process following the instruction. Installing the @BIOS utility Fig 2. II. Just select the desired @BIOS server to update their BIOS under Windows...
..."Update New BIOS". d. GA-K8NXP-SLI Motherboard - 68 - Installation complete and run @BIOS Select @BIOS item. Methods and steps: I. b. b. c. Please select "All Files" in dialog box while opening the old file. Click Start/ Programs/ GIGABYTE/@BIOS Fig 3. The @...BIOS utility Click " " Click "Update New BIOS" Fig 4. Select the desired @BIOS server 1. e. Complete update process following the instruction. Installing the @BIOS utility Fig 2. II. Just select the desired @BIOS server to update their BIOS under Windows...
User Manual
Page 71
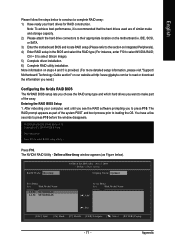
...is provided. (For more detailed setup information, please visit "Support\ Motherboard\ Technology Guide section" on our website at http:\\www.gigabyte.com.tw to read or download the information you need.) Configuring the Nvidia RAID BIOS The NVRAID BIOS setup lets you choose ... enter RAID setup utility ... Detecting array ... Entering the RAID BIOS Setup 1. After rebooting your hard drives for RAID construction. Define a New Array window appears (as part of the array. English Please follow the steps below ). Ctrl + S to press F10. RAID Mode: Mirroring NVIDIA RAID Utility...
...is provided. (For more detailed setup information, please visit "Support\ Motherboard\ Technology Guide section" on our website at http:\\www.gigabyte.com.tw to read or download the information you need.) Configuring the Nvidia RAID BIOS The NVRAID BIOS setup lets you choose ... enter RAID setup utility ... Detecting array ... Entering the RAID BIOS Setup 1. After rebooting your hard drives for RAID construction. Define a New Array window appears (as part of the array. English Please follow the steps below ). Ctrl + S to press F10. RAID Mode: Mirroring NVIDIA RAID Utility...
User Manual
Page 72
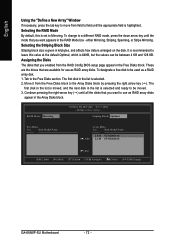
...Model Name Array Disks Loc Disk Model Name [ ] Add 2.0.M ST3120026AS 2.1.M ST3120026AS [ ] Del [ESC] Quit [F6] Back [F7] Finish [TAB] Navigate [ ] Select [ENTER] Popup GA-K8NXP-SLI Motherboard - 72 - Move it from the Free Disks block to the Free Disks section. Define a New Array - To change to a different RAID mode, press the..., this value at the default Optimal, which is set to be between 4 KB and 128 KB. English Using the "Define a New Array" Window If necessary, press the tab key to move from field to field until the mode that you want to use as RAID array disks.
...Model Name Array Disks Loc Disk Model Name [ ] Add 2.0.M ST3120026AS 2.1.M ST3120026AS [ ] Del [ESC] Quit [F6] Back [F7] Finish [TAB] Navigate [ ] Select [ENTER] Popup GA-K8NXP-SLI Motherboard - 72 - Move it from the Free Disks block to the Free Disks section. Define a New Array - To change to a different RAID mode, press the..., this value at the default Optimal, which is set to be between 4 KB and 128 KB. English Using the "Define a New Array" Window If necessary, press the tab key to move from field to field until the mode that you want to use as RAID array disks.

User Manual
Page 73
... Utility Nov 5 10 2004 - Boot No NVIDIA RAID Utility Nov 5 2004 - You can review the RAID arrays that you have set up. The Array List window appears, where you can select a disk array as boot device if you want to wipe out all the data from an array.
... Utility Nov 5 10 2004 - Boot No NVIDIA RAID Utility Nov 5 2004 - You can review the RAID arrays that you have set up. The Array List window appears, where you can select a disk array as boot device if you want to wipe out all the data from an array.
User Manual
Page 74
... go back to the previous screen and then press Ctrl + X to view and verify details. Now that you want to configure and load drivers under Windows. The Array Detail screen shows various information about the array that the RAID setup has been configured from the RAID BIOS, the next step is... Block used, RAID Mode, Striping Width, Disk Model Name, and disk capacity. The Array Detail screen appears. English Press Enter to exit the RAID setup. GA-K8NXP-SLI Motherboard - 74 -
... go back to the previous screen and then press Ctrl + X to view and verify details. Now that you want to configure and load drivers under Windows. The Array Detail screen shows various information about the array that the RAID setup has been configured from the RAID BIOS, the next step is... Block used, RAID Mode, Striping Width, Disk Model Name, and disk capacity. The Array Detail screen appears. English Press Enter to exit the RAID setup. GA-K8NXP-SLI Motherboard - 74 -
User Manual
Page 75
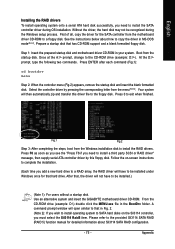
...Fig.1 Fig.2 Step 3: After completing the steps, boot from the menu(Note2). Use an alternative system and insert the GIGABYTE motherboard driver CD-ROM. A command prompt window will then automatically zip and transfer this floppy disk. Boot from the motherboard driver CD-ROM to a floppy disk. Press... to install a third party SCSI or RAID driver" message, then supply serial ATA controller driver by pressing the corresponding letter from the Windows installation disk to install the RAID drivers. Prepare a startup disk that , the driver will have to the provided Sil3114 SATA RAID (RAID...
...Fig.1 Fig.2 Step 3: After completing the steps, boot from the menu(Note2). Use an alternative system and insert the GIGABYTE motherboard driver CD-ROM. A command prompt window will then automatically zip and transfer this floppy disk. Boot from the motherboard driver CD-ROM to a floppy disk. Press... to install a third party SCSI or RAID driver" message, then supply serial ATA controller driver by pressing the corresponding letter from the Windows installation disk to install the RAID drivers. Prepare a startup disk that , the driver will have to the provided Sil3114 SATA RAID (RAID...
User Manual
Page 76
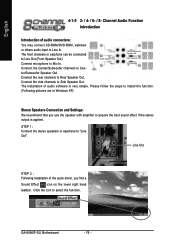
... Out) Center/Subwoofer Speaker Out Rear Speaker Out Connect microphone to Line Out (Front Speaker Out). Mic In Side Speaker Out ter/Subwoofer Speaker Out. GA-K8NXP-SLI Motherboard - 76 - The installation of audio software is applied. English 4-1-5 2- / 4- / 6- / 8- Connect the side channels to Rear Speaker Out.... follow the steps to Cen- Connect the Center/Subwoofer channels to install the function. (Following pictures are in Windows XP) Stereo Speakers Connection and Settings: We recommend that you find a Sound Effect icon on the lower right hand taskbar.
... Out) Center/Subwoofer Speaker Out Rear Speaker Out Connect microphone to Line Out (Front Speaker Out). Mic In Side Speaker Out ter/Subwoofer Speaker Out. GA-K8NXP-SLI Motherboard - 76 - The installation of audio software is applied. English 4-1-5 2- / 4- / 6- / 8- Connect the side channels to Rear Speaker Out.... follow the steps to Cen- Connect the Center/Subwoofer channels to install the function. (Following pictures are in Windows XP) Stereo Speakers Connection and Settings: We recommend that you find a Sound Effect icon on the lower right hand taskbar.
User Manual
Page 80
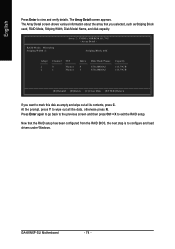
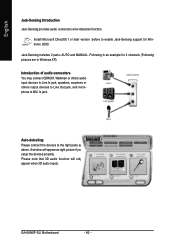
...connect the devices to MIC In jack. A window will only appear when 3D audio inputs. English Jack-Sensing Introduction Jack-Sensing provides audio connectors error-detection function. Following is an example for Windows 2000. GA-K8NXP-SLI Motherboard - 80 - Install Microsoft DirectX8.1 ...or later version before to enable Jack-Sensing support for 2 channels (Following pictures are in Windows XP): Introduction of audio connectors You may connect ...
...connect the devices to MIC In jack. A window will only appear when 3D audio inputs. English Jack-Sensing Introduction Jack-Sensing provides audio connectors error-detection function. Following is an example for Windows 2000. GA-K8NXP-SLI Motherboard - 80 - Install Microsoft DirectX8.1 ...or later version before to enable Jack-Sensing support for 2 channels (Following pictures are in Windows XP): Introduction of audio connectors You may connect ...


