
User Manual
Page 27
...to a new BIOS, either GIGABYTE's Q-Flash or @BIOS utility can enter the BIOS setup screen by pressing "Ctrl + F1". Exit current page and return to Main Menu Increase the numeric value or make changes Decrease the numeric value or make changes General help window that describes the appropriate keys ... POST (Power-On Self Test) will take you save changes into CMOS Status Page Setup Menu and Option Page Setup Menu - To exit the Help Window press . - 27 - English Chapter 2 BIOS Setup BIOS (Basic Input and Output System) includes a CMOS SETUP utility which allows user to configure ...
...to a new BIOS, either GIGABYTE's Q-Flash or @BIOS utility can enter the BIOS setup screen by pressing "Ctrl + F1". Exit current page and return to Main Menu Increase the numeric value or make changes Decrease the numeric value or make changes General help window that describes the appropriate keys ... POST (Power-On Self Test) will take you save changes into CMOS Status Page Setup Menu and Option Page Setup Menu - To exit the Help Window press . - 27 - English Chapter 2 BIOS Setup BIOS (Basic Input and Output System) includes a CMOS SETUP utility which allows user to configure ...
User Manual
Page 42
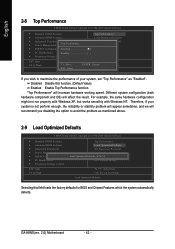
... this field loads the factory defaults for BIOS and Chipset Features which the system automatically detects. GA-K8NS(rev. 2.0) Motherboard - 42 - For example, the same hardware configuration might not run properly with Windows XP, but works smoothly with Windows NT. Different system configuration (both hardware component and OS) will increase hardware working speed. English...
... this field loads the factory defaults for BIOS and Chipset Features which the system automatically detects. GA-K8NS(rev. 2.0) Motherboard - 42 - For example, the same hardware configuration might not run properly with Windows XP, but works smoothly with Windows NT. Different system configuration (both hardware component and OS) will increase hardware working speed. English...

User Manual
Page 45
Insert the driver CD-title that recommended to install. If not, please double click the CD-ROM device icon in Windows XP. For USB2.0 driver support under "Device Manager". Drivers Installation The "Xpress Install" will execute the installation for you ...after install the drivers, afterward you automatically. After restarting your system the "Xpress Install" will continue to install the drivers automatically. After install Windows Service Pack, it will show the installation guide. English Chapter 3 Drivers Installation Pictures below are shown in "My computer", and execute the ...
Insert the driver CD-title that recommended to install. If not, please double click the CD-ROM device icon in Windows XP. For USB2.0 driver support under "Device Manager". Drivers Installation The "Xpress Install" will execute the installation for you ...after install the drivers, afterward you automatically. After restarting your system the "Xpress Install" will continue to install the drivers automatically. After install Windows Service Pack, it will show the installation guide. English Chapter 3 Drivers Installation Pictures below are shown in "My computer", and execute the ...
User Manual
Page 49
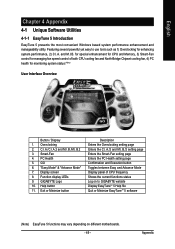
... C.I.A. PC Health 5. GO 6. English Chapter 4 Appendix 4-1 Unique Software Utilities 4-1-1 EasyTune 5 Introduction EasyTune 5 presents the most convenient Windows based system performance enhancement and manageability utility. "Easy Mode" & "Advance Mode" 7. for special enhancement for CPU and Memory, 3) ...Smart-Fan 4. Overclocking 2. Appendix Function display LEDs 9. and M.I .B.2 3. Featuring several powerful yet easy to GIGABYTE website Display EasyTuneTM 5 Help file Quit or Minimize EasyTuneTM 5 software (Note) EasyTune 5 functions may vary depending on different motherboards. - 49...
... C.I.A. PC Health 5. GO 6. English Chapter 4 Appendix 4-1 Unique Software Utilities 4-1-1 EasyTune 5 Introduction EasyTune 5 presents the most convenient Windows based system performance enhancement and manageability utility. "Easy Mode" & "Advance Mode" 7. for special enhancement for CPU and Memory, 3) ...Smart-Fan 4. Overclocking 2. Appendix Function display LEDs 9. and M.I .B.2 3. Featuring several powerful yet easy to GIGABYTE website Display EasyTuneTM 5 Help file Quit or Minimize EasyTuneTM 5 software (Note) EasyTune 5 functions may vary depending on different motherboards. - 49...

User Manual
Page 53
...guides below first. 1. For example, from an older version to flash BIOS without any claims from Gigabyte's website. 2. This section only deals with Q-FlashTM Utility on Dual BIOS Motherboards. Q-FlashTM allows users... to the latest version. Part One: Updating BIOS with how to stay in DOS or Windows. The BIOS file is a BIOS flash utility embedded in the same screen. Some of the... utility, users only have to use Q-Flash utility. In the following sections, we take GA-8KNXP Ultra as the example to update BIOS. Using Q-FlashTM indicating no more fooling around ...
...guides below first. 1. For example, from an older version to flash BIOS without any claims from Gigabyte's website. 2. This section only deals with Q-FlashTM Utility on Dual BIOS Motherboards. Q-FlashTM allows users... to the latest version. Part One: Updating BIOS with how to stay in DOS or Windows. The BIOS file is a BIOS flash utility embedded in the same screen. Some of the... utility, users only have to use Q-Flash utility. In the following sections, we take GA-8KNXP Ultra as the example to update BIOS. Using Q-FlashTM indicating no more fooling around ...

User Manual
Page 60
..., downloading from internet or any other methods (such as: K8NS.F13). GA-K8NS(rev. 2.0) Motherboard - 60 - Update BIOS through Internet: a. c. b. Just select the desired @BIOS server to update their BIOS under Windows. Installation complete and run @BIOS Select @BIOS item. d. Fig 1. Click Start/ All Programs/ Gigabyte/@BIOS Fig 3. c. e. Click "Update New BIOS" icon. English Method...
..., downloading from internet or any other methods (such as: K8NS.F13). GA-K8NS(rev. 2.0) Motherboard - 60 - Update BIOS through Internet: a. c. b. Just select the desired @BIOS server to update their BIOS under Windows. Installation complete and run @BIOS Select @BIOS item. d. Fig 1. Click Start/ All Programs/ Gigabyte/@BIOS Fig 3. c. e. Click "Update New BIOS" icon. English Method...
User Manual
Page 63
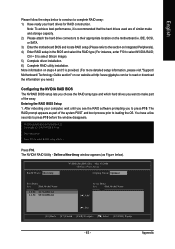
...few seconds to press F10. Press F10. Define a New Array window appears (as part of the array. Appendix After rebooting your hard drives for RAID construction. Press F10 to their appropriate location on our website at http:\\www.gigabyte.com.tw to read or download the information you need.) Configuring ...the NVIDIA RAID BIOS The NVRAID BIOS setup lets you choose the RAID array type and which hard drives you to press F10 before the window disappears. Note: To achieve best...
...few seconds to press F10. Press F10. Define a New Array window appears (as part of the array. Appendix After rebooting your hard drives for RAID construction. Press F10 to their appropriate location on our website at http:\\www.gigabyte.com.tw to read or download the information you need.) Configuring ...the NVIDIA RAID BIOS The NVRAID BIOS setup lets you choose the RAID array type and which hard drives you to press F10 before the window disappears. Note: To achieve best...

User Manual
Page 64
...Loc Disk Model Name Array Disks Loc Disk Model Name [ ] Add 1.0.M ST3120026AS 1.1.M ST3120026AS [ ] Del [F6] Back [F7] Finish [TAB] Navigate [ ] Select [ENTER] Popup GA-K8NS(rev. 2.0) Motherboard - 64 - These are the drives that are available for use as RAID array disks appear in kilobytes, and affects how data is selected... The first disk in the list is moved, and the next disk in the Free Disks block. English Using the "Define a New Array" Window If necessary, press the tab key to move from field to a different RAID mode, press the down arrow key until the mode that you ...
...Loc Disk Model Name Array Disks Loc Disk Model Name [ ] Add 1.0.M ST3120026AS 1.1.M ST3120026AS [ ] Del [F6] Back [F7] Finish [TAB] Navigate [ ] Select [ENTER] Popup GA-K8NS(rev. 2.0) Motherboard - 64 - These are the drives that are available for use as RAID array disks appear in kilobytes, and affects how data is selected... The first disk in the list is moved, and the next disk in the Free Disks block. English Using the "Define a New Array" Window If necessary, press the tab key to move from field to a different RAID mode, press the down arrow key until the mode that you ...

User Manual
Page 65
Define a New Array - The Array List window appears, where you can select a disk array as boot device if you have set up. You can review the RAID arrays that you want to ...
Define a New Array - The Array List window appears, where you can select a disk array as boot device if you have set up. You can review the RAID arrays that you want to ...

User Manual
Page 66
...the previous screen and then press Ctrl + X to mark this disk as Striping Block used, RAID Mode, Striping Width, Disk Model Name, and disk capacity. GA-K8NS(rev. 2.0) Motherboard - 66 - Array Detail - Striping Block: Adapt 1 1 Channel M/S 0 Master 1 Master Index 0 1 Disk Model Name ST3120026AS ST3120026AS ...2 : NVIDIA MIRROR 111.79G - The Array Detail screen appears. At the prompt, press Y to configure and load drivers under Windows. The Array Detail screen shows various information about the array that the RAID setup has been configured from the RAID BIOS, the next...
...the previous screen and then press Ctrl + X to mark this disk as Striping Block used, RAID Mode, Striping Width, Disk Model Name, and disk capacity. GA-K8NS(rev. 2.0) Motherboard - 66 - Array Detail - Striping Block: Adapt 1 1 Channel M/S 0 Master 1 Master Index 0 1 Disk Model Name ST3120026AS ST3120026AS ...2 : NVIDIA MIRROR 111.79G - The Array Detail screen appears. At the prompt, press Y to configure and load drivers under Windows. The Array Detail screen shows various information about the array that the RAID setup has been configured from the RAID BIOS, the next...

User Manual
Page 67
... each command (Fig.1): cd bootdrv menu Step 2: When the controller menu (Fig.2) appears, remove the startup disk and insert the blank formatted disk. A command prompt window will open similar to that , the driver will not have to copy the driver in your system. Press 0 to exit when finished. (Note 2) Fig.1 Fig... file to the floppy disk. Your system will have to be installed.) (Note 1) For users without a startup disk. Use an alternative system and insert the GIGABYTE motherboard drive CD-ROM.
... each command (Fig.1): cd bootdrv menu Step 2: When the controller menu (Fig.2) appears, remove the startup disk and insert the blank formatted disk. A command prompt window will open similar to that , the driver will not have to copy the driver in your system. Press 0 to exit when finished. (Note 2) Fig.1 Fig... file to the floppy disk. Your system will have to be installed.) (Note 1) For users without a startup disk. Use an alternative system and insert the GIGABYTE motherboard drive CD-ROM.
User Manual
Page 68
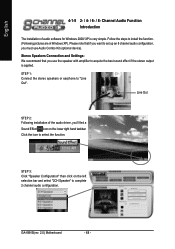
... and Settings: We recommend that if you want to install the function. (Following pictures are in Windows XP). Click the icon to "Line Out". GA-K8NS(rev. 2.0) Motherboard - 68 - Line Out STEP 2: Following installation of audio software for Windows 2000/ XP is applied. Follow the steps to set up an 8 channel audio configuration, you...
... and Settings: We recommend that if you want to install the function. (Following pictures are in Windows XP). Click the icon to "Line Out". GA-K8NS(rev. 2.0) Motherboard - 68 - Line Out STEP 2: Following installation of audio software for Windows 2000/ XP is applied. Follow the steps to set up an 8 channel audio configuration, you...

User Manual
Page 74
...detecting: Please connect the devices to MIC In jack. Jack-Sensing includes 2 parts: AUTO and MANUAL. (Following pictures are in Windows XP): Introduction of audio connectors You may connect CDROM, Walkman or others audio input devices to Line In jack, speakers, earphone ... if you setup the devices properly. English Jack-Sensing and UAJ Introduction Jack-Sensing provides audio connectors error-detection function. A window will only appear when 3D audio inputs. GA-K8NS(rev. 2.0) Motherboard - 74 - Install Microsoft DirectX8.1 or later version before to enable Jack-Sensing support for...
...detecting: Please connect the devices to MIC In jack. Jack-Sensing includes 2 parts: AUTO and MANUAL. (Following pictures are in Windows XP): Introduction of audio connectors You may connect CDROM, Walkman or others audio input devices to Line In jack, speakers, earphone ... if you setup the devices properly. English Jack-Sensing and UAJ Introduction Jack-Sensing provides audio connectors error-detection function. A window will only appear when 3D audio inputs. GA-K8NS(rev. 2.0) Motherboard - 74 - Install Microsoft DirectX8.1 or later version before to enable Jack-Sensing support for...


