
User Manual
Page 5
Chapter 3 Drivers Installation 49 3-1 Install Chipset Drivers 49 3-2 SoftwareApplication 50 3-3 Software Information 50 3-4 Hardware Information 51 3-5 Contact Us ...51 3-6 Connecting the Video Output Devices 52 Chapter 4 Appendix 53 4-1 Unique Software Utilities 53 4-1-1 EasyTune 5 Introduction 53 4-1-2 Xpress Recovery2 Introduction 54 4-1-3 Flash BIOS Method Introduction 56 4-1-4 Configuring SATA Hard Drive(s 65 4-1-5 2- / 4- / 6- / 8- Channel Audio Function Introduction 79 4-2 Troubleshooting 84 - 5 -
Chapter 3 Drivers Installation 49 3-1 Install Chipset Drivers 49 3-2 SoftwareApplication 50 3-3 Software Information 50 3-4 Hardware Information 51 3-5 Contact Us ...51 3-6 Connecting the Video Output Devices 52 Chapter 4 Appendix 53 4-1 Unique Software Utilities 53 4-1-1 EasyTune 5 Introduction 53 4-1-2 Xpress Recovery2 Introduction 54 4-1-3 Flash BIOS Method Introduction 56 4-1-4 Configuring SATA Hard Drive(s 65 4-1-5 2- / 4- / 6- / 8- Channel Audio Function Introduction 79 4-2 Troubleshooting 84 - 5 -
User Manual
Page 16
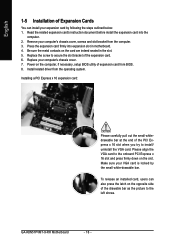
Power on the opposite side of the expansion card. 6. Install related driver from the computer. 3. Installing a PCI Express x 16 expansion card: Please carefully pull out the small whitedrawable bar at the end of expansion card from BIOS. 8. ... align the VGA card to the left shows. To release an installed card, users can install your expansion card by the small white-drawable bar. GA-K8N51PVMT-9-RH Motherboard - 16 - Read the related expansion card's instruction document before install the expansion card into expansion slot in the slot. 5. Remove your computer's chassis...
Power on the opposite side of the expansion card. 6. Install related driver from the computer. 3. Installing a PCI Express x 16 expansion card: Please carefully pull out the small whitedrawable bar at the end of expansion card from BIOS. 8. ... align the VGA card to the left shows. To release an installed card, users can install your expansion card by the small white-drawable bar. GA-K8N51PVMT-9-RH Motherboard - 16 - Read the related expansion card's instruction document before install the expansion card into expansion slot in the slot. 5. Remove your computer's chassis...

User Manual
Page 17
... The default MIC In jack. For more information please contact your OS does not support USB controller, please contact OS vendor for possible patch or driver upgrade. Devices like high speed, high bandwidth and hot plug. Center/Subwoofer Speaker Out The default Center/Subwoofer Speaker Out jack. If your OS or...
... The default MIC In jack. For more information please contact your OS does not support USB controller, please contact OS vendor for possible patch or driver upgrade. Devices like high speed, high bandwidth and hot plug. Center/Subwoofer Speaker Out The default Center/Subwoofer Speaker Out jack. If your OS or...

User Manual
Page 22
... rate. One IDE connector can connect to one IDE device as Master and the other as Slave (for the SATA 3Gb/s and install the proper driver in order to two IDE devices (hard drive or optical drive). If you wish to connect two IDE devices, please set the jumper on the.../1/2/3 (SATA 3Gb/s Connectors, Controlled by nForce 430) SATA 3Gb/s can then connect to work properly. 1 7 7 1 Pin No. 1 2 3 4 5 6 7 Definition GND TXP TXN GND RXN RXP GND GA-K8N51PVMT-9-RH Motherboard - 22 -
... rate. One IDE connector can connect to one IDE device as Master and the other as Slave (for the SATA 3Gb/s and install the proper driver in order to two IDE devices (hard drive or optical drive). If you wish to connect two IDE devices, please set the jumper on the.../1/2/3 (SATA 3Gb/s Connectors, Controlled by nForce 430) SATA 3Gb/s can then connect to work properly. 1 7 7 1 Pin No. 1 2 3 4 5 6 7 Definition GND TXP TXN GND RXN RXP GND GA-K8N51PVMT-9-RH Motherboard - 22 -

User Manual
Page 25
... audio out to this connector. Definition 1 MIC 2 GND 3 MIC Power 4 NC 5 Line Out (R) 6 NC 7 NC 8 No Pin 9 Line Out (L) 10 NC By default, the audio driver is configured to work or even damage it. To connect an AC97 front panel audio module to the connector. 1 Pin No.
... audio out to this connector. Definition 1 MIC 2 GND 3 MIC Power 4 NC 5 Line Out (R) 6 NC 7 NC 8 No Pin 9 Line Out (L) 10 NC By default, the audio driver is configured to work or even damage it. To connect an AC97 front panel audio module to the connector. 1 Pin No.

User Manual
Page 49
...install Windows Service Pack, it will show the installation guide. English Chapter 3 Drivers Installation Pictures below are shown in "My computer", and execute the Setup.exe. 3-1 Install Chipset Drivers After insert the driver CD, "Xpress Install" will scan automatically the system and then list all the...click the "GO" button. The "Xpress Install" uses the"Click and Go" technology to install other drivers. Insert the driver CD-title that recommended to install. For USB2.0 driver support under "Device Manager". If not, please double click the CD-ROM device icon in Windows XP....
...install Windows Service Pack, it will show the installation guide. English Chapter 3 Drivers Installation Pictures below are shown in "My computer", and execute the Setup.exe. 3-1 Install Chipset Drivers After insert the driver CD, "Xpress Install" will scan automatically the system and then list all the...click the "GO" button. The "Xpress Install" uses the"Click and Go" technology to install other drivers. Insert the driver CD-title that recommended to install. For USB2.0 driver support under "Device Manager". If not, please double click the CD-ROM device icon in Windows XP....

User Manual
Page 50
English 3-2 Software Application This page displays all the tools that GIGABYTE developed and some free software. You can click an item to install it. 3-3 Software Information This page lists the contents of software and drivers in this CD-title. GA-K8N51PVMT-9-RH Motherboard - 50 -
English 3-2 Software Application This page displays all the tools that GIGABYTE developed and some free software. You can click an item to install it. 3-3 Software Information This page lists the contents of software and drivers in this CD-title. GA-K8N51PVMT-9-RH Motherboard - 50 -

User Manual
Page 51
Drivers Installation English 3-4 Hardware Information This page lists all device you have for this motherboard. 3-5 Contact Us Please see the last page for details. - 51 -
Drivers Installation English 3-4 Hardware Information This page lists all device you have for this motherboard. 3-5 Contact Us Please see the last page for details. - 51 -

User Manual
Page 52
GA-K8N51PVMT-9-RH Motherboard - 52 - Select nView Display Settings from the side menu and select HDTV from the Current display list. Then click Apply to configure the driver settings. Then click Apply. Step 3: Right-click on the HDTV icon and select TV format depending on Desktop and select Properties... adapter according to the corresponding jack, then refer to the following procedure uses HDTV setup as an example) After installation of the motherboard driver, rightclick on your HDTV. TV Out Port Video Adapter Pb/AV Pr Y S-Video Output HDTV NTSC/PAL TV Projector Step 1: (...
GA-K8N51PVMT-9-RH Motherboard - 52 - Select nView Display Settings from the side menu and select HDTV from the Current display list. Then click Apply to configure the driver settings. Then click Apply. Step 3: Right-click on the HDTV icon and select TV format depending on Desktop and select Properties... adapter according to the corresponding jack, then refer to the following procedure uses HDTV setup as an example) After installation of the motherboard driver, rightclick on your HDTV. TV Out Port Video Adapter Pb/AV Pr Y S-Video Output HDTV NTSC/PAL TV Projector Step 1: (...

User Manual
Page 54
... later, you can be immediately installed once you complete installations of the hard disk will appear in the bottom left corner of system memory 3. GA-K8N51PVMT-9-RH Motherboard - 54 - If you wish to provide quick backup and restoration of hard disk data. VESA-supported VGA cards How to use ...for the first time, it will stay permanent in your CD-ROM drive. Save the settings and exit the BIOS Setup. Insert the provided driver CD into your hard disk. After the steps above are completed, subsequent access to enter Xpress Recovery2. Award Modular BIOS v6.00PG, An Energy...
... later, you can be immediately installed once you complete installations of the hard disk will appear in the bottom left corner of system memory 3. GA-K8N51PVMT-9-RH Motherboard - 54 - If you wish to provide quick backup and restoration of hard disk data. VESA-supported VGA cards How to use ...for the first time, it will stay permanent in your CD-ROM drive. Save the settings and exit the BIOS Setup. Insert the provided driver CD into your hard disk. After the steps above are completed, subsequent access to enter Xpress Recovery2. Award Modular BIOS v6.00PG, An Energy...

User Manual
Page 55
...f. It is a BIOS-related issue, it can be solved by BIOS update) GA-K8U GA-K8U-9 GA-K8NXP-SLI GA-K8N Ultra-SLI GA-K8N Pro-SLI GA-K8NXP-9 GA-K8N Ultra-9 GA-K8NF-9 (PCB Ver. 1.0) GA-K8NE (PCB Ver. 1.0) GA-K8NMF-9 GA-8N-SLI Royal GA-8N-SLI Pro GA-8N-SLI - 55 - Xpress Recovery2 supports only PATA hard disks and not... (As this is normal that data backup takes longer time than 128G under Windows 2000, be sure to be backed up data from the driver CD before data backup. 2. Xpress Recovery2 will store the backup file at the end of the data to execute the EnableBigLba.exe program from...
...f. It is a BIOS-related issue, it can be solved by BIOS update) GA-K8U GA-K8U-9 GA-K8NXP-SLI GA-K8N Ultra-SLI GA-K8N Pro-SLI GA-K8NXP-9 GA-K8N Ultra-9 GA-K8NF-9 (PCB Ver. 1.0) GA-K8NE (PCB Ver. 1.0) GA-K8NMF-9 GA-8N-SLI Royal GA-8N-SLI Pro GA-8N-SLI - 55 - Xpress Recovery2 supports only PATA hard disks and not... (As this is normal that data backup takes longer time than 128G under Windows 2000, be sure to be backed up data from the driver CD before data backup. 2. Xpress Recovery2 will store the backup file at the end of the data to execute the EnableBigLba.exe program from...

User Manual
Page 65
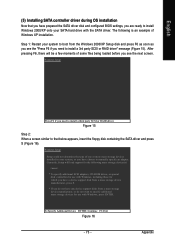
...Peripherals menu is recommended that you may prepare only one hard drive. (b) An empty formatted floppy disk. (c) Windows XP/2000 setup disk. (d) Driver CD for your motherboard. (1) Installing SATA hard drive(s) in your computer Attach one end of the SATA signal cable to the rear of the ...drive. (2) Configuring SATA controller mode and boot sequence in RAID BIOS. (Note) (4) Make a floppy disk containing the SATA controller driver. (5) Install the SATA controller driver during POST (Power-On Self Test). If you do not want to create RAID, you do not want to identify the SATA ...
...Peripherals menu is recommended that you may prepare only one hard drive. (b) An empty formatted floppy disk. (c) Windows XP/2000 setup disk. (d) Driver CD for your motherboard. (1) Installing SATA hard drive(s) in your computer Attach one end of the SATA signal cable to the rear of the ...drive. (2) Configuring SATA controller mode and boot sequence in RAID BIOS. (Note) (4) Make a floppy disk containing the SATA controller driver. (5) Install the SATA controller driver during POST (Power-On Self Test). If you do not want to create RAID, you do not want to identify the SATA ...

User Manual
Page 71
.... Now, you created will show Yes. English After that, the Array List screen displaying the RAID array you can proceed to install the SATA controller driver and operating system. - 71 - Appendix Array List - message appears, press Y to confirm or N to the Array List screen. Id Status Vendor Array Model Name 2 Healthy...
.... Now, you created will show Yes. English After that, the Array List screen displaying the RAID array you can proceed to install the SATA controller driver and operating system. - 71 - Appendix Array List - message appears, press Y to confirm or N to the Array List screen. Id Status Vendor Array Model Name 2 Healthy...

User Manual
Page 72
...the following two commands. Figure 12 Figure 13 (Note 1) For users without a startup disk: Use an alternative system and insert the GIGABYTE motherboard driver CD-ROM. Without the driver, the hard disk may not be recognized during OS installation. A command prompt window will then automatically zip and transfer this... XP. Once at the A:\> prompt, change to copy the driver in Figure 13. From the CD-ROM drive folder, double click the MENU.exe file in your system. See the instructions below about how to the CD-ROM drive (example: D:\>). GA-K8N51PVMT-9-RH Motherboard Figure 14 - 72 -
...the following two commands. Figure 12 Figure 13 (Note 1) For users without a startup disk: Use an alternative system and insert the GIGABYTE motherboard driver CD-ROM. Without the driver, the hard disk may not be recognized during OS installation. A command prompt window will then automatically zip and transfer this... XP. Once at the A:\> prompt, change to copy the driver in Figure 13. From the CD-ROM drive folder, double click the MENU.exe file in your system. See the instructions below about how to the CD-ROM drive (example: D:\>). GA-K8N51PVMT-9-RH Motherboard Figure 14 - 72 -
User Manual
Page 73
... is an example of one or more mass storage devices installed in your system, or you need to install a third party SCSI or RAID driver. Currently, Setup will be a few moments of some files being loaded before you need to install a 3rd party SCSI or RAID...mass storage devices(s) * To specify additional SCSI adapters, CD-ROM drives, or special disk controllers for use with the SATA driver. Windows Setup Press F6 if you have prepared the SATA driver disk and configured BIOS settings, you are ready to manually specify an adapter. S=Specify Additional Device ENTER=Continue F3=Exit...
... is an example of one or more mass storage devices installed in your system, or you need to install a third party SCSI or RAID driver. Currently, Setup will be a few moments of some files being loaded before you need to install a 3rd party SCSI or RAID...mass storage devices(s) * To specify additional SCSI adapters, CD-ROM drives, or special disk controllers for use with the SATA driver. Windows Setup Press F6 if you have prepared the SATA driver disk and configured BIOS settings, you are ready to manually specify an adapter. S=Specify Additional Device ENTER=Continue F3=Exit...

User Manual
Page 74
... a screen similar to Figure 18 appears, you do not have any device support disks from the following mass storage device(s): NVIDIA RAID CLASS DRIVER (required) * To specify additional SCSI adapters, CD-ROM drives, or special disk controllers for use with Windows, using a device support disk...which you have chosen to Figure 17 below will appear. Select the SCSI Adapter you want to select additional driver. If you do not want to the previous screen. GA-K8N51PVMT-9-RH Motherboard - 74 - Select NVIDIA nForce Storage Controller and press ENTER. The screen will load support ...
... a screen similar to Figure 18 appears, you do not have any device support disks from the following mass storage device(s): NVIDIA RAID CLASS DRIVER (required) * To specify additional SCSI adapters, CD-ROM drives, or special disk controllers for use with Windows, using a device support disk...which you have chosen to Figure 17 below will appear. Select the SCSI Adapter you want to select additional driver. If you do not want to the previous screen. GA-K8N51PVMT-9-RH Motherboard - 74 - Select NVIDIA nForce Storage Controller and press ENTER. The screen will load support ...

User Manual
Page 75
...To quit Setup without installing Windows XP, press F3. S=Specify Additional Device ENTER=Continue F3=Exit Figure 19 After the SATA controller driver installation is completed, you should see a screen similar to specify additional mass storage devices for use with Windows, including those for ... with Windows, press ENTER. To repair a Windows XP installation using Recovery Console, press R. WindowsXP Professional Setup Welcome to continue the SATA driver installation from a mass storage device manufacturer, or do not want to that below. To set up Windows XP now, press ENTER. Appendix...
...To quit Setup without installing Windows XP, press F3. S=Specify Additional Device ENTER=Continue F3=Exit Figure 19 After the SATA controller driver installation is completed, you should see a screen similar to specify additional mass storage devices for use with Windows, including those for ... with Windows, press ENTER. To repair a Windows XP installation using Recovery Console, press R. WindowsXP Professional Setup Welcome to continue the SATA driver installation from a mass storage device manufacturer, or do not want to that below. To set up Windows XP now, press ENTER. Appendix...

User Manual
Page 76
... Item Help Menu Level : Move Enter: Select F5: Previous Values +/-/PU/PD: Value F10: Save F6: Fail-Safe Defaults GA-K8N51PVMT-9-RH Motherboard Figure 22 - 76 - Solutions 1: Use the NVRAID tool (nForce Driver Version 5.xx) to convert the boot volume to a bootable RAID volume. Download and install Windows 2000 Service Pack 4 from Microsoft...
... Item Help Menu Level : Move Enter: Select F5: Previous Values +/-/PU/PD: Value F10: Save F6: Fail-Safe Defaults GA-K8N51PVMT-9-RH Motherboard Figure 22 - 76 - Solutions 1: Use the NVRAID tool (nForce Driver Version 5.xx) to convert the boot volume to a bootable RAID volume. Download and install Windows 2000 Service Pack 4 from Microsoft...

User Manual
Page 78
...select Next. To create the combination installation CD, refer to install Windows 2000 Service Pack 3 or 4, RAID is still supported on Windows 2000. GA-K8N51PVMT-9-RH Motherboard - 78 - You should see the single disk RAID array (in . Solutions 2: Users must create a combination installation CD that ... you want to the bootable RAID array. Note: Conversion may take 1~2 hours depending on it. English Step 5: Install the NVIDIA nForce Driver Package while in a bootable format. Press Finish then NVRAID will not be able to START> Programs>Nvidia Corporation and select NVRAID manager....
...select Next. To create the combination installation CD, refer to install Windows 2000 Service Pack 3 or 4, RAID is still supported on Windows 2000. GA-K8N51PVMT-9-RH Motherboard - 78 - You should see the single disk RAID array (in . Solutions 2: Users must create a combination installation CD that ... you want to the bootable RAID array. Note: Conversion may take 1~2 hours depending on it. English Step 5: Install the NVIDIA nForce Driver Package while in a bootable format. Press Finish then NVRAID will not be able to START> Programs>Nvidia Corporation and select NVRAID manager....

User Manual
Page 79
... a microphone, you can , for each audio jack by HD Audio allows users to open the Audio Control Panel. - 79 - STEP 1 : After installation of the audio driver, you should find the icon in and out) simultaneously. HD Audio With multiple built-in high quality digital-to work correctly. The jack retasking capability...
... a microphone, you can , for each audio jack by HD Audio allows users to open the Audio Control Panel. - 79 - STEP 1 : After installation of the audio driver, you should find the icon in and out) simultaneously. HD Audio With multiple built-in high quality digital-to work correctly. The jack retasking capability...


