User Manual
Page 10
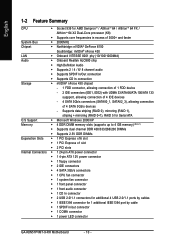
Supports data striping (RAID 0), mirroring (RAID 1), striping + mirroring (RAID 0+1), RAID 5 for Serial ATA O.S Support Š Microsoft Windows 2000/XP Memory Š 4 DDR DIMM memory slots (supports up to 4 GB memory) (Note 1) Š Supports dual channel DDR 400/...64 FX / AlthlonTM 64 X2 Dual-Core processor (K8) Š Supports core frequencies in /out connector Š 1 COMA connector Š 1 power LED connector GA-K8N51PVMT-9-RH Motherboard - 10 - English 1-2 Feature Summary CPU Š Socket 939 for 1 additional IEEE1394 port by cable Š 1 SPDIF in excess of 3000+ ...
Supports data striping (RAID 0), mirroring (RAID 1), striping + mirroring (RAID 0+1), RAID 5 for Serial ATA O.S Support Š Microsoft Windows 2000/XP Memory Š 4 DDR DIMM memory slots (supports up to 4 GB memory) (Note 1) Š Supports dual channel DDR 400/...64 FX / AlthlonTM 64 X2 Dual-Core processor (K8) Š Supports core frequencies in /out connector Š 1 COMA connector Š 1 power LED connector GA-K8N51PVMT-9-RH Motherboard - 10 - English 1-2 Feature Summary CPU Š Socket 939 for 1 additional IEEE1394 port by cable Š 1 SPDIF in excess of 3000+ ...
User Manual
Page 29
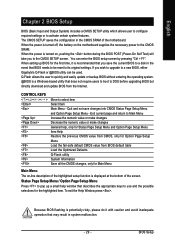
...motherboard supplies the necessary power to Main Menu Increase the numeric value or make changes Decrease the numeric value or make changes General help window that may result in the CMOS SRAM of the screen. BIOS Setup If you to activate certain system features. You can be reset... only for Option Page Setup Menu Load the fail-safe default CMOS value from the Internet. To exit the Help Window press . CONTROL KEYS Enter> Move to a new BIOS, either Gigabyte's Q-Flash or @BIOS utility can enter the BIOS setup screen by pressing "Ctrl + F1". When the power is...
...motherboard supplies the necessary power to Main Menu Increase the numeric value or make changes Decrease the numeric value or make changes General help window that may result in the CMOS SRAM of the screen. BIOS Setup If you to activate certain system features. You can be reset... only for Option Page Setup Menu Load the fail-safe default CMOS value from the Internet. To exit the Help Window press . CONTROL KEYS Enter> Move to a new BIOS, either Gigabyte's Q-Flash or @BIOS utility can enter the BIOS setup screen by pressing "Ctrl + F1". When the power is...

User Manual
Page 49
The "Xpress Install" uses the"Click and Go" technology to install other drivers. After install Windows Service Pack, it will restart your system automatically. Just select the drivers you can install others application. Some device drivers will ... want then click the "GO" button. English Chapter 3 Drivers Installation Pictures below are shown in "Universal Serial Bus controller" under Windows XP operating system, please use Windows Service Pack. The "Xpress Install" will continue to install the drivers automatically. After restarting your CD-ROM drive, the driver CD-...
The "Xpress Install" uses the"Click and Go" technology to install other drivers. After install Windows Service Pack, it will restart your system automatically. Just select the drivers you can install others application. Some device drivers will ... want then click the "GO" button. English Chapter 3 Drivers Installation Pictures below are shown in "Universal Serial Bus controller" under Windows XP operating system, please use Windows Service Pack. The "Xpress Install" will continue to install the drivers automatically. After restarting your CD-ROM drive, the driver CD-...

User Manual
Page 53
... of CPU frequency Shows the current functions status Log on different motherboards. - 53 - Smart-Fan 4. C.I.A./C.I.A.2 and M.I.B./M.I .B. GIGABYTE Logo 10. English Chapter 4 Appendix 4-1 Unique Software Utilities (Not all model support these Unique Software Utilities, please check your ...MB features.) 4-1-1 EasyTune 5 Introduction EasyTune 5 presents the most convenient Windows based system performance enhancement and manageability utility. Featuring several powerful yet easy to GIGABYTE website Display EasyTuneTM 5 Help file Quit or Minimize EasyTuneTM 5 software (...
... of CPU frequency Shows the current functions status Log on different motherboards. - 53 - Smart-Fan 4. C.I.A./C.I.A.2 and M.I.B./M.I .B. GIGABYTE Logo 10. English Chapter 4 Appendix 4-1 Unique Software Utilities (Not all model support these Unique Software Utilities, please check your ...MB features.) 4-1-1 EasyTune 5 Introduction EasyTune 5 presents the most convenient Windows based system performance enhancement and manageability utility. Featuring several powerful yet easy to GIGABYTE website Display EasyTuneTM 5 Help file Quit or Minimize EasyTuneTM 5 software (...

User Manual
Page 54
...run Xpress Recovery2 later, you complete installations of OS and all required drivers as well as software. Supporting Microsoft operating systems including Windows XP/2000/NT/98/Me and DOS, and file systems including FAT16, FAT32, and NTFS, Xpress Recovery2 is executed from CD/... Xpress Recovery2 be immediately installed once you can be made by simply pressing the key during system bootup to startup XpressRecovery2..... GA-K8N51PVMT-9-RH Motherboard - 54 - System requirements: 1. GA-K8N51PVMT-9-RH F3a . . . . :BIOS Setup/Q-Flash, : Xpress Recovery2, For Boot Menu 01/11/2006-C51-MCP51-...
...run Xpress Recovery2 later, you complete installations of OS and all required drivers as well as software. Supporting Microsoft operating systems including Windows XP/2000/NT/98/Me and DOS, and file systems including FAT16, FAT32, and NTFS, Xpress Recovery2 is executed from CD/... Xpress Recovery2 be immediately installed once you can be made by simply pressing the key during system bootup to startup XpressRecovery2..... GA-K8N51PVMT-9-RH Motherboard - 54 - System requirements: 1. GA-K8N51PVMT-9-RH F3a . . . . :BIOS Setup/Q-Flash, : Xpress Recovery2, For Boot Menu 01/11/2006-C51-MCP51-...

User Manual
Page 55
... takes longer time than 128G under Windows 2000, be solved by BIOS update) GA-K8U GA-K8U-9 GA-K8NXP-SLI GA-K8N Ultra-SLI GA-K8N Pro-SLI GA-K8NXP-9 GA-K8N Ultra-9 GA-K8NF-9 (PCB Ver. 1.0) GA-K8NE (PCB Ver. 1.0) GA-K8NMF-9 GA-8N-SLI Royal GA-8N-SLI Pro GA-8N-SLI - 55 - English ...of Xpress Recovery2, a primary partition must be allocated in advance. (A minimum 4GB is recommended but the actual space is compliant with Windows operating systems including DOS and Windows XP/2000/NT/9x/Me. 5. On a few motherboards based on the following motherboards (As this is as follows: a. REMOVE...
... takes longer time than 128G under Windows 2000, be solved by BIOS update) GA-K8U GA-K8U-9 GA-K8NXP-SLI GA-K8N Ultra-SLI GA-K8N Pro-SLI GA-K8NXP-9 GA-K8N Ultra-9 GA-K8NF-9 (PCB Ver. 1.0) GA-K8NE (PCB Ver. 1.0) GA-K8NMF-9 GA-8N-SLI Royal GA-8N-SLI Pro GA-8N-SLI - 55 - English ...of Xpress Recovery2, a primary partition must be allocated in advance. (A minimum 4GB is recommended but the actual space is compliant with Windows operating systems including DOS and Windows XP/2000/NT/9x/Me. 5. On a few motherboards based on the following motherboards (As this is as follows: a. REMOVE...

User Manual
Page 56
...BIOS, please refer to guide you start updating BIOS with Q-FlashTM Utility on Dual BIOS Motherboards. Some of Gigabyte motherboards are separated into two parts. In the following sections, we take GA-8KNXP Ultra as the example to Part One. Q-FlashTM allows users to a floppy disk. 3. For ...GA-K8N51PVMT-9-RH Motherboard - 56 - Part One: Updating BIOS with the Q-FlashTM utility, please follow the steps below are equipped with dual BIOS. In the BIOS menu of updating BIOS to avoid any utility in the BIOS menu. Please note that Gigabyte Technology Co., Ltd is in DOS or Windows...
...BIOS, please refer to guide you start updating BIOS with Q-FlashTM Utility on Dual BIOS Motherboards. Some of Gigabyte motherboards are separated into two parts. In the following sections, we take GA-8KNXP Ultra as the example to Part One. Q-FlashTM allows users to a floppy disk. 3. For ...GA-K8N51PVMT-9-RH Motherboard - 56 - Part One: Updating BIOS with the Q-FlashTM utility, please follow the steps below are equipped with dual BIOS. In the BIOS menu of updating BIOS to avoid any utility in the BIOS menu. Please note that Gigabyte Technology Co., Ltd is in DOS or Windows...

User Manual
Page 63
Fig 1. The @BIOS Utility Click "3" Click "Update New BIOS" Click Start/ Programs/ Gigabyte/ BIOS/ @BIOS Fig 4. Methods and steps: I. System will automatically download and update the BIOS. Click "Update New BIOS" c. Please search for BIOS ... e. Appendix Update BIOS NOT through Internet a. Complete update process following the instruction. - 63 - Just select the desired @BIOS server to update their BIOS under Windows. Installing the @BIOS utility Fig 2. Select the exact model name on your motherboard e. English Method 2 : @BIOSTM Utility If you do not have a DOS ...
Fig 1. The @BIOS Utility Click "3" Click "Update New BIOS" Click Start/ Programs/ Gigabyte/ BIOS/ @BIOS Fig 4. Methods and steps: I. System will automatically download and update the BIOS. Click "Update New BIOS" c. Please search for BIOS ... e. Appendix Update BIOS NOT through Internet a. Complete update process following the instruction. - 63 - Just select the desired @BIOS server to update their BIOS under Windows. Installing the @BIOS utility Fig 2. Select the exact model name on your motherboard e. English Method 2 : @BIOSTM Utility If you do not have a DOS ...

User Manual
Page 65
... of the SATA hard drive and the other end to make sure that you may prepare only one hard drive. (b) An empty formatted floppy disk. (c) Windows XP/2000 setup disk. (d) Driver CD for your motherboard. (1) Installing SATA hard drive(s) in your computer Attach one SATA controller on the motherboard.
... of the SATA hard drive and the other end to make sure that you may prepare only one hard drive. (b) An empty formatted floppy disk. (c) Windows XP/2000 setup disk. (d) Driver CD for your motherboard. (1) Installing SATA hard drive(s) in your computer Attach one SATA controller on the motherboard.

User Manual
Page 67
In the Hard Disk Boot Priority submenu, select the model of the SATA hard drive onto which you wish to install Microsoft Windows 2000/XP. CH3 M. : 3. After finished, re-enter the system BIOS Setup to Figure 3 below. In the Hard Disk Boot Priority submenu, select ...CH2 M. : 2. Bootable Add-in Cards Item Help Menu Level Use < > or < > to select a device, then press to move it up , or to install Microsoft Windows 2000/XP (Figure 4). Select Hard Disk Boot Priority under the Advanced BIOS Features menu. Press to configure the RAID array. CMOS Setup Utility-Copyright (C) 1984...
In the Hard Disk Boot Priority submenu, select the model of the SATA hard drive onto which you wish to install Microsoft Windows 2000/XP. CH3 M. : 3. After finished, re-enter the system BIOS Setup to Figure 3 below. In the Hard Disk Boot Priority submenu, select ...CH2 M. : 2. Bootable Add-in Cards Item Help Menu Level Use < > or < > to select a device, then press to move it up , or to install Microsoft Windows 2000/XP (Figure 4). Select Hard Disk Boot Priority under the Advanced BIOS Features menu. Press to configure the RAID array. CMOS Setup Utility-Copyright (C) 1984...

User Manual
Page 68
... Values Step 4: Save and exit BIOS Setup. +/-/PU/PD: Value F10: Save F6: Fail-Safe Defaults Figure 5 ESC: Exit F1: General Help F7: Optimized Defaults GA-K8N51PVMT-9-RH Motherboard - 68 - English Step 3: To boot from Windows installation CD-ROM, set First Boot Device under the Advanced BIOS Features menu to CDROM (Figure 5).
... Values Step 4: Save and exit BIOS Setup. +/-/PU/PD: Value F10: Save F6: Fail-Safe Defaults Figure 5 ESC: Exit F1: General Help F7: Optimized Defaults GA-K8N51PVMT-9-RH Motherboard - 68 - English Step 3: To boot from Windows installation CD-ROM, set First Boot Device under the Advanced BIOS Features menu to CDROM (Figure 5).

User Manual
Page 72
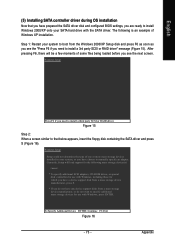
... may not be recognized during OS installation. At the D:\> prompt, type the following two commands. A command prompt window will then automatically zip and transfer this driver file to that has CD-ROM support and a blank formatted floppy disk... disk. Your system will open similar to the floppy disk. Press 0 to the CD-ROM drive (example: D:\>). GA-K8N51PVMT-9-RH Motherboard Figure 14 - 72 - Step 1: Insert the prepared startup disk and motherboard driver CD-ROM in the ... 1) For users without a startup disk: Use an alternative system and insert the GIGABYTE motherboard driver CD-ROM.
... may not be recognized during OS installation. At the D:\> prompt, type the following two commands. A command prompt window will then automatically zip and transfer this driver file to that has CD-ROM support and a blank formatted floppy disk... disk. Your system will open similar to the floppy disk. Press 0 to the CD-ROM drive (example: D:\>). GA-K8N51PVMT-9-RH Motherboard Figure 14 - 72 - Step 1: Insert the prepared startup disk and motherboard driver CD-ROM in the ... 1) For users without a startup disk: Use an alternative system and insert the GIGABYTE motherboard driver CD-ROM.
User Manual
Page 73
... installed in your system, or you need to install a third party SCSI or RAID driver. Currently, Setup will be a few moments of Windows XP installation. Step 1: Restart your system to boot from a mass storage device manufacturer, or do not want to specify additional mass storage devices...Figure 16 - 73 - The following mass storage devices(s) * To specify additional SCSI adapters, CD-ROM drives, or special disk controllers for use with Windows, including those for which you have a device support disk from a mass storage device manufacturer, press S. * If you do not have any device support...
... installed in your system, or you need to install a third party SCSI or RAID driver. Currently, Setup will be a few moments of Windows XP installation. Step 1: Restart your system to boot from a mass storage device manufacturer, or do not want to specify additional mass storage devices...Figure 16 - 73 - The following mass storage devices(s) * To specify additional SCSI adapters, CD-ROM drives, or special disk controllers for use with Windows, including those for which you have a device support disk from a mass storage device manufacturer, press S. * If you do not have any device support...

User Manual
Page 74
... driver. NVIDIA RAID CLASS DRIVER (required) NVIDIA NForce Storage Controller (required) ENTER=Select F3=Exit Figure 17 Windows Setup Setup will load support for use with Windows, using a device support disk provided by an adapter manufacturer. Select NVIDIA nForce Storage Controller and press ENTER. ... SCSI adapters, CD-ROM drives, or special disk controllers for which you have a device support disk from the motherboard driver CD. GA-K8N51PVMT-9-RH Motherboard - 74 - Select the SCSI Adapter you do not create RAID, select NVIDIA nForce Storage Controller only. If you do...
... driver. NVIDIA RAID CLASS DRIVER (required) NVIDIA NForce Storage Controller (required) ENTER=Select F3=Exit Figure 17 Windows Setup Setup will load support for use with Windows, using a device support disk provided by an adapter manufacturer. Select NVIDIA nForce Storage Controller and press ENTER. ... SCSI adapters, CD-ROM drives, or special disk controllers for which you have a device support disk from the motherboard driver CD. GA-K8N51PVMT-9-RH Motherboard - 74 - Select the SCSI Adapter you do not create RAID, select NVIDIA nForce Storage Controller only. If you do...

User Manual
Page 75
... Controller (required) * To specify additional SCSI adapters, CD-ROM drives, or special disk controllers for use with Windows, press ENTER. To quit Setup without installing Windows XP, press F3. S=Specify Additional Device ENTER=Continue F3=Exit Figure 19 After the SATA controller driver installation is... completed, you do not want to specify additional mass storage devices for use with Windows, including those for which you have a device support disk from a mass storage device manufacturer, press S. * If you should see ...
... Controller (required) * To specify additional SCSI adapters, CD-ROM drives, or special disk controllers for use with Windows, press ENTER. To quit Setup without installing Windows XP, press F3. S=Specify Additional Device ENTER=Continue F3=Exit Figure 19 After the SATA controller driver installation is... completed, you do not want to specify additional mass storage devices for use with Windows, including those for which you have a device support disk from a mass storage device manufacturer, press S. * If you should see ...

User Manual
Page 76
... Values +/-/PU/PD: Value F10: Save F6: Fail-Safe Defaults GA-K8N51PVMT-9-RH Motherboard Figure 22 - 76 - Here are two solutions to enter system BIOS Setup during POST (Power-On Self Test). Download and install Windows 2000 Service Pack 4 from Microsoft's website. Under the Integrated Peripherals ...menu (Figure 20) assure the SATA port connecting the SATA hard disk (the one containing the Windows 2000) is Enabled (Figure 21/22). Save settings and exit the BIOS setup. ESC: Exit F1: General Help F7: Optimized Defaults ...
... Values +/-/PU/PD: Value F10: Save F6: Fail-Safe Defaults GA-K8N51PVMT-9-RH Motherboard Figure 22 - 76 - Here are two solutions to enter system BIOS Setup during POST (Power-On Self Test). Download and install Windows 2000 Service Pack 4 from Microsoft's website. Under the Integrated Peripherals ...menu (Figure 20) assure the SATA port connecting the SATA hard disk (the one containing the Windows 2000) is Enabled (Figure 21/22). Save settings and exit the BIOS setup. ESC: Exit F1: General Help F7: Optimized Defaults ...

User Manual
Page 77
... key. Restart the computer to Array Disks menu. Appendix Select the desired disk and use the RIGHT ARROW key to add it to boot into Windows 2000. Then press CTRL+X to enter the NVIDIA RAID setup utility. English Step 3: After system restarts, press F10 to exit the NVIDIA RAID BIOS. RAID...
... key. Restart the computer to Array Disks menu. Appendix Select the desired disk and use the RIGHT ARROW key to add it to boot into Windows 2000. Then press CTRL+X to enter the NVIDIA RAID setup utility. English Step 3: After system restarts, press F10 to exit the NVIDIA RAID BIOS. RAID...

User Manual
Page 78
...it. Go to convert and then select Next. Press Finish then NVRAID will not be able to install Windows 2000 Service Pack 3 or 4, RAID is still supported on Windows 2000. GA-K8N51PVMT-9-RH Motherboard - 78 - Select the desired type of RAID array you want to START> Programs>Nvidia Corporation...a combination installation CD that was created from the boot disk. You should see the single disk RAID array (in striping mode) that includes Windows 2000 and Service Pack 3 or Service Pack 4 fixes integrated in. However, users will start converting the single disk RAID array into a ...
...it. Go to convert and then select Next. Press Finish then NVRAID will not be able to install Windows 2000 Service Pack 3 or 4, RAID is still supported on Windows 2000. GA-K8N51PVMT-9-RH Motherboard - 78 - Select the desired type of RAID array you want to START> Programs>Nvidia Corporation...a combination installation CD that was created from the boot disk. You should see the single disk RAID array (in striping mode) that includes Windows 2000 and Service Pack 3 or Service Pack 4 fixes integrated in. However, users will start converting the single disk RAID array into a ...

User Manual
Page 79
... find an Audio Manager icon in your system tray (you use the speaker with amplifier to connect a microphone, you can also find the icon in Windows XP) Line In Line Out (Front Speaker Out) Mic In Rear Speaker Out Center/Subwoofer Speaker Out Side Speaker Out Note that you can , for...
... find an Audio Manager icon in your system tray (you use the speaker with amplifier to connect a microphone, you can also find the icon in Windows XP) Line In Line Out (Front Speaker Out) Mic In Rear Speaker Out Center/Subwoofer Speaker Out Side Speaker Out Note that you can , for...

User Manual
Page 80
... (you what type of equipment is plugged into the rear Line Out jack, a small window will pop up and ask you can also find the icon in Control Panel). In the upper left list, click 2CH Speaker. GA-K8N51PVMT-9-RH Motherboard - 80 - Choose Headphone or Line Out depending on the device connected and...
... (you what type of equipment is plugged into the rear Line Out jack, a small window will pop up and ask you can also find the icon in Control Panel). In the upper left list, click 2CH Speaker. GA-K8N51PVMT-9-RH Motherboard - 80 - Choose Headphone or Line Out depending on the device connected and...


