Manual
Page 14
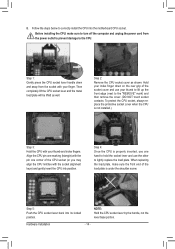
.... Hardware Installation - 14 - Step 2: Remove the CPU socket cover as well. Hold your finger. When replacing the load plate, make sure to the CPU. To protect the CPU socket, always replace the protective socket cover when the CPU is under the shoulder screw. B. Before installing the CPU, make sure... (DO NOT touch socket contacts. Align the CPU pin one marking (triangle) with your thumb to lift up the front edge (next to lightly replace the load plate. Step 1: Gently press the CPU socket lever handle down on the rear grip of the load plate is not installed.) Step 3:...
.... Hardware Installation - 14 - Step 2: Remove the CPU socket cover as well. Hold your finger. When replacing the load plate, make sure to the CPU. To protect the CPU socket, always replace the protective socket cover when the CPU is under the shoulder screw. B. Before installing the CPU, make sure... (DO NOT touch socket contacts. Align the CPU pin one marking (triangle) with your thumb to lift up the front edge (next to lightly replace the load plate. Step 1: Gently press the CPU socket lever handle down on the rear grip of the load plate is not installed.) Step 3:...
Manual
Page 18
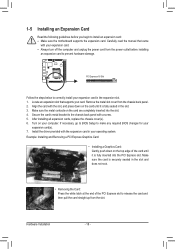
... Setup to make any required BIOS changes for your computer. Make sure the card is fully inserted into the slot. 4. After installing all expansion cards, replace the chassis cover(s). 6. PCI Express x16 Slot Follow the steps below to correctly install your operating system. 1-5 Installing an Expansion Card Read the following guidelines...
... Setup to make any required BIOS changes for your computer. Make sure the card is fully inserted into the slot. 4. After installing all expansion cards, replace the chassis cover(s). 6. PCI Express x16 Slot Follow the steps below to correctly install your operating system. 1-5 Installing an Expansion Card Read the following guidelines...

Manual
Page 23
... in damage to connect it is recommended that a system fan be handled in the correct orientation (the black connector wire is the ground wire). Replace the battery. 4. When connecting a fan cable, be sure to the CPU or the system may be accurate or may hang. ••...off . Gently remove the battery from overheating. Plug in the CMOS when the computer is replaced with an equivalent one minute. (Or use of the battery holder, making them short for 5 seconds.) 3. Replace the battery when the battery voltage drops to touch the positive and negative terminals of a CPU...
... in damage to connect it is recommended that a system fan be handled in the correct orientation (the black connector wire is the ground wire). Replace the battery. 4. When connecting a fan cable, be sure to the CPU or the system may be accurate or may hang. ••...off . Gently remove the battery from overheating. Plug in the CMOS when the computer is replaced with an equivalent one minute. (Or use of the battery holder, making them short for 5 seconds.) 3. Replace the battery when the battery voltage drops to touch the positive and negative terminals of a CPU...
Manual
Page 70
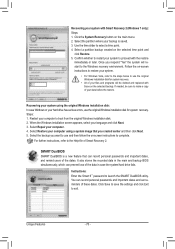
... and click Restore. 5. Use the time slider to boot from the original Windows installation disk. 2. Once you respond "Yes" the system will be deleted and replaced with those on -screen instructions to launch the SMART DualBIOS utility. When the Windows installation screen appears, select your computer. 4. Click Save to save the...
... and click Restore. 5. Use the time slider to boot from the original Windows installation disk. 2. Once you respond "Yes" the system will be deleted and replaced with those on -screen instructions to launch the SMART DualBIOS utility. When the Windows installation screen appears, select your computer. 4. Click Save to save the...
Manual
Page 84
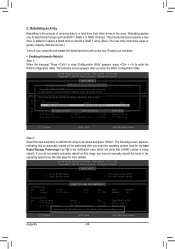
...completes in the array. Reset Disks to fault-tolerant arrays such as RAID 1, RAID 5 or RAID 10 arrays. Restart your computer and replace the failed hard drive with "Rebuild" status will be rebuilt and press . Select the port of restoring data to Non-RAID "Degrad2e.d ...DvoeluetmeeRaAnIdDdVisokluamvaeilable for more details). Create RAID Volume 2. The following screen appears, indicating that a RAID volume is added to replace a failed drive to rebuild a RAID 1 array. (Note: The new drive must have to be performed after you enter the RAID Configuration Utility....
...completes in the array. Reset Disks to fault-tolerant arrays such as RAID 1, RAID 5 or RAID 10 arrays. Restart your computer and replace the failed hard drive with "Rebuild" status will be rebuilt and press . Select the port of restoring data to Non-RAID "Degrad2e.d ...DvoeluetmeeRaAnIdDdVisokluamvaeilable for more details). Create RAID Volume 2. The following screen appears, indicating that a RAID volume is added to replace a failed drive to rebuild a RAID 1 array. (Note: The new drive must have to be performed after you enter the RAID Configuration Utility....

