
Manual
Page 1
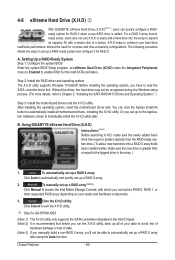
... drive may not be able to enhance your hard drive read/write performance without the need for the Intel SATA controllers. To manually set up all motherboard drivers, including the X.H.D utility. Exits the X.H.D utility: Click Cancel to exit the X.H.D utility. (Note... 1) The X.H.D utility only supports the SATA controllers integrated in the array. ) 1. eXtreme Hard Drive (X.H.D) With GIGABYTE eXtreme Hard Drive (X.H.D)(Note 1), users can quickly configure a RAIDready system for RAID 0. The following procedure details the steps to expand its capacity....
... drive may not be able to enhance your hard drive read/write performance without the need for the Intel SATA controllers. To manually set up all motherboard drivers, including the X.H.D utility. Exits the X.H.D utility: Click Cancel to exit the X.H.D utility. (Note... 1) The X.H.D utility only supports the SATA controllers integrated in the array. ) 1. eXtreme Hard Drive (X.H.D) With GIGABYTE eXtreme Hard Drive (X.H.D)(Note 1), users can quickly configure a RAIDready system for RAID 0. The following procedure details the steps to expand its capacity....
Manual
Page 1
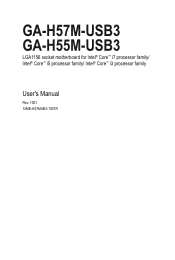
GA-H57M-USB3 GA-H55M-USB3 LGA1156 socket motherboard for Intel® Core™ i7 processor family/ Intel® Core™ i5 processor family/ Intel® Core™ i3 processor family User's Manual Rev. 1001 12ME-H57MUB3-1001R
GA-H57M-USB3 GA-H55M-USB3 LGA1156 socket motherboard for Intel® Core™ i7 processor family/ Intel® Core™ i5 processor family/ Intel® Core™ i3 processor family User's Manual Rev. 1001 12ME-H57MUB3-1001R

Manual
Page 3
...In order to assist in this product, GIGABYTE provides the following types of documentations: For quick set-up of this manual are legally registered to their respective owners. For example, "REV: 1.0" means the revision of GIGABYTE. All rights reserved. For instructions on.... Example: Changes to use of this manual may be made by copyright laws and is the property of the motherboard is protected by GIGABYTE without GIGABYTE's prior written permission. For detailed product information, carefully read the User's Manual. The trademarks mentioned in this : "...
...In order to assist in this product, GIGABYTE provides the following types of documentations: For quick set-up of this manual are legally registered to their respective owners. For example, "REV: 1.0" means the revision of GIGABYTE. All rights reserved. For instructions on.... Example: Changes to use of this manual may be made by copyright laws and is the property of the motherboard is protected by GIGABYTE without GIGABYTE's prior written permission. For detailed product information, carefully read the User's Manual. The trademarks mentioned in this : "...
Manual
Page 5
... 3 Drivers Installation 61 3-1 Installing Chipset Drivers 61 3-2 Application Software 62 3-3 Technical Manuals 62 3-4 Contact...63 3-5 System...63 3-6 Download Center 64 3-7 New Utilities...64...(X.H.D) j 80 Chapter 5 Appendix...81 5-1 Configuring SATA Hard Drive(s 81 5-1-1 Configuring Intel H57 SATA Controllers j 81 5-1-2 Configuring GIGABYTE SATA2 SATA Controller 89 5-1-3 Making a SATA RAID/AHCI Driver Diskette 95 5-1-4 Installing the SATA RAID/AHCI Driver and Operating System 96... 115 5-3-2 Troubleshooting Procedure 116 5-4 Regulatory Statements 118 j Only for GA-H57M-USB3. - 5 -
... 3 Drivers Installation 61 3-1 Installing Chipset Drivers 61 3-2 Application Software 62 3-3 Technical Manuals 62 3-4 Contact...63 3-5 System...63 3-6 Download Center 64 3-7 New Utilities...64...(X.H.D) j 80 Chapter 5 Appendix...81 5-1 Configuring SATA Hard Drive(s 81 5-1-1 Configuring Intel H57 SATA Controllers j 81 5-1-2 Configuring GIGABYTE SATA2 SATA Controller 89 5-1-3 Making a SATA RAID/AHCI Driver Diskette 95 5-1-4 Installing the SATA RAID/AHCI Driver and Operating System 96... 115 5-3-2 Troubleshooting Procedure 116 5-4 Regulatory Statements 118 j Only for GA-H57M-USB3. - 5 -
Manual
Page 6
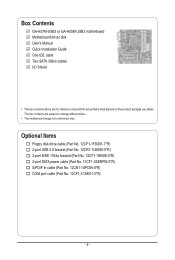
Box Contents GA-H57M-USB3 or GA-H55M-USB3 motherboard Motherboard driver disk User's Manual Quick Installation Guide One IDE cable Two SATA 3Gb/s cables I/O Shield • The box contents above are subject to change without notice. • The motherboard ...
Box Contents GA-H57M-USB3 or GA-H55M-USB3 motherboard Motherboard driver disk User's Manual Quick Installation Guide One IDE cable Two SATA 3Gb/s cables I/O Shield • The box contents above are subject to change without notice. • The motherboard ...
Manual
Page 9
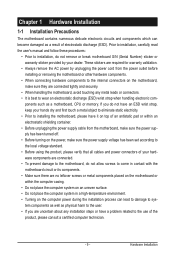
...; Before using the product, please verify that all cables and power connectors of electrostatic discharge (ESD). Hardware Installation Prior to installation, carefully read the user's manual and follow these procedures: • Prior to wear an electrostatic discharge (ESD) wrist strap when handling electronic com- If you do not have an ESD...
...; Before using the product, please verify that all cables and power connectors of electrostatic discharge (ESD). Hardware Installation Prior to installation, carefully read the user's manual and follow these procedures: • Prior to wear an electrostatic discharge (ESD) wrist strap when handling electronic com- If you do not have an ESD...

Manual
Page 15
... the CPU fan header (CPU_FAN) on installing the cooler.) Step 5: After the installation, check the back of the CPU cooler to your CPU cooler installation manual for instructions on the motherboard. Step 6: Finally, attach the power connector of the motherboard. Inadequately removing the CPU cooler may adhere to correctly install the...
... the CPU fan header (CPU_FAN) on installing the cooler.) Step 5: After the installation, check the back of the CPU cooler to your CPU cooler installation manual for instructions on the motherboard. Step 6: Finally, attach the power connector of the motherboard. Inadequately removing the CPU cooler may adhere to correctly install the...

Manual
Page 18
Carefully read the manual that supports your computer. Remove the metal slot cover from the slot. Install the driver provided with the slot, and press down on the card ...
Carefully read the manual that supports your computer. Remove the metal slot cover from the slot. Install the driver provided with the slot, and press down on the card ...

Manual
Page 29
... from your motherboard to certain expansion cards like graphics cards and sound cards. For information about connecting the S/PDIF digital audio cable, carefully read the manual for digital audio output from your motherboard to your expansion card. Pin No. Definition 1 1 SPDIFO 2 GND - 29 - Definition 1 Power 1 2 SPDIFI 3 GND 14) SPDIF_O (S/PDIF Out...
... from your motherboard to certain expansion cards like graphics cards and sound cards. For information about connecting the S/PDIF digital audio cable, carefully read the manual for digital audio output from your motherboard to your expansion card. Pin No. Definition 1 1 SPDIFO 2 GND - 29 - Definition 1 Power 1 2 SPDIFI 3 GND 14) SPDIF_O (S/PDIF Out...

Manual
Page 31
... do so may cause damage to the motherboard. • After system restart, go to BIOS Setup to load factory defaults (select Load Optimized Defaults) or manually configure the BIOS settings (refer to clear the CMOS values (e.g. date information and BIOS configurations) and reset the CMOS values to touch the two pins...
... do so may cause damage to the motherboard. • After system restart, go to BIOS Setup to load factory defaults (select Load Optimized Defaults) or manually configure the BIOS settings (refer to clear the CMOS values (e.g. date information and BIOS configurations) and reset the CMOS values to touch the two pins...

Manual
Page 39
... recommended that supports this setting. (Default: Auto) CPU EIST Function (Note) Enables or disables Enhanced Intel SpeedStep Technology (EIST). QPI Clock Ratio Allows you to manually set - C3/C6/C7 State Support (Note) Allows you install a CPU that the CPU frequency be emitted to lower CPU performance to decrease heat production...
... recommended that supports this setting. (Default: Auto) CPU EIST Function (Note) Enables or disables Enhanced Intel SpeedStep Technology (EIST). QPI Clock Ratio Allows you to manually set - C3/C6/C7 State Support (Note) Allows you install a CPU that the CPU frequency be emitted to lower CPU performance to decrease heat production...

Manual
Page 40
... CPU and Chipset clock. Auto sets the PCIe clock frequency to standard 100 MHz. (Default: Auto) >>>>> Advanced Clock Control CPU Clock Drive Allows you to manually set the Chipset clock prior to set the system memory multiplier. Disabled Disables this feature. Profile2 (Note) Uses Profile 2 settings.
... CPU and Chipset clock. Auto sets the PCIe clock frequency to standard 100 MHz. (Default: Auto) >>>>> Advanced Clock Control CPU Clock Drive Allows you to manually set the Chipset clock prior to set the system memory multiplier. Disabled Disables this feature. Profile2 (Note) Uses Profile 2 settings.

Manual
Page 47
...select the type of heads. Capacity Approximate capacity of the hard drive when the hard drive access mode is set this item to manually enter the specifications of the currently installed hard drive. Sector Number of the device during the POST. Halt On Allows you to None...but stop for the MS-DOS operating system. BIOS Setup Cylinder Number of extended memory. Drive A Allows you wish to enter the parameters manually, refer to None so the system will stop for an error during the POST for all other errors. If you do not install ...
...select the type of heads. Capacity Approximate capacity of the hard drive when the hard drive access mode is set this item to manually enter the specifications of the currently installed hard drive. Sector Number of the device during the POST. Halt On Allows you to None...but stop for the MS-DOS operating system. BIOS Setup Cylinder Number of extended memory. Drive A Allows you wish to enter the parameters manually, refer to None so the system will stop for an error during the POST for all other errors. If you do not install ...

Manual
Page 61
... select Uninstall) and restart the system. (The system will restart your system and then list all the recommended drivers. Or click Install Single Items to manually select the drivers you wish to install. You can click the Install All button and "Xpress Install" will automatically scan your system automatically during the...
... select Uninstall) and restart the system. (The system will restart your system and then list all the recommended drivers. Or click Install Single Items to manually select the drivers you wish to install. You can click the Install All button and "Xpress Install" will automatically scan your system automatically during the...

Manual
Page 62
Drivers Installation - 62 - You can click the Install button on the right of an item to install it. 3-3 Technical Manuals This page provides GIGABYTE's application guides, content descriptions for this driver disk, and the motherboard manuals. 3-2 Application Software This page displays all the utilities and applications that GIGABYTE develops and some free software.
Drivers Installation - 62 - You can click the Install button on the right of an item to install it. 3-3 Technical Manuals This page provides GIGABYTE's application guides, content descriptions for this driver disk, and the motherboard manuals. 3-2 Application Software This page displays all the utilities and applications that GIGABYTE develops and some free software.

Manual
Page 68
... potentially risky, please do it with the Q-Flash Utility A. From GIGABYTE's website, download the latest compressed BIOS update file that support DualBIOS have two BIOS onboard, a main BIOS and a backup BIOS. During the POST, press the key to your motherboard model. 2. H55M/H57M-USB3 E8 . . . . : BIOS Setup : XpressRecovery2 : Boot Menu : Qflash 12..., this motherboard features the DualBIOS™ design, which enhances protection for the safety and stability of system safety, users cannot update the backup BIOS manually. h57musb3.f1) to enter Q-Flash. Restart the system.
... potentially risky, please do it with the Q-Flash Utility A. From GIGABYTE's website, download the latest compressed BIOS update file that support DualBIOS have two BIOS onboard, a main BIOS and a backup BIOS. During the POST, press the key to your motherboard model. 2. H55M/H57M-USB3 E8 . . . . : BIOS Setup : XpressRecovery2 : Boot Menu : Qflash 12..., this motherboard features the DualBIOS™ design, which enhances protection for the safety and stability of system safety, users cannot update the backup BIOS manually. h57musb3.f1) to enter Q-Flash. Restart the system.

Manual
Page 71
...Utility A. Unique Features If the BIOS update file for example, avoid a power loss or switching off the Internet). Do not use the G.O.M. (GIGABYTE Online Management) function when using @BIOS. 4. Update the BIOS Using the Internet Update Function: Click Update BIOS from an inadequate BIOS flashing. Save ... Click Save Current BIOS to File to boot. - 71 - Make sure that is not present on the @BIOS server site, please manually download the BIOS update file from the Internet or through other source. Failure to do NOT interrupt the Internet connection (for your motherboard is...
...Utility A. Unique Features If the BIOS update file for example, avoid a power loss or switching off the Internet). Do not use the G.O.M. (GIGABYTE Online Management) function when using @BIOS. 4. Update the BIOS Using the Internet Update Function: Click Update BIOS from an inadequate BIOS flashing. Save ... Click Save Current BIOS to File to boot. - 71 - Make sure that is not present on the @BIOS server site, please manually download the BIOS update file from the Internet or through other source. Failure to do NOT interrupt the Internet connection (for your motherboard is...
Manual
Page 80
... utility later. Or you have to load the SATA controller driver first. To manually set up a RAID-ready system and configure it for RAID 0. Unique Features - 80 - 4-8 eXtreme Hard Drive (X.H.D) j With GIGABYTE eXtreme Hard Drive (X.H.D)(Note 1), users can quickly configure a RAIDready system for RAID ...a hard drive into a RAID 0 array that's been created earlier, make sure the new drive is greater than or equal to enable RAID for GA-H57M-USB3. (Note 1) The X.H.D utility only supports the SATA controllers integrated in the array. ) 1. The following procedure details the steps to set up...
... utility later. Or you have to load the SATA controller driver first. To manually set up a RAID-ready system and configure it for RAID 0. Unique Features - 80 - 4-8 eXtreme Hard Drive (X.H.D) j With GIGABYTE eXtreme Hard Drive (X.H.D)(Note 1), users can quickly configure a RAIDready system for RAID ...a hard drive into a RAID 0 array that's been created earlier, make sure the new drive is greater than or equal to enable RAID for GA-H57M-USB3. (Note 1) The X.H.D utility only supports the SATA controllers integrated in the array. ) 1. The following procedure details the steps to set up...

Manual
Page 87
...drive. (Make sure the recovery drive has equal or larger capacity than the master drive.) Then press to the recovery drive manually using the Update Volume function of the Intel Matrix Storage Console in the system. Select 1 Master RanAdID1 1R:eMcoivrreorrys ddiastka ...: Select Disks Strip Size : N/A Capacity : 0.0 GB Sync : Continuous Create Volume [ HELP ] Select a sync option: On Request: volume is updated manually Continuous: volume is updated automatically [hi]-Change [TAB]-Next [ESC]-Previous Menu Figure 11 [ENTER]-Select Step 5: Finally press on the hard drive you want...
...drive. (Make sure the recovery drive has equal or larger capacity than the master drive.) Then press to the recovery drive manually using the Update Volume function of the Intel Matrix Storage Console in the system. Select 1 Master RanAdID1 1R:eMcoivrreorrys ddiastka ...: Select Disks Strip Size : N/A Capacity : 0.0 GB Sync : Continuous Create Volume [ HELP ] Select a sync option: On Request: volume is updated manually Continuous: volume is updated automatically [hi]-Change [TAB]-Next [ESC]-Previous Menu Figure 11 [ENTER]-Select Step 5: Finally press on the hard drive you want...

Manual
Page 102
... ID) Member Disk (0) Non-RAID Disk [hi]-Select [ESC]-Exit [ENTER]-Select Menu Step 2: Select the new hard drive to add into the array to manually rebuild the array in the operating system. Create RAID Volume[ DEGRADED VOLUME DETECTED3]. C. If you do not enable automatic rebuild on this stage, you enter...
... ID) Member Disk (0) Non-RAID Disk [hi]-Select [ESC]-Exit [ENTER]-Select Menu Step 2: Select the new hard drive to add into the array to manually rebuild the array in the operating system. Create RAID Volume[ DEGRADED VOLUME DETECTED3]. C. If you do not enable automatic rebuild on this stage, you enter...


