Manual
Page 1
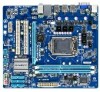
GA-H55M-S2 LGA1156 socket motherboard for Intel® Core™ i7 processors/Intel® Core™ i5 processors/Intel® Core™ i3 processors/Intel® Pentium® processors User's Manual Rev. 1301 12ME-H55MS2-1301R
GA-H55M-S2 LGA1156 socket motherboard for Intel® Core™ i7 processors/Intel® Core™ i5 processors/Intel® Core™ i3 processors/Intel® Pentium® processors User's Manual Rev. 1301 12ME-H55MS2-1301R
Manual
Page 10
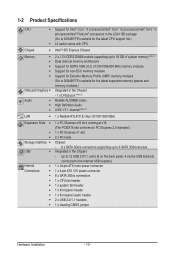
...Core™ i5 processors/Intel® Core™ i3 processors/Intel® Pentium® processors in the LGA1156 package (Go to GIGABYTE's website for the latest CPU support list.) L3 cache varies with CPU Chipset Intel® H55 Express Chipset Memory Onboard ...Graphics Audio 2 x 1.5V DDR3 DIMM sockets supporting up to 16 GB of system memory (Note 1) Dual channel memory architecture Support for DDR3 1666 (O.C.)/1333/1066/800 MHz memory modules ...
...Core™ i5 processors/Intel® Core™ i3 processors/Intel® Pentium® processors in the LGA1156 package (Go to GIGABYTE's website for the latest CPU support list.) L3 cache varies with CPU Chipset Intel® H55 Express Chipset Memory Onboard ...Graphics Audio 2 x 1.5V DDR3 DIMM sockets supporting up to 16 GB of system memory (Note 1) Dual channel memory architecture Support for DDR3 1666 (O.C.)/1333/1066/800 MHz memory modules ...
Manual
Page 12
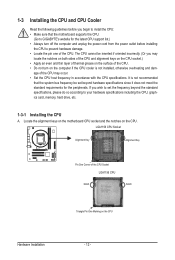
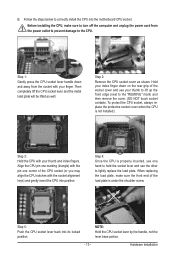
... frequency in accordance with the CPU specifications. Locate the alignment keys on the motherboard CPU socket and the notches on the computer if the CPU cooler is not recommended that the motherboard supports the CPU. (Go to GIGABYTE's website for the peripherals. 1-3 Installing the CPU and CPU Cooler Read the following guidelines...
... frequency in accordance with the CPU specifications. Locate the alignment keys on the motherboard CPU socket and the notches on the computer if the CPU cooler is not recommended that the motherboard supports the CPU. (Go to GIGABYTE's website for the peripherals. 1-3 Installing the CPU and CPU Cooler Read the following guidelines...
Manual
Page 13
... front edge (next to the "REMOVE" mark) and then remove the cover. (DO NOT touch socket contacts. Step 5: Push the CPU socket lever back into the motherboard CPU socket. B. Then completely lift the CPU socket lever and the metal load plate will be lifted as shown. When replacing the load plate, make... sure to turn off the computer and unplug the power cord from the socket with your thumb and index fingers. Align the CPU pin one marking (triangle) with the socket alignment keys) and gently insert the CPU into position. Follow the steps below to hold the...
... front edge (next to the "REMOVE" mark) and then remove the cover. (DO NOT touch socket contacts. Step 5: Push the CPU socket lever back into the motherboard CPU socket. B. Then completely lift the CPU socket lever and the metal load plate will be lifted as shown. When replacing the load plate, make... sure to turn off the computer and unplug the power cord from the socket with your thumb and index fingers. Align the CPU pin one marking (triangle) with the socket alignment keys) and gently insert the CPU into position. Follow the steps below to hold the...
Manual
Page 15
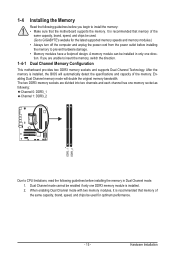
...sockets and supports Dual Channel Technology. Dual Channel mode cannot be used for the latest supported memory speeds and memory modules.) • Always turn off the computer and unplug the power cord from the power outlet before installing the memory in only one direction. A memory module can be used . (Go to GIGABYTE... the Memory 1-4-1 Read the following guidelines before you are divided into two channels and each channel has one memory socket as following: Channel 0: DDR3_1 Channel 1: DDR3_2 DDR3_1 DDR3_2 Due to CPU limitations, read the following guidelines before ...
...sockets and supports Dual Channel Technology. Dual Channel mode cannot be used for the latest supported memory speeds and memory modules.) • Always turn off the computer and unplug the power cord from the power outlet before installing the memory in only one direction. A memory module can be used . (Go to GIGABYTE... the Memory 1-4-1 Read the following guidelines before you are divided into two channels and each channel has one memory socket as following: Channel 0: DDR3_1 Channel 1: DDR3_2 DDR3_1 DDR3_2 Due to CPU limitations, read the following guidelines before ...
Manual
Page 16
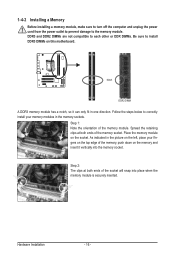
... indicated in the picture on the memory and insert it can only fit in the memory sockets. Step 1: Note the orientation of the socket will snap into the memory socket. Hardware Installation - 16 - 1-4-2 Installing a Memory Before installing a memory module, make sure to turn off the computer and unplug the power cord... from the power outlet to prevent damage to install DDR3 DIMMs on the socket. Step 2: The clips at both ends of the memory module. DDR3 and DDR2 DIMMs are not compatible to each other or DDR DIMMs....
... indicated in the picture on the memory and insert it can only fit in the memory sockets. Step 1: Note the orientation of the socket will snap into the memory socket. Hardware Installation - 16 - 1-4-2 Installing a Memory Before installing a memory module, make sure to turn off the computer and unplug the power cord... from the power outlet to prevent damage to install DDR3 DIMMs on the socket. Step 2: The clips at both ends of the memory module. DDR3 and DDR2 DIMMs are not compatible to each other or DDR DIMMs....

Manual
Page 74
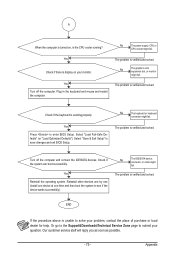
... CPU cooler is installed properly on the CPU. Secure the CPU cooler No on the memory slot. No Correctly insert the memory into the memory socket. Yes Isolate the short circuit. Check if the memory is attached to the CPU_FAN header properly? Connect the CPU cooler power cable to start the...
... CPU cooler is installed properly on the CPU. Secure the CPU cooler No on the memory slot. No Correctly insert the memory into the memory socket. Yes Isolate the short circuit. Check if the memory is attached to the CPU_FAN header properly? Connect the CPU cooler power cable to start the...
Manual
Page 75
... to enter BIOS Setup. Plug in the keyboard and mouse and restart the computer. Turn off the computer. No The power supply, CPU or CPU socket might fail. Yes Check if there is display on , is the CPU cooler running? The problem is working properly. No The keyboard or keyboard connector...
... to enter BIOS Setup. Plug in the keyboard and mouse and restart the computer. Turn off the computer. No The power supply, CPU or CPU socket might fail. Yes Check if there is display on , is the CPU cooler running? The problem is working properly. No The keyboard or keyboard connector...


