Manual
Page 3
... motherboard looks like this manual are legally registered to use GIGABYTE's unique features, read or download the information on/from the Support&Downloads\Motherboard\Technology Guide page on your motherboard revision before updating motherboard BIOS, drivers, or when looking for technical information. For example, "REV: 1.0" means the revision of the motherboard is the property of documentations: For detailed product information, carefully read the User's Manual. For instructions...
... motherboard looks like this manual are legally registered to use GIGABYTE's unique features, read or download the information on/from the Support&Downloads\Motherboard\Technology Guide page on your motherboard revision before updating motherboard BIOS, drivers, or when looking for technical information. For example, "REV: 1.0" means the revision of the motherboard is the property of documentations: For detailed product information, carefully read the User's Manual. For instructions...
Manual
Page 4
... Contents Box Contents...6 Optional Items...6 GA-H55M-S2 Motherboard Layout 7 GA-H55M-S2 Motherboard Block Diagram 8 Chapter 1 Hardware Installation 9 1-1 Installation Precautions 9 1-2 Product Specifications 10 1-3 Installing the CPU and CPU Cooler 12 1-3-1 Installing the CPU 12 1-3-2 Installing the CPU Cooler 14 1-4 Installing the Memory 15 1-4-1 Dual Channel Memory Configuration 15 1-4-2 Installing a Memory 16 1-5 Installing an Expansion Card 17 1-6 Back Panel Connectors 18 1-7 Internal Connectors 19 Chapter 2 BIOS Setup 27 2-1 Startup Screen 28 2-2 The Main Menu 29 2-3 MB...
... Contents Box Contents...6 Optional Items...6 GA-H55M-S2 Motherboard Layout 7 GA-H55M-S2 Motherboard Block Diagram 8 Chapter 1 Hardware Installation 9 1-1 Installation Precautions 9 1-2 Product Specifications 10 1-3 Installing the CPU and CPU Cooler 12 1-3-1 Installing the CPU 12 1-3-2 Installing the CPU Cooler 14 1-4 Installing the Memory 15 1-4-1 Dual Channel Memory Configuration 15 1-4-2 Installing a Memory 16 1-5 Installing an Expansion Card 17 1-6 Back Panel Connectors 18 1-7 Internal Connectors 19 Chapter 2 BIOS Setup 27 2-1 Startup Screen 28 2-2 The Main Menu 29 2-3 MB...
Manual
Page 10
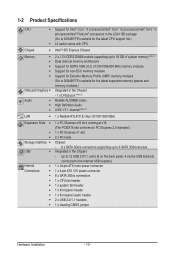
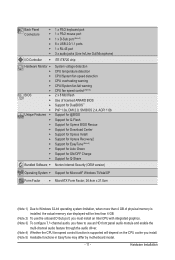
... PCIEX16 slot conforms to PCI Express 2.0 standard.) 1 x PCI Express x1 slot 2 x PCI slots Storage Interface Chipset: - 6 x SATA 3Gb/s connectors supporting up to the internal USB headers) Internal w 1 x 24-pin ATX main power connector Connectors w 1 x 4-pin ATX 12V power connector w 6 x SATA 3Gb/s connectors w 1 x CPU fan header w 1 x system fan header w 1 x front panel header w 1 x front panel audio header w 2 x USB 2.0/1.1 headers w 1 x clearing CMOS jumper Hardware Installation...
... PCIEX16 slot conforms to PCI Express 2.0 standard.) 1 x PCI Express x1 slot 2 x PCI slots Storage Interface Chipset: - 6 x SATA 3Gb/s connectors supporting up to the internal USB headers) Internal w 1 x 24-pin ATX main power connector Connectors w 1 x 4-pin ATX 12V power connector w 6 x SATA 3Gb/s connectors w 1 x CPU fan header w 1 x system fan header w 1 x front panel header w 1 x front panel audio header w 2 x USB 2.0/1.1 headers w 1 x clearing CMOS jumper Hardware Installation...
Manual
Page 11
... actual memory size displayed will be less than 4 GB. (Note 2) To use the onboard D-Sub port, you must install an Intel CPU with integrated graphics. (Note 3) To configure 7.1-channel audio, you have to use an HD front panel audio module and enable the multi-channel audio feature through the audio driver. (Note 4) Whether the CPU fan speed control function is supported will depend on the CPU cooler you install. (Note 5) Available functions in EasyTune may differ by motherboard model...
... actual memory size displayed will be less than 4 GB. (Note 2) To use the onboard D-Sub port, you must install an Intel CPU with integrated graphics. (Note 3) To configure 7.1-channel audio, you have to use an HD front panel audio module and enable the multi-channel audio feature through the audio driver. (Note 4) Whether the CPU fan speed control function is supported will depend on the CPU cooler you install. (Note 5) Available functions in EasyTune may differ by motherboard model...
Manual
Page 15
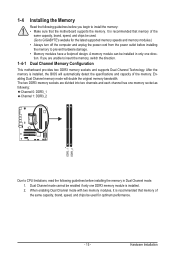
... BIOS will double the original memory bandwidth. Dual Channel mode cannot be installed in Dual Channel mode. 1. After the memory is recommended that memory of the same capacity, brand, speed, and chips be used . (Go to GIGABYTE's website for optimum performance. - 15 - Dual Channel Memory Configuration This motherboard provides two DDR3 memory sockets and supports Dual Channel Technology. The two DDR3 memory sockets are unable to insert the memory, switch the direction. When enabling Dual Channel mode with two memory modules, it is installed. 2. Hardware Installation...
... BIOS will double the original memory bandwidth. Dual Channel mode cannot be installed in Dual Channel mode. 1. After the memory is recommended that memory of the same capacity, brand, speed, and chips be used . (Go to GIGABYTE's website for optimum performance. - 15 - Dual Channel Memory Configuration This motherboard provides two DDR3 memory sockets and supports Dual Channel Technology. The two DDR3 memory sockets are unable to insert the memory, switch the direction. When enabling Dual Channel mode with two memory modules, it is installed. 2. Hardware Installation...
Manual
Page 17
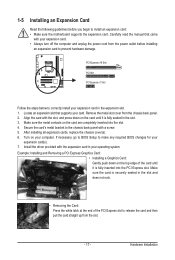
... edge of the card until it is securely seated in your computer. After installing all expansion cards, replace the chassis cover(s). 6. Make sure the card is fully inserted into the slot. 4. Example: Installing and Removing a PCI Express Graphics Card: • Installing a Graphics Card: Gently push down on your operating system. Carefully read the manual that supports your expansion card(s). 7. Secure the card's metal bracket to make any required BIOS changes for your...
... edge of the card until it is securely seated in your computer. After installing all expansion cards, replace the chassis cover(s). 6. Make sure the card is fully inserted into the slot. 4. Example: Installing and Removing a PCI Express Graphics Card: • Installing a Graphics Card: Gently push down on your operating system. Carefully read the manual that supports your expansion card(s). 7. Secure the card's metal bracket to make any required BIOS changes for your...
Manual
Page 18
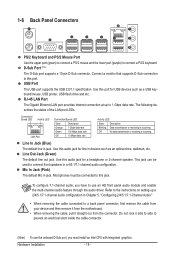
... removing the cable, pull it straight out from the connector. Connect a monitor that supports D-Sub connection to this audio jack for a headphone or 2-channel speaker. USB Port The USB port supports the USB 2.0/1.1 specification. Use this jack. Microphones must install an Intel CPU with integrated graphics. Do not rock it side to side to prevent an electrical short inside the cable connector. (Note) To use an HD front panel audio module and enable the multi-channel audio feature through the audio driver...
... removing the cable, pull it straight out from the connector. Connect a monitor that supports D-Sub connection to this audio jack for a headphone or 2-channel speaker. USB Port The USB port supports the USB 2.0/1.1 specification. Use this jack. Microphones must install an Intel CPU with integrated graphics. Do not rock it side to side to prevent an electrical short inside the cable connector. (Note) To use an HD front panel audio module and enable the multi-channel audio feature through the audio driver...
Manual
Page 25
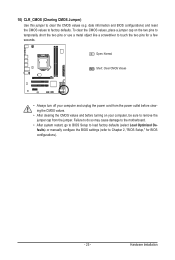
Failure to do so may cause damage to the motherboard. • After system restart, go to BIOS Setup to load factory defaults (select Load Optimized Defaults) or manually configure the BIOS settings (refer to remove the jumper cap from the power outlet before clearing the CMOS values. • After clearing the CMOS values and before turning on the two pins to temporarily short the two pins or use a metal object like a screwdriver to touch the...
Failure to do so may cause damage to the motherboard. • After system restart, go to BIOS Setup to load factory defaults (select Load Optimized Defaults) or manually configure the BIOS settings (refer to remove the jumper cap from the power outlet before clearing the CMOS values. • After clearing the CMOS values and before turning on the two pins to temporarily short the two pins or use a metal object like a screwdriver to touch the...
Manual
Page 30
... CPU, memory, etc. Standard CMOS Features Use this menu to configure the system time and date, hard drive types, floppy disk drive types, and the type of errors that stop the system boot, etc. Advanced BIOS Features Use this menu to configure the device boot order, advanced features available on the CPU, and the primary display adapter. Integrated Peripherals Use this menu to configure all peripheral devices, such as IDE, SATA, USB, integrated audio, and integrated LAN, etc. Power Management Setup Use...
... CPU, memory, etc. Standard CMOS Features Use this menu to configure the system time and date, hard drive types, floppy disk drive types, and the type of errors that stop the system boot, etc. Advanced BIOS Features Use this menu to configure the device boot order, advanced features available on the CPU, and the primary display adapter. Integrated Peripherals Use this menu to configure all peripheral devices, such as IDE, SATA, USB, integrated audio, and integrated LAN, etc. Power Management Setup Use...
Manual
Page 31
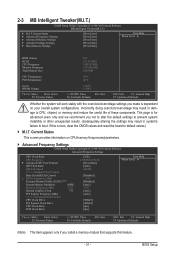
... Setup Utility-Copyright (C) 1984-2010 Award Software Advanced Frequency Settings CPU Clock Ratio CPU Frequency } Advanced CPU Core Features QPI Clock Ratio QPI Link Speed >>>>> Standard Clock Control Base Clock(BCLK) Control x BCLK Frequency (Mhz) Extreme Memory Profile (X.M.P.) (Note) System Memory Multiplier (SPD) Memory Frequency (Mhz) 1333 Internal Graphics Clock 733 PCI Express Frequency (Mhz) >>>>> Advanced Clock Control CPU Clock Drive PCI Express Clock Drive CPU Clock Skew PCH Clock Skew [22X] 2.93GHz (133x22) [Press Enter...
... Setup Utility-Copyright (C) 1984-2010 Award Software Advanced Frequency Settings CPU Clock Ratio CPU Frequency } Advanced CPU Core Features QPI Clock Ratio QPI Link Speed >>>>> Standard Clock Control Base Clock(BCLK) Control x BCLK Frequency (Mhz) Extreme Memory Profile (X.M.P.) (Note) System Memory Multiplier (SPD) Memory Frequency (Mhz) 1333 Internal Graphics Clock 733 PCI Express Frequency (Mhz) >>>>> Advanced Clock Control CPU Clock Drive PCI Express Clock Drive CPU Clock Skew PCH Clock Skew [22X] 2.93GHz (133x22) [Press Enter...
Manual
Page 32
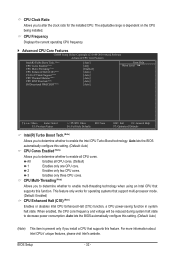
... whether to decrease power consumption. Auto lets the BIOS automatically configure this setting. (Default: Auto) (Note) This item is dependent on the CPU being installed. CPU Frequency Displays the current operating CPU frequency. Advanced CPU Core Features CMOS Setup Utility-Copyright (C) 1984-2010 Award Software Advanced CPU Core Features Intel(R) Turbo Boost Tech. (Note) CPU Cores Enabled (Note) CPU Multi-Threading (Note) CPU Enhanced Halt (C1E) (Note) C3/C6/C7 State Support (Note) CPU Thermal Monitor (Note) CPU EIST Function (Note...
... whether to decrease power consumption. Auto lets the BIOS automatically configure this setting. (Default: Auto) (Note) This item is dependent on the CPU being installed. CPU Frequency Displays the current operating CPU frequency. Advanced CPU Core Features CMOS Setup Utility-Copyright (C) 1984-2010 Award Software Advanced CPU Core Features Intel(R) Turbo Boost Tech. (Note) CPU Cores Enabled (Note) CPU Multi-Threading (Note) CPU Enhanced Halt (C1E) (Note) C3/C6/C7 State Support (Note) CPU Thermal Monitor (Note) CPU EIST Function (Note...
Manual
Page 33
... highly recommended that supports this setting. (Default: Auto) CPU Thermal Monitor (Note) Enables or disables Intel CPU Thermal Monitor function, a CPU overheating protection function. The adjustable range is dependent on CPU loading, Intel EIST technology can dynamically and effectively lower the CPU voltage and core frequency to 600 MHz. C3/C6/C7 State Support (Note) Allows you to determine whether to let the CPU enter C3/C6/C7 mode in accordance with unlocked clock...
... highly recommended that supports this setting. (Default: Auto) CPU Thermal Monitor (Note) Enables or disables Intel CPU Thermal Monitor function, a CPU overheating protection function. The adjustable range is dependent on CPU loading, Intel EIST technology can dynamically and effectively lower the CPU voltage and core frequency to 600 MHz. C3/C6/C7 State Support (Note) Allows you to determine whether to let the CPU enter C3/C6/C7 mode in accordance with unlocked clock...
Manual
Page 38
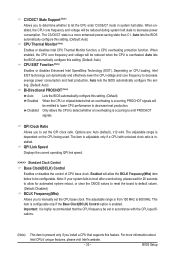
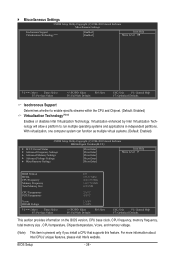
...F1: General Help F7: Optimized Defaults This section provides information on the BIOS version, CPU base clock, CPU frequency, memory frequency, total memory size , CPU temperature, Chipset temperature, Vcore, and memory voltage. (Note) This item is present only if you install a CPU that supports this feature. Miscellaneous Settings CMOS Setup Utility-Copyright (C) 1984-2010 Award Software Miscellaneous Settings Isochronous Support Virtualization Technology (Note) [Enabled] [Enabled] Item Help Menu Level Move Enter: Select F5: Previous Values +/-/PU...
...F1: General Help F7: Optimized Defaults This section provides information on the BIOS version, CPU base clock, CPU frequency, memory frequency, total memory size , CPU temperature, Chipset temperature, Vcore, and memory voltage. (Note) This item is present only if you install a CPU that supports this feature. Miscellaneous Settings CMOS Setup Utility-Copyright (C) 1984-2010 Award Software Miscellaneous Settings Isochronous Support Virtualization Technology (Note) [Enabled] [Enabled] Item Help Menu Level Move Enter: Select F5: Previous Values +/-/PU...
Manual
Page 39
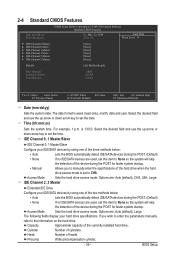
... set the date. Options are : Auto (default), CHS, LBA, Large. The date format is set this item to manually enter the specifications of the device during the POST. (Default) • None If no IDE/SATA devices are used , set to CHS. IDE Channel 2, 3 Master Extended IDE Drive Configure your hard drive specifications. If you to None so the system will skip the detection of cylinders. For example, 1 p.m. is 13:0:0. Sets the hard drive access mode. The following fields display your IDE/SATA devices...
... set the date. Options are : Auto (default), CHS, LBA, Large. The date format is set this item to manually enter the specifications of the device during the POST. (Default) • None If no IDE/SATA devices are used , set to CHS. IDE Channel 2, 3 Master Extended IDE Drive Configure your hard drive specifications. If you to None so the system will skip the detection of cylinders. For example, 1 p.m. is 13:0:0. Sets the hard drive access mode. The following fields display your IDE/SATA devices...
Manual
Page 41
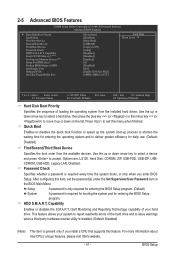
... Set Supervisor/User Password item in the BIOS Main Menu. Setup A password is only required for entering the BIOS Setup program. (Default) System A password is required for booting the system and for daily use. (Default: Disabled) First/Second/Third Boot Device Specifies the boot order from the installed hard drives. HDD S.M.A.R.T. Press to issue warnings when a third party hardware monitor utility is installed. (Default: Disabled) (Note) This item is required every time the system boots, or only when you install a CPU that supports...
... Set Supervisor/User Password item in the BIOS Main Menu. Setup A password is only required for entering the BIOS Setup program. (Default) System A password is required for booting the system and for daily use. (Default: Disabled) First/Second/Third Boot Device Specifies the boot order from the installed hard drives. HDD S.M.A.R.T. Press to issue warnings when a third party hardware monitor utility is installed. (Default: Disabled) (Note) This item is required every time the system boots, or only when you install a CPU that supports...

Manual
Page 42
... the BIOS image file to Disabled for example, will be recovered from the installed PCI graphics card, PCI Express graphics card or the onboard graphics. Onboard VGA Enables or disables the onboard graphics function. MS-DOS, for Windows XP operating system; Set this item to Always Enable. If the system BIOS is present only if you to set a delay time for legacy operating system such as the system boots up a dual view configuration, set this item to the hard drive. For...
... the BIOS image file to Disabled for example, will be recovered from the installed PCI graphics card, PCI Express graphics card or the onboard graphics. Onboard VGA Enables or disables the onboard graphics function. MS-DOS, for Windows XP operating system; Set this item to Always Enable. If the system BIOS is present only if you to set a delay time for legacy operating system such as the system boots up a dual view configuration, set this item to the hard drive. For...
Manual
Page 43
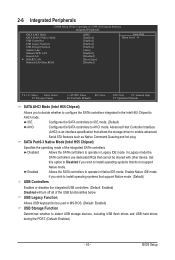
...support Native mode. (Default) USB Controllers Enables or disables the integrated USB controllers. (Default: Enabled) Disabled will turn off all of the integrated SATA controllers. 2-6 Integrated Peripherals CMOS Setup Utility-Copyright (C) 1984-2010 Award Software Integrated Peripherals SATA AHCI Mode SATA Port0-3 Native Mode USB Controllers USB Legacy Function USB Storage Function Azalia Codec Onboard H/W LAN Green LAN } SMART LAN Onboard LAN Boot ROM [IDE] [Enabled] [Enabled] [Enabled] [Enabled] [Auto] [Enabled] [Disabled] [Press Enter] [Disabled...
...support Native mode. (Default) USB Controllers Enables or disables the integrated USB controllers. (Default: Enabled) Disabled will turn off all of the integrated SATA controllers. 2-6 Integrated Peripherals CMOS Setup Utility-Copyright (C) 1984-2010 Award Software Integrated Peripherals SATA AHCI Mode SATA Port0-3 Native Mode USB Controllers USB Legacy Function USB Storage Function Azalia Codec Onboard H/W LAN Green LAN } SMART LAN Onboard LAN Boot ROM [IDE] [Enabled] [Enabled] [Enabled] [Enabled] [Auto] [Enabled] [Disabled] [Press Enter] [Disabled...
Manual
Page 44
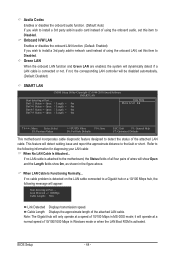
...in audio card instead of using the onboard LAN, set this item to Disabled. If not, the corresponding LAN controller will appear: Start detecting at Port..... Refer to the following message will be disabled automatically. (Default: Disabled) SMART LAN CMOS Setup Utility-Copyright (C) 1984-2010 Award Software SMART LAN Start detecting at Port..... BIOS Setup - 44 - Link Detected --> 100Mbps Cable Length= 30m Link Detected Displays transmission speed. Azalia Codec Enables or disables the onboard audio function. (Default: Auto) If you wish to install a 3rd party add-in network...
...in audio card instead of using the onboard LAN, set this item to Disabled. If not, the corresponding LAN controller will appear: Start detecting at Port..... Refer to the following message will be disabled automatically. (Default: Disabled) SMART LAN CMOS Setup Utility-Copyright (C) 1984-2010 Award Software SMART LAN Start detecting at Port..... BIOS Setup - 44 - Link Detected --> 100Mbps Cable Length= 30m Link Detected Displays transmission speed. Azalia Codec Enables or disables the onboard audio function. (Default: Auto) If you wish to install a 3rd party add-in network...

Manual
Page 61
...(Is)DfaotuandEnable HDD 0-0 Loa d CMO S Default Enable Update BIOS from Drive and press . • The Save Main BIOS to Drive option allows you to save the BIOS file to access Q-Flash. 2. appears, press to Drive Enter : Run hi:Move Total size : 0 ESC:Reset Free size : 0 F10:Power Off 3. The monitor will display the update process. • Do not turn off or restart the system when the system is reading/updating the BIOS. • Do not remove the USB flash drive or hard drive when...
...(Is)DfaotuandEnable HDD 0-0 Loa d CMO S Default Enable Update BIOS from Drive and press . • The Save Main BIOS to Drive option allows you to save the BIOS file to access Q-Flash. 2. appears, press to Drive Enter : Run hi:Move Total size : 0 ESC:Reset Free size : 0 F10:Power Off 3. The monitor will display the update process. • Do not turn off or restart the system when the system is reading/updating the BIOS. • Do not remove the USB flash drive or hard drive when...
Manual
Page 73
... still on the motherboard battery in Chapter 1. A: The following Award BIOS beep code descriptions may help you identify possible computer problems. (For reference only.) 1 short: System boots successfully 1 long, 3 short: Keyboard error 2 short: CMOS setting error 1 long, 9 short: BIOS ROM error 1 long, 1 short: Memory or motherboard error Continuous long beeps: Graphics card not inserted properly 1 long, 2 short: Monitor or graphics card error Continuous short beeps: Power error - 73 - A: Some advanced options are some BIOS options missing? A: For motherboards that 's why the...
... still on the motherboard battery in Chapter 1. A: The following Award BIOS beep code descriptions may help you identify possible computer problems. (For reference only.) 1 short: System boots successfully 1 long, 3 short: Keyboard error 2 short: CMOS setting error 1 long, 9 short: BIOS ROM error 1 long, 1 short: Memory or motherboard error Continuous long beeps: Graphics card not inserted properly 1 long, 2 short: Monitor or graphics card error Continuous short beeps: Power error - 73 - A: Some advanced options are some BIOS options missing? A: For motherboards that 's why the...


