Manual
Page 5
... 55 3-1 Installing Chipset Drivers 55 3-2 Application Software 56 3-3 Technical Manuals 56 3-4 Contact...57 3-5 System...57 3-6 Download Center 58 Chapter 4 Unique Features 59 4-1 Xpress Recovery2 59 ...the @BIOS Utility 65 4-3 EasyTune 6...66 4-4 Easy Energy Saver 67 4-5 Q-Share...69 4-6 Time Repair...70 Chapter 5 Appendix...71 5-1 Configuring Audio Input and Output 71 5-1-1 Configuring 2/4/5.1/7.1-Channel Audio 71 5-1-2 Configuring S/PDIF In/Out 74 5-1-3 Configuring Microphone Recording 76 5-1-4 Using the Sound Recorder 78 5-2 Troubleshooting 79 5-2-1 Frequently Asked Questions ...
... 55 3-1 Installing Chipset Drivers 55 3-2 Application Software 56 3-3 Technical Manuals 56 3-4 Contact...57 3-5 System...57 3-6 Download Center 58 Chapter 4 Unique Features 59 4-1 Xpress Recovery2 59 ...the @BIOS Utility 65 4-3 EasyTune 6...66 4-4 Easy Energy Saver 67 4-5 Q-Share...69 4-6 Time Repair...70 Chapter 5 Appendix...71 5-1 Configuring Audio Input and Output 71 5-1-1 Configuring 2/4/5.1/7.1-Channel Audio 71 5-1-2 Configuring S/PDIF In/Out 74 5-1-3 Configuring Microphone Recording 76 5-1-4 Using the Sound Recorder 78 5-2 Troubleshooting 79 5-2-1 Frequently Asked Questions ...
Manual
Page 12
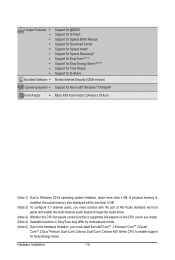
... installed, the actual memory size displayed will be less than 4 GB. (Note 2) To configure 7.1-channel audio, you need connect with the port of HD Audio standard via front panel and enable the multi-channel audio feature through the audio driver. (Note 3) Whether the CPU fan speed control function is supported will depend on the CPU...
... installed, the actual memory size displayed will be less than 4 GB. (Note 2) To configure 7.1-channel audio, you need connect with the port of HD Audio standard via front panel and enable the multi-channel audio feature through the audio driver. (Note 3) Whether the CPU fan speed control function is supported will depend on the CPU...
Manual
Page 19
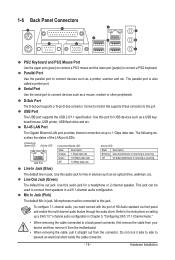
...No data transmission or receiving is also called a printer port. Mic In Jack (Pink) The default Mic in a 4/5.1-channel audio configuration. To configure 7.1-channel audio, you need connect with the port of the LAN port LEDs. D-Sub Port The D-Sub port supports a 15-pin D-Sub...USB Port The USB port supports the USB 2.0/1.1 specification. The following describes the states of HD Audio standard via front panel and enable the multi-channel audio feature through the audio driver. Hardware Installation Serial Port Use the serial port to a back panel connector, first remove the cable...
...No data transmission or receiving is also called a printer port. Mic In Jack (Pink) The default Mic in a 4/5.1-channel audio configuration. To configure 7.1-channel audio, you need connect with the port of the LAN port LEDs. D-Sub Port The D-Sub port supports a 15-pin D-Sub...USB Port The USB port supports the USB 2.0/1.1 specification. The following describes the states of HD Audio standard via front panel and enable the multi-channel audio feature through the audio driver. Hardware Installation Serial Port Use the serial port to a back panel connector, first remove the cable...
Manual
Page 71
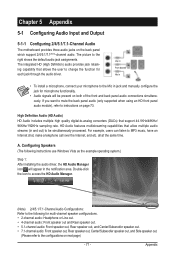
... speaker out, and Side speaker out. (Please refer to the following instructions use Windows Vista as the example operating system.) Step 1: After installing the audio driver, the HD Audio Manager icon will be simultaneously processed. Line In Front Speaker Out Mic In • To install a microphone, connect your microphone to the Mic in...
... speaker out, and Side speaker out. (Please refer to the following instructions use Windows Vista as the example operating system.) Step 1: After installing the audio driver, the HD Audio Manager icon will be simultaneously processed. Line In Front Speaker Out Mic In • To install a microphone, connect your microphone to the Mic in...
Manual
Page 76
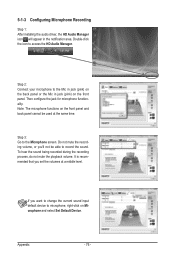
5-1-3 Configuring Microphone Recording Step 1: After installing the audio driver, the HD Audio Manager icon will appear in jack (pink) on the front panel and back panel cannot be able to microphone, right-click on Microphone and select ... your microphone to the Mic in jack (pink) on the back panel or the Mic in the notification area. Step 3: Go to access the HD Audio Manager. It is recommended that you want to change the current sound input default device to record the sound. Then configure the jack for microphone...
5-1-3 Configuring Microphone Recording Step 1: After installing the audio driver, the HD Audio Manager icon will appear in jack (pink) on the front panel and back panel cannot be able to microphone, right-click on Microphone and select ... your microphone to the Mic in jack (pink) on the back panel or the Mic in the notification area. Step 3: Go to access the HD Audio Manager. It is recommended that you want to change the current sound input default device to record the sound. Then configure the jack for microphone...
Manual
Page 79
... of my keyboard/optical mouse still on High Definition Audio Bus or Unknown device is still on GIGABYTE's website. For motherboards that have turned my speaker to show the advanced options. Then install the onboard HD audio driver from the motherboard driver disk or download the audio driver from GIGABYTE's website to the instructions on our website and...
... of my keyboard/optical mouse still on High Definition Audio Bus or Unknown device is still on GIGABYTE's website. For motherboards that have turned my speaker to show the advanced options. Then install the onboard HD audio driver from the motherboard driver disk or download the audio driver from GIGABYTE's website to the instructions on our website and...


