Manual
Page 4
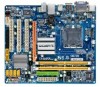
Table of Contents Box Contents...6 Optional Items...6 GA-G41M-ES2H Motherboard Layout 7 Block Diagram...8 Chapter 1 Hardware Installation 9 1-1 Installation Precautions 9 1-2 Product Specifications 10 1-3 Installing the CPU and CPU Cooler 13 1-3-1 Installing the CPU 13 1-3-2 Installing the CPU Cooler 15 1-4 Installing the Memory 16 1-4-1 Dual Channel Memory Configuration 16 1-4-2 Installing a Memory 17 1-5 Installing an Expansion Card 18 1-6 Back Panel...
Table of Contents Box Contents...6 Optional Items...6 GA-G41M-ES2H Motherboard Layout 7 Block Diagram...8 Chapter 1 Hardware Installation 9 1-1 Installation Precautions 9 1-2 Product Specifications 10 1-3 Installing the CPU and CPU Cooler 13 1-3-1 Installing the CPU 13 1-3-2 Installing the CPU Cooler 15 1-4 Installing the Memory 16 1-4-1 Dual Channel Memory Configuration 16 1-4-2 Installing a Memory 17 1-5 Installing an Expansion Card 18 1-6 Back Panel...
Manual
Page 8
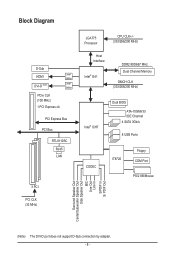
... LAN 3 PCI PCI CLK (33 MHz) LGA775 Processor CPU CLK+/(333/266/200 MHz) Host Interface Intel® G41 DDR2 800/667 MHz Dual Channel Memory GMCH CLK (333/266/200 MHz) Intel® ICH7 Dual BIOS ATA-100/66/33 IDE Channel 4 SATA 3Gb/s 8 USB Ports CODEC IT8720 Floppy COM...
... LAN 3 PCI PCI CLK (33 MHz) LGA775 Processor CPU CLK+/(333/266/200 MHz) Host Interface Intel® G41 DDR2 800/667 MHz Dual Channel Memory GMCH CLK (333/266/200 MHz) Intel® ICH7 Dual BIOS ATA-100/66/33 IDE Channel 4 SATA 3Gb/s 8 USB Ports CODEC IT8720 Floppy COM...
Manual
Page 9
... you are uncertain about any installation steps or have it on the computer power during the installation process can become damaged as a motherboard, CPU or memory. Hardware Installation Chapter 1 Hardware Installation 1-1 Installation Precautions The motherboard contains numerous delicate electronic circuits and components which can lead to damage to system components as...
... you are uncertain about any installation steps or have it on the computer power during the installation process can become damaged as a motherboard, CPU or memory. Hardware Installation Chapter 1 Hardware Installation 1-1 Installation Precautions The motherboard contains numerous delicate electronic circuits and components which can lead to damage to system components as...
Manual
Page 10
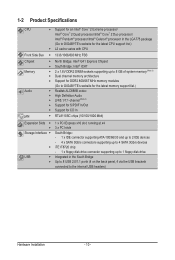
...174; Celeron® processor in the LGA775 package (Go to GIGABYTE's website for the latest CPU support list.) L2 cache varies with CPU Front Side Bus w 1333/1066/800 MHz FSB Chipset Memory Audio LAN w North Bridge: Intel® G41 Express Chipset... ICH7 2 x 1.8V DDR2 DIMM sockets supporting up to 8 GB of system memory (Note 1) w Dual channel memory architecture w Support for DDR2 800/667 MHz memory modules (Go to GIGABYTE's website for the latest memory support list.) Realtek ALC888B codec High Definition Audio 2/4/5.1/7.1-channel ...
...174; Celeron® processor in the LGA775 package (Go to GIGABYTE's website for the latest CPU support list.) L2 cache varies with CPU Front Side Bus w 1333/1066/800 MHz FSB Chipset Memory Audio LAN w North Bridge: Intel® G41 Express Chipset... ICH7 2 x 1.8V DDR2 DIMM sockets supporting up to 8 GB of system memory (Note 1) w Dual channel memory architecture w Support for DDR2 800/667 MHz memory modules (Go to GIGABYTE's website for the latest memory support list.) Realtek ALC888B codec High Definition Audio 2/4/5.1/7.1-channel ...
Manual
Page 12
... Form Factor; 24.4cm x 20.8cm (Note 1) Due to Windows Vista/XP 32-bit operating system limitation, when more than 4 GB of physical memory is installed, the actual memory size displayed will be less than 4 GB. (Note 2) To configure 7.1-channel audio, you need connect with the port of HD Audio standard via...
... Form Factor; 24.4cm x 20.8cm (Note 1) Due to Windows Vista/XP 32-bit operating system limitation, when more than 4 GB of physical memory is installed, the actual memory size displayed will be less than 4 GB. (Note 2) To configure 7.1-channel audio, you need connect with the port of HD Audio standard via...

Manual
Page 13
... of the CPU. • Do not turn on the computer if the CPU cooler is not recommended that the motherboard supports the CPU. (Go to GIGABYTE's website for the peripherals. Hardware Installation The CPU cannot be set the frequency beyond hardware specifications since it does not meet the standard requirements for... the CPU. 1-3 Installing the CPU and CPU Cooler Read the following guidelines before installing the CPU to your hardware specifications including the CPU, graphics card, memory, hard drive, etc. 1-3-1 Installing the CPU A.
... of the CPU. • Do not turn on the computer if the CPU cooler is not recommended that the motherboard supports the CPU. (Go to GIGABYTE's website for the peripherals. Hardware Installation The CPU cannot be set the frequency beyond hardware specifications since it does not meet the standard requirements for... the CPU. 1-3 Installing the CPU and CPU Cooler Read the following guidelines before installing the CPU to your hardware specifications including the CPU, graphics card, memory, hard drive, etc. 1-3-1 Installing the CPU A.

Manual
Page 16
... specifications and capacity of the same capacity, brand, speed, and chips be installed in Dual Channel mode. 1. Dual Channel mode cannot be used . (Go to GIGABYTE's website for the latest memory support list.) • Always turn off the computer and unplug the power cord from the power outlet before installing the...
... specifications and capacity of the same capacity, brand, speed, and chips be installed in Dual Channel mode. 1. Dual Channel mode cannot be used . (Go to GIGABYTE's website for the latest memory support list.) • Always turn off the computer and unplug the power cord from the power outlet before installing the...

Manual
Page 17
...Spread the retaining clips at both ends of the socket will snap into the memory socket. Place the memory module on the memory and insert it can only fit in the memory sockets. 1-4-2 Installing a Memory Before installing a memory module, make sure to turn off the computer and unplug the power cord...damage to install DDR2 DIMMs on this motherboard. Notch DDR2 DIMM A DDR2 memory module has a notch, so it vertically into place when the memory module is securely inserted. - 17 - Step 1: Note the orientation of the memory, push down on the socket. As indicated in the picture on the...
...Spread the retaining clips at both ends of the socket will snap into the memory socket. Place the memory module on the memory and insert it can only fit in the memory sockets. 1-4-2 Installing a Memory Before installing a memory module, make sure to turn off the computer and unplug the power cord...damage to install DDR2 DIMMs on this motherboard. Notch DDR2 DIMM A DDR2 memory module has a notch, so it vertically into place when the memory module is securely inserted. - 17 - Step 1: Note the orientation of the memory, push down on the socket. As indicated in the picture on the...

Manual
Page 20
..., etc. Hardware Installation - 20 - Microphones must be connected to the recommended system requirements (or better) below. • CPU: Intel Dual-Core processor • Memory: Two 1 GB DDR2 800 memory modules with the port of HD DVD and Blu-ray Discs: In order to get better playback quality, when playing the HD DVD...
..., etc. Hardware Installation - 20 - Microphones must be connected to the recommended system requirements (or better) below. • CPU: Intel Dual-Core processor • Memory: Two 1 GB DDR2 800 memory modules with the port of HD DVD and Blu-ray Discs: In order to get better playback quality, when playing the HD DVD...
Manual
Page 34
... to the confirmation message will exit BIOS Setup. (Pressing can also carry out this function to load the BIOS settings from BIOS If your CPU, memory, etc. Standard CMOS Features Use this menu to configure the system time and date, hard drive types, floppy disk drive types, and the type...
... to the confirmation message will exit BIOS Setup. (Pressing can also carry out this function to load the BIOS settings from BIOS If your CPU, memory, etc. Standard CMOS Features Use this menu to configure the system time and date, hard drive types, floppy disk drive types, and the type...
Manual
Page 35
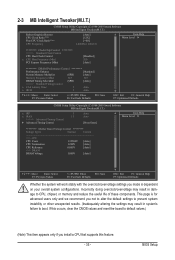
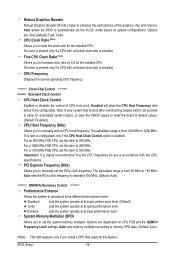
...Control x CPU Host Frequency (Mhz) PCI Express Frequency (Mhz) [Disabled] 200 [Auto] ******** DRAM Performance Control ******** Performance Enhance [Standard] System Memory Multiplier (SPD) [Auto] Memory Frequency (Mhz) 667 667 DRAM Timing Selectable (SPD) [Auto] >>>>> Standard Timing Control x CAS Latency Time 5 Auto x tRCD 5 Auto Move... results. (Inadequately altering the settings may result in system's failure to CPU, chipset, or memory and reduce the useful life of these components. This page is dependent on your overall system configurations.
...Control x CPU Host Frequency (Mhz) PCI Express Frequency (Mhz) [Disabled] 200 [Auto] ******** DRAM Performance Control ******** Performance Enhance [Standard] System Memory Multiplier (SPD) [Auto] Memory Frequency (Mhz) 667 667 DRAM Timing Selectable (SPD) [Auto] >>>>> Standard Timing Control x CAS Latency Time 5 Auto x tRCD 5 Auto Move... results. (Inadequately altering the settings may result in system's failure to CPU, chipset, or memory and reduce the useful life of these components. This page is dependent on your overall system configurations.
Manual
Page 36
...an 800 MHz FSB CPU, set in accordance with unlocked clock ratio is installed. For a 1066 MHz FSB CPU, set the system memory multiplier. The adjustable range is enabled. Auto allows the BIOS to set this feature. This item is configurable only if the CPU Host ... current operating CPU frequency. ******** Clock Chip Control Standard Clock Control CPU Host Clock Control Enables or disables the control of the graphics chip and memory. PCI Express Frequency (Mhz) Allows you to manually set the R.G.B. Options are : Auto (default), Fast, Turbo. Extreme Lets the system ...
...an 800 MHz FSB CPU, set in accordance with unlocked clock ratio is installed. For a 1066 MHz FSB CPU, set the system memory multiplier. The adjustable range is enabled. Auto allows the BIOS to set this feature. This item is configurable only if the CPU Host ... current operating CPU frequency. ******** Clock Chip Control Standard Clock Control CPU Host Clock Control Enables or disables the control of the graphics chip and memory. PCI Express Frequency (Mhz) Allows you to manually set the R.G.B. Options are : Auto (default), Fast, Turbo. Extreme Lets the system ...
Manual
Page 37
DRAM Timing Selectable (SPD) Manual allows all DRAM timing control items below to the CPU Host Frequency (Mhz) and System Memory Multiplier settings. ESC: Exit F1: General Help F7: Optimized Defaults - 37 - BIOS Setup tRAS Options are: Auto (default), 1~63... Enter: Select F5: Previous Values +/-/PU/PD: Value F10: Save F6: Fail-Safe Defaults tRRD Options are : Auto (default), 1~31. Memory Frequency (Mhz) The first memory frequency value is automatically adjusted according to be configurable. tWTR Options are : Auto (default), 1~15. Options are: Auto (default), Manual. ...
DRAM Timing Selectable (SPD) Manual allows all DRAM timing control items below to the CPU Host Frequency (Mhz) and System Memory Multiplier settings. ESC: Exit F1: General Help F7: Optimized Defaults - 37 - BIOS Setup tRAS Options are: Auto (default), 1~63... Enter: Select F5: Previous Values +/-/PU/PD: Value F10: Save F6: Fail-Safe Defaults tRRD Options are : Auto (default), 1~31. Memory Frequency (Mhz) The first memory frequency value is automatically adjusted according to be configurable. tWTR Options are : Auto (default), 1~15. Options are: Auto (default), Manual. ...

Manual
Page 39
... Options are : Auto (default), +800ps~-700ps. DIMM2 Clock Skew Control Options are : Auto (default), +8~-7. Disabled Disables this function to enhance memory compatibility. Data Driving Pull-Up Level Options are : Auto (default), +800ps~-700ps. BIOS Setup Trd2wr(Same/Diff Rank) Options are : Auto ...(default), +8~-7. Auto Lets the BIOS decide whether to enhance memory compatibility. Ctrl Driving Pull-Up Level Options are : Auto (default), 1~15. Channel A/B Driving Settings CMOS Setup Utility-Copyright (C) 1984-2009...
... Options are : Auto (default), +800ps~-700ps. DIMM2 Clock Skew Control Options are : Auto (default), +8~-7. Disabled Disables this function to enhance memory compatibility. Data Driving Pull-Up Level Options are : Auto (default), +800ps~-700ps. BIOS Setup Trd2wr(Same/Diff Rank) Options are : Auto ...(default), +8~-7. Auto Lets the BIOS decide whether to enhance memory compatibility. Ctrl Driving Pull-Up Level Options are : Auto (default), 1~15. Channel A/B Driving Settings CMOS Setup Utility-Copyright (C) 1984-2009...
Manual
Page 41
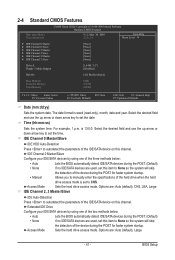
... } IDE Channel 3 Master } IDE Channel 3 Slave [None] [None] [None] [None] [None] [None] Drive A Floppy 3 Mode Support [1.44M, 3.5"] [Disabled] Halt On [All, But Keyboard] Base Memory Extended Memory Total Memory 640K 1022M 1024M Move Enter: Select F5: Previous Values +/-/PU/PD: Value F10: Save F6: Fail-Safe Defaults ESC: Exit F1: General Help F7...
... } IDE Channel 3 Master } IDE Channel 3 Slave [None] [None] [None] [None] [None] [None] Drive A Floppy 3 Mode Support [1.44M, 3.5"] [Disabled] Halt On [All, But Keyboard] Base Memory Extended Memory Total Memory 640K 1022M 1024M Move Enter: Select F5: Previous Values +/-/PU/PD: Value F10: Save F6: Fail-Safe Defaults ESC: Exit F1: General Help F7...

Manual
Page 42
...keyboard or a floppy disk drive error but it will not stop . Base Memory Also called conventional memory. BIOS Setup - 42 - Floppy 3 Mode Support Allows you to None. Total Memory The total amount of memory installed on the hard drive. Head Number of the currently installed hard drive.... a keyboard error but stop for all other errors. All, But Keyboard The system boot will stop for the MS-DOS operating system. Memory These fields are read-only and are : None, 360K/5.25", 1.2M/5.25", 720K/3.5", 1.44M/3.5", 2.88M/3.5". Sector Number of floppy ...
...keyboard or a floppy disk drive error but it will not stop . Base Memory Also called conventional memory. BIOS Setup - 42 - Floppy 3 Mode Support Allows you to None. Total Memory The total amount of memory installed on the hard drive. Head Number of the currently installed hard drive.... a keyboard error but stop for all other errors. All, But Keyboard The system boot will stop for the MS-DOS operating system. Memory These fields are read-only and are : None, 360K/5.25", 1.2M/5.25", 720K/3.5", 1.44M/3.5", 2.88M/3.5". Sector Number of floppy ...

Manual
Page 43
to 3 (Note) No-Execute Memory Protect (Note) CPU Enhanced Halt (C1E) (Note) CPU Thermal Monitor 2(TM2) (Note) CPU EIST Function (Note) Virtualization Technology (Note) Delay For HDD (Secs) Backup BIOS ...
to 3 (Note) No-Execute Memory Protect (Note) CPU Enhanced Halt (C1E) (Note) CPU Thermal Monitor 2(TM2) (Note) CPU EIST Function (Note) Virtualization Technology (Note) Delay For HDD (Secs) Backup BIOS ...

Manual
Page 44
... using an Intel CPU that supports multi-core technology. Depending on CPU loading, Intel EIST technology can function as Windows NT4.0. (Default: Disabled) No-Execute Memory Protect (Note) Enables or disables Intel Execute Disable Bit function. When enabled, the CPU core frequency and voltage will be reduced during system halt state...
... using an Intel CPU that supports multi-core technology. Depending on CPU loading, Intel EIST technology can function as Windows NT4.0. (Default: Disabled) No-Execute Memory Protect (Note) Enables or disables Intel Execute Disable Bit function. When enabled, the CPU core frequency and voltage will be reduced during system halt state...
Manual
Page 45
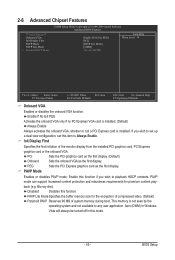
... mode. - 45 - Aero (DWM) in Windows Vista will always be turned off in this function. PAVP Lite Mode Specifies the buffer memory size for premium content playback (e.g. PEG Sets the PCI Express graphics card as the first display. 2-6 Advanced Chipset Features CMOS Setup Utility-Copyright... Help F7: Optimized Defaults Onboard VGA Enables or disables the onboard VGA function. Init Display First Specifies the first initiation of system memory during boot. PCI Sets the PCI graphics card as the first display. (Default) Onboard Sets the onboard VGA as the first display...
... mode. - 45 - Aero (DWM) in Windows Vista will always be turned off in this function. PAVP Lite Mode Specifies the buffer memory size for premium content playback (e.g. PEG Sets the PCI Express graphics card as the first display. 2-6 Advanced Chipset Features CMOS Setup Utility-Copyright... Help F7: Optimized Defaults Onboard VGA Enables or disables the onboard VGA function. Init Display First Specifies the first initiation of system memory during boot. PCI Sets the PCI graphics card as the first display. (Default) Onboard Sets the onboard VGA as the first display...
Manual
Page 46
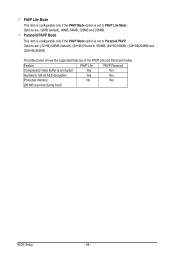
.... Paranoid PAVP Mode This item is configurable only if the PAVP Mode option is encrypted Yes Yes Hardware 128-bit AES decryption Yes Yes Protected memory No Yes (96 MB reserved during boot) BIOS Setup - 46 - PAVP Lite Mode This item is configurable only if the PAVP Mode option is set...
.... Paranoid PAVP Mode This item is configurable only if the PAVP Mode option is encrypted Yes Yes Hardware 128-bit AES decryption Yes Yes Protected memory No Yes (96 MB reserved during boot) BIOS Setup - 46 - PAVP Lite Mode This item is configurable only if the PAVP Mode option is set...


