
Manual
Page 3
...the property of this manual may be made by any means without prior notice. by GIGA-BYTE TECHNOLOGY CO., LTD as the exclu- GIGABYTE UNITED INC. sive global distributor of documentations: „ For detailed product information, carefully read the User's Manual. „ For ... the use of this manual are legally registered to use GIGABYTE's unique features, read or download the information on/from the Support\Motherboard\Technology Guide page on your motherboard revision before updating motherboard BIOS, drivers, or when looking for technical information. The logo is designated...
...the property of this manual may be made by any means without prior notice. by GIGA-BYTE TECHNOLOGY CO., LTD as the exclu- GIGABYTE UNITED INC. sive global distributor of documentations: „ For detailed product information, carefully read the User's Manual. „ For ... the use of this manual are legally registered to use GIGABYTE's unique features, read or download the information on/from the Support\Motherboard\Technology Guide page on your motherboard revision before updating motherboard BIOS, drivers, or when looking for technical information. The logo is designated...
Manual
Page 5
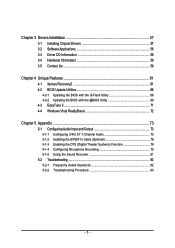
... 57 3-1 Installing Chipset Drivers 57 3-2 SoftwareApplications 58 3-3 Driver CD Information 58 3-4 Hardware Information 59 3-5 Contact Us ...59 Chapter 4 Unique Features 61 4-1 Xpress Recovery2 61 4-2 BIOS Update Utilities 66 4-2-1 Updating the BIOS with the Q-...
... 57 3-1 Installing Chipset Drivers 57 3-2 SoftwareApplications 58 3-3 Driver CD Information 58 3-4 Hardware Information 59 3-5 Contact Us ...59 Chapter 4 Unique Features 61 4-1 Xpress Recovery2 61 4-2 BIOS Update Utilities 66 4-2-1 Updating the BIOS with the Q-...

Manual
Page 6
Box Contents GA-G33M-S2H motherboard Motherboard driver disk User's Manual Intel® LGA775 CPU Installation Guide One IDE cable and one floppy disk drive cable Two SATA 3Gb/s cables I/O Shield The box ...
Box Contents GA-G33M-S2H motherboard Motherboard driver disk User's Manual Intel® LGA775 CPU Installation Guide One IDE cable and one floppy disk drive cable Two SATA 3Gb/s cables I/O Shield The box ...
Manual
Page 12
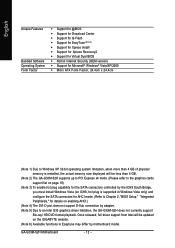
...24.4cm x 24.4cm (Note 1) Due to Windows XP 32-bit operating system limitation, when more than 4 GB. (Note 2) The GA-G33M-S2H supports up to PCI Express x4 mode. (Please refer to the graphics cards support list on page 19) (Note 3) To enable hot plug ...Peripherals," for details on the GIGABYTE website. (Note 6) Available functions in Easytune may differ by adapter. (Note 5) Due to an Intel G33 graphics driver limitation, the GA-G33M-S2H does not currently support Blu-ray/ HD DVD format playback. GA-G33M-S2H Motherboard - 12 - Once released, full driver support from Intel will be ...
...24.4cm x 24.4cm (Note 1) Due to Windows XP 32-bit operating system limitation, when more than 4 GB. (Note 2) The GA-G33M-S2H supports up to PCI Express x4 mode. (Please refer to the graphics cards support list on page 19) (Note 3) To enable hot plug ...Peripherals," for details on the GIGABYTE website. (Note 6) Available functions in Easytune may differ by adapter. (Note 5) Due to an Intel G33 graphics driver limitation, the GA-G33M-S2H does not currently support Blu-ray/ HD DVD format playback. GA-G33M-S2H Motherboard - 12 - Once released, full driver support from Intel will be ...
Manual
Page 18
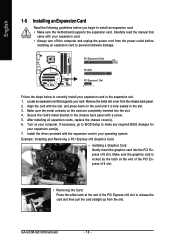
... at the end of the PCI Express x16 slot to release the card and then pull the card straight up from the slot. Install the driver provided with a screw. 5. English 1-5 Installing an Expansion Card Read the following guidelines before installing an expansion card to prevent hardware damage. Remove the metal slot... graphics card is fully seated in your expansion card. • Always turn off the computer and unplug the power cord from the chassis back panel. 2. GA-G33M-S2H Motherboard - 18 -
... at the end of the PCI Express x16 slot to release the card and then pull the card straight up from the slot. Install the driver provided with a screw. 5. English 1-5 Installing an Expansion Card Read the following guidelines before installing an expansion card to prevent hardware damage. Remove the metal slot... graphics card is fully seated in your expansion card. • Always turn off the computer and unplug the power cord from the chassis back panel. 2. GA-G33M-S2H Motherboard - 18 -
Manual
Page 19
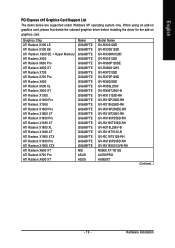
...ATI Radeon X1950 Pro ATI Radeon X1950 XTX ATI Radeon X600 XT ATI Radeon X700 Pro ATI Radeon X800 XT Maker GIGABYTE GIGABYTE GIGABYTE GIGABYTE GIGABYTE GIGABYTE GIGABYTE GIGABYTE GIGABYTE GIGABYTE GIGABYTE GIGABYTE GIGABYTE GIGABYTE GIGABYTE GIGABYTE GIGABYTE GIGABYTE GIGABYTE GIGABYTE GIGABYTE GIGABYTE GIGABYTE MSI ASUS ASUS Model Name GV-RX30128D GV-RX30S128D GV-RX30HM128D GV-RX55128D GV-RX60P128DE GV-RX60X128V GV-RX70128D GV-... operating system only. When using an add-on graphics card, please first delete the onboard graphics driver before installing the driver for the add-on graphics card.
...ATI Radeon X1950 Pro ATI Radeon X1950 XTX ATI Radeon X600 XT ATI Radeon X700 Pro ATI Radeon X800 XT Maker GIGABYTE GIGABYTE GIGABYTE GIGABYTE GIGABYTE GIGABYTE GIGABYTE GIGABYTE GIGABYTE GIGABYTE GIGABYTE GIGABYTE GIGABYTE GIGABYTE GIGABYTE GIGABYTE GIGABYTE GIGABYTE GIGABYTE GIGABYTE GIGABYTE GIGABYTE GIGABYTE MSI ASUS ASUS Model Name GV-RX30128D GV-RX30S128D GV-RX30HM128D GV-RX55128D GV-RX60P128DE GV-RX60X128V GV-RX70128D GV-... operating system only. When using an add-on graphics card, please first delete the onboard graphics driver before installing the driver for the add-on graphics card.
Manual
Page 21
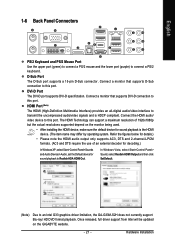
...supported depend on the GIGABYTE website. - 21 - Hardware Installation English 1-6 Back Panel Connectors PS/2 Keyboard and PS/2 Mouse Port Use the upper port (green) to connect a PS/2 mouse and the lower port (purple) to an Intel G33 graphics driver limitation, the GA-G33M-S2H does not currently support ...select Start>Control Panel>Sounds and Audio Devices>Audio, set the Default device for sound playback is HDCP compliant. Once released, full driver support from Intel will be updated on the monitor being used. • After installing the HDMI device, make sure the default device...
...supported depend on the GIGABYTE website. - 21 - Hardware Installation English 1-6 Back Panel Connectors PS/2 Keyboard and PS/2 Mouse Port Use the upper port (green) to connect a PS/2 mouse and the lower port (purple) to an Intel G33 graphics driver limitation, the GA-G33M-S2H does not currently support ...select Start>Control Panel>Sounds and Audio Devices>Audio, set the Default device for sound playback is HDCP compliant. Once released, full driver support from Intel will be updated on the monitor being used. • After installing the HDMI device, make sure the default device...

Manual
Page 36
Intel G33 BIOS for G33M-S2H F1a . . . . : BIOS Setup/Q-Flash : XpressRecovery2 : Boot Menu : Qflash 06/26/2007-G33-ICH9-6A79OG0OC-00 Function...The following screen may appear when the computer boots. In Boot Menu, use the up hard drive data using the motherboard driver disk, the key can access Boot Menu again to change the first boot device setting as needed. : Q-Flash Press the... Boot Menu is effective for subsequent access to accept. To exit Boot Menu, press . GA-G33M-S2H Motherboard - 36 - The system will still be used for one time only. Note: The setting in Boot Menu.
Intel G33 BIOS for G33M-S2H F1a . . . . : BIOS Setup/Q-Flash : XpressRecovery2 : Boot Menu : Qflash 06/26/2007-G33-ICH9-6A79OG0OC-00 Function...The following screen may appear when the computer boots. In Boot Menu, use the up hard drive data using the motherboard driver disk, the key can access Boot Menu again to change the first boot device setting as needed. : Q-Flash Press the... Boot Menu is effective for subsequent access to accept. To exit Boot Menu, press . GA-G33M-S2H Motherboard - 36 - The system will still be used for one time only. Note: The setting in Boot Menu.
Manual
Page 43
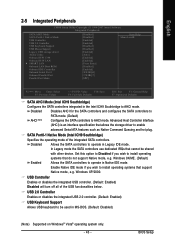
... use dedicated IRQs that do not support Native mode, e.g. Set this option to Disabled if you wish to install operating systems that allows the storage driver to AHCI mode.
... use dedicated IRQs that do not support Native mode, e.g. Set this option to Disabled if you wish to install operating systems that allows the storage driver to AHCI mode.

Manual
Page 50
... when Intel® QST is set for a 3-pin CPU fan. Auto Lets BIOS autodetect the type of Intel Host Embedded Control Interface (HECI) driver from the motherboard driver disk. GA-G33M-S2H Motherboard - 50 - Auto Lets BIOS control CPU fan speed. (Default) Intel(R) QST Allows CPU fan speed to be set to Intel(R) QST, make...
... when Intel® QST is set for a 3-pin CPU fan. Auto Lets BIOS autodetect the type of Intel Host Embedded Control Interface (HECI) driver from the motherboard driver disk. GA-G33M-S2H Motherboard - 50 - Auto Lets BIOS control CPU fan speed. (Default) Intel(R) QST Allows CPU fan speed to be set to Intel(R) QST, make...
Manual
Page 57
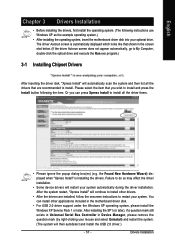
...appear automatically, go to My Computer, double-click the optical drive and execute the Run.exe program.) 3-1 Installing Chipset Drivers After inserting the driver disk, "Xpress Install" will continue to install other applications included in Device Manager, please remove the question mark (by... After the system restart, "Xpress Install" will automatically scan the system and then list all the driver items. • Please ignore the popup dialog box(es) (e.g. Drivers Installation the Found New Hardware Wizard) displayed when "Xpress Install" is automatically displayed which looks like...
...appear automatically, go to My Computer, double-click the optical drive and execute the Run.exe program.) 3-1 Installing Chipset Drivers After inserting the driver disk, "Xpress Install" will continue to install other applications included in Device Manager, please remove the question mark (by... After the system restart, "Xpress Install" will automatically scan the system and then list all the driver items. • Please ignore the popup dialog box(es) (e.g. Drivers Installation the Found New Hardware Wizard) displayed when "Xpress Install" is automatically displayed which looks like...
Manual
Page 58
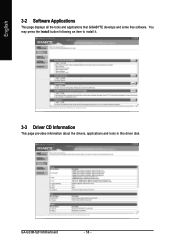
GA-G33M-S2H Motherboard - 58 - You may press the Install button following an item to install it. 3-3 Driver CD Information This page provides information about the drivers, applications and tools in this driver disk. English 3-2 Software Applications This page displays all the tools and applications that GIGABYTE develops and some free software.
GA-G33M-S2H Motherboard - 58 - You may press the Install button following an item to install it. 3-3 Driver CD Information This page provides information about the drivers, applications and tools in this driver disk. English 3-2 Software Applications This page displays all the tools and applications that GIGABYTE develops and some free software.
Manual
Page 59
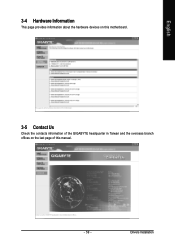
Drivers Installation English 3-4 Hardware Information This page provides information about the hardware devices on this motherboard. 3-5 Contact Us Check the contacts information of the GIGABYTE headquarter in Taiwan and the overseas branch offices on the last page of this manual. - 59 -
Drivers Installation English 3-4 Hardware Information This page provides information about the hardware devices on this motherboard. 3-5 Contact Us Check the contacts information of the GIGABYTE headquarter in Taiwan and the overseas branch offices on the last page of this manual. - 59 -

Manual
Page 61
.../restored. • It takes longer to back up a hard drive than to quickly compress and back up your system soon after the operating system and drivers are not supported. Supporting NTFS, FAT32, and FAT16 file systems, Xpress Recovery2 can only back up your system data and perform restoration of the hard...
.../restored. • It takes longer to back up a hard drive than to quickly compress and back up your system soon after the operating system and drivers are not supported. Supporting NTFS, FAT32, and FAT16 file systems, Xpress Recovery2 can only back up your system data and perform restoration of the hard...
Manual
Page 64
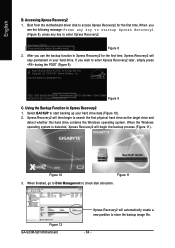
Boot from the motherboard driver disk to store the backup image file. - 64 - Select BACKUP to check disk allocation. Figure 12 GA-G33M-S2H Motherboard Xpress Recovery2 will begin to enter Xpress Recovery2. . . Intel G33 BIOS for the first time. When ... begin the backup process (Figure 11). When the Windows operating system is detected, Xpress Recovery2 will automatically create a new partition to access Xpress Recovery2 for G33M-S2H F1a . . . . : BIOS Setup/Q-Flash : XpressRecovery2 : Boot Menu : Qflash 06/26/2007-G33-ICH9-6A79OG0OC-00 Figure 9 C. English B....
Boot from the motherboard driver disk to store the backup image file. - 64 - Select BACKUP to check disk allocation. Figure 12 GA-G33M-S2H Motherboard Xpress Recovery2 will begin to enter Xpress Recovery2. . . Intel G33 BIOS for the first time. When ... begin the backup process (Figure 11). When the Windows operating system is detected, Xpress Recovery2 will automatically create a new partition to access Xpress Recovery2 for G33M-S2H F1a . . . . : BIOS Setup/Q-Flash : XpressRecovery2 : Boot Menu : Qflash 06/26/2007-G33-ICH9-6A79OG0OC-00 Figure 9 C. English B....
Manual
Page 69
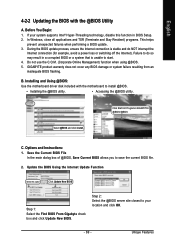
... the Internet connection (for example, avoid a power loss or switching off the Internet). Installing and Using @BIOS: Use the motherboard driver disk included with the @BIOS Utility A. Before You Begin: 1. In Windows, close all applications and TSR (Terminate and Stay Resident... function when using @BIOS. 5. Options and Instructions: 1. Click Start>All Programs>GIGABYTE> @BIOS>@BIOS C. Step 2: Select the @BIOS server site closest to save the current BIOS file. 2. GIGABYTE product warranty does not cover any BIOS damage or system failure resulting from an inadequate...
... the Internet connection (for example, avoid a power loss or switching off the Internet). Installing and Using @BIOS: Use the motherboard driver disk included with the @BIOS Utility A. Before You Begin: 1. In Windows, close all applications and TSR (Terminate and Stay Resident... function when using @BIOS. 5. Options and Instructions: 1. Click Start>All Programs>GIGABYTE> @BIOS>@BIOS C. Step 2: Select the @BIOS server site closest to save the current BIOS file. 2. GIGABYTE product warranty does not cover any BIOS damage or system failure resulting from an inadequate...

Manual
Page 73
... microphone functionality. • If your microphone to the Mic in or Line in and out) to change the function for each jack through the audio driver. The integrated HD (High Definition) audio provides Center/Subwoofer Speaker Out Rear Speaker Out Line In Front Speaker Out jack retasking capability that support 48KHz...
... microphone functionality. • If your microphone to the Mic in or Line in and out) to change the function for each jack through the audio driver. The integrated HD (High Definition) audio provides Center/Subwoofer Speaker Out Rear Speaker Out Line In Front Speaker Out jack retasking capability that support 48KHz...

Manual
Page 74
... High Definition Audio" has been installed from the motherboard driver disk and your system tray. Then click OK to access the Audio Control Panel. GA-G33M-S2H Motherboard - 74 - Double-click the icon to complete the configuration. In the speaker list on the left, select 2CH Speaker, 4CH Speaker... Click the Audio I/O tab. Configuring Speakers: (The following instructions use Windows XP as the example operating system.) Step 1: After installing the audio driver, the Audio Manager icon will appear in your operating system has been updated with the latest Service Pack for Windows.
... High Definition Audio" has been installed from the motherboard driver disk and your system tray. Then click OK to access the Audio Control Panel. GA-G33M-S2H Motherboard - 74 - Double-click the icon to complete the configuration. In the speaker list on the left, select 2CH Speaker, 4CH Speaker... Click the Audio I/O tab. Configuring Speakers: (The following instructions use Windows XP as the example operating system.) Step 1: After installing the audio driver, the Audio Manager icon will appear in your operating system has been updated with the latest Service Pack for Windows.
Manual
Page 78
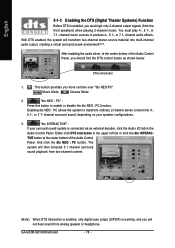
You must play 4-, 5.1-, or 7.1- channel audio effects. After installing the audio driver, at the center bottom of the Audio Control Panel, you should find the DTS control button as shown below: DTS control button 1. : This button provides ... the dts NEO : PC function. "dts NEO : PC" : Press this button to produce 4-, 5.1-, or 7.1- TIVE button at the center bottom of the Audio Control Panel. GA-G33M-S2H Motherboard - 78 - The system will then simulate 5.1 channel surround sound playback from analog speaker or headphone. Cinema Mode 2.
You must play 4-, 5.1-, or 7.1- channel audio effects. After installing the audio driver, at the center bottom of the Audio Control Panel, you should find the DTS control button as shown below: DTS control button 1. : This button provides ... the dts NEO : PC function. "dts NEO : PC" : Press this button to produce 4-, 5.1-, or 7.1- TIVE button at the center bottom of the Audio Control Panel. GA-G33M-S2H Motherboard - 78 - The system will then simulate 5.1 channel surround sound playback from analog speaker or headphone. Cinema Mode 2.
Manual
Page 79
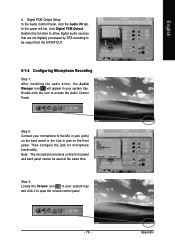
... Line in jack on the front panel and back panel cannot be output from the S/PDIF OUT. 5-1-4 Configuring Microphone Recording Step 1: After installing the audio driver, the Audio Manager icon will appear in your microphone to be used at the same time. Step 2: Connect your system tray and click it to...
... Line in jack on the front panel and back panel cannot be output from the S/PDIF OUT. 5-1-4 Configuring Microphone Recording Step 1: After installing the audio driver, the Audio Manager icon will appear in your microphone to be used at the same time. Step 2: Connect your system tray and click it to...


