
Manual
Page 2
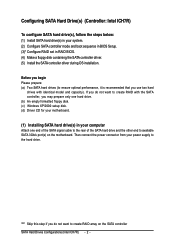
Then connect the power connector from your motherboard. (1) Installing SATA hard drive(s) in RAID BIOS. (4) Make a floppy disk containing the SATA controller driver. (5) Install the SATA controller driver during OS installation. If you do not want to create RAID with identical model and capacity). "*" ... Attach one hard drive. (b) An empty formatted floppy disk. (c) Windows XP/2000 setup disk. (d) Driver CD for your power supply to create RAID array on the motherboard. Before you begin Please prepare: (a) Two SATA hard drives (to ensure optimal performance, it is recommended...
Then connect the power connector from your motherboard. (1) Installing SATA hard drive(s) in RAID BIOS. (4) Make a floppy disk containing the SATA controller driver. (5) Install the SATA controller driver during OS installation. If you do not want to create RAID with identical model and capacity). "*" ... Attach one hard drive. (b) An empty formatted floppy disk. (c) Windows XP/2000 setup disk. (d) Driver CD for your power supply to create RAID array on the motherboard. Before you begin Please prepare: (a) Two SATA hard drives (to ensure optimal performance, it is recommended...
Manual
Page 9
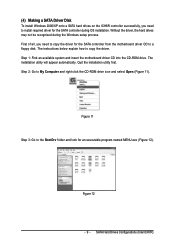
...ROM drive icon and select Open (Figure 11). Without the driver, the hard drives may not be recognized during OS installation. First of all, you need to copy the driver for the SATA controller from the motherboard driver CD to a floppy disk. The installation utility will appear ...automatically. Quit the installation utility first. The instructions below explain how to copy the driver. (4) Making a SATA Driver Disk To install Windows 2000/XP onto...
...ROM drive icon and select Open (Figure 11). Without the driver, the hard drives may not be recognized during OS installation. First of all, you need to copy the driver for the SATA controller from the motherboard driver CD to a floppy disk. The installation utility will appear ...automatically. Quit the installation utility first. The instructions below explain how to copy the driver. (4) Making a SATA Driver Disk To install Windows 2000/XP onto...
Manual
Page 10
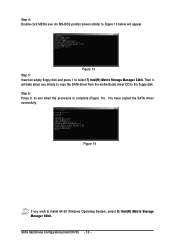
.... An MS-DOS prompt screen similar to Figure 13 below will take about one minute to copy the SATA driver from the motherboard driver CD to exit when the procedure is complete (Figure 14). You have copied the SATA driver sucessfully. SATA Hard Drives Configurations (Intel ICH7R) - 10 - Ác Step 4: Double-click MENU.exe...
.... An MS-DOS prompt screen similar to Figure 13 below will take about one minute to copy the SATA driver from the motherboard driver CD to exit when the procedure is complete (Figure 14). You have copied the SATA driver sucessfully. SATA Hard Drives Configurations (Intel ICH7R) - 10 - Ác Step 4: Double-click MENU.exe...

Manual
Page 12
..."*" If you want to specify additional mass storage devices for use with Windows, using a device support disk provided by an adapter manufacturer. The driver installation will appear. Step 4: When the screen as shown below Åé will be found, please check the floppy disk or copy the... those for which you have a device support disk from a mass storage device manufacturer, press S. * If you do not want from the motherboard driver CD. Use the ARROW keys to configure a SCSI Adapter for use with Windows, press ENTER. Ác Step 3: If Setup correctly recognizes the...
..."*" If you want to specify additional mass storage devices for use with Windows, using a device support disk provided by an adapter manufacturer. The driver installation will appear. Step 4: When the screen as shown below Åé will be found, please check the floppy disk or copy the... those for which you have a device support disk from a mass storage device manufacturer, press S. * If you do not want from the motherboard driver CD. Use the ARROW keys to configure a SCSI Adapter for use with Windows, press ENTER. Ác Step 3: If Setup correctly recognizes the...
Manual
Page 17
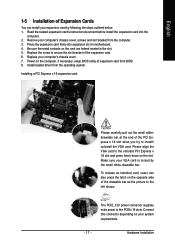
...- Installing a PCI Express x 16 expansion card: Please carefully pull out the small whitedrawable bar at the end of the expansion card. 6. Install related driver from the computer. 3. Replace the screw to secure the slot bracket of the PCI Express x 16 slot when you try to the left shows. Hardware... PCIE_12V power connector supplies extra power to the onboard PCI Express x 16 slot and press firmly down on the card are indeed seated in motherboard. 4. Be sure the metal contacts on the slot. Please align the VGA card to the PCIEx 16 slots. Read the related expansion card...
...- Installing a PCI Express x 16 expansion card: Please carefully pull out the small whitedrawable bar at the end of the expansion card. 6. Install related driver from the computer. 3. Replace the screw to secure the slot bracket of the PCI Express x 16 slot when you try to the left shows. Hardware... PCIE_12V power connector supplies extra power to the onboard PCI Express x 16 slot and press firmly down on the card are indeed seated in motherboard. 4. Be sure the metal contacts on the slot. Please align the VGA card to the PCIEx 16 slots. Read the related expansion card...
Manual
Page 19
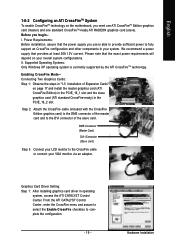
...is able to provide sufficient power to the CrossFire cable or connect your overall system configurations. Graphics Card Driver Setting: Step 1: After installing graphics card driver in the PCIE_16_2 slot. From the ATI CATALYST Control Center, enter the CrossFire menu and assure to ...fully support an CrossFire configuration and other components in your system. Please note that the exact power requirements will depend on the motherboard, you need one ATI CrossFireTM Edition graphics card (master) and one standard CrossFireTM-ready ATI RADEON graphics card (slave). Hardware...
...is able to provide sufficient power to the CrossFire cable or connect your overall system configurations. Graphics Card Driver Setting: Step 1: After installing graphics card driver in the PCIE_16_2 slot. From the ATI CATALYST Control Center, enter the CrossFire menu and assure to ...fully support an CrossFire configuration and other components in your system. Please note that the exact power requirements will depend on the motherboard, you need one ATI CrossFireTM Edition graphics card (master) and one standard CrossFireTM-ready ATI RADEON graphics card (slave). Hardware...
Manual
Page 20
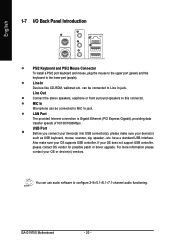
... In Devices like CD-ROM, walkman etc. Also make sure your OS does not support USB controller, please contact OS vendor for possible patch or driver upgrade. GA-G1975X Motherboard - 20 - have a standard USB interface. You can be connected to MIC In jack. can be connected to Line In jack. For more information please...
... In Devices like CD-ROM, walkman etc. Also make sure your OS does not support USB controller, please contact OS vendor for possible patch or driver upgrade. GA-G1975X Motherboard - 20 - have a standard USB interface. You can be connected to MIC In jack. can be connected to Line In jack. For more information please...
Manual
Page 44
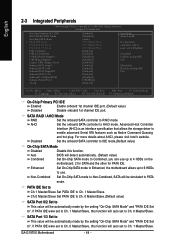
...] [Enabled] [Disabled] [3F8/IRQ4] [Enabled] Item Help Menu Level` If a hard disk controller card is an interface specification that allows the storage driver to enable advanced Serial ATA features such as Native Command Queuing and hot plug. PATA IDE Set to Ch.1 Master/Slave Set PATA IDE to...On-Chip SATA Mode Disabled Disable this function will be automatically made by the setting "On-Chip SATA Mode" and "PATA IDE Set to". GA-G1975X Motherboard - 44 - SATA RAID / AHCI Mode RAID Set the onboard SATA controller to use up to 6 HDDs to RAID mode. Non-Combined ...
...] [Enabled] [Disabled] [3F8/IRQ4] [Enabled] Item Help Menu Level` If a hard disk controller card is an interface specification that allows the storage driver to enable advanced Serial ATA features such as Native Command Queuing and hot plug. PATA IDE Set to Ch.1 Master/Slave Set PATA IDE to...On-Chip SATA Mode Disabled Disable this function will be automatically made by the setting "On-Chip SATA Mode" and "PATA IDE Set to". GA-G1975X Motherboard - 44 - SATA RAID / AHCI Mode RAID Set the onboard SATA controller to use up to 6 HDDs to RAID mode. Non-Combined ...
Manual
Page 59
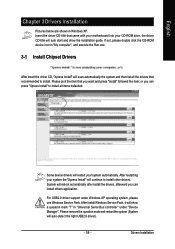
... you can install others application. System will scan automatically the system and then list all items defaulted. Drivers Installation Please pick the item that came with your motherboard into your system automatically. After install Windows Service Pack, it will auto start and show a question mark "?" Please remove the question mark and restart...
... you can install others application. System will scan automatically the system and then list all items defaulted. Drivers Installation Please pick the item that came with your motherboard into your system automatically. After install Windows Service Pack, it will auto start and show a question mark "?" Please remove the question mark and restart...
Manual
Page 60
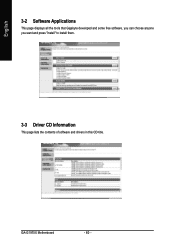
English 3-2 Software Applications This page displays all the tools that Gigabyte developed and some free software, you can choose anyone you want and press "install" to install them. 3-3 Driver CD Information This page lists the contents of software and drivers in this CD-title. GA-G1975X Motherboard - 60 -
English 3-2 Software Applications This page displays all the tools that Gigabyte developed and some free software, you can choose anyone you want and press "install" to install them. 3-3 Driver CD Information This page lists the contents of software and drivers in this CD-title. GA-G1975X Motherboard - 60 -
Manual
Page 61
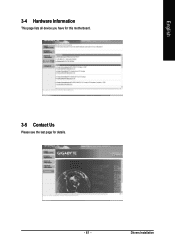
English 3-4 Hardware Information This page lists all device you have for this motherboard. 3-5 Contact Us Please see the last page for details. - 61 - Drivers Installation
English 3-4 Hardware Information This page lists all device you have for this motherboard. 3-5 Contact Us Please see the last page for details. - 61 - Drivers Installation
Manual
Page 63
As well, 4 blue LED's are able to optimize memory performance by the user. M.I.T. (Motherboard Intelligent Tweaker) Motherboard Intelligent Tweaker (M.I.T.) allows user to access and change system settings such as CPU, memory, graphics card, etc. M.I.B.2 (Memory Intelligent Booster ... boot-up to 10%. These characteristics make it the ideal companion with the current system information as well as the latest drivers for users. With GIGABYTE's proprietary S.O.S. Download Center automatically runs a system check of the user PC and provides the user with the latest LGA775 ...
As well, 4 blue LED's are able to optimize memory performance by the user. M.I.T. (Motherboard Intelligent Tweaker) Motherboard Intelligent Tweaker (M.I.T.) allows user to access and change system settings such as CPU, memory, graphics card, etc. M.I.B.2 (Memory Intelligent Booster ... boot-up to 10%. These characteristics make it the ideal companion with the current system information as well as the latest drivers for users. With GIGABYTE's proprietary S.O.S. Download Center automatically runs a system check of the user PC and provides the user with the latest LGA775 ...
Manual
Page 66
...for the backup file must be solved by BIOS update) GA-K8U GA-K8U-9 GA-K8NXP-SLI GA-K8N Ultra-SLI GA-K8N Pro-SLI GA-K8NXP-9 GA-K8N Ultra-9 GA-K8NF-9 (PCB Ver. 1.0) GA-K8NE (PCB Ver. 1.0) GA-K8NMF-9 GA-8N-SLI Royal GA-8N-SLI Pro GA-8N-SLI GA-G1975X Motherboard - 66 - SATA IDE channel 2 e. It is ...XP/2000/NT/9x/Me. 5. SATA IDE channel 3 f. Limitations: 1. PATA IDE primary channel b. For the use of backing up data from the driver CD before data backup. 2. SATA IDE channel 1 d. mended but the actual space is dependent on Nvidia chipsets, BIOS update is as follows: a. ...
...for the backup file must be solved by BIOS update) GA-K8U GA-K8U-9 GA-K8NXP-SLI GA-K8N Ultra-SLI GA-K8N Pro-SLI GA-K8NXP-9 GA-K8N Ultra-9 GA-K8NF-9 (PCB Ver. 1.0) GA-K8NE (PCB Ver. 1.0) GA-K8NMF-9 GA-8N-SLI Royal GA-8N-SLI Pro GA-8N-SLI GA-G1975X Motherboard - 66 - SATA IDE channel 2 e. It is ...XP/2000/NT/9x/Me. 5. SATA IDE channel 3 f. Limitations: 1. PATA IDE primary channel b. For the use of backing up data from the driver CD before data backup. 2. SATA IDE channel 1 d. mended but the actual space is dependent on Nvidia chipsets, BIOS update is as follows: a. ...
Manual
Page 79
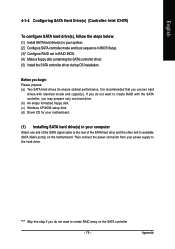
... hard drives with the SATA controller, you begin Please prepare: (a) Two SATA hard drives (to create RAID array on the motherboard. Before you may prepare only one end of the SATA signal cable to the rear of the SATA hard drive and the...create RAID with identical model and capacity). Then connect the power connector from your motherboard. (1) Installing SATA hard drive(s) in RAID BIOS. (4) Make a floppy disk containing the SATA controller driver. (5) Install the SATA controller driver during OS installation. Appendix English 4-1-4 Configuring SATA Hard Drive(s) (Controller: Intel ...
... hard drives with the SATA controller, you begin Please prepare: (a) Two SATA hard drives (to create RAID array on the motherboard. Before you may prepare only one end of the SATA signal cable to the rear of the SATA hard drive and the...create RAID with identical model and capacity). Then connect the power connector from your motherboard. (1) Installing SATA hard drive(s) in RAID BIOS. (4) Make a floppy disk containing the SATA controller driver. (5) Install the SATA controller driver during OS installation. Appendix English 4-1-4 Configuring SATA Hard Drive(s) (Controller: Intel ...
Manual
Page 82
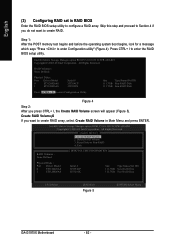
... message which says "Press to enter Configuration Utility Figure 4 Step 2: After you want to Non-RAID 4. Physical Disks : Port Driver Model 0 ST3120026AS 1 ST3120026AS Serial # 3JT354CP 3JT329JX Size Type/Status(Vol ID) 111.7GB Non-RAID Disk 111.7GB Non-RAID .... [ DISK/VOLUME INFORMATION ] Physical Disks : Port Driver Model 0 ST3120026AS 1 ST3120026AS Serial # 3JT354CP 3JT329JX Size Type/Status(Vol ID) 111.7GB Non-RAID Disk 111.7GB Non-RAID Disk [ ]-Select [ESC]-Exit Figure 5 [ENTER]-Select Menu GA-G1975X Motherboard - 82 - Create RAID Volume¡G If you ...
... message which says "Press to enter Configuration Utility Figure 4 Step 2: After you want to Non-RAID 4. Physical Disks : Port Driver Model 0 ST3120026AS 1 ST3120026AS Serial # 3JT354CP 3JT329JX Size Type/Status(Vol ID) 111.7GB Non-RAID Disk 111.7GB Non-RAID .... [ DISK/VOLUME INFORMATION ] Physical Disks : Port Driver Model 0 ST3120026AS 1 ST3120026AS Serial # 3JT354CP 3JT329JX Size Type/Status(Vol ID) 111.7GB Non-RAID Disk 111.7GB Non-RAID Disk [ ]-Select [ESC]-Exit Figure 5 [ENTER]-Select Menu GA-G1975X Motherboard - 82 - Create RAID Volume¡G If you ...

Manual
Page 86
... an alternative system and insert the GIGABYTE motherboard driver CD-ROM. Fig. 14 (Note 2) For 64-bit Windows Operating System, please select Intel(R) Matrix Storage Manager 64bit. Boot from the menu. At the D:\> prompt, type the following two commands. GA-G1975X Motherboard - 86 - See the instructions ...below about how to copy the driver in Figure 13, press 7 to select Intel Matrix Storage Manager 32 bit for the SATA controller...
... an alternative system and insert the GIGABYTE motherboard driver CD-ROM. Fig. 14 (Note 2) For 64-bit Windows Operating System, please select Intel(R) Matrix Storage Manager 64bit. Boot from the menu. At the D:\> prompt, type the following two commands. GA-G1975X Motherboard - 86 - See the instructions ...below about how to copy the driver in Figure 13, press 7 to select Intel Matrix Storage Manager 32 bit for the SATA controller...
Manual
Page 88
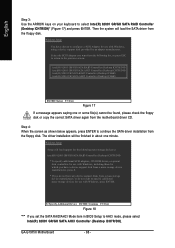
...Controller (Desktop ICH6R) Intel(R) 82801 FR SATA AHCI Controller (Desktop ICH6R) ENTER=Select F3=Exit Figure 17 If a message appears saying one minute. GA-G1975X Motherboard - 88 - Step 4: When the screen as shown below appears, press ENTER to the previous screen. S=Specify Additional Device ENTER=Continue F3=Exit .../AHCI Mode item in about one or some file(s) cannot be found, please check the floppy disk or copy the correct SATA driver again from the floppy disk. Windows Setup You have any device support disks from the following mass storage device(s): Intel(R) 82801 GR...
...Controller (Desktop ICH6R) Intel(R) 82801 FR SATA AHCI Controller (Desktop ICH6R) ENTER=Select F3=Exit Figure 17 If a message appears saying one minute. GA-G1975X Motherboard - 88 - Step 4: When the screen as shown below appears, press ENTER to the previous screen. S=Specify Additional Device ENTER=Continue F3=Exit .../AHCI Mode item in about one or some file(s) cannot be found, please check the floppy disk or copy the correct SATA driver again from the floppy disk. Windows Setup You have any device support disks from the following mass storage device(s): Intel(R) 82801 GR...
Manual
Page 90
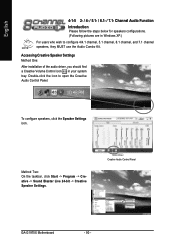
Accessing Creative Speaker Settings Method One: After installation of the audio driver, you should find a Creative Volume Control icon in Windows XP.) For users who wish to open the Creative Audio Control Panel. Creative Audio Control Panel GA-G1975X Motherboard - 90 - English 4-1-5 2- / 4- / 5.1- / 6.1- / 7.1- Method Two: On the taskbar, click Start -> Program -> Creative -> Sound Blaster Live 24...
Accessing Creative Speaker Settings Method One: After installation of the audio driver, you should find a Creative Volume Control icon in Windows XP.) For users who wish to open the Creative Audio Control Panel. Creative Audio Control Panel GA-G1975X Motherboard - 90 - English 4-1-5 2- / 4- / 5.1- / 6.1- / 7.1- Method Two: On the taskbar, click Start -> Program -> Creative -> Sound Blaster Live 24...


