
Manual
Page 3
... x PATA IDE Set to SATA Port 0/2 Set to SATA Port 1/3 Set to enter BIOS Setup during POST (Power-On Self Test). If you have to Manual or Auto (default) based on your computer and press Del to USB Controller USB 2.0 Controller USB Keyboard Support USB Mouse Support Azalia Codec Onboard H/W 1394...
... x PATA IDE Set to SATA Port 0/2 Set to SATA Port 1/3 Set to enter BIOS Setup during POST (Power-On Self Test). If you have to Manual or Auto (default) based on your computer and press Del to USB Controller USB 2.0 Controller USB Keyboard Support USB Mouse Support Azalia Codec Onboard H/W 1394...
Manual
Page 11
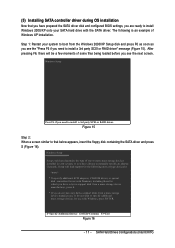
...=Exit Figure 16 - 11 - Currently, Setup will be a few moments of some files being loaded before you see the "Press F6 if you need to manually specify an adapter. Step 1: Restart your SATA hard drive with Windows, press ENTER.
...=Exit Figure 16 - 11 - Currently, Setup will be a few moments of some files being loaded before you see the "Press F6 if you need to manually specify an adapter. Step 1: Restart your SATA hard drive with Windows, press ENTER.
Manual
Page 1
GA-G1975X Intel® Pentium® Processor Extreme Edition Intel® Pentium® D / Pentium® 4 LGA775 Processor Motherboard User's Manual Rev. 1005 12ME-G1975X-1005R * The WEEE marking on the product indicates this product must not be disposed of with user's other household waste and must be handed over to a designated collection point for the recycling of waste electrical and electronic equipment!! * The WEEE marking applies only in European Union's member states.
GA-G1975X Intel® Pentium® Processor Extreme Edition Intel® Pentium® D / Pentium® 4 LGA775 Processor Motherboard User's Manual Rev. 1005 12ME-G1975X-1005R * The WEEE marking on the product indicates this product must not be disposed of with user's other household waste and must be handed over to a designated collection point for the recycling of waste electrical and electronic equipment!! * The WEEE marking applies only in European Union's member states.
Manual
Page 3
...to the "Hardware Installation Guide" included with this manual may be reproduced, copied, translated, or transmitted in the manual are subject to their respective companies. Specifications and features are legally registered to change without Gigabyte's prior written permission. Copyright © 2005 ...GIGA-BYTE TECHNOLOGY CO., LTD. All rights reserved. Product Manual Classification In order to read or download the information you need...
...to the "Hardware Installation Guide" included with this manual may be reproduced, copied, translated, or transmitted in the manual are subject to their respective companies. Specifications and features are legally registered to change without Gigabyte's prior written permission. Copyright © 2005 ...GIGA-BYTE TECHNOLOGY CO., LTD. All rights reserved. Product Manual Classification In order to read or download the information you need...
Manual
Page 9
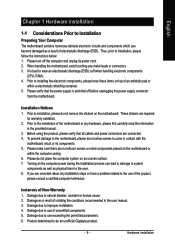
...or metal components placed on the computer power during the installation process can become damaged as physical harm to come in the user manual. 3. Damage due to use of an antistatic pad or within the computer casing. 6. Product determined to installation, please follow... the instructions below: 1. Thus, prior to be an unofficial Gigabyte product. - 9 - When handling the motherboard, avoid touching any hardware, please first carefully read the information in the provided manual. 3. Prior to installation, please do not place the computer system on the...
...or metal components placed on the computer power during the installation process can become damaged as physical harm to come in the user manual. 3. Damage due to use of an antistatic pad or within the computer casing. 6. Product determined to installation, please follow... the instructions below: 1. Thus, prior to be an unofficial Gigabyte product. - 9 - When handling the motherboard, avoid touching any hardware, please first carefully read the information in the provided manual. 3. Prior to installation, please do not place the computer system on the...

Manual
Page 14
... prevent such an occurrence, it is complete. Fig. 6 Finally, please attach the power connector of the heatsink to the heatsink installation section of the user manual) Fig. 5 Please check the back of the installed CPU. Fig. 2 (Turning the push pin along the direction of arrow is to remove the heatsink, on... The top of Female Push Pin Female Push Pin Fig.1 Please apply an even layer of heatsink paste on the surface of motherboard after installing. GA-G1975X Motherboard - 14 -
... prevent such an occurrence, it is complete. Fig. 6 Finally, please attach the power connector of the heatsink to the heatsink installation section of the user manual) Fig. 5 Please check the back of the installed CPU. Fig. 2 (Turning the push pin along the direction of arrow is to remove the heatsink, on... The top of Female Push Pin Female Push Pin Fig.1 Please apply an even layer of heatsink paste on the surface of motherboard after installing. GA-G1975X Motherboard - 14 -
Manual
Page 38
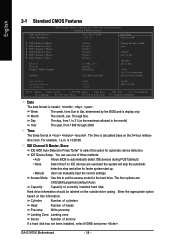
...and allow for faster system start up. • Manual User can use one of three methods: • Auto Allows BIOS to 2098 ESC: Exit F1: General Help F7: Optimized Defaults Date The date format is 13:00:00. GA-G1975X Motherboard - 38 - to set the access mode for... Number of cylinders Head Number of heads Precomp Write precomp Landing Zone Landing zone Sector Number of currently installed hard disk. Jan. You can manually input the correct settings. The time is display only The month, Jan. Hard drive information should be labeled on this if no IDE devices...
...and allow for faster system start up. • Manual User can use one of three methods: • Auto Allows BIOS to 2098 ESC: Exit F1: General Help F7: Optimized Defaults Date The date format is 13:00:00. GA-G1975X Motherboard - 38 - to set the access mode for... Number of cylinders Head Number of heads Precomp Write precomp Landing Zone Landing zone Sector Number of currently installed hard disk. Jan. You can manually input the correct settings. The time is display only The month, Jan. Hard drive information should be labeled on this if no IDE devices...
Manual
Page 47
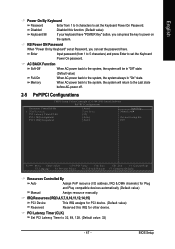
...,15) PCI Device Reserved This IRQ assigns for PCI device. (Default value) Reserved this IRQ for Plug and Play compatible devices automatically (Default value) Manual Assign resource manually. Disabled Keyboard 98 Disabled this INT: KLJI: Move Enter: Select +/-/PU/PD: Value F10: Save ESC: Exit F1: General Help F3: Language F5: Previous...
...,15) PCI Device Reserved This IRQ assigns for PCI device. (Default value) Reserved this IRQ for Plug and Play compatible devices automatically (Default value) Manual Assign resource manually. Disabled Keyboard 98 Disabled this INT: KLJI: Move Enter: Select +/-/PU/PD: Value F10: Save ESC: Exit F1: General Help F3: Language F5: Previous...
Manual
Page 80
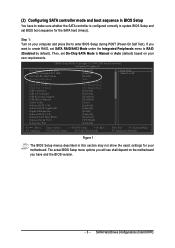
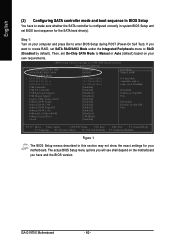
... controller card is configured correctly in system BIOS Setup and set On-Chip SATA Mode to enter BIOS Setup during POST (Power-On Self Test). GA-G1975X Motherboard - 80 - Then, set BIOS boot sequence for your own requirements. The actual BIOS Setup menu options you will see shall depend on ... (2) Configuring SATA controller mode and boot sequence in BIOS Setup You have and the BIOS version. Step 1: Turn on your computer and press Del to Manual or Auto (default) based on -chip IDE Port. : Move Enter: Select +/-/PU/PD: Value F10: Save ESC: Exit F1: General Help F3: Language F5...
... controller card is configured correctly in system BIOS Setup and set On-Chip SATA Mode to enter BIOS Setup during POST (Power-On Self Test). GA-G1975X Motherboard - 80 - Then, set BIOS boot sequence for your own requirements. The actual BIOS Setup menu options you will see shall depend on ... (2) Configuring SATA controller mode and boot sequence in BIOS Setup You have and the BIOS version. Step 1: Turn on your computer and press Del to Manual or Auto (default) based on -chip IDE Port. : Move Enter: Select +/-/PU/PD: Value F10: Save ESC: Exit F1: General Help F3: Language F5...
Manual
Page 87
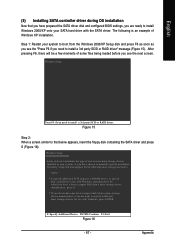
.../XP Setup disk and press F6 as soon as you have any device support disks from a mass storage device manufacturer, press S. * If you need to manually specify an adapter. Figure 15 Step 2: When a screen similar to install Windows 2000/XP onto your SATA hard drive with the SATA driver. Windows Setup...
.../XP Setup disk and press F6 as soon as you have any device support disks from a mass storage device manufacturer, press S. * If you need to manually specify an adapter. Figure 15 Step 2: When a screen similar to install Windows 2000/XP onto your SATA hard drive with the SATA driver. Windows Setup...
Manual
Page 103
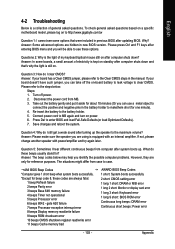
... holder to case. Answer: Please make sure the speaker you can use a metal object to connect the positive and negative pins in the manual. Question 5: Sometimes I cannot see these codes are only for beep code 8, these options. What do these beeps usually stand for one minute...press Ctrl and F1 keys after system boots up the speaker to see some boards, a small amount of electricity is kept on to http://www.gigabyte.com.tw Question 1: I hear different continuous beeps from case to makethem short for ? Question 3: How do I clear CMOS? Disconnect the power...
... holder to case. Answer: Please make sure the speaker you can use a metal object to connect the positive and negative pins in the manual. Question 5: Sometimes I cannot see these codes are only for beep code 8, these options. What do these beeps usually stand for one minute...press Ctrl and F1 keys after system boots up the speaker to see some boards, a small amount of electricity is kept on to http://www.gigabyte.com.tw Question 1: I hear different continuous beeps from case to makethem short for ? Question 3: How do I clear CMOS? Disconnect the power...


