
Manual
Page 3
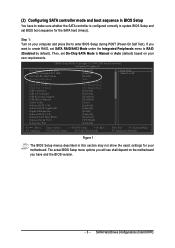
... ESC: Exit F1: General Help F7: Optimized Defaults Figure 1 The BIOS Setup menus described in system BIOS Setup and set On-Chip SATA Mode to Manual or Auto (default) based on your own requirements. SATA Hard Drives Configurations (Intel ICH7R) If you have to enter BIOS Setup during POST (Power-On...
... ESC: Exit F1: General Help F7: Optimized Defaults Figure 1 The BIOS Setup menus described in system BIOS Setup and set On-Chip SATA Mode to Manual or Auto (default) based on your own requirements. SATA Hard Drives Configurations (Intel ICH7R) If you have to enter BIOS Setup during POST (Power-On...
Manual
Page 11
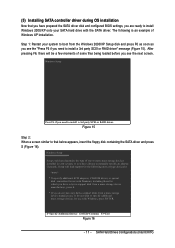
... Setup disk and press F6 as soon as you have any device support disks from a mass storage device manufacturer, press S. * If you are ready to manually specify an adapter. Windows Setup Press F6 if you need to install a 3rd party SCSI or RAID driver" message (Figure 15). Figure 15 Step 2: When...
... Setup disk and press F6 as soon as you have any device support disks from a mass storage device manufacturer, press S. * If you are ready to manually specify an adapter. Windows Setup Press F6 if you need to install a 3rd party SCSI or RAID driver" message (Figure 15). Figure 15 Step 2: When...
Manual
Page 1
GA-G1975X Intel® Pentium® Processor Extreme Edition Intel® Pentium® D / Pentium® 4 LGA775 Processor Motherboard User's Manual Rev. 1005 12ME-G1975X-1005R * The WEEE marking on the product indicates this product must not be disposed of with user's other household waste and must be handed over to a designated collection point for the recycling of waste electrical and electronic equipment!! * The WEEE marking applies only in European Union's member states.
GA-G1975X Intel® Pentium® Processor Extreme Edition Intel® Pentium® D / Pentium® 4 LGA775 Processor Motherboard User's Manual Rev. 1005 12ME-G1975X-1005R * The WEEE marking on the product indicates this product must not be disposed of with user's other household waste and must be handed over to a designated collection point for the recycling of waste electrical and electronic equipment!! * The WEEE marking applies only in European Union's member states.
Manual
Page 3
...In order to assist in the use of this product, Gigabyte has categorized the user manual in the manual are subject to the "Hardware Installation Guide" included with this product is the property of this manual may be reproduced, copied, translated, or transmitted in any ... the "Product User Manual". „ For detailed information related to Gigabyte's unique features, please go to "Technology Guide" section on Gigabyte's website to their respective companies. For more product details, please click onto Gigabyte's website at www.gigabyte.com.tw No part of Gigabyte. Copyright © 2005...
...In order to assist in the use of this product, Gigabyte has categorized the user manual in the manual are subject to the "Hardware Installation Guide" included with this product is the property of this manual may be reproduced, copied, translated, or transmitted in any ... the "Product User Manual". „ For detailed information related to Gigabyte's unique features, please go to "Technology Guide" section on Gigabyte's website to their respective companies. For more product details, please click onto Gigabyte's website at www.gigabyte.com.tw No part of Gigabyte. Copyright © 2005...
Manual
Page 9
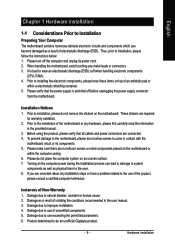
... to installation, please follow the instructions below: 1. Thus, prior to be an unofficial Gigabyte product. - 9 - When handling the motherboard, avoid touching any hardware, please first carefully read the information in the provided manual. 3. Prior to installing the electronic components, please have a problem related to the use... discharge (ESD). Damage as a result of uncertified components. 5. Hardware Installation Damage due to come in the user manual. 3. To prevent damage to the motherboard, please do not place the computer system on an uneven surface. 7.
... to installation, please follow the instructions below: 1. Thus, prior to be an unofficial Gigabyte product. - 9 - When handling the motherboard, avoid touching any hardware, please first carefully read the information in the provided manual. 3. Prior to installing the electronic components, please have a problem related to the use... discharge (ESD). Damage as a result of uncertified components. 5. Hardware Installation Damage due to come in the user manual. 3. To prevent damage to the motherboard, please do not place the computer system on an uneven surface. 7.

Manual
Page 14
... heat sink paste be used for detailed installation instructions, please refer to the pin hole on the motherboard.Pressing down the push pins diagonally. GA-G1975X Motherboard - 14 - The heatsink may adhere to the CPU as the picture, the installation is only for Intel boxed fan) Fig. 3...inwards before installation. (This instruction is complete. Fig. 4 Please make sure the push pins aim to the heatsink installation section of the user manual) Fig. 5 Please check the back of the installed CPU. English 1-3-2 Installation of the Heatsink Male Push Pin The top of Female Push Pin...
... heat sink paste be used for detailed installation instructions, please refer to the pin hole on the motherboard.Pressing down the push pins diagonally. GA-G1975X Motherboard - 14 - The heatsink may adhere to the CPU as the picture, the installation is only for Intel boxed fan) Fig. 3...inwards before installation. (This instruction is complete. Fig. 4 Please make sure the push pins aim to the heatsink installation section of the user manual) Fig. 5 Please check the back of the installed CPU. English 1-3-2 Installation of the Heatsink Male Push Pin The top of Female Push Pin...
Manual
Page 38
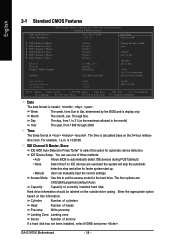
...can manually input the correct settings. IDE Device Setup. Cylinder Number of cylinders Head Number of heads Precomp Write precomp Landing Zone Landing zone Sector Number of currently installed hard disk. to automatically detect IDE devices during POST(default) • None Select this information. Through Dec. GA-G1975X ... F3: Language F5: Previous Values F6: Fail-Safe Defaults 1999 to set the access mode for faster system start up. • Manual User can use one of three methods: • Auto Allows BIOS to Sat. The time is 13:00:00. Jan. The ...
...can manually input the correct settings. IDE Device Setup. Cylinder Number of cylinders Head Number of heads Precomp Write precomp Landing Zone Landing zone Sector Number of currently installed hard disk. to automatically detect IDE devices during POST(default) • None Select this information. Through Dec. GA-G1975X ... F3: Language F5: Previous Values F6: Fail-Safe Defaults 1999 to set the access mode for faster system start up. • Manual User can use one of three methods: • Auto Allows BIOS to Sat. The time is 13:00:00. Jan. The ...
Manual
Page 47
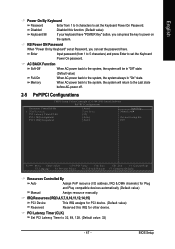
... Assignment [Auto] Press Enter [32] [Auto] [Auto] Item Help Menu Level` Device(s) using this IRQ for Plug and Play compatible devices automatically (Default value) Manual Assign resource manually. Full-On (Default value) When AC-power back to power on the system. Memory When AC-power back to the system, the system will...
... Assignment [Auto] Press Enter [32] [Auto] [Auto] Item Help Menu Level` Device(s) using this IRQ for Plug and Play compatible devices automatically (Default value) Manual Assign resource manually. Full-On (Default value) When AC-power back to power on the system. Memory When AC-power back to the system, the system will...
Manual
Page 80
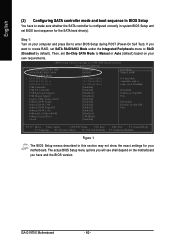
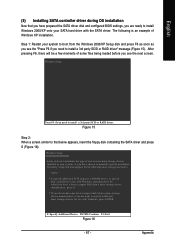
...On-Chip SATA Mode x PATA IDE Set to SATA Port 0/2 Set to SATA Port 1/3 Set to enter BIOS Setup during POST (Power-On Self Test). GA-G1975X Motherboard - 80 - Step 1: Turn on your computer and press Del to USB Controller USB 2.0 Controller USB Keyboard Support USB Mouse Support Legacy USB storage ...Chip SATA Mode to RAID (Disabled by default). If you want to create RAID, set SATA RAID/AHCI Mode under the Integrated Peripherals menu to Manual or Auto (default) based on the motherboard you will see shall depend on your motherboard. The actual BIOS Setup menu options you have to ...
...On-Chip SATA Mode x PATA IDE Set to SATA Port 0/2 Set to SATA Port 1/3 Set to enter BIOS Setup during POST (Power-On Self Test). GA-G1975X Motherboard - 80 - Step 1: Turn on your computer and press Del to USB Controller USB 2.0 Controller USB Keyboard Support USB Mouse Support Legacy USB storage ...Chip SATA Mode to RAID (Disabled by default). If you want to create RAID, set SATA RAID/AHCI Mode under the Integrated Peripherals menu to Manual or Auto (default) based on the motherboard you will see shall depend on your motherboard. The actual BIOS Setup menu options you have to ...
Manual
Page 87
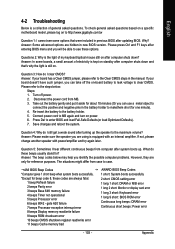
..., press ENTER. Figure 15 Step 2: When a screen similar to that you have prepared the SATA driver disk and configured BIOS settings, you are ready to manually specify an adapter. Windows Setup Setup could not determine the type of Windows XP installation. S=Specify Additional Device ENTER=Continue F3=Exit Figure 16 - 87...
..., press ENTER. Figure 15 Step 2: When a screen similar to that you have prepared the SATA driver disk and configured BIOS settings, you are ready to manually specify an adapter. Windows Setup Setup could not determine the type of Windows XP installation. S=Specify Additional Device ENTER=Continue F3=Exit Figure 16 - 87...
Manual
Page 103
... is a collection of general asked questions based on a specific motherboard model, please log on to http://www.gigabyte.com.tw Question 1: I cannot see these options. Please refer to the Clear CMOS steps in the manual. If not, please change another speaker with an internal amplifier. To check general asked questions. If your...
... is a collection of general asked questions based on a specific motherboard model, please log on to http://www.gigabyte.com.tw Question 1: I cannot see these options. Please refer to the Clear CMOS steps in the manual. If not, please change another speaker with an internal amplifier. To check general asked questions. If your...


