Manual
Page 27
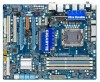
... LED, Blue) Connects to the pin assignments below. The LED is on when the hard drive is reading or writing data. • RES (Reset Switch, Green): Connects to the reset switch on when the system is detected, the BIOS may differ by issuing a beep code. A front panel module mainly consists of power switch..., reset switch, power LED, hard drive activity LED, speaker and etc. One single short beep will be heard if no problem is in different patterns to...
... LED, Blue) Connects to the pin assignments below. The LED is on when the hard drive is reading or writing data. • RES (Reset Switch, Green): Connects to the reset switch on when the system is detected, the BIOS may differ by issuing a beep code. A front panel module mainly consists of power switch..., reset switch, power LED, hard drive activity LED, speaker and etc. One single short beep will be heard if no problem is in different patterns to...

Manual
Page 31
... 2 3 NSOUT 4 NDTR- 5 GND 6 NDSR- 7 NRTS- 8 NCTS- 9 NRI- 10 No Pin 19) CLR_CMOS (Clearing CMOS Jumper) Use this jumper to factory defaults. date information and BIOS configurations) and reset the CMOS values to clear the CMOS values (e.g. Hardware Installation Pin No. Open: Normal Short: Clear CMOS Values • Always turn off your computer...
... 2 3 NSOUT 4 NDTR- 5 GND 6 NDSR- 7 NRTS- 8 NCTS- 9 NRI- 10 No Pin 19) CLR_CMOS (Clearing CMOS Jumper) Use this jumper to factory defaults. date information and BIOS configurations) and reset the CMOS values to clear the CMOS values (e.g. Hardware Installation Pin No. Open: Normal Short: Clear CMOS Values • Always turn off your computer...
Manual
Page 33
... etc. If this occurs, try to clear the CMOS values and reset the board to default values. (Refer to activate certain system features. For instructions on . To upgrade the BIOS, use either the GIGABYTE Q-Flash or @BIOS utility. • Q-Flash allows the user to quickly and easily ...upgrade or back up BIOS without entering the operating system. • @BIOS is recommended that allows the user to modify basic system ...
... etc. If this occurs, try to clear the CMOS values and reset the board to default values. (Refer to activate certain system features. For instructions on . To upgrade the BIOS, use either the GIGABYTE Q-Flash or @BIOS utility. • Q-Flash allows the user to quickly and easily ...upgrade or back up BIOS without entering the operating system. • @BIOS is recommended that allows the user to modify basic system ...
Manual
Page 37
If this occurs, clear the CMOS values and reset the board to default values.) (Note 1) This item appears only if you install a CPU that supports this feature. - 37 - This page is dependent on your ... system's failure to CPU, chipset, or memory and reduce the useful life of these components. Incorrectly doing overclock/overvoltage may result in damage to boot. BIOS Setup
If this occurs, clear the CMOS values and reset the board to default values.) (Note 1) This item appears only if you install a CPU that supports this feature. - 37 - This page is dependent on your ... system's failure to CPU, chipset, or memory and reduce the useful life of these components. Incorrectly doing overclock/overvoltage may result in damage to boot. BIOS Setup

Manual
Page 41
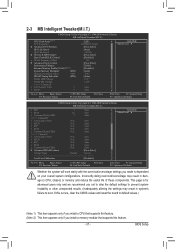
... dynamically based on system components, when system instability occurs after overclocking, please wait for automated system reboot, or clear the CMOS values to reset the board to default values. (Default: Disabled) BCLK Frequency(Mhz) Allows you to adjust the amplitude of the PCI Express and North Bridge...CPU and North Bridge clock. Options are : 0ps~750ps. (Default: 0ps) - 41 - CPU Clock Skew Allows you to 150 MHz. BIOS Setup The adjustable range is designed to automatically adjust CPU computing power to the North Bridge clock. Sports Increases CPU frequency by 7% or 9% ...
... dynamically based on system components, when system instability occurs after overclocking, please wait for automated system reboot, or clear the CMOS values to reset the board to default values. (Default: Disabled) BCLK Frequency(Mhz) Allows you to adjust the amplitude of the PCI Express and North Bridge...CPU and North Bridge clock. Options are : 0ps~750ps. (Default: 0ps) - 41 - CPU Clock Skew Allows you to 150 MHz. BIOS Setup The adjustable range is designed to automatically adjust CPU computing power to the North Bridge clock. Sports Increases CPU frequency by 7% or 9% ...
Manual
Page 57
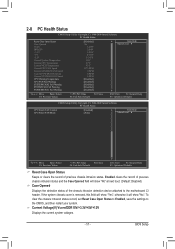
...2-8 PC Health Status CMOS Setup Utility-Copyright (C) 1984-2009 Award Software PC Health Status Reset Case Open Status Case Opened Vcore DDR15V +3.3V +5V +12V Current System Temperature Current CPU...F10: Save F6: Fail-Safe Defaults ESC: Exit F1: General Help F7: Optimized Defaults Reset Case Open Status Keeps or clears the record of the chassis intrusion detection device attached to...and then restart your system. To clear the chassis intrusion status record, set Reset Case Open Status to Enabled, save the settings to the motherboard CI header. ...
...2-8 PC Health Status CMOS Setup Utility-Copyright (C) 1984-2009 Award Software PC Health Status Reset Case Open Status Case Opened Vcore DDR15V +3.3V +5V +12V Current System Temperature Current CPU...F10: Save F6: Fail-Safe Defaults ESC: Exit F1: General Help F7: Optimized Defaults Reset Case Open Status Keeps or clears the record of the chassis intrusion detection device attached to...and then restart your system. To clear the chassis intrusion status record, set Reset Case Open Status to Enabled, save the settings to the motherboard CI header. ...
Manual
Page 71
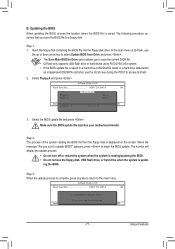
In the main menu of the system reading the BIOS file from Drive Please SparevsesBaInOySketoy Dtoricvoentinue Enter : Run hi:Move ESC:Reset F10:Power Off - 71 - When the message "Are you sure to access Q-Flash. 2. Step 3: When the update process is complete, press any key to return ... A and press . The monitor will display the update process. • Do not turn off or restart the system when the system is reading/updating the BIOS. • Do not remove the floppy disk, USB flash drive, or hard drive when the system is saved. Q-Flash Utility v2.09 Flash Type/Size...
In the main menu of the system reading the BIOS file from Drive Please SparevsesBaInOySketoy Dtoricvoentinue Enter : Run hi:Move ESC:Reset F10:Power Off - 71 - When the message "Are you sure to access Q-Flash. 2. Step 3: When the update process is complete, press any key to return ... A and press . The monitor will display the update process. • Do not turn off or restart the system when the system is reading/updating the BIOS. • Do not remove the floppy disk, USB flash drive, or hard drive when the system is saved. Q-Flash Utility v2.09 Flash Type/Size...
Manual
Page 76
...the system continues to run in a set to zero. (Note 5) Dynamic Energy Saver Meter will enter power saving mode after the system is unable to reset to Enabled. (Note 2) Maximize system power saving with the user-defined power saving settings, even after restart) (Default: Off) C. Total Mode In Total...the application. (Note 1) Before using the DES function, make sure the CPU Enhanced Halt (C1E) and CPU EIST Function items in the BIOS Setup program are able to see how much total power savings they have accumulated in taskbar) 15 INFO/Help 16 Live Utility Update (Check ...
...the system continues to run in a set to zero. (Note 5) Dynamic Energy Saver Meter will enter power saving mode after the system is unable to reset to Enabled. (Note 2) Maximize system power saving with the user-defined power saving settings, even after restart) (Default: Off) C. Total Mode In Total...the application. (Note 1) Before using the DES function, make sure the CPU Enhanced Halt (C1E) and CPU EIST Function items in the BIOS Setup program are able to see how much total power savings they have accumulated in taskbar) 15 INFO/Help 16 Live Utility Update (Check ...
Manual
Page 81
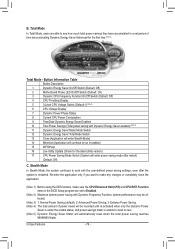
... and proceed with the installation of Windows operating system for a message which says "Press to create a RAID array, select Create RAID Volume in RAID BIOS Enter the RAID BIOS setup utility to enter the RAID Configuration Utility. Create RAID Volume 2. Press + to configure a RAID array. Physical Disks : Port Drive Model 0 ST3120026AS ... press + , the MAIN MENU screen will appear (Figure 3). Intel(R) Matrix Storage Manager option ROM v8.0.0.1039 ICH10R wRAID5 Copyright(C) 2003-08 Intel Corporation. Reset Disks to enter Configuration Utility.. Appendix
... and proceed with the installation of Windows operating system for a message which says "Press to create a RAID array, select Create RAID Volume in RAID BIOS Enter the RAID BIOS setup utility to enter the RAID Configuration Utility. Create RAID Volume 2. Press + to configure a RAID array. Physical Disks : Port Drive Model 0 ST3120026AS ... press + , the MAIN MENU screen will appear (Figure 3). Intel(R) Matrix Storage Manager option ROM v8.0.0.1039 ICH10R wRAID5 Copyright(C) 2003-08 Intel Corporation. Reset Disks to enter Configuration Utility.. Appendix
Manual
Page 83
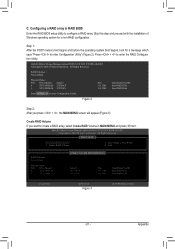
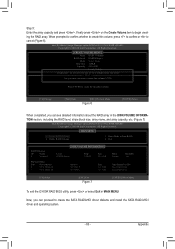
...ALL DATA ON SELECTED DISKS WILL BE LOST. [ HELP ] Are you sure you want to create this volume, press to confirm or to cancel (Figure 6). Reset Disks to begin creating the RAID array. Appendix Step 5: Enter the array capacity and press . All Rights Reversed. [ MAIN MENU ] 1. Finally press on ... Yes Type/Status(Vol ID) Non-RAID Disk Non-RAID Disk [hi]-Select [ESC]-Exit Figure 7 [ENTER]-Select Menu To exit the ICH10R RAID BIOS utility, press or select Exit in the DISK/VOLUME INFORMATION section, including the RAID level, stripe block size, array name, and array capacity, etc...
...ALL DATA ON SELECTED DISKS WILL BE LOST. [ HELP ] Are you sure you want to create this volume, press to confirm or to cancel (Figure 6). Reset Disks to begin creating the RAID array. Appendix Step 5: Enter the array capacity and press . All Rights Reversed. [ MAIN MENU ] 1. Finally press on ... Yes Type/Status(Vol ID) Non-RAID Disk Non-RAID Disk [hi]-Select [ESC]-Exit Figure 7 [ENTER]-Select Menu To exit the ICH10R RAID BIOS utility, press or select Exit in the DISK/VOLUME INFORMATION section, including the RAID level, stripe block size, array name, and array capacity, etc...


