Manual
Page 16
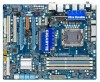
After the memory is installed, the BIOS will appear during the POST. DS/SS DDR3_4 DS/SS - - 3 Channel Memory Configurations Table DDR3_1 DDR3_3 DDR3_2 DDR3_4 Three Modules DS/SS - - When enabling 3 Channel mode with three memory modules, ... says memory is recommended that memory of the same capacity, brand, speed, and chips be used. pacity, brand, speed, and chips be used . (Go to GIGABYTE's website for the latest memory support list.) • Always turn off the computer and unplug the power cord from the power outlet before installing the...
After the memory is installed, the BIOS will appear during the POST. DS/SS DDR3_4 DS/SS - - 3 Channel Memory Configurations Table DDR3_1 DDR3_3 DDR3_2 DDR3_4 Three Modules DS/SS - - When enabling 3 Channel mode with three memory modules, ... says memory is recommended that memory of the same capacity, brand, speed, and chips be used. pacity, brand, speed, and chips be used . (Go to GIGABYTE's website for the latest memory support list.) • Always turn off the computer and unplug the power cord from the power outlet before installing the...
Manual
Page 33
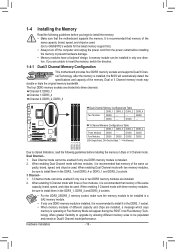
To upgrade the BIOS, use either the GIGABYTE Q-Flash or @BIOS utility. • Q-Flash allows the user to boot...from the Internet and updates the BIOS. BIOS Setup To access the BIOS Setup program, press the key during the POST. To flash the BIOS, do not encounter problems using the Q-Flash and @BIOS utilities, refer to Chapter 4,... for how to prevent system instability or other unexpected results. Its major functions include conducting the Power-On Self-Test (POST) during system startup, saving system parameters and loading operating system, etc. Chapter 2 BIOS Setup BIOS (Basic Input and...
To upgrade the BIOS, use either the GIGABYTE Q-Flash or @BIOS utility. • Q-Flash allows the user to boot...from the Internet and updates the BIOS. BIOS Setup To access the BIOS Setup program, press the key during the POST. To flash the BIOS, do not encounter problems using the Q-Flash and @BIOS utilities, refer to Chapter 4,... for how to prevent system instability or other unexpected results. Its major functions include conducting the Power-On Self-Test (POST) during system startup, saving system parameters and loading operating system, etc. Chapter 2 BIOS Setup BIOS (Basic Input and...
Manual
Page 34
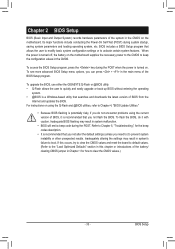
... LOGO Screen (Default) B. Motherboard Model BIOS Version EX58-UD3R E3 . . . . : BIOS Setup : XpressRecovery2 : Boot Menu : Qflash 04/13/2009-X58-ICH10-7A89QG0EC-00 Function Keys Function Keys Function Keys: : POST SCREEN Press the key to show the BIOS POST screen at system startup, refer to the instructions on...can access Boot Menu again to change the first boot device setting as needed. : Q-FLASH Press the key to Xpress Recovery2 during the POST. The POST Screen Award Modular BIOS v6.00PG, An Energy Star Ally Copyright (C) 1984-2009, Award Software, Inc. To exit Boot Menu, press ...
... LOGO Screen (Default) B. Motherboard Model BIOS Version EX58-UD3R E3 . . . . : BIOS Setup : XpressRecovery2 : Boot Menu : Qflash 04/13/2009-X58-ICH10-7A89QG0EC-00 Function Keys Function Keys Function Keys: : POST SCREEN Press the key to show the BIOS POST screen at system startup, refer to the instructions on...can access Boot Menu again to change the first boot device setting as needed. : Q-FLASH Press the key to Xpress Recovery2 during the POST. The POST Screen Award Modular BIOS v6.00PG, An Energy Star Ally Copyright (C) 1984-2009, Award Software, Inc. To exit Boot Menu, press ...
Manual
Page 49
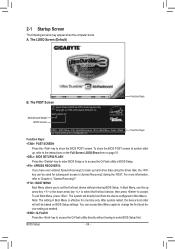
...the system boot will skip the detection of the two methods below: • Auto Lets the BIOS automatically detect IDE/SATA devices during the POST. (Default) • None If no IDE/SATA devices are : Disabled (default), Drive A. All, But Keyboard The system boot will...specifications of extended memory. Access Mode Sets the hard drive access mode. Options are determined by using one of the device during the POST for all other errors. Options are: Auto (default), Large. The following fields display your system. Head Number of cylinders. Landing...
...the system boot will skip the detection of the two methods below: • Auto Lets the BIOS automatically detect IDE/SATA devices during the POST. (Default) • None If no IDE/SATA devices are : Disabled (default), Drive A. All, But Keyboard The system boot will...specifications of extended memory. Access Mode Sets the hard drive access mode. Options are determined by using one of the device during the POST for all other errors. Options are: Auto (default), Large. The following fields display your system. Head Number of cylinders. Landing...
Manual
Page 51
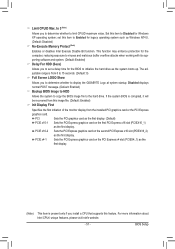
... Bit function. This function may enhance protection for the computer, reducing exposure to display the GIGABYTE Logo at system startup. For more information about Intel CPUs' unique features, please visit Intel's website. - 51 - Disabled displays normal POST message. (Default: Enabled) Backup BIOS Image to HDD Allows the system to copy the BIOS...
... Bit function. This function may enhance protection for the computer, reducing exposure to display the GIGABYTE Logo at system startup. For more information about Intel CPUs' unique features, please visit Intel's website. - 51 - Disabled displays normal POST message. (Default: Enabled) Backup BIOS Image to HDD Allows the system to copy the BIOS...
Manual
Page 53
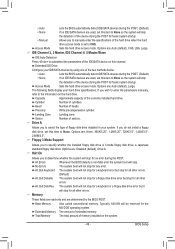
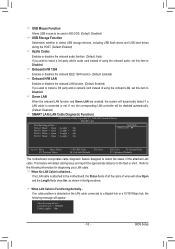
... in MS-DOS. (Default: Disabled) USB Storage Function Determines whether to detect USB storage devices, including USB flash drives and USB hard drives during the POST. (Default: Enabled) Azalia Codec Enables or disables the onboard audio function. (Default: Auto) If you wish to install a 3rd party add-in network card instead...
... in MS-DOS. (Default: Disabled) USB Storage Function Determines whether to detect USB storage devices, including USB flash drives and USB hard drives during the POST. (Default: Enabled) Azalia Codec Enables or disables the onboard audio function. (Default: Auto) If you wish to install a 3rd party add-in network card instead...
Manual
Page 68
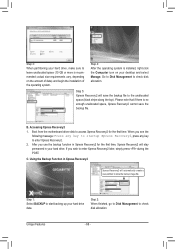
... (10 GB or more is no enough unallocated space, Xpress Recovery2 cannot save the backup file to enter Xpress Recovery2 later, simply press during the POST. Step 3: When partitioning your desktop and select Manage. B. When you wish to the unallocated space (black stripe along the top). actual size requirements vary, depending...
... (10 GB or more is no enough unallocated space, Xpress Recovery2 cannot save the backup file to enter Xpress Recovery2 later, simply press during the POST. Step 3: When partitioning your desktop and select Manage. B. When you wish to the unallocated space (black stripe along the top). actual size requirements vary, depending...
Manual
Page 70
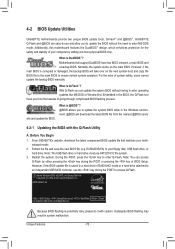
...and save the new BIOS file (e.g. During the POST, press the key to enter MS-DOS mode. Note: You can update the system BIOS without the need to enter Q-Flash. Unique Features - 70 - 4-2 BIOS Update Utilities GIGABYTE motherboards provide two unique BIOS update tools, Q-...GIGABYTE Q-Flash and @BIOS are easy-to access Q-Flash. However, if the main BIOS is potentially risky, please do it with the Q-Flash Utility A. EX58UD3R.FA) to your computer by either pressing the key during the POST to -use and allow you can access Q-Flash by adding one more physical BIOS chip. EX58-UD3R...
...and save the new BIOS file (e.g. During the POST, press the key to enter MS-DOS mode. Note: You can update the system BIOS without the need to enter Q-Flash. Unique Features - 70 - 4-2 BIOS Update Utilities GIGABYTE motherboards provide two unique BIOS update tools, Q-...GIGABYTE Q-Flash and @BIOS are easy-to access Q-Flash. However, if the main BIOS is potentially risky, please do it with the Q-Flash Utility A. EX58UD3R.FA) to your computer by either pressing the key during the POST to -use and allow you can access Q-Flash by adding one more physical BIOS chip. EX58-UD3R...
Manual
Page 71
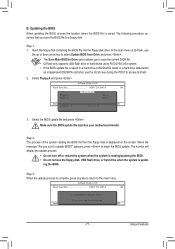
... BIOS?" Q-Flash Utility v2.09 Flash Type/Size MXIC 25L1605A 1M Keep DMI Data Enable !L! Step 2: The process of Q-Flash, use the key during the POST to select Update BIOS from the floppy disk is saved to a hard drive in RAID/AHCI mode or a hard drive attached to an independent IDE...
... BIOS?" Q-Flash Utility v2.09 Flash Type/Size MXIC 25L1605A 1M Keep DMI Data Enable !L! Step 2: The process of Q-Flash, use the key during the POST to select Update BIOS from the floppy disk is saved to a hard drive in RAID/AHCI mode or a hard drive attached to an independent IDE...

Manual
Page 72
System will re-detect all peripheral devices after the system restarts. Unique Features - 72 - Step 5: During the POST, press to exit Q-Flash and reboot the system. Step 4: Press and then to enter BIOS Setup. As the system boots, you reload BIOS defaults. CMOS ... exit BIOS Setup. The procedure is complete after a BIOS update, so we recommend that you should see the new BIOS version is present on the POST screen.
System will re-detect all peripheral devices after the system restarts. Unique Features - 72 - Step 5: During the POST, press to exit Q-Flash and reboot the system. Step 4: Press and then to enter BIOS Setup. As the system boots, you reload BIOS defaults. CMOS ... exit BIOS Setup. The procedure is complete after a BIOS update, so we recommend that you should see the new BIOS version is present on the POST screen.
Manual
Page 80
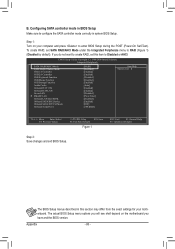
... exact settings for your computer and press to Disabled or AHCI. The BIOS Setup menus described in this item to enter BIOS Setup during the POST (Power-On Self-Test). Configuring SATA controller mode in system BIOS Setup. If you will see shall depend on your motherboard. Appendix - 80 - The actual...
... exact settings for your computer and press to Disabled or AHCI. The BIOS Setup menus described in this item to enter BIOS Setup during the POST (Power-On Self-Test). Configuring SATA controller mode in system BIOS Setup. If you will see shall depend on your motherboard. Appendix - 80 - The actual...
Manual
Page 81
... Manager option ROM v8.0.0.1039 ICH10R wRAID5 Copyright(C) 2003-08 Intel Corporation. Reset Disks to enter Configuration Utility" (Figure 2). Delete RAID Volume 3. Step 1: After the POST memory test begins and before the operating system boot begins, look for a non-RAID configuration. Exit RAID Volumes : None defined. Physical Disks : Port Drive Model...
... Manager option ROM v8.0.0.1039 ICH10R wRAID5 Copyright(C) 2003-08 Intel Corporation. Reset Disks to enter Configuration Utility" (Figure 2). Delete RAID Volume 3. Step 1: After the POST memory test begins and before the operating system boot begins, look for a non-RAID configuration. Exit RAID Volumes : None defined. Physical Disks : Port Drive Model...
Manual
Page 85
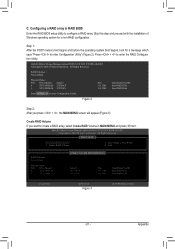
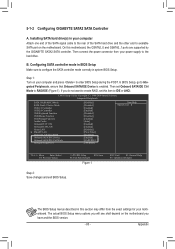
...to RAID/IDE (Figure 1). In BIOS Setup, go to the hard drive. Then set this item to enter BIOS Setup during the POST. 5-1-2 Configuring GIGABYTE SATA2 SATA Controller A. On this section may differ from your motherboard. B. CMOS Setup Utility-Copyright (C) 1984-2009 Award Software Integrated ...depend on the motherboard. Appendix The BIOS Setup menus described in this motherboard, the GSATA2_0 and GSATA2_1 ports are supported by the GIGABYTE SATA2 SATA controller. Installing SATA hard drive(s) in system BIOS Setup. Then connect the power connector from the exact settings for ...
...to RAID/IDE (Figure 1). In BIOS Setup, go to the hard drive. Then set this item to enter BIOS Setup during the POST. 5-1-2 Configuring GIGABYTE SATA2 SATA Controller A. On this section may differ from your motherboard. B. CMOS Setup Utility-Copyright (C) 1984-2009 Award Software Integrated ...depend on the motherboard. Appendix The BIOS Setup menus described in this motherboard, the GSATA2_0 and GSATA2_1 ports are supported by the GIGABYTE SATA2 SATA controller. Installing SATA hard drive(s) in system BIOS Setup. Then connect the power connector from the exact settings for ...
Manual
Page 86
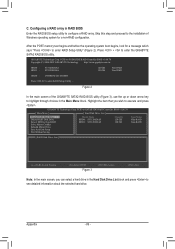
...hard drive in the Hard Disk Drive List block and press to the installation of the GIGABYTE SATA2 RAID BIOS utility (Figure 3), use the up or down arrow key to execute and press . GIGABYTE Technology Corp. Figure 2 In the main screen of Windows operating system for a message which... says "Press to enter the GIGABYTE SATA2 RAID BIOS utility. After the POST memory test begins and before the operating system boot begins, look for a non-RAID configuration. Press + to enter RAID Setup Utility" (...
...hard drive in the Hard Disk Drive List block and press to the installation of the GIGABYTE SATA2 RAID BIOS utility (Figure 3), use the up or down arrow key to execute and press . GIGABYTE Technology Corp. Figure 2 In the main screen of Windows operating system for a message which... says "Press to enter the GIGABYTE SATA2 RAID BIOS utility. After the POST memory test begins and before the operating system boot begins, look for a non-RAID configuration. Press + to enter RAID Setup Utility" (...
Manual
Page 109
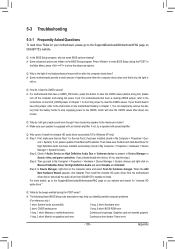
... Microsoft UAA Bus Driver for hardware changes. If not, try a speaker with an internal amplifier. If not, please update it from GIGABYTE's website to the instructions on GIGABYTE's website. If yes, please disable this device. (If not, skip this step.) Step 3: Then go back to My Computer >...for High Definition Audio has been installed successfully (check in My Computer > Properties > Gen- Q: What do the beeps emitted during the POST. A: Some advanced options are some BIOS options missing? For motherboards that have turned my speaker to clear the CMOS values. If your ...
... Microsoft UAA Bus Driver for hardware changes. If not, try a speaker with an internal amplifier. If not, please update it from GIGABYTE's website to the instructions on GIGABYTE's website. If yes, please disable this device. (If not, skip this step.) Step 3: Then go back to My Computer >...for High Definition Audio has been installed successfully (check in My Computer > Properties > Gen- Q: What do the beeps emitted during the POST. A: Some advanced options are some BIOS options missing? For motherboards that have turned my speaker to clear the CMOS values. If your ...


