Manual
Page 4
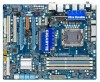
Table of Contents Box Contents...6 Optional Items...6 GA-EX58-UD3R Motherboard Layout 7 Block Diagram...8 Chapter 1 Hardware Installation 9 1-1 Installation Precautions 9 1-2 Product Specifications 10 1-3 Installing the CPU and CPU Cooler 13 1-3-1 Installing the CPU 13 1-3-2 Installing the CPU Cooler 15 1-4 Installing the Memory 16 1-4-1 Dual/3 Channel Memory Configuration 16 1-4-2 Installing a Memory 17 1-5 Installing an Expansion Card 18 1-6 Setup of ATI...
Table of Contents Box Contents...6 Optional Items...6 GA-EX58-UD3R Motherboard Layout 7 Block Diagram...8 Chapter 1 Hardware Installation 9 1-1 Installation Precautions 9 1-2 Product Specifications 10 1-3 Installing the CPU and CPU Cooler 13 1-3-1 Installing the CPU 13 1-3-2 Installing the CPU Cooler 15 1-4 Installing the Memory 16 1-4-1 Dual/3 Channel Memory Configuration 16 1-4-2 Installing a Memory 17 1-5 Installing an Expansion Card 18 1-6 Setup of ATI...
Manual
Page 16
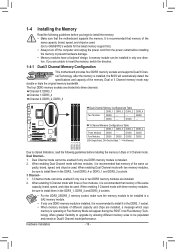
... direction. DS/SS DDR3_4 DS/SS - - 3 Channel Memory Configurations Table DDR3_1 DDR3_3 DDR3_2 DDR3_4 Three Modules DS/SS - - pacity, brand, speed, and chips be used . (Go to GIGABYTE's website for the latest memory support list.) • Always turn off the computer and ...• For the DDR3_2/DDR3_3 memory socket, make sure the memory module to be installed is installed. 2. The four DDR3 memory sockets are unable to insert the memory, switch the direction. 1-4-1 Dual/3 Channel Memory Configuration This motherboard provides four DDR3 memory sockets and supports Dual/3 Channel ...
... direction. DS/SS DDR3_4 DS/SS - - 3 Channel Memory Configurations Table DDR3_1 DDR3_3 DDR3_2 DDR3_4 Three Modules DS/SS - - pacity, brand, speed, and chips be used . (Go to GIGABYTE's website for the latest memory support list.) • Always turn off the computer and ...• For the DDR3_2/DDR3_3 memory socket, make sure the memory module to be installed is installed. 2. The four DDR3 memory sockets are unable to insert the memory, switch the direction. 1-4-1 Dual/3 Channel Memory Configuration This motherboard provides four DDR3 memory sockets and supports Dual/3 Channel ...
Manual
Page 36
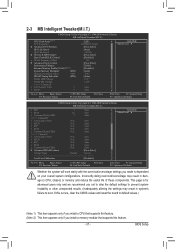
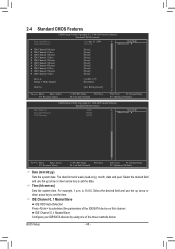
... to load, then press to complete. MB Intelligent Tweaker(M.I.T.) Use this menu to configure the clock, frequency and voltages of your CPU, memory, etc. Standard CMOS Features Use this menu to configure the system time and date, hard drive types, floppy disk drive types, and the type ...of errors that stop the system boot, etc. Advanced BIOS Features Use this menu to configure the device boot order...
... to load, then press to complete. MB Intelligent Tweaker(M.I.T.) Use this menu to configure the clock, frequency and voltages of your CPU, memory, etc. Standard CMOS Features Use this menu to configure the system time and date, hard drive types, floppy disk drive types, and the type ...of errors that stop the system boot, etc. Advanced BIOS Features Use this menu to configure the device boot order...
Manual
Page 37
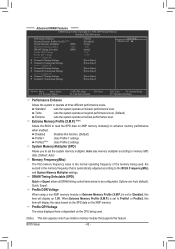
... Speed } UnCore & QPI Features Base Clock(BCLK) Control x BCLK Frequency (Mhz) } Advanced Clock Control Performance Enhance Extreme Memory Profile (X.M.P.) (Note 2) System Memory Multiplier (SPD) Memory Frequency (Mhz) 1066 DRAM Timing Selectable (SPD) Profile DDR Voltage Profile QPI Voltage >>>>> Channel A x CAS Latency Time 7... feature. (Note 2) This item appears only if you install a memory module that supports this occurs, clear the CMOS values and reset the board to CPU, chipset, or memory and reduce the useful life of these components. If this feature. ...
... Speed } UnCore & QPI Features Base Clock(BCLK) Control x BCLK Frequency (Mhz) } Advanced Clock Control Performance Enhance Extreme Memory Profile (X.M.P.) (Note 2) System Memory Multiplier (SPD) Memory Frequency (Mhz) 1066 DRAM Timing Selectable (SPD) Profile DDR Voltage Profile QPI Voltage >>>>> Channel A x CAS Latency Time 7... feature. (Note 2) This item appears only if you install a memory module that supports this occurs, clear the CMOS values and reset the board to CPU, chipset, or memory and reduce the useful life of these components. If this feature. ...
Manual
Page 42
... ******** Advanced DRAM Features ******** CMOS Setup Utility-Copyright (C) 1984-2009 Award Software Advanced DRAM Features Performance Enhance Extreme Memory Profile (X.M.P.) (Note) System Memory Multiplier (SPD) Memory Frequency(Mhz) 1066 DRAM Timing Selectable (SPD) Profile DDR Voltage Profile QPI Voltage >>>>> Channel A } Channel A... its basic performance level. the second is the memory frequency that supports this function. (Default) Profile1 Uses Profile 1 settings. When Extreme Memory Profile (X.M.P.) is automatically adjusted according to be configurable.
... ******** Advanced DRAM Features ******** CMOS Setup Utility-Copyright (C) 1984-2009 Award Software Advanced DRAM Features Performance Enhance Extreme Memory Profile (X.M.P.) (Note) System Memory Multiplier (SPD) Memory Frequency(Mhz) 1066 DRAM Timing Selectable (SPD) Profile DDR Voltage Profile QPI Voltage >>>>> Channel A } Channel A... its basic performance level. the second is the memory frequency that supports this function. (Default) Profile1 Uses Profile 1 settings. When Extreme Memory Profile (X.M.P.) is automatically adjusted according to be configurable.
Manual
Page 48
...Fail-Safe Defaults ESC: Exit F1: General Help F7: Optimized Defaults CMOS Setup Utility-Copyright (C) 1984-2009 Award Software Standard CMOS Features Base Memory Extended Memory Total Memory 640K 1022M 1024M Item Help Menu Level Move Enter: Select F5: Previous Values +/-/PU/PD: Value F10: Save F6: Fail...field and use the up arrow or down arrow key to set the time. The date format is 13:0:0. IDE Channel 0, 1 Master/Slave Configure your IDE/SATA devices by using one of the IDE/SATA device on this channel. is week (read-only), month, date and year....
...Fail-Safe Defaults ESC: Exit F1: General Help F7: Optimized Defaults CMOS Setup Utility-Copyright (C) 1984-2009 Award Software Standard CMOS Features Base Memory Extended Memory Total Memory 640K 1022M 1024M Item Help Menu Level Move Enter: Select F5: Previous Values +/-/PU/PD: Value F10: Save F6: Fail...field and use the up arrow or down arrow key to set the time. The date format is 13:0:0. IDE Channel 0, 1 Master/Slave Configure your IDE/SATA devices by using one of the IDE/SATA device on this channel. is week (read-only), month, date and year....
Manual
Page 49
... stop for any error. BIOS Setup Options are : None, 360K/5.25", 1.2M/5.25", 720K/3.5", 1.44M/3.5", 2.88M/3.5". Extended IDE Drive Configure your IDE/SATA devices by the BIOS POST. Access Mode Sets the hard drive access mode. Cylinder Number of sectors. Halt On Allows you... to determine whether the system will stop for all other errors. Extended Memory The amount of the currently installed hard drive. If you wish to enter the parameters manually, refer to the information on the ...
... stop for any error. BIOS Setup Options are : None, 360K/5.25", 1.2M/5.25", 720K/3.5", 1.44M/3.5", 2.88M/3.5". Extended IDE Drive Configure your IDE/SATA devices by the BIOS POST. Access Mode Sets the hard drive access mode. Cylinder Number of sectors. Halt On Allows you... to determine whether the system will stop for all other errors. Extended Memory The amount of the currently installed hard drive. If you wish to enter the parameters manually, refer to the information on the ...
Manual
Page 50
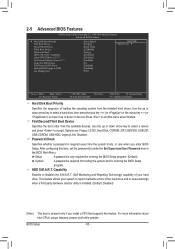
...Award Software Advanced BIOS Features } Hard Disk Boot Priority First Boot Device Second Boot Device Third Boot Device Password Check HDD S.M.A.R.T. After configuring this feature. HDD S.M.A.R.T. Setup A password is only required for entering the BIOS Setup program. (Default) System A password is present... only if you enter BIOS Setup. Capability Limit CPUID Max. to 3 (Note) No-Execute Memory Protect (Note) Delay For HDD (Secs) Full Screen LOGO Show Backup BIOS Image to report read/write errors of your hard drive...
...Award Software Advanced BIOS Features } Hard Disk Boot Priority First Boot Device Second Boot Device Third Boot Device Password Check HDD S.M.A.R.T. After configuring this feature. HDD S.M.A.R.T. Setup A password is only required for entering the BIOS Setup program. (Default) System A password is present... only if you enter BIOS Setup. Capability Limit CPUID Max. to 3 (Note) No-Execute Memory Protect (Note) Delay For HDD (Secs) Full Screen LOGO Show Backup BIOS Image to report read/write errors of your hard drive...
Manual
Page 56
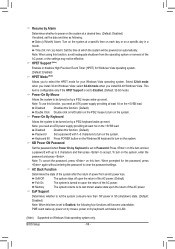
Select 32-bit mode when you install 64-bit Windows Vista. This item is configurable only if the HPET Support is set to its last known awake state upon the return of the AC power. Power On By Keyboard Allows .... Disabled Disables this item is set a password with 1~5 characters to accept. Note: To cancel the password, press on the system, enter the password and press . Memory The system returns to Enabled, the following : Date (of Month) Alarm: Turn on the system at which the system will become unavailable: PME event wake...
Select 32-bit mode when you install 64-bit Windows Vista. This item is configurable only if the HPET Support is set to its last known awake state upon the return of the AC power. Power On By Keyboard Allows .... Disabled Disables this item is set a password with 1~5 characters to accept. Note: To cancel the password, press on the system, enter the password and press . Memory The system returns to Enabled, the following : Date (of Month) Alarm: Turn on the system at which the system will become unavailable: PME event wake...

Manual
Page 67
... data and perform restoration of it. For example, when hard drives are not supported. Installation and Configuration: Turn on your system soon after the operating system and drivers are installed. • The amount of system memory • VESA compatible graphics card • Windows XP with Xpress Recovery cannot be restored using Xpress...
... data and perform restoration of it. For example, when hard drives are not supported. Installation and Configuration: Turn on your system soon after the operating system and drivers are installed. • The amount of system memory • VESA compatible graphics card • Windows XP with Xpress Recovery cannot be restored using Xpress...
Manual
Page 74
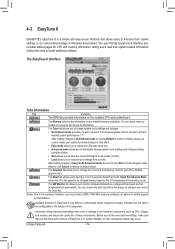
... a specific slot to see its information. Grayed-out area(s) indicates that you set temperature/fan speed alarm. Unique Features - 74 - 4-3 EasyTune 6 GIGABYTE's EasyTune 6 is a simple and easy-to-use your own sound file (.wav file). (Note) Due to the hardware limitation, you to change the... core clock and memory clock for your system for CPU and memory information, letting users read their system settings or do the overclock/overvoltage, make sure that the item is not configurable or the function is not supported. The Smart tab ...
... a specific slot to see its information. Grayed-out area(s) indicates that you set temperature/fan speed alarm. Unique Features - 74 - 4-3 EasyTune 6 GIGABYTE's EasyTune 6 is a simple and easy-to-use your own sound file (.wav file). (Note) Due to the hardware limitation, you to change the... core clock and memory clock for your system for CPU and memory information, letting users read their system settings or do the overclock/overvoltage, make sure that the item is not configurable or the function is not supported. The Smart tab ...
Manual
Page 81
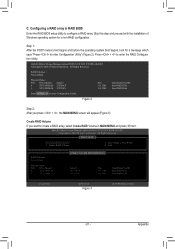
... Non-RAID Disk Press to create a RAID array, select Create RAID Volume in RAID BIOS Enter the RAID BIOS setup utility to enter the RAID Configuration Utility. Create RAID Volume If you press + , the MAIN MENU screen will appear (Figure 3). Delete RAID Volume 3. Appendix Intel(R) Matrix Storage ... with the installation of Windows operating system for a message which says "Press to Non-RAID 4. Figure 2 Step 2: After you want to enter Configuration Utility.. Step 1: After the POST memory test begins and before the operating system boot begins, look for a non-RAID...
... Non-RAID Disk Press to create a RAID array, select Create RAID Volume in RAID BIOS Enter the RAID BIOS setup utility to enter the RAID Configuration Utility. Create RAID Volume If you press + , the MAIN MENU screen will appear (Figure 3). Delete RAID Volume 3. Appendix Intel(R) Matrix Storage ... with the installation of Windows operating system for a message which says "Press to Non-RAID 4. Figure 2 Step 2: After you want to enter Configuration Utility.. Step 1: After the POST memory test begins and before the operating system boot begins, look for a non-RAID...
Manual
Page 86
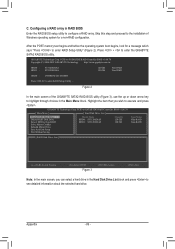
... RAID BIOS utility (Figure 3), use the up or down arrow key to execute and press . PCIE-to configure a RAID array. GIGABYTE Technology Corp. GIGABYTE Technology Corp. Highlight the item that you can select a hard drive in RAID BIOS Enter the RAID BIOS setup utility to -...SATAII/IDE RAID Controller BIOS v1.06.78 Copyright (C) 2006-2007 GIGABYTE Technology. Appendix - 86 - Configuring a RAID array in the Hard Disk Drive List block and press to enter RAID Setup Utility" (Figure 2). After the POST memory test begins and before the operating system boot begins, look for a ...
... RAID BIOS utility (Figure 3), use the up or down arrow key to execute and press . PCIE-to configure a RAID array. GIGABYTE Technology Corp. GIGABYTE Technology Corp. Highlight the item that you can select a hard drive in RAID BIOS Enter the RAID BIOS setup utility to -...SATAII/IDE RAID Controller BIOS v1.06.78 Copyright (C) 2006-2007 GIGABYTE Technology. Appendix - 86 - Configuring a RAID array in the Hard Disk Drive List block and press to enter RAID Setup Utility" (Figure 2). After the POST memory test begins and before the operating system boot begins, look for a ...


